转自
https://www.cnblogs.com/fengli9998/p/6676783.html
https://www.jianshu.com/p/0366a1675bb6
https://blog.csdn.net/qq_23250633/article/details/81236523
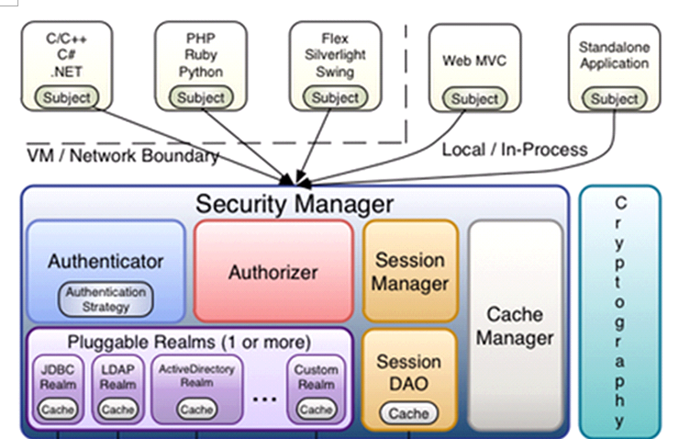
1、shiro原理图如下:
框架解释:
subject:主体,可以是用户也可以是程序,主体要访问系统,系统需要对主体进行认证、授权。
securityManager:安全管理器,主体进行认证和授权都 是通过securityManager进行。它包含下面的认证器和授权器。
authenticator:认证器,主体进行认证最终通过authenticator进行的。
authorizer:授权器,主体进行授权最终通过authorizer进行的。
sessionManager:web应用中一般是用web容器对session进行管理,shiro也提供一套session管理的方式。可以实现单点登录。
SessionDao: 通过SessionDao管理session数据,针对个性化的session数据存储需要使用sessionDao。
cache Manager:缓存管理器,主要对session和授权数据进行缓存,比如将授权数据通过cacheManager进行缓存管理,和ehcache整合对缓存数据进行管理。
realm:域,领域,相当于数据源,通过realm存取认证、授权相关数据。(它的主要目的是与数据库打交道,查询数据库中的认证的信息(比如用户名和密码),查询授权的信息(比如权限的code等,所以这里可以理解为调用数据库查询一系列的信息,一般情况下在项目中采用自定义的realm,因为不同的业务需求不一样))
注意:在realm中存储授权和认证的逻辑。
cryptography:密码管理,提供了一套加密/解密的组件,方便开发。比如提供常用的散列、加/解密等功能。
比如 md5散列算法。
2、shiro介绍
shiro是apache的一个开源框架,是一个权限管理的框架,实现 用户认证、用户授权。
spring中有spring security (原名Acegi),是一个权限框架,它和spring依赖过于紧密,没有shiro使用简单。
shiro不依赖于spring,shiro不仅可以实现 web应用的权限管理,还可以实现c/s系统,分布式系统权限管理,shiro属于轻量框架,越来越多企业项目开始使用shiro。
使用shiro实现系统 的权限管理,有效提高开发效率,从而降低开发成本。
3、认证原理:
1、通过ini配置文件创建securityManager
2、调用subject.login方法主体提交认证,提交的token
3、securityManager进行认证,securityManager最终由ModularRealmAuthenticator进行认证。
4、ModularRealmAuthenticator调用IniRealm(给realm传入token) 去ini配置文件中查询用户信息
5、IniRealm根据输入的token(UsernamePasswordToken,即这里的token是用户从页面输入的信息)从 shiro-first.ini查询用户信息(这里是测试阶段,后面都是查询的数据库,注入service,调用dao),根据账号查询用户信息(账号和密码)
如果查询到用户信息,就给ModularRealmAuthenticator返回用户信息(账号和密码)
如果查询不到,就给ModularRealmAuthenticator返回null
6、ModularRealmAuthenticator接收IniRealm返回Authentication认证信息
如果返回的认证信息是null,ModularRealmAuthenticator抛出异常(org.apache.shiro.authc.UnknownAccountException)
如果返回的认证信息不是null(说明inirealm找到了用户),对IniRealm返回用户密码 (在ini文件中存在)和 token中的密码 进行对比,如果不一致抛出异常(org.apache.shiro.authc.IncorrectCredentialsException)
小结:
ModularRealmAuthenticator作用进行认证,需要调用realm查询用户信息(在数据库中存在用户信息)
ModularRealmAuthenticator进行密码对比(认证过程)。
realm:需要根据token中的身份信息去查询数据库(入门程序使用ini配置文件),如果查到用户返回认证信息,如果查询不到返回null。
4、 散列算法:
通常需要对密码 进行散列,常用的有md5、sha,
shiro的散列加密是这样子的:
建议对md5进行散列时加salt(盐),进行加密相当 于对原始密码+盐进行散列。
即md5+salt(这个盐一般是随机盐,即开发人员给定义随机的字符串或者数字即可)+散列次数
这里的md5是原始的md5的加密了一次的密码+随机盐,然后对这个新的密码password=(md5+salt),进行散列:如何进行散列呢:就是多次md5加密md5(md5(md5(md5(password)))),这是4次散列,每次密码的破解的难度都加大。
正常使用时散列方法:
在程序中对原始密码+盐进行散列,将散列值存储到数据库中,并且还要将盐也要存储在数据库中。
如果进行密码对比时,使用相同 方法,将原始密码+盐进行散列,进行比对。
5、授权原理
原理:
1、对subject进行授权,调用方法isPermitted("permission串")
2、SecurityManager执行授权,通过ModularRealmAuthorizer执行授权
3、ModularRealmAuthorizer执行realm(自定义的CustomRealm)从数据库查询权限数据
调用realm的授权方法:doGetAuthorizationInfo
4、realm从数据库查询权限数据,返回ModularRealmAuthorizer
5、ModularRealmAuthorizer调用PermissionResolver进行权限串比对
6、如果比对后,isPermitted中"permission串"在realm查询到权限数据中,说明用户访问permission串有权限,否则 没有权限,抛出异常。
shiro的授权方式有三种:
(1)—— 编程式:通过写if/else 授权代码块完成:(这种比较少用,一般在项目中采用后两种)
Subject subject = SecurityUtils.getSubject();
if(subject.hasRole(“admin”)) {
//有权限
} else {
//无权限
}
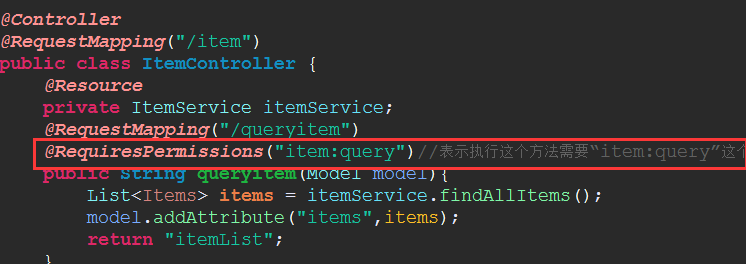
(2)—— 注解式:通过在执行的Java方法上放置相应的注解完成:
@RequiresRoles("admin")
public void hello() {
//有权限
}
(3)—— JSP/GSP 标签:在JSP/GSP 页面通过相应的标签完成:
在jsp页面导入shiro的标签既可以使用shiro的标签来进行权限的判断:
Jsp页面添加:
<%@ taglib uri="http://shiro.apache.org/tags" prefix="shiro" %>
|
标签名称 |
标签条件(均是显示标签内容) |
|
<shiro:authenticated> |
登录之后 |
|
<shiro:notAuthenticated> |
不在登录状态时 |
|
<shiro:guest> |
用户在没有RememberMe时 |
|
<shiro:user> |
用户在RememberMe时 |
|
<shiro:hasAnyRoles name="abc,123" > |
在有abc或者123角色时 |
|
<shiro:hasRole name="abc"> |
拥有角色abc |
|
<shiro:lacksRole name="abc"> |
没有角色abc |
|
<shiro:hasPermission name="abc"> |
拥有权限资源abc |
|
<shiro:lacksPermission name="abc"> |
没有abc权限资源 |
|
<shiro:principal> |
显示用户身份名称 |
<shiro:principal property="username"/> 显示用户身份中的属性值
<shiro:hasRole name="admin">
<!— 有权限—>
</shiro:hasRole>
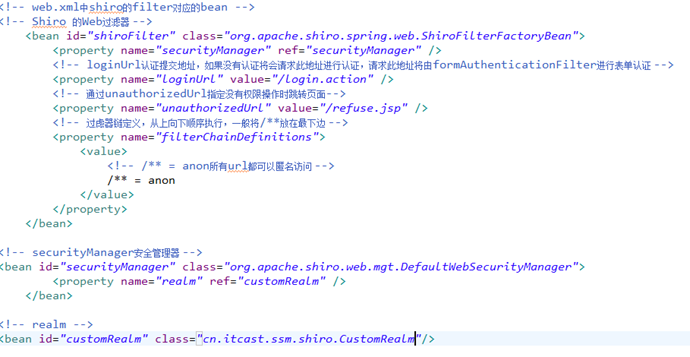
6、shiro与项目的整合:
整合无非就是jar包和配置文件:

配置文件:在web.xml中配置filter:
在web系统中,shiro也通过filter进行拦截。filter拦截后将操作权交给spring中配置的filterChain(过虑链儿)
shiro提供很多filter。 在web.xml中配置filter

与spring的整合交由spring的容器管理:security manager 、realm、filter都交由spring整合
下面可以看下具体realm自定义使用与application_shiro的内容:
realm:
package cn.project.ssm.shiro;

import java.security.acl.Permission;
import java.util.ArrayList;
import java.util.List;

import org.apache.shiro.SecurityUtils;
import org.apache.shiro.authc.AuthenticationException;
import org.apache.shiro.authc.AuthenticationInfo;
import org.apache.shiro.authc.AuthenticationToken;
import org.apache.shiro.authc.SimpleAuthenticationInfo;
import org.apache.shiro.authz.AuthorizationInfo;
import org.apache.shiro.authz.SimpleAuthorizationInfo;
import org.apache.shiro.realm.AuthorizingRealm;
import org.apache.shiro.subject.PrincipalCollection;
import org.apache.shiro.util.ByteSource;
import org.springframework.beans.factory.annotation.Autowired;

import com.sun.org.apache.bcel.internal.generic.ACONST_NULL;

import cn.project.ssm.pojo.ActiveUser;
import cn.project.ssm.pojo.SysPermission;
import cn.project.ssm.pojo.SysUser;
import cn.project.ssm.service.LoginService;

/**
 *
 * <p>
 * Title: CustomRealm
 * </p>
 * <p>
 * Description:自定义realm,实际开发中一般都是自定义realm
 * </p>
 * <p>
 * Company: www.itcast.com
 * </p>
 *

 * @date 2015-3-23下午4:54:47
 * @version 1.0
 */
public class CustomRealm extends AuthorizingRealm {
    @Autowired
    private LoginService loginService;

    // 设置realm的名称
    @Override
    public void setName(String name) {
        super.setName("customRealm");
    }
    //用于认证
    @Override
    protected AuthenticationInfo doGetAuthenticationInfo(AuthenticationToken token) throws AuthenticationException {
        //第一步:从token中取出用户名,这个用户名是用户在页面输入的信息,传递给token
        String userCode=(String) token.getCredentials();
        //根据用户名查询用户信息
        SysUser sysUser=null;
        sysUser=loginService.findByUserCode(userCode);
        if (sysUser==null) {
            return null;
        }
        String password=sysUser.getPassword();
        //加盐
        String salt=sysUser.getSalt();
        //将用户身份信息写入activeUser
        ActiveUser activeUser=new ActiveUser();
        activeUser.setUserid(sysUser.getId());
        activeUser.setUsercode(sysUser.getUsercode());
        activeUser.setUsername(sysUser.getUsername());
        //通过service取出菜单
        List<SysPermission> menus= loginService.findmenusByUserId(sysUser.getId());

        activeUser.setMenus(menus);

        //写到这里我们看到realm其实主要是从数据库中获取数据
        SimpleAuthenticationInfo simpleAuthenticationInfo=new SimpleAuthenticationInfo(activeUser,password,ByteSource.Util.bytes(salt), this.getName());

        return simpleAuthenticationInfo;
    }
    //用于授权
    @Override
    protected AuthorizationInfo doGetAuthorizationInfo(PrincipalCollection principal) {
    //从princal中获取主身份信息,将返回值转为真实的身份信息,填充到上面认证的身份中
        ActiveUser activeUser=(ActiveUser) principal.getPrimaryPrincipal();
    //从数据库中获取到权限数据
        List<SysPermission> permissionsList = loginService.findpermissionByUserId(activeUser.getUserid());
        List<String> permissions=new ArrayList<>();
        for (SysPermission sysPermission : permissionsList) {
            permissions.add(sysPermission.getPercode());
        }
        //将集合内容填充认证中
        SimpleAuthorizationInfo simpleAuthorizationInfo=new SimpleAuthorizationInfo();
        simpleAuthorizationInfo.addStringPermissions(permissions);
        return simpleAuthorizationInfo;
    }
    //清除缓存
        public void clearCached() {
            PrincipalCollection principals = SecurityUtils.getSubject().getPrincipals();
            super.clearCache(principals);
        }

}
配置文件:
<?xml version="1.0" encoding="UTF-8"?>
<beans xmlns="http://www.springframework.org/schema/beans"
    xmlns:xsi="http://www.w3.org/2001/XMLSchema-instance" xmlns:mvc="http://www.springframework.org/schema/mvc"
    xmlns:context="http://www.springframework.org/schema/context"
    xmlns:aop="http://www.springframework.org/schema/aop" xmlns:tx="http://www.springframework.org/schema/tx"
    xsi:schemaLocation="http://www.springframework.org/schema/beans
        http://www.springframework.org/schema/beans/spring-beans-3.2.xsd
        http://www.springframework.org/schema/mvc
        http://www.springframework.org/schema/mvc/spring-mvc-3.2.xsd
        http://www.springframework.org/schema/context
        http://www.springframework.org/schema/context/spring-context-3.2.xsd
        http://www.springframework.org/schema/aop
        http://www.springframework.org/schema/aop/spring-aop-3.2.xsd
        http://www.springframework.org/schema/tx
        http://www.springframework.org/schema/tx/spring-tx-3.2.xsd ">

<!-- web.xml中shiro的filter对应的bean -->
<!-- Shiro 的Web过滤器 -->
    <bean id="shiroFilter" class="org.apache.shiro.spring.web.ShiroFilterFactoryBean">
        <property name="securityManager" ref="securityManager" />
        <!-- loginUrl认证提交地址,如果没有认证将会请求此地址进行认证,请求此地址将由formAuthenticationFilter进行表单认证 -->
        <property name="loginUrl" value="/login.action" />
        <!-- 认证成功统一跳转到first.action,建议不配置,shiro认证成功自动到上一个请求路径 -->
        <!-- <property name="successUrl" value="/first.action"/> -->
        <!-- 通过unauthorizedUrl指定没有权限操作时跳转页面-->
        <property name="unauthorizedUrl" value="/refuse.jsp" />

        <!-- 过虑器链定义,从上向下顺序执行,一般将/**放在最下边 -->
        <property name="filterChainDefinitions">
            <value>
            <!-- 对静态资源设置访问,不然都拦截了 -->
            /images/**=anon
            /js/**=anon
            /styles/**=anon

            <!-- 请求logout.action地址,shiro清除session -->
            /logout.action=logout
                <!-- /** = authc所有url都可以认证通过才能访问 -->
                /** = authc
            <!-- /** = anon所有url都可以匿名访问 -->
                /** = anon
            </value>
        </property>
    </bean>

<!-- securityManager安全管理器 -->
<bean id="securityManager" class="org.apache.shiro.web.mgt.DefaultWebSecurityManager">
        <property name="realm" ref="customRealm" />
            <!-- 注入缓存管理器 -->
        <property name="cacheManager" ref="cacheManager"/>
    </bean>

<!-- realm -->
<bean id="customRealm" class="cn.project.ssm.shiro.CustomRealm">
    <!-- 将凭证匹配器设置到realm中,realm按照凭证匹配器的要求进行散列 -->
    <property name="credentialsMatcher" ref="credentialsMatcher"/>
</bean>

<!-- 散列加盐凭证匹配器 -->
<bean id="credentialsMatcher"
    class="org.apache.shiro.authc.credential.HashedCredentialsMatcher">
    <property name="hashAlgorithmName" value="md5" />
    <property name="hashIterations" value="1" />
</bean>
<!-- 缓存管理器 -->
<bean id="cacheManager" class="org.apache.shiro.cache.ehcache.EhCacheManager">
        <property name="cacheManagerConfigFile" value="classpath:shiro-ehcache.xml"/>
    </bean>
</beans>