WebService的开发手段
1、使用JDK开发(1.6及以上版本)
2、使用CXF框架开发(工作中)
WebService的组成
1、服务器端
2、客户端
使用JDK开发WebService
a、开发WebService服务端
1、使用eclipse新建一个服务端java工程

2、新建一个接口,使用@WebService(SEI和SEI的实现类)注解标注接口,使用@WebMethod(SEI中的所有方法)注解标注接口中定义的所有方法,如下:
 1 package com.test.ws;
 2
 3 import javax.jws.WebMethod;
 4 import javax.jws.WebService;
 5
 6 /**
 7  * 定义SEI(WebService EndPoint Interface)终端
 8  * @author H__D
 9  * @date 2017年7月28日 上午11:35:34
10  *
11  */
12 //使用@WebService注解标注WebServiceI接口
13 @WebService
14 public interface HelloWS {
15
16     //使用@WebMethod注解标注WebServiceI接口中的方法
17     @WebMethod
18     public String sayHello(String name);
19
20 }
3、编写一个接口实现类,使用@WebService注解标注实现类,如下:
 1 package com.test.ws;
 2
 3 import javax.jws.WebService;
 4
 5 /**
 6  * SEI的具体实现
 7  * @author H__D
 8  * @date 2017年7月28日 上午11:37:43
 9  *
10  */
11 //使用@WebService注解标注
12 @WebService
13 public class HelloWSImpl implements HelloWS{
14
15     @Override
16     public String sayHello(String name) {
17         System.out.println("WebService sayHello : " + name);
18         return "Hello : " + name;
19     }
20 }
4、使用Endpoint(终端)类发布webservice,如下:
 1 package com.test.ws.server;
 2
 3 import javax.xml.ws.Endpoint;
 4
 5 import com.test.ws.HelloWSImpl;
 6
 7 /**
 8  * 发布Web Service
 9  * @author H__D
10  * @date 2017年7月28日 上午11:40:48
11  *
12  */
13 public class ServerTest {
14
15     public static void main(String[] args) {
16
17         //定义WebService的发布地址,这个地址就是提供给外界访问Webervice的URL地址,URL地址格式为:http://ip:端口号/xxxx
18         String address = "http://127.0.0.1:8989/test-webservice/hellows";
19         //使用Endpoint类提供的publish方法发布WebService,发布时要保证使用的端口号没有被其他应用程序占用
20         Endpoint.publish(address, new HelloWSImpl());
21         System.out.println("发布webservice成功!");
22
23     }
24 }
5、运行SeverTest类的main方法,使用浏览器进行访问,访问地址:http://127.0.0.1:8989/test-webservice/hellows,如下:
控制他输出:

网页访问:

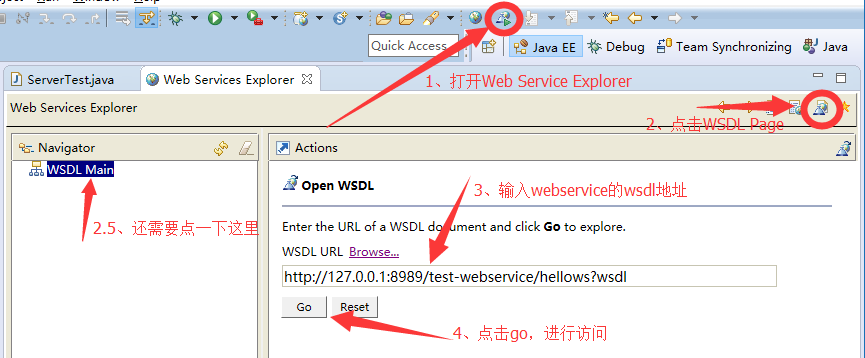
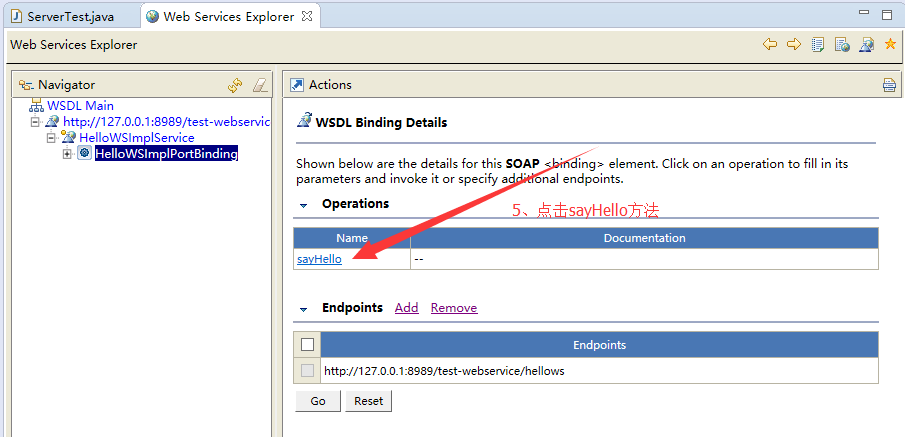
6、使用Eclipse的Web Services Explorer,测试访问WebService,其中要输入wsdl地址(一般是发布的WebService的Endpoint后面加上'?wsdl'):
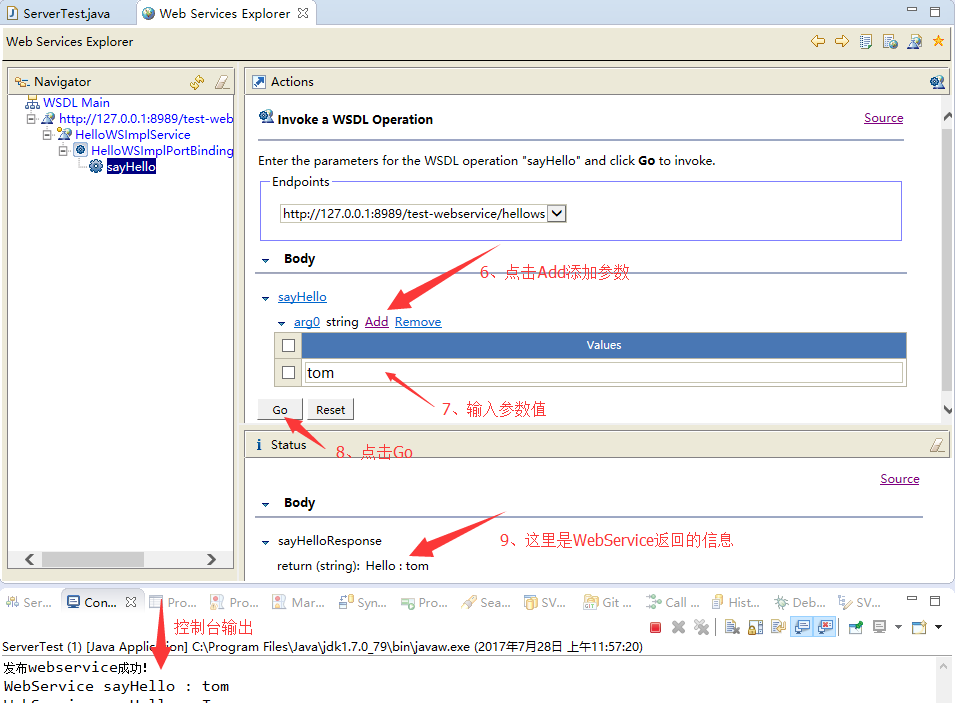
7、查看发送消息和响应消息的具体内容,在Eclipse的Web Services Explorer模块中的Status中,点击Source如下:

然后在请求框中查看源,同理在响应框中查看源,可以看到发送的请求消息和响应消息
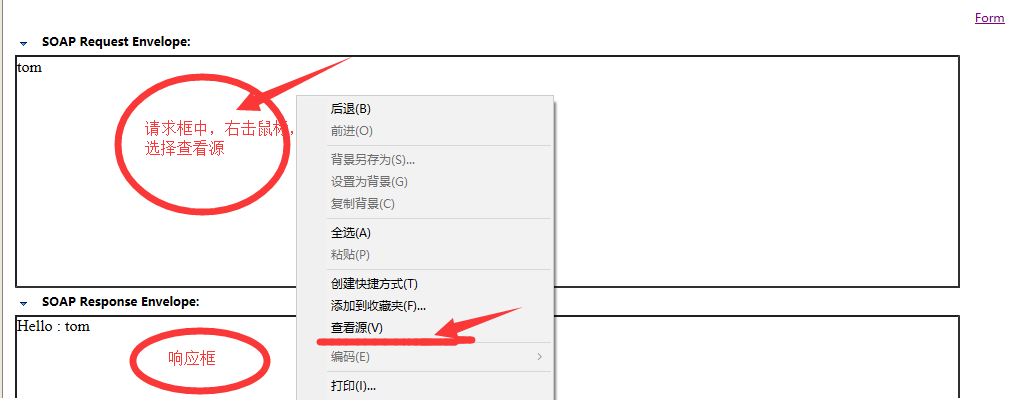
请求消息
1 <soapenv:Envelope xmlns:soapenv="http://schemas.xmlsoap.org/soap/envelope/" xmlns:q0="http://ws.test.com/" xmlns:xsd="http://www.w3.org/2001/XMLSchema" xmlns:xsi="http://www.w3.org/2001/XMLSchema-instance">
2   <soapenv:Body>
3     <q0:sayHello>
4       <arg0>tom</arg0>
5     </q0:sayHello>
6   </soapenv:Body>
7 </soapenv:Envelope>
响应消息
<S:Envelope xmlns:S="http://schemas.xmlsoap.org/soap/envelope/">
  <S:Body>
    <ns2:sayHelloResponse xmlns:ns2="http://ws.test.com/">
      <return>Hello : tom</return>
    </ns2:sayHelloResponse>
  </S:Body>
</S:Envelope>
b、开发WebService客户端
1、使用eclipse新建一个客服端java工程

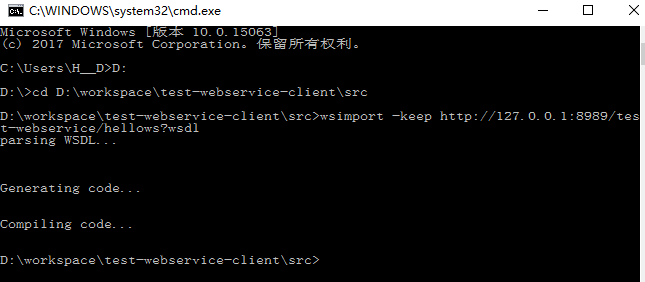
2、使用jdk的wsimort.exe工具生成客户端代码,执行命令:wsimport -keep url(url为wsdl文件的路径)生成客户端代码,wsimort.exe工具位于jdk的bin目录下,如下:

打开命令行窗口,切换到src目录中,执行命令:wsimport -keep http://127.0.0.1:8989/test-webservice/hellows?wsdl,如下:
刷新工程,可以看到代码已经生成,如下

3、编写调用WebService对外提供的方法
wsimport工具帮我们生成了好几个java类,但我们只需要关心WebServiceImplService类和WebServiceImpl接口的使用即可,如下:
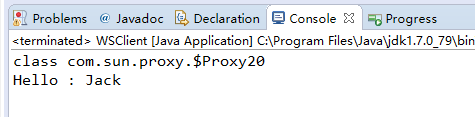
 1 package com.test.ws.client;
 2
 3 import com.test.ws.HelloWSImpl;
 4 import com.test.ws.HelloWSImplService;
 5
 6 /**
 7  * 调用WebService的客户端
 8  * @author H__D
 9  * @date 2017年7月28日 下午2:39:24
10  *
11  */
12 public class WSClient {
13
14     public static void main(String[] args) {
15         //创建一个用于产生WebServiceImpl实例的工厂,WebServiceImplService类是wsimport工具生成的
16         HelloWSImplService factory = new HelloWSImplService();
17         //通过工厂生成一个WebServiceImpl实例,WebServiceImpl是wsimport工具生成的
18         HelloWSImpl helloWS = factory.getHelloWSImplPort();
19         System.out.println(helloWS.getClass());
20
21         //调用WebService的sayHello方法
22         String result = helloWS.sayHello("Jack");
23         System.out.println(result);
24     }
25 }
4、运行main方法,控制台输出,可以看到已经成功调用了WebService,如下: