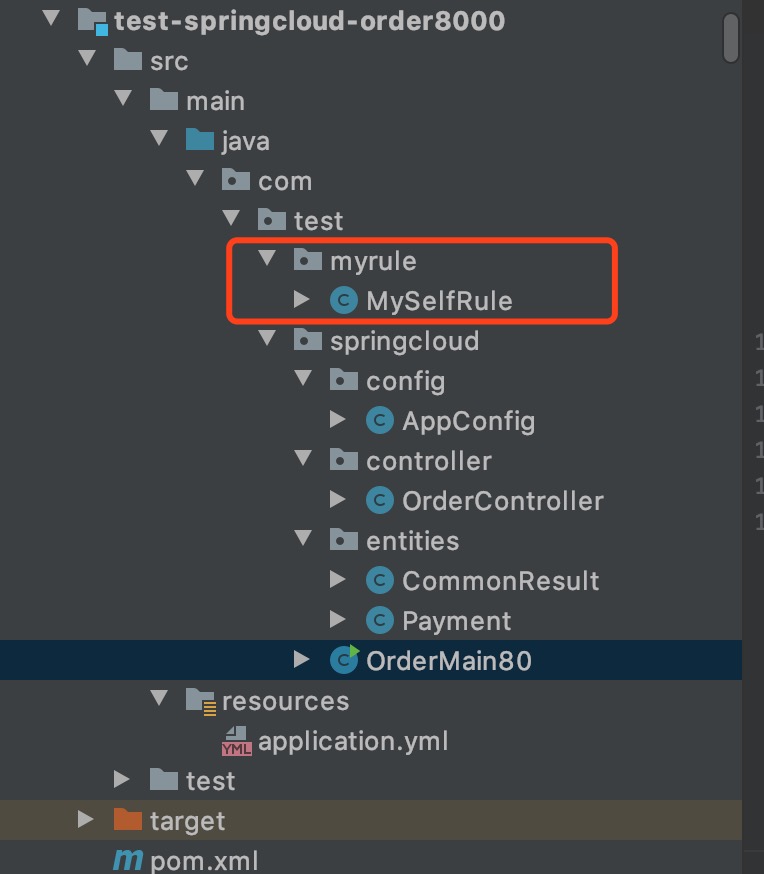
本章介绍Ribbon自定义规则
Ribbon自带随机均衡策略
1、搭建项目,参考:【SpringCloud】服务提供者集群与服务发现Discovery(三)
2、新增配置类,配置类中注入IRule的实现类
在调用者项目(test-springcloud-order8000)中,新增一个配置类com.test.myrule.MySelfRule
 1 package com.test.myrule;
 2
 3 import com.netflix.loadbalancer.IRule;
 4 import com.netflix.loadbalancer.RandomRule;
 5 import org.springframework.context.annotation.Bean;
 6 import org.springframework.context.annotation.Configuration;
 7
 8 @Configuration
 9 public class MySelfRule {
10
11     @Bean
12     public IRule myRule(){
13         // 定义随机规则
14         return new RandomRule();
15     }
16 }
注意,官方文档明确给出警告:
这个自定义配置类不能放在@Configuration所扫描的当前包及子包下,否则我们自定义的这个配置类就会被所有Ribbon客户端共享,达不到特殊化定制的目的了
如果想要Ribbon客户端共享,那边就放在@Configuration所扫描的地方

3、使用新增的配置类对“CLOUD-PAYMENT-SERVICE”服务生效,在启动类com.test.springcloud.Application上增加注解
@RibbonClient(name = "CLOUD-PAYMENT-SERVICE", configuration = MySelfRule.class)
name指定针对哪个服务 进行负载均衡,而configuration指定负载均衡的算法具体实现类。
 1 package com.test.springcloud;
 2
 3 import com.test.myrule.MySelfRule;
 4 import org.springframework.boot.SpringApplication;
 5 import org.springframework.boot.autoconfigure.SpringBootApplication;
 6 import org.springframework.cloud.netflix.eureka.EnableEurekaClient;
 7 import org.springframework.cloud.netflix.ribbon.RibbonClient;
 8
 9 @EnableEurekaClient
10 @SpringBootApplication
11 @RibbonClient(name = "CLOUD-PAYMENT-SERVICE", configuration = MySelfRule.class)
12 public class OrderMain80 {
13     public static void main(String[] args) {
14         SpringApplication.run(OrderMain80.class, args);
15     }
16 }
4、启动项目,测试项目
使用地址:http://localhost:8000/consumer/payment/get/1
可以看到,的到的响应内容是从提供者的2个节点中,随机的到的。
自定义Ribbon均衡策略
1、新增一个IRule的实现类

 1 package com.test.myrule;
 2
 3 import com.netflix.client.config.IClientConfig;
 4 import com.netflix.loadbalancer.AbstractLoadBalancerRule;
 5 import com.netflix.loadbalancer.ILoadBalancer;
 6 import com.netflix.loadbalancer.Server;
 7
 8 import java.util.List;
 9
10 public class MyCustomeRule extends AbstractLoadBalancerRule {
11
12     private int total = 0;             // 总共被调用的次数,目前要求每台被调用5次
13     private int currentIndex = 0;    // 当前提供服务的下标
14
15     public Server choose(ILoadBalancer loadBalancer, Object key) {
16
17         if (loadBalancer == null) {
18             return null;
19         }
20         Server server = null;
21
22         while (server == null) {
23             if (Thread.interrupted()) {
24                 return null;
25             }
26             List<Server> upList = loadBalancer.getReachableServers(); //当前存活的服务
27             List<Server> allList = loadBalancer.getAllServers();  //获取全部的服务
28
29             int serverCount = allList.size();
30             if (serverCount == 0) {
31                 return null;
32             }
33
34             //int index = rand.nextInt(serverCount);
35             //server = upList.get(index);
36             if(total < 5)
37             {
38                 server = upList.get(currentIndex);
39                 total++;
40             }else {
41                 total = 0;
42                 currentIndex++;
43                 if(currentIndex >= upList.size())
44                 {
45                     currentIndex = 0;
46                 }
47             }
48
49             if (server == null) {
50                 Thread.yield();
51                 continue;
52             }
53
54             if (server.isAlive()) {
55                 return (server);
56             }
57
58             // Shouldn't actually happen.. but must be transient or a bug.
59             server = null;
60             Thread.yield();
61         }
62         return server;
63     }
64
65     public Server choose(Object key) {
66         return choose(getLoadBalancer(), key);
67     }
68     public void initWithNiwsConfig(IClientConfig clientConfig) {
69
70     }
71 }
2、修改配置类,在配置类中注入新编写的实现类,同上
@RibbonClient(name = "CLOUD-PAYMENT-SERVICE", configuration =MyCustomeRule.class)
3、启动项目,测试
使用地址:http://localhost:8000/consumer/payment/get/1
结果:每5次访问,之后切换节点
自定义均衡器
流程:使用DiscoveryClient发现服务—》通过自定义均衡器筛选服务—》使用RestTemplate调用
1、自定义均衡器接口
1 public interface LoadBalancer {
2
3     // 筛选出服务
4     ServiceInstance instances(List<ServiceInstance> serviceInstances);
5 }
2、编写接口实现类
 1 @Component
 2 public class MyLB implements  LoadBalancer {
 3
 4     private AtomicInteger atomicInteger = new AtomicInteger(0);
 5
 6     public final int getAndIncrement(){
 7         int current;
 8         int next;
 9         do {
10             current = this.atomicInteger.getAndIncrement();
11             next = current >= Integer.MAX_VALUE ? 0 : current + 1;
12         } while (this.atomicInteger.compareAndSet(current, next));
13         System.out.println("=======next:" + next);
14         return next;
15     }
16
17     public ServiceInstance instances(List<ServiceInstance> serviceInstances) {
18
19         int index = getAndIncrement() % serviceInstances.size();
20         return serviceInstances.get(index);
21     }
22 }
3、编写controller方法
 1 @RestController
 2 @Slf4j
 3 public class OrderController {
 4
 5     @Autowired
 6     private LoadBalancer loadBalancer;
 7
 8     @Autowired
 9     private DiscoveryClient discoveryClient;
10
11     // 未使用Ribbon包装restTemplate
12     private RestTemplate restTemplate = new RestTemplate();
13
14
15     @GetMapping("/consumer/payment/get/{id}/lb")
16     public CommonResult<Payment> getPaymentLB(@PathVariable("id") Long id){
17         List<ServiceInstance> instances = discoveryClient.getInstances("CLOUD-PAYMENT-SERVICE");
18         if(instances == null || instances.size() == 0) {
19             return null;
20         }
21
22         ServiceInstance instance = loadBalancer.instances(instances);
23         URI uri = instance.getUri();
24
25         return restTemplate.getForObject(uri + "/payment/get/" + id, CommonResult.class);
26     }
27 }
注意:
1)restTemplate对象,未被Ribbon包装
2)此处的instance.getUri()获取的url地址,可能是主机名称+端口,需要改成是IP+端口。而要获取到的是IP+端口,需要服务提供者,在Eureka注册的时候,使用ip注册
服务端注册增加配置如下:
1 eureka:
2   instance:
3     #  instance:
4     instance-id: ${spring.cloud.client.ip-address}:${server.port}
5     # 访问路径可以显示IP地址
6     prefer-ip-address: true
4、启动项目,测试
访问地址:http://localhost:8000/consumer/payment/get/1/lb
结果:返回结果以达到轮询的目的
