嵌入式Servlet容器
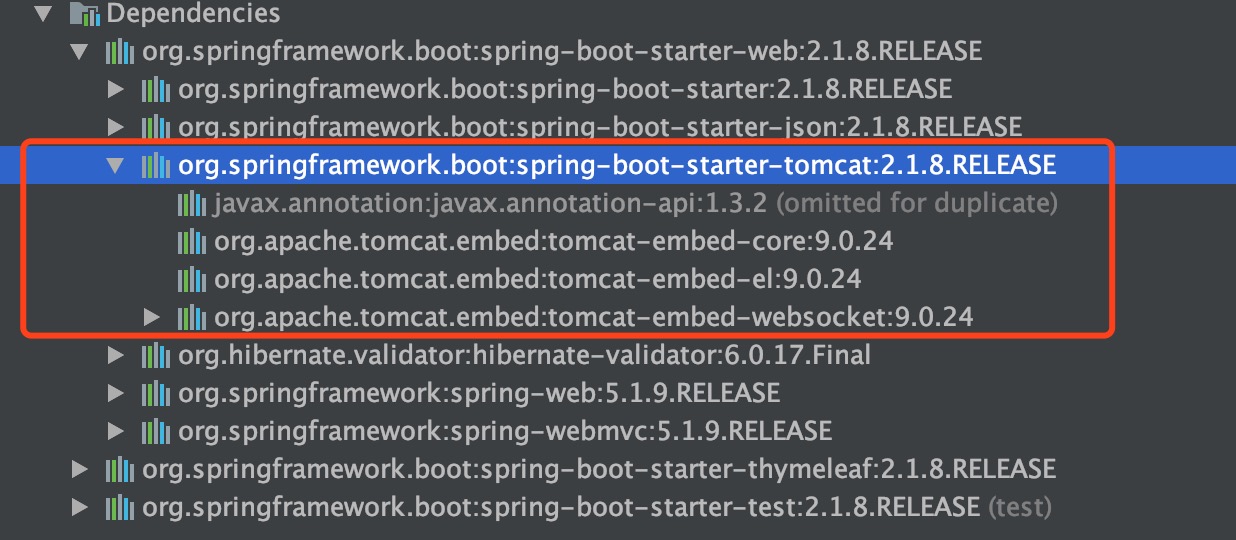
新建一个SpringBoot Web项目,可以看到依赖,SpringBoot默认使用Tomcat作为嵌入式的Servlet容器;
1、定制和修改嵌入式Servlet容器的相关配置
1、修改和server有关的配置(ServerProperties【也是EmbeddedServletContainerCustomizer】);
 1 # 项目端口
 2 server.port=8081
 3 # 项目访问路径
 4 server.servlet.context-path=/test
 5 # tomcat编码
 6 server.tomcat.uri-encoding=UTF-8
 7
 8 # 通用的Servlet容器设置
 9 # server.xxx
10
11 # Tomcat的设置
12 # server.tomcat.xxx
2、编写一个EmbeddedServletContainerCustomizer:嵌入式的Servlet容器的定制器;来修改Servlet容器的 配置
 1 //定制器加入到容器中
 2 @Bean
 3 public WebServerFactoryCustomizer<ConfigurableWebServerFactory> webServerFactoryCustomizer() {
 4     return new WebServerFactoryCustomizer<ConfigurableWebServerFactory>() {
 5
 6         //定制嵌入式的Servlet容器相关的规则
 7         @Override
 8         public void customize(ConfigurableWebServerFactory factory) {
 9             factory.setPort(8083);
10         }
11     };
12 }
2、替换为其他嵌入式Servlet容器
主要有三种嵌入式Servlet容器:Tomcat,Jetty(支持长链接),Undertow(不支持JSP)
a、Tomcat(默认使用)
引入web模块默认就是使用嵌入式的Tomcat作为Servlet容器;
1 <dependency>
2     <groupId>org.springframework.boot</groupId>
3     <artifactId>spring-boot-starter-web</artifactId>
4 </dependency>
b、Jetty
 1 <!-- 引入Web模块 -->
 2 <dependency>
 3     <groupId>org.springframework.boot</groupId>
 4     <artifactId>spring-boot-starter-web</artifactId>
 5     <!--<exclusions>-->
 6         <!--<exclusion>-->
 7             <!--<groupId>org.springframework.boot</groupId>-->
 8             <!--<artifactId>spring-boot-starter-tomcat</artifactId>-->
 9         <!--</exclusion>-->
10     <!--</exclusions>-->
11 </dependency>
12
13 <!-- 引入其他的Servlet容器 -->
14 <dependency>
15     <groupId>org.springframework.boot</groupId>
16     <artifactId>spring-boot-starter-jetty</artifactId>
17 </dependency>
c、undertow


 1 <!-- 引入Web模块 -->
 2 <dependency>
 3     <groupId>org.springframework.boot</groupId>
 4     <artifactId>spring-boot-starter-web</artifactId>
 5     <!--<exclusions>-->
 6         <!--<exclusion>-->
 7             <!--<groupId>org.springframework.boot</groupId>-->
 8             <!--<artifactId>spring-boot-starter-tomcat</artifactId>-->
 9         <!--</exclusion>-->
10     <!--</exclusions>-->
11 </dependency>
12
13 <!-- 引入其他的Servlet容器 -->
14 <dependency>
15     <groupId>org.springframework.boot</groupId>
16     <artifactId>spring-boot-starter-undertow</artifactId>
17 </dependency>
3、使用外置的Servlet容器
嵌入式Servlet容器:应用打成可执行的jar
优点:简单、便携;
缺点:默认不支持JSP、优化定制比较复杂(使用定制器【ServerProperties、自定义WebServerFactoryCustomizer】,自己编写嵌入式Servlet容器的创建工厂 【WebServerFactoryCustomizer】);
外置的Servlet容器:外面安装Tomcat---应用war包的方式打包;
步骤
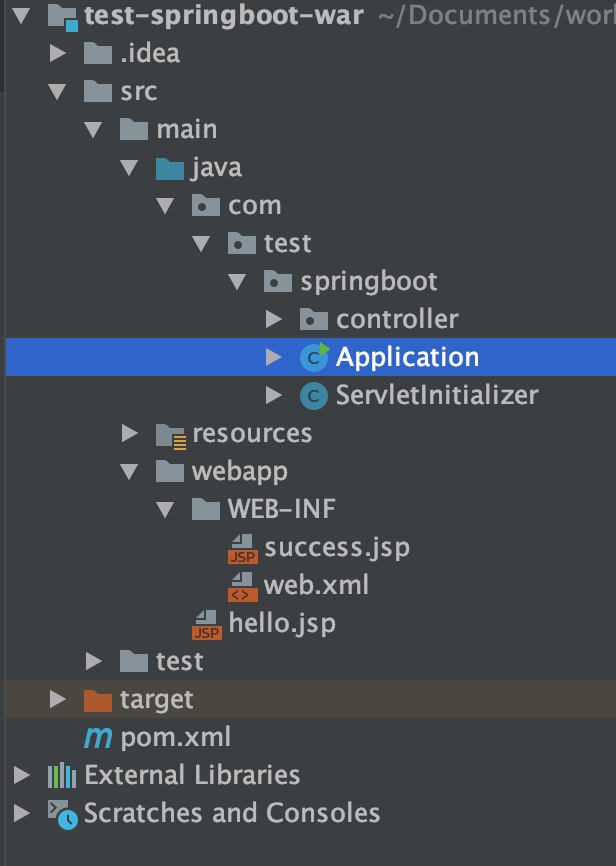
a、创建一个SpringBoot War项目;
pom.xml
 1 <?xml version="1.0" encoding="UTF-8"?>
 2 <project xmlns="http://maven.apache.org/POM/4.0.0"
 3          xmlns:xsi="http://www.w3.org/2001/XMLSchema-instance"
 4          xsi:schemaLocation="http://maven.apache.org/POM/4.0.0 http://maven.apache.org/xsd/maven-4.0.0.xsd">
 5     <modelVersion>4.0.0</modelVersion>
 6
 7     <groupId>com.test</groupId>
 8     <artifactId>test-springboot-war</artifactId>
 9     <version>1.0-SNAPSHOT</version>
10     <packaging>war</packaging>
11
12     <parent>
13         <groupId>org.springframework.boot</groupId>
14         <artifactId>spring-boot-starter-parent</artifactId>
15         <version>2.1.8.RELEASE</version>
16     </parent>
17
18     <properties>
19
20         <project.build.sourceEncoding>UTF-8</project.build.sourceEncoding>
21         <project.reporting.outputEncoding>UTF-8</project.reporting.outputEncoding>
22         <java.version>1.8</java.version>
23     </properties>
24
25     <dependencies>
26
27         <dependency>
28             <groupId>org.springframework.boot</groupId>
29             <artifactId>spring-boot-starter-web</artifactId>
30         </dependency>
31
32         <dependency>
33             <groupId>org.springframework.boot</groupId>
34             <artifactId>spring-boot-starter-tomcat</artifactId>
35             <scope>provided</scope>
36         </dependency>
37
38         <dependency>
39             <groupId>org.springframework.boot</groupId>
40             <artifactId>spring-boot-starter-test</artifactId>
41             <scope>test</scope>
42         </dependency>
43
44     </dependencies>
45
46
47     <!-- SpringBoot打包插件,可以将代码打包成一个可执行的jar包 -->
48     <build>
49         <plugins>
50             <plugin>
51                 <groupId>org.springframework.boot</groupId>
52                 <artifactId>spring-boot-maven-plugin</artifactId>
53             </plugin>
54         </plugins>
55     </build>
56 </project>
b、将嵌入式的Tomcat指定为provided;
1 <dependency>
2     <groupId>org.springframework.boot</groupId>
3     <artifactId>spring-boot-starter-tomcat</artifactId>
4     <scope>provided</scope>
5 </dependency>
c、必须编写一个SpringBootServletInitializer的子类 ServletInitializer.java,并重写configure方法
 1 package com.test.springboot;
 2
 3 import org.springframework.boot.builder.SpringApplicationBuilder;
 4 import org.springframework.boot.web.servlet.support.SpringBootServletInitializer;
 5
 6 public class ServletInitializer extends SpringBootServletInitializer {
 7
 8     @Override
 9     protected SpringApplicationBuilder configure(SpringApplicationBuilder application) {
10         return application.sources(Application.class);
11     }
12
13 }
4、外置的Servlet容器原理
jar包:执行SpringBoot主类的main方法,启动ioc容器,创建嵌入式的Servlet容器;
war包:启动服务器,服务器启动SpringBoot应用【SpringBootServletInitializer】,启动ioc容器;
servlet3.0(规范): 8.2.4 Shared libraries / runtimes pluggability: 规则:
1)、服务器启动(web应用启动)会创建当前web应用里面每一个jar包里面ServletContainerInitializer实例:
2)、ServletContainerInitializer的实现放在jar包的META-INF/services文件夹下,有一个名为javax.servlet.ServletContainerInitializer的文件,内容就是ServletContainerInitializer的实现类的全类名
3)、还可以使用@HandlesTypes,在应用启动的时候加载我们感兴趣的类;
流程
1)、启动Tomcat
2)、orgspringframeworkspring-web4.3.14.RELEASEspring-web-4.3.14.RELEASE.jar!META- INFservicesjavax.servlet.ServletContainerInitializer:
Spring的web模块里面有这个文件:org.springframework.web.SpringServletContainerInitializer
3)、SpringServletContainerInitializer将@HandlesTypes(WebApplicationInitializer.class)标注的所有这个类型的类都传入到onStartup方法的Set>;
为这些WebApplicationInitializer类型的类创建实例;
4)、每一个WebApplicationInitializer都调用自己的onStartup;
5)、相当于我们的SpringBootServletInitializer的类会被创建对象,并执行onStartup方法
6)、SpringBootServletInitializer实例执行onStartup的时候会createRootApplicationContext;创建容器
 1 protected WebApplicationContext createRootApplicationContext(ServletContext servletContext) {
 2
 3     //1、创建SpringApplicationBuilder
 4     SpringApplicationBuilder builder = createSpringApplicationBuilder();
 5     builder.main(getClass());
 6     ApplicationContext parent = getExistingRootWebApplicationContext(servletContext);
 7     if (parent != null) {
 8         this.logger.info("Root context already created (using as parent).");
 9         servletContext.setAttribute(WebApplicationContext.ROOT_WEB_APPLICATION_CONTEXT_ATTRIBUTE, null);
10         builder.initializers(new ParentContextApplicationContextInitializer(parent));
11     }
12
13     builder.initializers(new ServletContextApplicationContextInitializer(servletContext));
14     builder.contextClass(AnnotationConfigServletWebServerApplicationContext.class);
15
16     //调用configure方法,子类重写了这个方法,将SpringBoot的主程序类传入了进来
17     builder = configure(builder);
18     //使用builder创建一个Spring应用
19     builder.listeners(new WebEnvironmentPropertySourceInitializer(servletContext));
20
21     SpringApplication application = builder.build();
22     if (application.getAllSources().isEmpty()
23             && AnnotationUtils.findAnnotation(getClass(), Configuration.class) != null) {
24         application.addPrimarySources(Collections.singleton(getClass()));
25     }
26     Assert.state(!application.getAllSources().isEmpty(),
27             "No SpringApplication sources have been defined. Either override the "
28                     + "configure method or add an @Configuration annotation");
29     // Ensure error pages are registered
30     if (this.registerErrorPageFilter) {
31         application.addPrimarySources(Collections.singleton(ErrorPageFilterConfiguration.class));
32     }
33     //启动Spring应用
34     return run(application);
35 }
7)、Spring的应用就启动并且创建IOC容器
 1 public ConfigurableApplicationContext run(String... args) {
 2     StopWatch stopWatch = new StopWatch();
 3     stopWatch.start();
 4     ConfigurableApplicationContext context = null;
 5     Collection<SpringBootExceptionReporter> exceptionReporters = new ArrayList<>();
 6     configureHeadlessProperty();
 7     SpringApplicationRunListeners listeners = getRunListeners(args);
 8     listeners.starting();
 9     try {
10         ApplicationArguments applicationArguments = new DefaultApplicationArguments(args);
11         ConfigurableEnvironment environment = prepareEnvironment(listeners, applicationArguments);
12         configureIgnoreBeanInfo(environment);
13         Banner printedBanner = printBanner(environment);
14         context = createApplicationContext();
15         exceptionReporters = getSpringFactoriesInstances(SpringBootExceptionReporter.class,
16                 new Class[] { ConfigurableApplicationContext.class }, context);
17         prepareContext(context, environment, listeners, applicationArguments, printedBanner);
18
19         //刷新IOC容器
20         refreshContext(context);
21         afterRefresh(context, applicationArguments);
22         stopWatch.stop();
23         if (this.logStartupInfo) {
24             new StartupInfoLogger(this.mainApplicationClass).logStarted(getApplicationLog(), stopWatch);
25         }
26         listeners.started(context);
27         callRunners(context, applicationArguments);
28     }
29     catch (Throwable ex) {
30         handleRunFailure(context, ex, exceptionReporters, listeners);
31         throw new IllegalStateException(ex);
32     }
33
34     try {
35         listeners.running(context);
36     }
37     catch (Throwable ex) {
38         handleRunFailure(context, ex, exceptionReporters, null);
39         throw new IllegalStateException(ex);
40     }
41     return context;
42 }
启动Servlet容器,再启动SpringBoot应用