Python PIL
PIL (Python Image Library) 库是Python 语言的一个第三方库,PIL库支持图像存储、显示和处理,能够处理几乎所有格式的图片。
一、PIL库简介
1. PIL库主要有2个方面的功能:
(1) 图像归档:对图像进行批处理、生产图像预览、图像格式转换等。
(2) 图像处理:图像基本处理、像素处理、颜色处理等。
二、安装库函数
pip install pillow
三、使用库函数Image类 —— 基本图像处理
1. 调用Image类
from PIL import Image
2. Image类关于图像读取与创建
|
方法 |
说明 |
|
Image.open(filename) |
加载图像文件 |
|
Image.new(mode,size,color) |
根据给定参数创建新图像 |
|
Image.open(StringIO.StringIO(buffer)) |
从字符串中获取图像 |
|
Image.frombytes(mode,size,color) |
根据像素点创建新图像 |
|
Image.verify() |
对图像完整性进行检查,返回异常 |

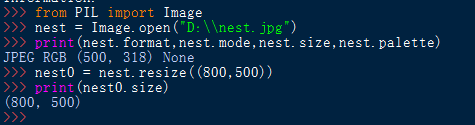
3. Image类的常用属性
|
方法 |
说明 |
|
Image.format |
图像格式或来源,若图像不是从文件读取,返回None |
|
Image.mode |
图像的色彩模式,’L’为灰度模式,’RGB’为真彩色图像,’C(青)M(品红)Y(黄)K(黑)’为出版图像 |
|
Image.size |
图像的宽度和高度,单位是像素(px),返回值为元组类型 |
|
Image.palette |
调色板属性,返回ImagePalette类型 |

4.Image类的序列图像操作方法
|
方法 |
说明 |
|
Image.seek(frame) |
跳转并返回图像中的指定帧 |
|
Image.tell() |
返回当前帧的序号 |

5.Image类的图像旋转和缩放方法
|
方法 |
说明 |
|
Image.resize(size) |
返回按size大小调整图像的副本 |
|
Image.rotate(angle) |
返回按angle角度旋转图像的副本 |
6.Image类的图像转换和保存方法
|
方法 |
说明 |
|
Image.save(filename,format) |
将图像保存为filename文件名,format格式 |
|
Image.convert(mode) |
将图像转换为mode模式 |
|
Image.thumbnail(size) |
创建图像的缩略图,size是缩略图尺寸的元组 |
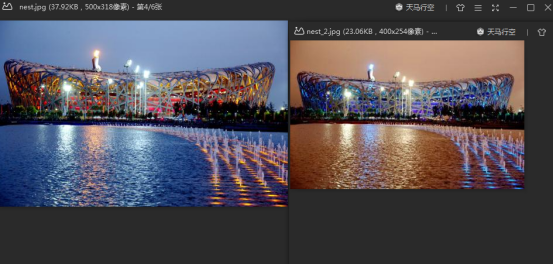
例子1
# -*- encoding:utf-8 -*-
''' 改变颜色 --- 颜色反转'''
from PIL import Image
nest = Image.open("D:\nest.jpg")
r,g,b = nest.split()           #获取原图的RGB通道的颜色值
newb = b.point(lambda i:i*1.1) #将B通道的颜色值增强
nest1 = Image.merge(nest.mode,(b,g,r))
nest1.thumbnail((400,254))     #创建缩略图
nest1.save("D:\nest_2.jpg")
处理图像序列(gif图像)
函数:ImageSequence()
下面的代码可以遍历gif图像中的所有帧,并分别保存为图像。
 index = 0
while 1:

try:

gif.seek(index)

 gif.save("%d.%s" %(index,'jpg' if gif.mode == 'JPEG' else 'png'))

index += 1... except EOFError:

 print("Reach the end of gif sequence!")

break
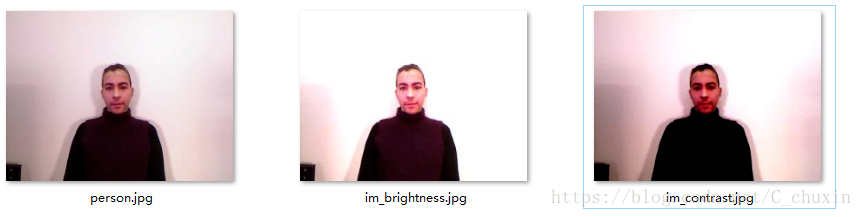
ImageEnhance()
from PIL import Image , ImageEnhance

im = Image.open("F:\test\image1\person.jpg")

brightness = ImageEnhance.Brightness(im)

im_brightness = brightness.enhance(1.5)

contrast = ImageEnhance.Contrast(im)

im_contrast = contrast.enhance(1.5)

im_brightness.save("./image1/im_brightness.jpg")

im_contrast.save("./image1/im_contrast.jpg")
ImageEnhance是PIL下的一个子类,主要用于图像增强,比如增加亮度(Brightness),增加对比度(Contrast)等。上面的代码将原来图像的亮度增加50%,将对比度也增加了50%。
接下来把图片变成素描的效果
from PIL import Image

def sketch(img, threshold):
    '''
    素描
    param img: Image实例
    param threshold: 介于0到100
    '''
    if threshold < 0: threshold = 0
    if threshold > 100: threshold = 100

    width, height = img.size
    img = img.convert('L') # convert to grayscale mode
    pix = img.load() # get pixel matrix

    for w in xrange(width):
        for h in xrange(height):
            if w == width-1 or h == height-1:
                continue

            src = pix[w, h]
            dst = pix[w+1, h+1]

            diff = abs(src - dst)

            if diff >= threshold:
                pix[w, h] = 0
            else:
                pix[w, h] = 255

    return img
if __name__ == "__main__":
    import sys, os

    path = os.path.dirname(__file__) + os.sep.join(['', 'images', 'lam.jpg'])
    threshold = 15

    if len(sys.argv) == 2:
        try:
            threshold = int(sys.argv[1])
        except ValueError:
            path  = sys.argv[1]
    elif len(sys.argv) == 3:
        path = sys.argv[1]
        threshold = int(sys.argv[2])

    img = Image.open(path)
    img = sketch(img, threshold)
    img.save(os.path.splitext(path)[0]+'.sketch.jpg', 'JPEG')


效果对比图。