随着对 CocoaPods 越来越多的依赖,我们也可以尝试把自己的库发布到它上面。
1.在Github上新建一个项目(名字我随便取了一个,其他步骤截图为WCUIKit)。自己做相应修改即可。
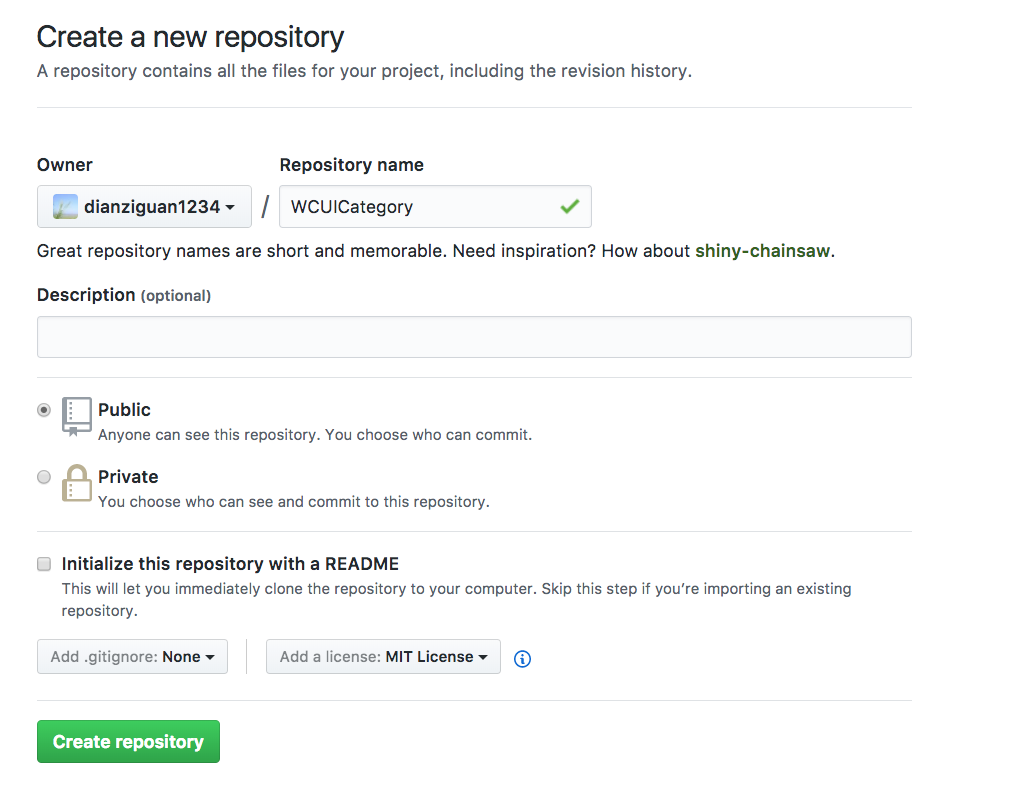
2.克隆到本地 git clone https://github.com/dianziguan1234/WCUIKit.git
Xcode创建项目。添加自己的代码。目录结构大致为
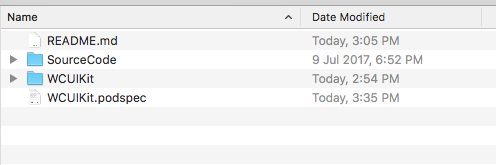
其中SourceCode存放源码部分,就是后来通过cocoapods安装以后得到的代码块。
WCUIKit存放我们Xcode创建的项目。
3.重要的一步。添加tag并提交github master分支。
git add -A && git commit -m "Release 1.0.2"
git tag '1.0.2'
git push --tags
git push origin master
4:创建podspec文件。
cd WCUIKit
pod spec create WCUIKit.podspec
之后在该目录下会生成一个 WCUIKit.podspec 文件,该文件是 Ruby 编写的,打开并编辑这个文件,填写好配置文件。
#
#  Be sure to run `pod spec lint WCUIKit.podspec' to ensure this is a
#  valid spec and to remove all comments including this before submitting the spec.
#
#  To learn more about Podspec attributes see http://docs.cocoapods.org/specification.html
#  To see working Podspecs in the CocoaPods repo see https://github.com/CocoaPods/Specs/
#

Pod::Spec.new do |s|

  # ―――  Spec Metadata  ―――――――――――――――――――――――――――――――――――――――――――――――――――――――――― #
  #
  #  These will help people to find your library, and whilst it
  #  can feel like a chore to fill in it's definitely to your advantage. The
  #  summary should be tweet-length, and the description more in depth.
  #

  s.name         = "WCUIKit"
  s.version      = "1.0.2"
  s.summary      = "任意视图添加角标"

  # This description is used to generate tags and improve search results.
  #   * Think: What does it do? Why did you write it? What is the focus?
  #   * Try to keep it short, snappy and to the point.
  #   * Write the description between the DESC delimiters below.
  #   * Finally, don't worry about the indent, CocoaPods strips it!

  s.homepage     = "https://github.com/dianziguan1234/WCUIKit"
  # s.screenshots  = "www.example.com/screenshots_1.gif", "www.example.com/screenshots_2.gif"


  # ―――  Spec License  ――――――――――――――――――――――――――――――――――――――――――――――――――――――――――― #
  #
  #  Licensing your code is important. See http://choosealicense.com for more info.
  #  CocoaPods will detect a license file if there is a named LICENSE*
  #  Popular ones are 'MIT', 'BSD' and 'Apache License, Version 2.0'.
  #

  #s.license      = "MIT (example)"
   s.license      = { :type => "MIT", :file => "FILE_LICENSE" }


  # ――― Author Metadata  ――――――――――――――――――――――――――――――――――――――――――――――――――――――――― #
  #
  #  Specify the authors of the library, with email addresses. Email addresses
  #  of the authors are extracted from the SCM log. E.g. $ git log. CocoaPods also
  #  accepts just a name if you'd rather not provide an email address.
  #
  #  Specify a social_media_url where others can refer to, for example a twitter
  #  profile URL.
  #

  s.author             = { "guanweicheng" => "1396539283@qq.com" }
  # Or just: s.author    = "guanweicheng"
  # s.authors            = { "guanweicheng" => "1396539283@qq.com" }
  # s.social_media_url   = "http://twitter.com/guanweicheng"

  # ――― Platform Specifics ――――――――――――――――――――――――――――――――――――――――――――――――――――――― #
  #
  #  If this Pod runs only on iOS or OS X, then specify the platform and
  #  the deployment target. You can optionally include the target after the platform.
  #

   s.platform     = :ios
   s.platform     = :ios, "8.0"

  #  When using multiple platforms
  # s.ios.deployment_target = "5.0"
  # s.osx.deployment_target = "10.7"
  # s.watchos.deployment_target = "2.0"
  # s.tvos.deployment_target = "9.0"


  # ――― Source Location ―――――――――――――――――――――――――――――――――――――――――――――――――――――――――― #
  #
  #  Specify the location from where the source should be retrieved.
  #  Supports git, hg, bzr, svn and HTTP.
  #

  s.source       = { :git => "https://github.com/dianziguan1234/WCUIKit.git", :tag => "#{s.version}" }


  # ――― Source Code ―――――――――――――――――――――――――――――――――――――――――――――――――――――――――――――― #
  #
  #  CocoaPods is smart about how it includes source code. For source files
  #  giving a folder will include any swift, h, m, mm, c & cpp files.
  #  For header files it will include any header in the folder.
  #  Not including the public_header_files will make all headers public.
  #

  s.source_files  = 'SourceCode/**/*.{h,m}'
  #s.exclude_files = "SourceCode/"

  s.public_header_files = "SourceCode/**/*.h"


  # ――― Resources ―――――――――――――――――――――――――――――――――――――――――――――――――――――――――――――――― #
  #
  #  A list of resources included with the Pod. These are copied into the
  #  target bundle with a build phase script. Anything else will be cleaned.
  #  You can preserve files from being cleaned, please don't preserve
  #  non-essential files like tests, examples and documentation.
  #

  # s.resource  = "icon.png"
  # s.resources = "Resources/*.png"

  # s.preserve_paths = "FilesToSave", "MoreFilesToSave"


  # ――― Project Linking ―――――――――――――――――――――――――――――――――――――――――――――――――――――――――― #
  #
  #  Link your library with frameworks, or libraries. Libraries do not include
  #  the lib prefix of their name.
  #

  # s.framework  = "SomeFramework"
  # s.frameworks = "SomeFramework", "AnotherFramework"

  # s.library   = "iconv"
  # s.libraries = "iconv", "xml2"


  # ――― Project Settings ――――――――――――――――――――――――――――――――――――――――――――――――――――――――― #
  #
  #  If your library depends on compiler flags you can set them in the xcconfig hash
  #  where they will only apply to your library. If you depend on other Podspecs
  #  you can include multiple dependencies to ensure it works.

   s.requires_arc = true

  # s.xcconfig = { "HEADER_SEARCH_PATHS" => "$(SDKROOT)/usr/include/libxml2" }
  # s.dependency "JSONKit", "~> 1.4"

end
红色部分稍微留意下。如果需要详细文档请移步 Specs and the Specs Repo。
5.验证podspec文件
cd WCUIKit
pod spec lint WCUIKit.podspec
6.注册上传到cocoapods
pod trunk register 1396539283@qq.com 'guanweicheng' --description='gwc'

pod trunk push WCUIKit.podspec
如果不出意外的话。会恭喜你发布成功。
7.然后可以pod search 你自己的库文件了。这里可能会出搜索不到的情况。参考链接解决即可(原理简单)。http://blog.cocoachina.com/article/29127
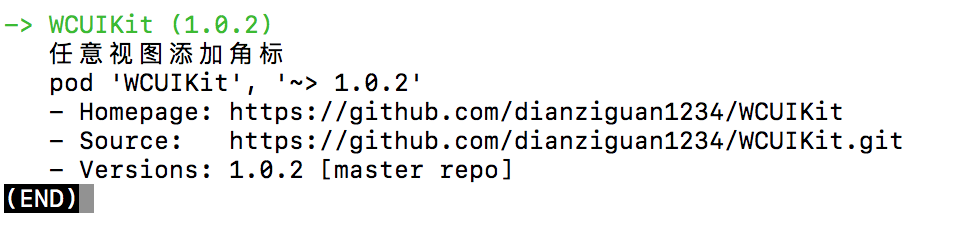
podspec文件可以参考我的项目。https://github.com/dianziguan1234/WCUIKit.git