#查看系统版本
[root@ctos3 ~]# cat /etc/redhat-release
CentOS Linux release 7.5.1804 (Core)
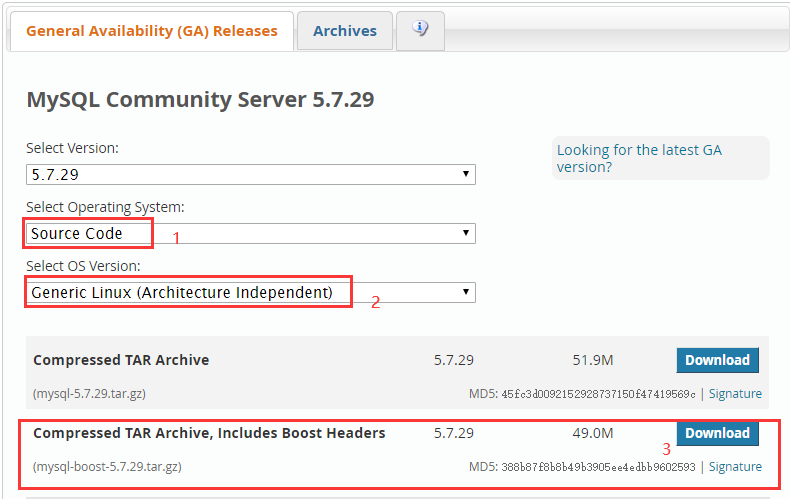
#下载源码包,需要注意的是mysql5.7 编译安装需要boost 库,可以在官网下载含boost的源码包
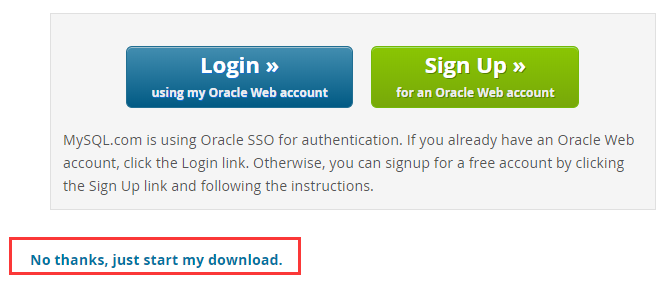
#提示,下载的时候如果不想进行登录或注册,就点不用,开始下载
#开始源码编译安装
#1.安装相关依赖包
yum install -y gcc gcc-c++ cmake ncurses ncurses-devel bison wget openssl-devel.x86_64
#2.创建用户和组
groupadd  mysql
useradd mysql -s /sbin/nologin -M -g mysql
#3.下载mysql和解压,也可以下载好使用rz(包名lrzsz)上传
mkdir /home/demo/tools/
cd /home/demo/tools/
wget https://cdn.mysql.com//Downloads/MySQL-5.7/mysql-boost-5.7.29.tar.gz
tar xf mysql-boost-5.7.29.tar.gz
#4.配置相关参数
[root@ctos3 tools]# cd mysql-5.7.29/
[root@ctos3 mysql-5.7.29]# pwd
/home/demo/tools/mysql-5.7.29
[root@ctos3 mysql-5.7.29]# cmake -DCMAKE_INSTALL_PREFIX=/application/mysql  -DMYSQL_DATADIR=/application/mysql/data -DMYSQL_UNIX_ADDR=/application/mysql/tmp/mysql.sock -DDEFAULT_CHARSET=utf8 -DDEFAULT_COLLATION=utf8_general_ci -DWITH_BOOST=boost
#参数介绍
DCMAKE_INSTALL_PREFIX  #指定MySQL程序的安装目录
DMYSQL_DATADIR         #数据文件目录
DMYSQL_UNIX_ADDR       #socket文件路径
DDEFAULT_CHARSET       #指定服务器默认字符集,默认latin1
DDEFAULT_COLLATION     #指定服务器默认的校对规则,默认latin1_general_ci
#5.编译安装
[root@ctos3 mysql-5.7.29]# make -j 2 && make install
#-j参数作用:编译时会占用大量的系统资源,可以通过-j参数指定多个编译命令进行并行编译来提高速度,使用以下命令查看系统CPU核数
[root@ctos3 ~]# cat /proc/cpuinfo | grep processor |wc -l
2
#6.创建数据目录和修改权限
[root@ctos3 mysql-5.7.29]# mkdir /application/mysql/data #存放数据目录
[root@ctos3 mysql-5.7.29]# mkdir /application/mysql/tmp #存放sock目录
[root@ctos3 mysql-5.7.29]# chown -R mysql.mysql /application/mysql/
#7.配置/etc/my.cnf文件
#注意:5.7版本没有模板文件/application/mysql/support-files/my-default.cnf,可根据需要自行添加
[root@ctos3 ~]# cat /etc/my.cnf
[mysqld]
port = 3306
socket = /application/mysql/tmp/mysql.sock
user = mysql
basedir = /application/mysql
datadir = /application/mysql/data
pid-file = /application/mysql/data/mysql.pid
sql_mode='ONLY_FULL_GROUP_BY'
log_error = /application/mysql/mysql-error.log
!includedir /etc/my.cnf.d

[client]
port = 3306
socket = /application/mysql/tmp/mysql.sock
#8.初始化数据库
[root@ctos3 support-files]# /application/mysql/bin/mysqld --initialize-insecure --user=mysql --basedir=/application/mysql --datadir=/application/mysql/data
#9.生成服务启动脚本
#设置环境变量
[root@ctos3 support-files]# echo 'export PATH=/application/mysql/bin:$PATH' >> /etc/profile
[root@ctos3 support-files]# source /etc/profile
[root@ctos3 support-files]# tail -1 /etc/profile
export PATH=/application/mysql/bin:$PATH

#生成启动脚本
[root@ctos3 ~]# cd /application/mysql/support-files/
[root@ctos3 support-files]# ls
magic  mysqld_multi.server  mysql-log-rotate  mysql.server
[root@ctos3 support-files]# cp mysql.server /etc/init.d/mysqld

#启动服务和设置开机自启
[root@ctos3 support-files]# /etc/init.d/mysqld start
Starting MySQL. SUCCESS!
[root@ctos3 support-files]# chkconfig --add mysqld
[root@ctos3 support-files]# chkconfig mysqld on
#10.登录MySQL(没有密码登录)
[root@ctos3 ~]# mysql -uroot -p
Enter password:
#11.查看版本
mysql> select version();
+-----------+
| version() |
+-----------+
| 5.7.29    |
+-----------+
1 row in set (0.00 sec)
#12.设置密码
mysql> update mysql.user set authentication_string=password('guoke123') where user='root';
Query OK, 1 row affected, 1 warning (0.01 sec)
Rows matched: 1  Changed: 1  Warnings: 1

mysql> flush privileges;
Query OK, 0 rows affected (0.01 sec)