Spring AOP 概述
AOP是OOP的延续,是Aspect Oriented Programming的缩写,意思是面向切面编程。可以通过预编译方式和运行期动态代理实现在不修改源代码的情况下给程序动态统一添加功能的一种技术。AOP设计模式孜孜不倦追求的是调用者和被调用者之间的解耦,AOP 可以说也是这种目标的一种实现。我们现在做的一些非业务,如:日志、事务、安全等都会写在业务代码中(也即是说,这些非业务类横切于业务类),但这些代码往往是重复,复制——粘贴式的代码会给程序的维护带来不便,AOP 就实现了把这些业务需求与系统需求分开来做。这种解决的方式也称代理机制。
AOP里面的几个概念
1.切面(Aspect)
官方的抽象定义为“一个关注点的模块化,这个关注点可能会横切多个对象”。“切面”在ApplicationContext 中<aop:aspect>来配置。连接点(Joinpoint) :程序执行过程中的某一行为,例如,MemberService.get 的调用或者MemberService.delete 抛出异常等行为。
2、通知(Advice)
“切面”对于某个“连接点”所产生的动作。其中,一个“切面”可以包含多个“Advice”。
3、切入点(Pointcut)
匹配连接点的断言,在 AOP 中通知和一个切入点表达式关联。切面中的所有通知所关注的连接点,都由切入点表达式来决定。
4、目标对象(Target Object)
被一个或者多个切面所通知的对象。当然在实际运行时,SpringAOP 采用代理实现,实际 AOP 操作的是 TargetObject 的代理对象。
5、AOP 代理(AOP Proxy)
在 Spring AOP 中有两种代理方式,JDK 动态代理和 CGLib 代理。默认情况下,TargetObject 实现了接口时,则采用 JDK 动态代理,反之,采用 CGLib 代理。强制使用 CGLib 代理需要将 <aop:config>的 proxy-target-class 属性设为 true。
通知类型:
6、前置通知(Before Advice)
在某连接点(JoinPoint)之前执行的通知,但这个通知不能阻止连接点前的执行。ApplicationContext中在<aop:aspect>里面使用<aop:before>元素进行声明。
7、后置通知(After Advice)
当某连接点退出的时候执行的通知(不论是正常返回还是异常退出)。ApplicationContext 中在<aop:aspect>里面使用<aop:after>元素进行声明。
8、返回后通知(After Return Advice)
在某连接点正常完成后执行的通知,不包括抛出异常的情况。ApplicationContext 中在<aop:aspect>里面使用<after-returning>元素进行声明。
9、环绕通知(Around Advice)
包围一个连接点的通知,类似 Web 中 Servlet 规范中的 Filter 的 doFilter 方法。可以在方法的调用前后完成自定义的行为,也可以选择不执行。ApplicationContext 中在<aop:aspect>里面使用<aop:around>元素进行声明。例如,ServiceAspect 中的 around 方法。
10、异常通知(After Throwing Advice)
在 方 法 抛 出 异 常 退 出 时 执 行 的 通 知 。 ApplicationContext 中 在 <aop:aspect> 里 面 使 用<aop:after-throwing>元素进行声明。
注:可以将多个通知应用到一个目标对象上,即可以将多个切面织入到同一目标对象。使用 Spring AOP 可以基于两种方式,一种是比较方便和强大的注解方式,另一种则是中规中矩的 xml配置方式。
先说注解,使用注解配置 Spring AOP 总体分为两步,第一步是在 xml 文件中声明激活自动扫描组件功能,同时激活自动代理功能:
<?xml version="1.0" encoding="UTF-8"?>
<beans xmlns="http://www.springframework.org/schema/beans"
       xmlns:xsi="http://www.w3.org/2001/XMLSchema-instance"
       xmlns:context="http://www.springframework.org/schema/context"
       xsi:schemaLocation="http://www.springframework.org/schema/beans http://www.springframework.org/schema/beans/spring-beans.xsd
       http://www.springframework.org/schema/context http://www.springframework.org/schema/context/spring-context-4.3.xsd">

    <context:component-scan base-package="com.stu"/>
    <context:annotation-config />

</beans>
第二步是为 Aspect 切面类添加注解:
//声明这是一个组件
@Component
//声明这是一个切面Bean,AnnotaionAspect是一个面,由框架实现的
@Aspect
public class AnnotaionAspect {

    private final static Logger log = Logger.getLogger(AnnotaionAspect.class);

    //配置切入点,该方法无方法体,主要为方便同类中其他方法使用此处配置的切入点
    //切点的集合,这个表达式所描述的是一个虚拟面(规则)
    //就是为了Annotation扫描时能够拿到注解中的内容
    @Pointcut("execution(* com.stu.aop.service..*(..))")
    public void aspect(){}

    /*
     * 配置前置通知,使用在方法aspect()上注册的切入点
     * 同时接受JoinPoint切入点对象,可以没有该参数
     */
    @Before("aspect()")
    public void before(JoinPoint joinPoint){
        log.info("before " + joinPoint);
    }

    //配置后置通知,使用在方法aspect()上注册的切入点
    @After("aspect()")
    public void after(JoinPoint joinPoint){
        log.info("after " + joinPoint);
    }

    //配置环绕通知,使用在方法aspect()上注册的切入点
    @Around("aspect()")
    public void around(JoinPoint joinPoint){
        long start = System.currentTimeMillis();
        try {
            ((ProceedingJoinPoint) joinPoint).proceed();
            long end = System.currentTimeMillis();
            log.info("around " + joinPoint + "	Use time : " + (end - start) + " ms!");
        } catch (Throwable e) {
            long end = System.currentTimeMillis();
            log.info("around " + joinPoint + "	Use time : " + (end - start) + " ms with exception : " + e.getMessage());
        }
    }

    //配置后置返回通知,使用在方法aspect()上注册的切入点
    @AfterReturning("aspect()")
    public void afterReturn(JoinPoint joinPoint){
        log.info("afterReturn " + joinPoint);
    }

    //配置抛出异常后通知,使用在方法aspect()上注册的切入点
    @AfterThrowing(pointcut="aspect()", throwing="ex")
    public void afterThrow(JoinPoint joinPoint, Exception ex){
        log.info("afterThrow " + joinPoint + "	" + ex.getMessage());
    }

}
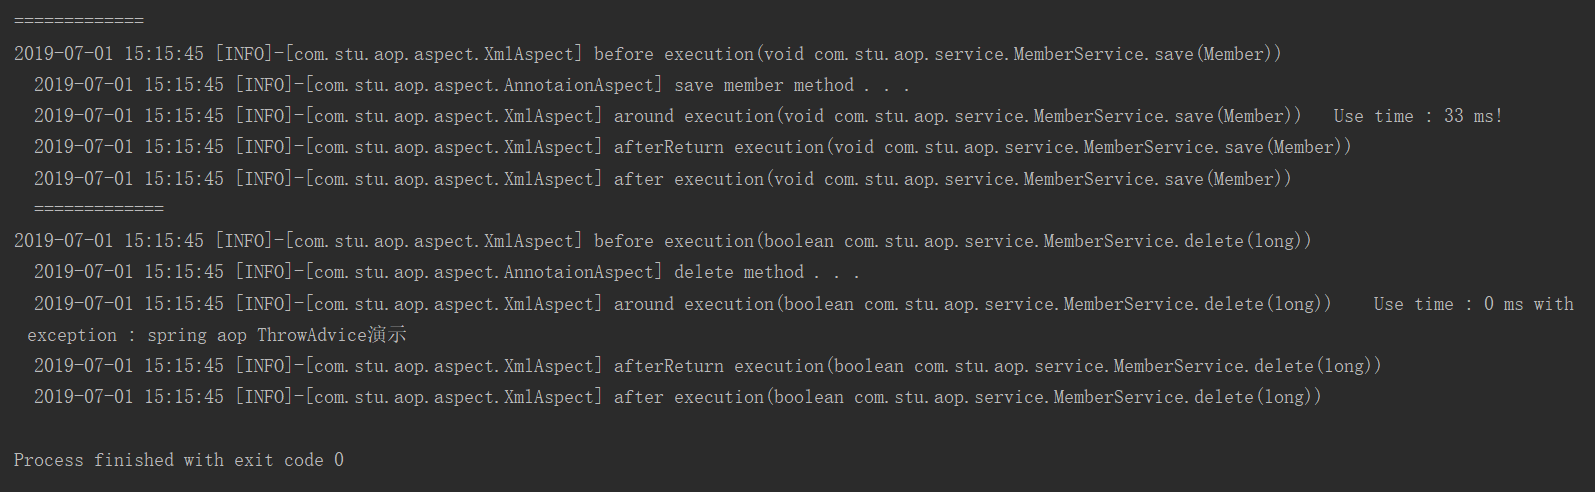
测试代码
@ContextConfiguration(locations = {"classpath*:application-context.xml"})
@RunWith(SpringJUnit4ClassRunner.class)
public class AnnotationTest {
    @Autowired
    MemberService memberService;

    @Test
    public void test(){
        System.out.println("================");

        memberService.save(new Member());
        System.out.println("================");

        try {
            memberService.delete(1L);
        } catch (Exception e) {
            //e.printStackTrace();
        }

    }
}
测试结果
下面说下xml的简单使用
<beans xmlns="http://www.springframework.org/schema/beans"
       xmlns:aop="http://www.springframework.org/schema/aop"
       xmlns:xsi="http://www.w3.org/2001/XMLSchema-instance"
       xsi:schemaLocation="http://www.springframework.org/schema/beans
                       http://www.springframework.org/schema/beans/spring-beans-4.3.xsd
              http://www.springframework.org/schema/aop
              http://www.springframework.org/schema/aop/spring-aop.xsd">

    <!-- 注解驱动加上这句话 -->
    <!--<aop:aspectj-autoproxy proxy-target-class="true"/>-->

    <bean id="xmlAspect" class="com.stu.aop.aspect.XmlAspect"></bean>
     <!--AOP配置 -->
    <aop:config>
         <!--声明一个切面,并注入切面Bean,相当于@Aspect -->
        <aop:aspect ref="xmlAspect" >
             <!--配置一个切入点,相当于@Pointcut -->
            <aop:pointcut expression="execution(* com.stu.aop.service..*(..))" id="simplePointcut"/>
             <!--配置通知,相当于@Before、@After、@AfterReturn、@Around、@AfterThrowing -->
            <aop:before pointcut-ref="simplePointcut" method="before"/>
            <aop:after pointcut-ref="simplePointcut" method="after"/>
            <aop:after-returning pointcut-ref="simplePointcut" method="afterReturn"/>
            <aop:after-throwing pointcut-ref="simplePointcut" method="afterThrow" throwing="ex"/>
            <aop:around pointcut-ref="simplePointcut"  method="around"/>
        </aop:aspect>
    </aop:config>

</beans>
XmlAspect就是一个切面类,具体实现就不贴出来了
通常情况下,表达式中使用”execution“就可以满足大部分的要求。表达式格式如下:
execution(modifiers-pattern? ret-type-pattern declaring-type-pattern? name-pattern(param-pattern) throws-pattern?
modifiers-pattern:方法的操作权限
ret-type-pattern:返回值
declaring-type-pattern:方法所在的包
name-pattern:方法名
parm-pattern:参数名
throws-pattern:异常
其 中 , 除 ret-type-pattern 和 name-pattern 之 外 , 其 他 都 是 可 选 的 。execution(* com.spring.service.*.*(..))表示 com.spring.service 包下,返回值为任意类型;方法名任意;参数不限制的所有方法。
在上面的 Aspect 切面 Bean 中已经看到了,每个通知方法第一个参数都是 JoinPoint。其实,在 Spring中,任何通知(Advice)方法都可以将第一个参数定义为org.aspectj.lang.JoinPoint 类型用以接受当前连接点对象。JoinPoint 接口提供了一系列有用的方法, 比如 getArgs() (返回方法参数)、getThis() (返回代理对象)、getTarget() (返回目标)、getSignature() (返回正在被通知的方法相关信息)和 toString() (打印出正在被通知的方法的有用信息)。
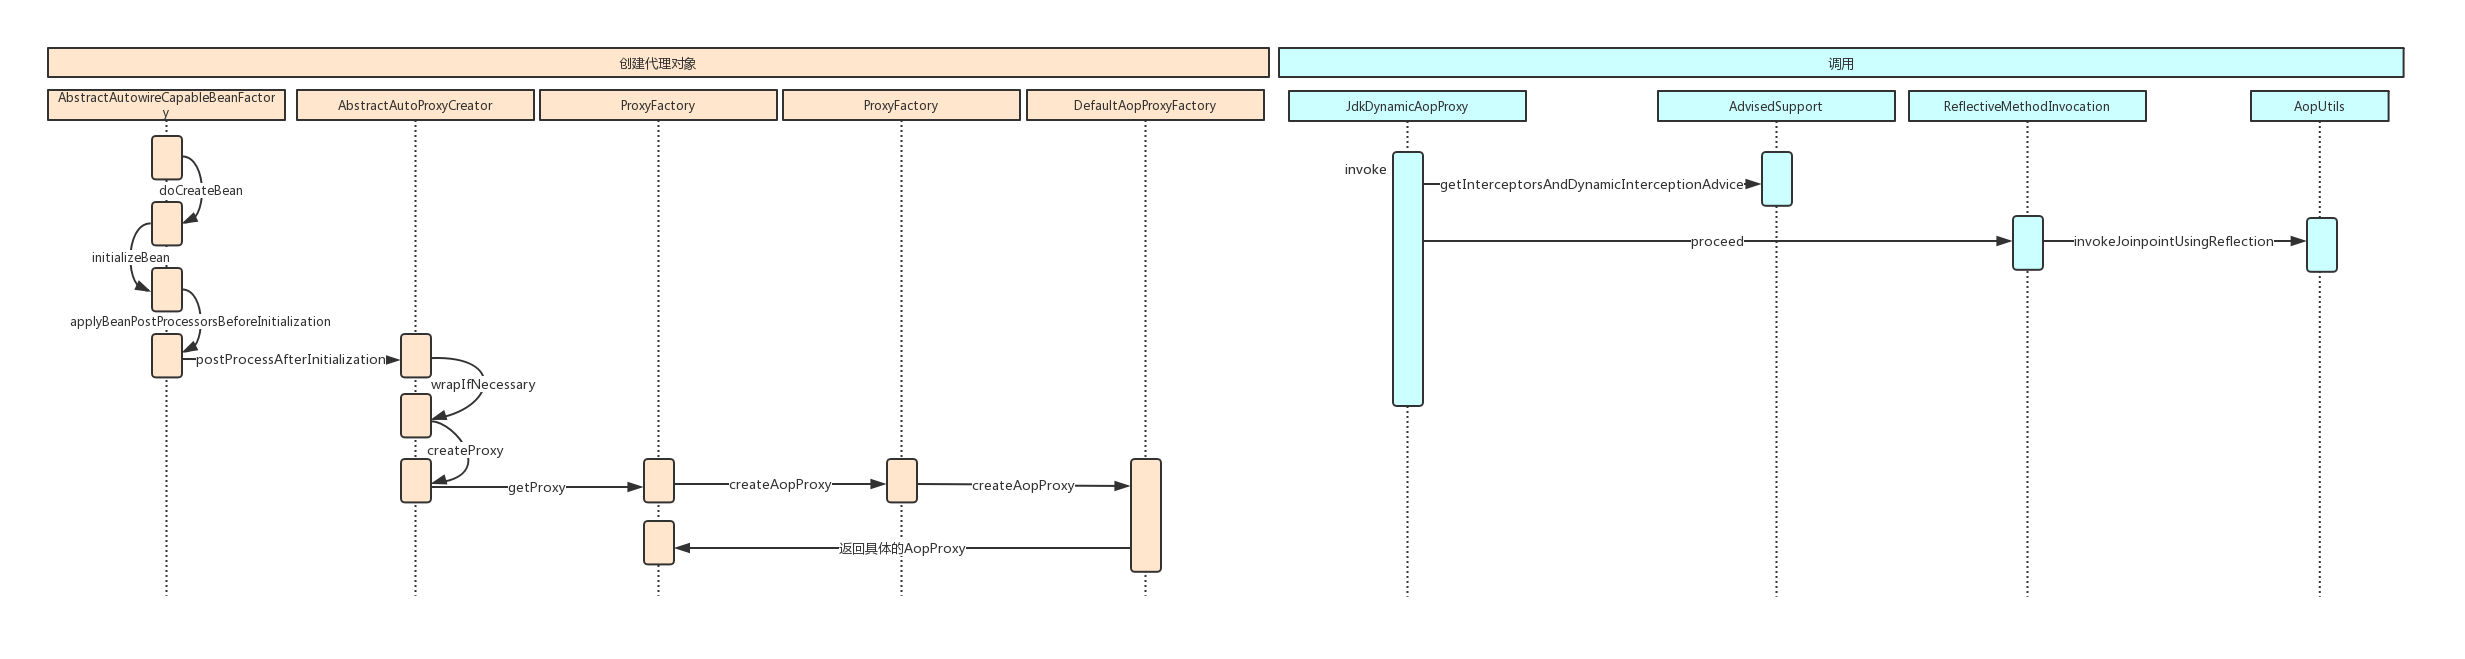
Spring AOP 源码分析
寻找入口
Spring 的 AOP 是通过接入 BeanPostProcessor 后置处理器开始的,它是 Spring IOC 容器经常使用到的一个特性,这个 Bean 后置处理器是一个监听器,可以监听容器触发的 Bean 声明周期事件。后置处
理器向容器注册以后,容器中管理的 Bean 就具备了接收 IOC 容器事件回调的能力。
1、BeanPostProcessor 源码
public interface BeanPostProcessor {

    //为在Bean的初始化前提供回调入口
    @Nullable
    default Object postProcessBeforeInitialization(Object bean, String beanName) throws BeansException {
        return bean;
    }

    //为在Bean的初始化之后提供回调入口
    @Nullable
    default Object postProcessAfterInitialization(Object bean, String beanName) throws BeansException {
        return bean;
    }

}
这两个回调的入口都是和容器管理的 Bean 的生命周期事件紧密相关,可以为用户提供在 Spring IOC容器初始化 Bean 过程中自定义的处理操作。
2、AbstractAutowireCapableBeanFactory 类对容器生成的 Bean 添加后置处理器
BeanPostProcessor 后置处理器的调用发生在 Spring IOC 容器完成对 Bean 实例对象的创建和属性的依赖注入完成之后,在对 Spring 依赖注入的源码分析过程中我们知道,当应用程序第一次调用 getBean()
方法(lazy-init 预实例化除外)向 Spring IOC 容器索取指定 Bean 时触发 Spring IOC 容器创建 Bean 实例 对 象 并 进 行 依 赖 注 入 的 过 程 , 其 中 真 正 实 现 创 建 Bean 对 象 并 进 行 依 赖 注 入 的 方 法 是AbstractAutowireCapableBeanFactory 类的 doCreateBean()方法,主要源码如下:
protected Object doCreateBean(final String beanName, final RootBeanDefinition mbd, final @Nullable Object[] args)
            throws BeanCreationException {

       ....// Initialize the bean instance.
        //Bean对象的初始化,依赖注入在此触发
        //这个exposedObject在初始化完成之后返回作为依赖注入完成后的Bean
        Object exposedObject = bean;
        try {
            //将Bean实例对象封装,并且Bean定义中配置的属性值赋值给实例对象
            populateBean(beanName, mbd, instanceWrapper);
            //初始化Bean对象
            exposedObject = initializeBean(beanName, exposedObject, mbd);
        }
     ....

return exposedObject;
    }
从上面的代码中我们知道,为 Bean 实例对象添加 BeanPostProcessor 后置处理器的入口的是initializeBean()方法。
3、initializeBean()方法为容器产生的 Bean 实例对象添加 BeanPostProcessor 后置处理器
同样在 AbstractAutowireCapableBeanFactory 类中,initializeBean()方法实现为容器创建的 Bean实例对象添加 BeanPostProcessor 后置处理器,源码如下:
//初始容器创建的Bean实例对象,为其添加BeanPostProcessor后置处理器
    protected Object initializeBean(final String beanName, final Object bean, @Nullable RootBeanDefinition mbd) {
        //JDK的安全机制验证权限
        if (System.getSecurityManager() != null) {
            //实现PrivilegedAction接口的匿名内部类
            AccessController.doPrivileged((PrivilegedAction<Object>) () -> {
                invokeAwareMethods(beanName, bean);
                return null;
            }, getAccessControlContext());
        }
        else {
            //为Bean实例对象包装相关属性,如名称,类加载器,所属容器等信息
            invokeAwareMethods(beanName, bean);
        }

        Object wrappedBean = bean;
        //对BeanPostProcessor后置处理器的postProcessBeforeInitialization
        //回调方法的调用,为Bean实例初始化前做一些处理
        if (mbd == null || !mbd.isSynthetic()) {
            wrappedBean = applyBeanPostProcessorsBeforeInitialization(wrappedBean, beanName);
        }

        //调用Bean实例对象初始化的方法,这个初始化方法是在Spring Bean定义配置
        //文件中通过init-method属性指定的
        try {
            invokeInitMethods(beanName, wrappedBean, mbd);
        }
        catch (Throwable ex) {
            throw new BeanCreationException(
                    (mbd != null ? mbd.getResourceDescription() : null),
                    beanName, "Invocation of init method failed", ex);
        }
        //对BeanPostProcessor后置处理器的postProcessAfterInitialization
        //回调方法的调用,为Bean实例初始化之后做一些处理
        if (mbd == null || !mbd.isSynthetic()) {
            wrappedBean = applyBeanPostProcessorsAfterInitialization(wrappedBean, beanName);
        }

        return wrappedBean;
    }

//调用BeanPostProcessor后置处理器实例对象初始化之前的处理方法
    public Object applyBeanPostProcessorsBeforeInitialization(Object existingBean, String beanName)
            throws BeansException {
        Object result = existingBean;
        //遍历容器为所创建的Bean添加的所有BeanPostProcessor后置处理器
        for (BeanPostProcessor beanProcessor : getBeanPostProcessors()) {
            //调用Bean实例所有的后置处理中的初始化前处理方法,为Bean实例对象在
            //初始化之前做一些自定义的处理操作
            Object current = beanProcessor.postProcessBeforeInitialization(result, beanName);
            if (current == null) {
                return result;
            }
            result = current;
        }
        return result;
    }

//调用BeanPostProcessor后置处理器实例对象初始化之后的处理方法
    public Object applyBeanPostProcessorsAfterInitialization(Object existingBean, String beanName)
            throws BeansException {

        Object result = existingBean;
        //遍历容器为所创建的Bean添加的所有BeanPostProcessor后置处理器
        for (BeanPostProcessor beanProcessor : getBeanPostProcessors()) {
            //调用Bean实例所有的后置处理中的初始化后处理方法,为Bean实例对象在
            //初始化之后做一些自定义的处理操作
            Object current = beanProcessor.postProcessAfterInitialization(result, beanName);
            if (current == null) {
                return result;
            }
            result = current;
        }
        return result;
    }
BeanPostProcessor 是一个接口,其初始化前的操作方法和初始化后的操作方法均委托其实现子类来实现,在 Spring 中,BeanPostProcessor 的实现子类非常的多,分别完成不同的操作,如:AOP 面向切面编程的注册通知适配器、Bean 对象的数据校验、Bean 继承属性、方法的合并等等,我们以最简单的AOP 切面织入来简单了解其主要的功能。下面我们来分析其中一个创建 AOP 代理对象的子类AbstractAutoProxyCreator 类。该类重写了 postProcessAfterInitialization()方法。选择代理策略进入 postProcessAfterInitialization()方法,我们发现调到了一个非常核心的方法 wrapIfNecessary(),其源码如下:
@Override
    public Object postProcessAfterInitialization(@Nullable Object bean, String beanName) throws BeansException {
        if (bean != null) {
            Object cacheKey = getCacheKey(bean.getClass(), beanName);
            if (!this.earlyProxyReferences.contains(cacheKey)) {
                return wrapIfNecessary(bean, beanName, cacheKey);
            }
        }
        return bean;
    }

protected Object wrapIfNecessary(Object bean, String beanName, Object cacheKey) {
        if (StringUtils.hasLength(beanName) && this.targetSourcedBeans.contains(beanName)) {
            return bean;
        }
        // 判断是否不应该代理这个 bean
        if (Boolean.FALSE.equals(this.advisedBeans.get(cacheKey))) {
            return bean;
        }
        /**
        * 判断是否是一些 InfrastructureClass 或者是否应该跳过这个 bean。
        * 所谓 InfrastructureClass 就是指 Advice/PointCut/Advisor 等接口的实现类。
        * shouldSkip 默认实现为返回 false,由于是 protected 方法, 子类可以覆盖。
        */
        if (isInfrastructureClass(bean.getClass()) || shouldSkip(bean.getClass(), beanName)) {
            this.advisedBeans.put(cacheKey, Boolean.FALSE);
            return bean;
        }

        // 获取这个 bean 的 advice
        // Create proxy if we have advice.
        Object[] specificInterceptors = getAdvicesAndAdvisorsForBean(bean.getClass(), beanName, null);
        if (specificInterceptors != DO_NOT_PROXY) {
            this.advisedBeans.put(cacheKey, Boolean.TRUE);
            Object proxy = createProxy(
                    bean.getClass(), beanName, specificInterceptors, new SingletonTargetSource(bean));
            this.proxyTypes.put(cacheKey, proxy.getClass());
            return proxy;
        }

        this.advisedBeans.put(cacheKey, Boolean.FALSE);
        return bean;
    }

protected Object createProxy(Class<?> beanClass, @Nullable String beanName,
            @Nullable Object[] specificInterceptors, TargetSource targetSource) {

        if (this.beanFactory instanceof ConfigurableListableBeanFactory) {
            AutoProxyUtils.exposeTargetClass((ConfigurableListableBeanFactory) this.beanFactory, beanName, beanClass);
        }

        ProxyFactory proxyFactory = new ProxyFactory();
        proxyFactory.copyFrom(this);

        if (!proxyFactory.isProxyTargetClass()) {
            if (shouldProxyTargetClass(beanClass, beanName)) {
                proxyFactory.setProxyTargetClass(true);
            }
            else {
                evaluateProxyInterfaces(beanClass, proxyFactory);
            }
        }

        Advisor[] advisors = buildAdvisors(beanName, specificInterceptors);
        proxyFactory.addAdvisors(advisors);
        proxyFactory.setTargetSource(targetSource);
        customizeProxyFactory(proxyFactory);

        proxyFactory.setFrozen(this.freezeProxy);
        if (advisorsPreFiltered()) {
            proxyFactory.setPreFiltered(true);
        }

        return proxyFactory.getProxy(getProxyClassLoader());
    }
整个过程跟下来,我发现最终调用的是 proxyFactory.getProxy()方法。到这里我们大概能够猜到proxyFactory 有 JDK 和 CGLib 的,那么我们该如何选择呢?最终调用的是 DefaultAopProxyFactory
的 createAopProxy()方法:
public AopProxy createAopProxy(AdvisedSupport config) throws AopConfigException {
        if (config.isOptimize() || config.isProxyTargetClass() || hasNoUserSuppliedProxyInterfaces(config)) {
            Class<?> targetClass = config.getTargetClass();
            if (targetClass == null) {
                throw new AopConfigException("TargetSource cannot determine target class: " +
                        "Either an interface or a target is required for proxy creation.");
            }
            if (targetClass.isInterface() || Proxy.isProxyClass(targetClass)) {
                return new JdkDynamicAopProxy(config);
            }
            return new ObjenesisCglibAopProxy(config);
        }
        else {
            return new JdkDynamicAopProxy(config);
        }
    }
上面我们已经了解到 Spring 提供了两种方式来生成代理方式有 JDKProxy 和 CGLib。下面我们来研究一下 Spring 如何使用 JDK 来生成代理对象,具体的生成代码放在 JdkDynamicAopProxy 这个类中,
直接上相关代码:
@Override
    public Object getProxy(@Nullable ClassLoader classLoader) {
        if (logger.isDebugEnabled()) {
            logger.debug("Creating JDK dynamic proxy: target source is " + this.advised.getTargetSource());
        }
        Class<?>[] proxiedInterfaces = AopProxyUtils.completeProxiedInterfaces(this.advised, true);
        findDefinedEqualsAndHashCodeMethods(proxiedInterfaces);
        return Proxy.newProxyInstance(classLoader, proxiedInterfaces, this);
    }
通过注释我们应该已经看得非常明白代理对象的生成过程,此处不再赘述。下面的问题是,代理对象生成了,那切面是如何织入的?我们知道 InvocationHandler 是 JDK 动态代理的核心,生成的代理对象的方法调用都会委托到InvocationHandler.invoke()方法。而从 JdkDynamicAopProxy 的源码我们可以看到这个类其实也实现了 InvocationHandler,下面我们分析 Spring AOP 是如何织入切面的,直接上源码看 invoke()方法:
public Object invoke(Object proxy, Method method, Object[] args) throws Throwable {
        MethodInvocation invocation;
        Object oldProxy = null;
        boolean setProxyContext = false;

        TargetSource targetSource = this.advised.targetSource;
        Object target = null;

        try {
            //eqauls()方法,具目标对象未实现此方法
            if (!this.equalsDefined && AopUtils.isEqualsMethod(method)) {
                // The target does not implement the equals(Object) method itself.
                return equals(args[0]);
            }
            //hashCode()方法,具目标对象未实现此方法
            else if (!this.hashCodeDefined && AopUtils.isHashCodeMethod(method)) {
                // The target does not implement the hashCode() method itself.
                return hashCode();
            }
            else if (method.getDeclaringClass() == DecoratingProxy.class) {
                // There is only getDecoratedClass() declared -> dispatch to proxy config.
                return AopProxyUtils.ultimateTargetClass(this.advised);
            }
            //Advised接口或者其父接口中定义的方法,直接反射调用,不应用通知
            else if (!this.advised.opaque && method.getDeclaringClass().isInterface() &&
                    method.getDeclaringClass().isAssignableFrom(Advised.class)) {
                // Service invocations on ProxyConfig with the proxy config...
                return AopUtils.invokeJoinpointUsingReflection(this.advised, method, args);
            }

            Object retVal;

            if (this.advised.exposeProxy) {
                // Make invocation available if necessary.
                oldProxy = AopContext.setCurrentProxy(proxy);
                setProxyContext = true;
            }

            // Get as late as possible to minimize the time we "own" the target,
            // in case it comes from a pool.
            //获得目标对象的类
            target = targetSource.getTarget();
            Class<?> targetClass = (target != null ? target.getClass() : null);

            // Get the interception chain for this method.
            //获取可以应用到此方法上的Interceptor列表
            List<Object> chain = this.advised.getInterceptorsAndDynamicInterceptionAdvice(method, targetClass);

            // Check whether we have any advice. If we don't, we can fallback on direct
            // reflective invocation of the target, and avoid creating a MethodInvocation.
            //如果没有可以应用到此方法的通知(Interceptor),此直接反射调用 method.invoke(target, args)
            if (chain.isEmpty()) {
                // We can skip creating a MethodInvocation: just invoke the target directly
                // Note that the final invoker must be an InvokerInterceptor so we know it does
                // nothing but a reflective operation on the target, and no hot swapping or fancy proxying.
                Object[] argsToUse = AopProxyUtils.adaptArgumentsIfNecessary(method, args);
                retVal = AopUtils.invokeJoinpointUsingReflection(target, method, argsToUse);
            }
            else {
                // We need to create a method invocation...
                //创建MethodInvocation
                invocation = new ReflectiveMethodInvocation(proxy, target, method, args, targetClass, chain);
                // Proceed to the joinpoint through the interceptor chain.
                retVal = invocation.proceed();
            }

            // Massage return value if necessary.
            Class<?> returnType = method.getReturnType();
            if (retVal != null && retVal == target &&
                    returnType != Object.class && returnType.isInstance(proxy) &&
                    !RawTargetAccess.class.isAssignableFrom(method.getDeclaringClass())) {
                // Special case: it returned "this" and the return type of the method
                // is type-compatible. Note that we can't help if the target sets
                // a reference to itself in another returned object.
                retVal = proxy;
            }
            else if (retVal == null && returnType != Void.TYPE && returnType.isPrimitive()) {
                throw new AopInvocationException(
                        "Null return value from advice does not match primitive return type for: " + method);
            }
            return retVal;
        }
        finally {
            if (target != null && !targetSource.isStatic()) {
                // Must have come from TargetSource.
                targetSource.releaseTarget(target);
            }
            if (setProxyContext) {
                // Restore old proxy.
                AopContext.setCurrentProxy(oldProxy);
            }
        }
    }
主要实现思路可以简述为:首先获取应用到此方法上的通知链(Interceptor Chain)。如果有通知,应用通知,并执行 JoinPoint;如果没有通知,则直接反射执行 JoinPoint。而这里的关键是通知链是如
何获取的以及它又是如何执行的呢?现在来逐一分析。首先,从上面的代码可以看到,Advised.getInterceptorsAndDynamicInterceptionAdvice()这个方法来获取的,的实现逻辑:
public List<Object> getInterceptorsAndDynamicInterceptionAdvice(Method method, @Nullable Class<?> targetClass) {
        MethodCacheKey cacheKey = new MethodCacheKey(method);
        List<Object> cached = this.methodCache.get(cacheKey);
        if (cached == null) {
            cached = this.advisorChainFactory.getInterceptorsAndDynamicInterceptionAdvice(
                    this, method, targetClass);
            this.methodCache.put(cacheKey, cached);
        }
        return cached;
    }
这个方法执行完成后,Advised 中配置能够应用到连接点(JoinPoint)或者目标类(Target Object)的 Advisor 全部被转化成了 MethodInterceptor,接下来我们再看下得到的拦截器链是怎么起作用的
        //如果没有可以应用到此方法的通知(Interceptor),此直接反射调用 method.invoke(target, args)
            if (chain.isEmpty()) {
                // We can skip creating a MethodInvocation: just invoke the target directly
                // Note that the final invoker must be an InvokerInterceptor so we know it does
                // nothing but a reflective operation on the target, and no hot swapping or fancy proxying.
                Object[] argsToUse = AopProxyUtils.adaptArgumentsIfNecessary(method, args);
                retVal = AopUtils.invokeJoinpointUsingReflection(target, method, argsToUse);
            }
            else {
                // We need to create a method invocation...
                //创建MethodInvocation
                invocation = new ReflectiveMethodInvocation(proxy, target, method, args, targetClass, chain);
                // Proceed to the joinpoint through the interceptor chain.
                retVal = invocation.proceed();
            }
从这 段 代 码 可 以 看 出 , 如 果 得 到 的 拦 截 器 链 为 空 , 则 直 接 反 射 调 用 目 标 方 法 , 否 则 创 建MethodInvocation,调用其 proceed()方法,触发拦截器链的执行,来看下具体代码:
public Object proceed() throws Throwable {
        //    We start with an index of -1 and increment early.
        //如果Interceptor执行完了,则执行joinPoint
        if (this.currentInterceptorIndex == this.interceptorsAndDynamicMethodMatchers.size() - 1) {
            return invokeJoinpoint();
        }

        Object interceptorOrInterceptionAdvice =
                this.interceptorsAndDynamicMethodMatchers.get(++this.currentInterceptorIndex);
        //如果要动态匹配joinPoint
        if (interceptorOrInterceptionAdvice instanceof InterceptorAndDynamicMethodMatcher) {
            // Evaluate dynamic method matcher here: static part will already have
            // been evaluated and found to match.
            InterceptorAndDynamicMethodMatcher dm =
                    (InterceptorAndDynamicMethodMatcher) interceptorOrInterceptionAdvice;
            //动态匹配:运行时参数是否满足匹配条件
            if (dm.methodMatcher.matches(this.method, this.targetClass, this.arguments)) {
                return dm.interceptor.invoke(this);
            }
            else {
                // Dynamic matching failed.
                // Skip this interceptor and invoke the next in the chain.
                //动态匹配失败时,略过当前Intercetpor,调用下一个Interceptor
                return proceed();
            }
        }
        else {
            // It's an interceptor, so we just invoke it: The pointcut will have
            // been evaluated statically before this object was constructed.
            //执行当前Intercetpor
            return ((MethodInterceptor) interceptorOrInterceptionAdvice).invoke(this);
        }
    }
至此,通知链就完美地形成了。我们再往下来看 invokeJoinpointUsingReflection()方法,其实就是反射调用:
public static Object invokeJoinpointUsingReflection(@Nullable Object target, Method method, Object[] args)
            throws Throwable {

        // Use reflection to invoke the method.
        try {
            ReflectionUtils.makeAccessible(method);
            return method.invoke(target, args);
        }
        catch (InvocationTargetException ex) {
            // Invoked method threw a checked exception.
            // We must rethrow it. The client won't see the interceptor.
            throw ex.getTargetException();
        }
        catch (IllegalArgumentException ex) {
            throw new AopInvocationException("AOP configuration seems to be invalid: tried calling method [" +
                    method + "] on target [" + target + "]", ex);
        }
        catch (IllegalAccessException ex) {
            throw new AopInvocationException("Could not access method [" + method + "]", ex);
        }
    }
Spring AOP运行时序图