编写views
views:作为MVC中的C,接收用户的输入,调用数据库Model层和业务逻辑Model层,处理后将处理结果渲染到V层中去。
polls/views.py:
from django.http import HttpResponse

# Create your views here.
def index(request):
    return HttpResponse("Hello, world. You're at the polls index.")
编写urls
urls,程序的入口,支持正则匹配访问url,将访问url映射到views中的具体某个函数中。
为了能调用到上面这个views,我们需要将views.index函数映射到URL中。
我们可以创建一个urls.py 在App目录下。
polls/urls.py:
#!/usr/bin/python
# coding=utf-8

from django.conf.urls import url
from . import views

urlpatterns = [
    url(r'^$', views.index, name='index'),
]
下一步,我们需要将创建的urls.py 添加到全局urls.py中,如
mysite/urls.py:
from django.conf.urls import url, include
from django.contrib import admin

urlpatterns = [
    url(r'^polls/', include('polls.urls')),
    url(r'^admin/', admin.site.urls),
]
此时,可以通过访问 http://localhost:8000/polls/ 可以调用到所编写的views

编写models
models与数据库操作相关,是django处理数据库的一个特色之处,它包含你的数据库基本字段与数据。通过一系列封装的api可以直接操作数据库。当然,也支持原生sql。
既然models与数据库相关,那么首先需要配置数据库
1、数据库设置,mysite/settings.py:
这里默认使用内置的sqlite3,配置如下:
DATABASES = {
    'default': {
        'ENGINE': 'django.db.backends.sqlite3',
        'NAME': os.path.join(BASE_DIR, 'db.sqlite3'),
    }
}
如果想要改为MYSQL,配置修改如下:
DATABASES = {
    'default': {
        'ENGINE': 'django.db.backends.mysql',
        'NAME': MYSQL_DB,
        'USER': MYSQL_USER,
        'PASSWORD': MYSQL_PASS,
        'HOST': MYSQL_HOST_M,
        'PORT': MYSQL_PORT,
    }
}
2、初始化数据库数据
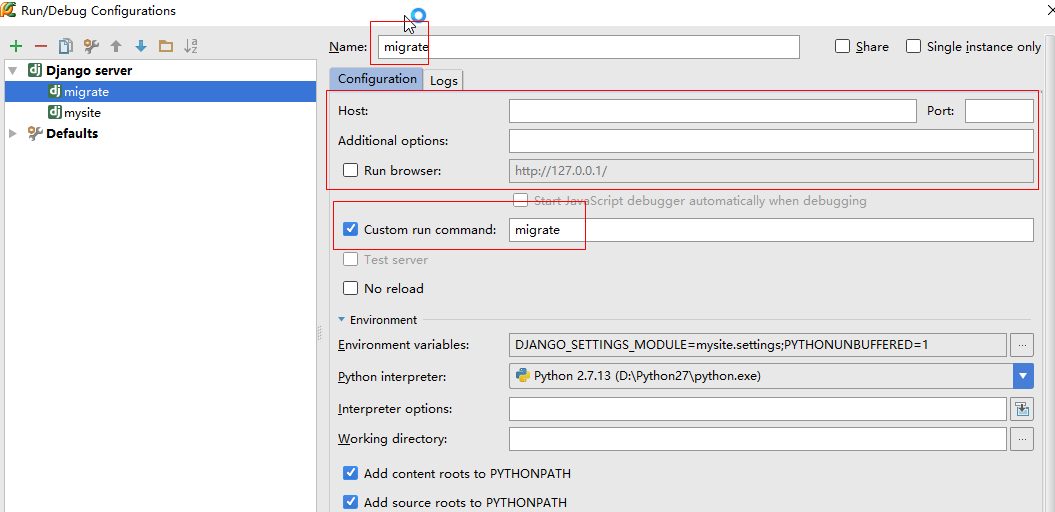
在pycharm中,首次使用django相关命令,需要做一些配置。如

配置 python manage.py migrate

配置好后便可运行,运行结果如:
$ python manage.py migrate
Operations to perform:
  Apply all migrations: admin, auth, contenttypes, sessions
Running migrations:
  Applying contenttypes.0001_initial... OK
  Applying auth.0001_initial... OK
  Applying admin.0001_initial... OK
  Applying admin.0002_logentry_remove_auto_add... OK
  Applying contenttypes.0002_remove_content_type_name... OK
  Applying auth.0002_alter_permission_name_max_length... OK
  Applying auth.0003_alter_user_email_max_length... OK
  Applying auth.0004_alter_user_username_opts... OK
  Applying auth.0005_alter_user_last_login_null... OK
  Applying auth.0006_require_contenttypes_0002... OK
  Applying auth.0007_alter_validators_add_error_messages... OK
  Applying auth.0008_alter_user_username_max_length... OK
  Applying sessions.0001_initial... OK
3、创建models
在本实例中,创建两个models:Questions 和 Choice.
polls/models.py:
from __future__ import unicode_literals

from django.db import models


# Create your models here.

class Question(models.Model):
    question_text = models.CharField(max_length=200)
    pub_date = models.DateTimeField('date published')


class Choice(models.Model):
    question = models.ForeignKey(Question, on_delete=models.CASCADE)
    choice_text = models.CharField(max_length=200)
    votes = models.IntegerField(default=0)
4、激活models
将app包含到project中,我们需要将它的配置类注册到全局配置中的 INSTALLED_APPS 中。它的配置类 PollsConfig 在 polls/apps.py 中,所以它的路径为'polls.apps.PollsConfig'
编辑mysite/settings.py:
INSTALLED_APPS = [
    'polls.apps.PollsConfig',
    'django.contrib.admin',
    'django.contrib.auth',
    'django.contrib.contenttypes',
    'django.contrib.sessions',
    'django.contrib.messages',
    'django.contrib.staticfiles',
]
现在,django已经知道包含了polls app。此时,我们需要告诉django,models已经更改。to create migrations for those changes
$ python manage.py makemigrations polls
makemigrations 命令将会生成一些更新sql语句,同样的,为了在pycharm中容易使用,将其配置如:

运行后,控制台输出如:

然后,重新运行 python manage.py migrate,将会在数据库中创建这些models表。to apply those changes to the database.
$ python manage.py migrate

注意,每次更改models,都必须重新分别执行
$ python manage.py makemigrations
$ python manage.py migrate
增强models
polls/models.py:
from django.db import models
from django.utils.encoding import python_2_unicode_compatible
import datetime
from django.utils import timezone

# Create your models here.

@python_2_unicode_compatible  # only if you need to support Python 2
class Question(models.Model):
    question_text = models.CharField(max_length=200)
    pub_date = models.DateTimeField('date published')

    def was_published_recently(self):
        return self.pub_date >= timezone.now() - datetime.timedelta(days=1)

    def __str__(self):
        return self.question_text

@python_2_unicode_compatible  # only if you need to support Python 2
class Choice(models.Model):
    question = models.ForeignKey(Question, on_delete=models.CASCADE)
    choice_text = models.CharField(max_length=200)
    votes = models.IntegerField(default=0)

    def __str__(self):
        return self.choice_text
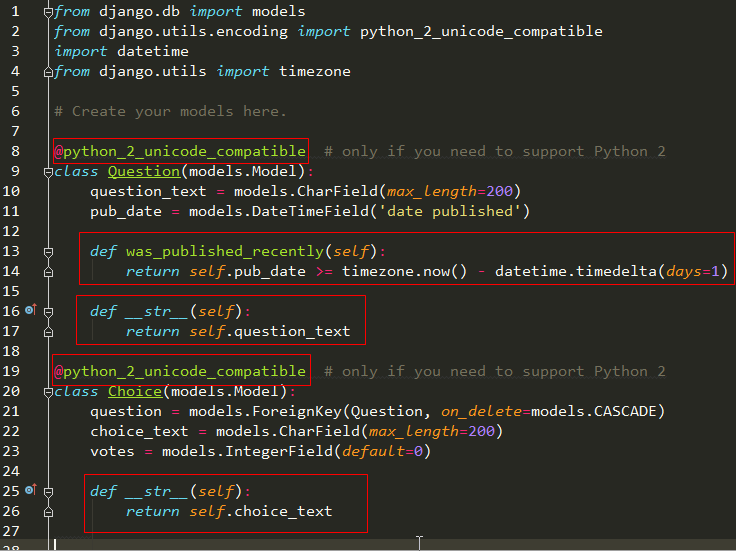
修改位置:

通过Database API操作数据
进入django shell 环境:
$ python manage.py shell
执行database API:
>>> from polls.models import Question, Choice   # Import the model classes we just wrote.

# No questions are in the system yet.
>>> Question.objects.all()
<QuerySet []>

# Create a new Question.
# Support for time zones is enabled in the default settings file, so
# Django expects a datetime with tzinfo for pub_date. Use timezone.now()
# instead of datetime.datetime.now() and it will do the right thing.
>>> from django.utils import timezone
>>> q = Question(question_text="What's new?", pub_date=timezone.now())

# Save the object into the database. You have to call save() explicitly.
>>> q.save()

# Now it has an ID. Note that this might say "1L" instead of "1", depending
# on which database you're using. That's no biggie; it just means your
# database backend prefers to return integers as Python long integer
# objects.
>>> q.id
1

# Access model field values via Python attributes.
>>> q.question_text
"What's new?"
>>> q.pub_date
datetime.datetime(2012, 2, 26, 13, 0, 0, 775217, tzinfo=<UTC>)

# Change values by changing the attributes, then calling save().
>>> q.question_text = "What's up?"
>>> q.save()

# objects.all() displays all the questions in the database.
# Make sure our __str__() addition worked.
>>> Question.objects.all()
<QuerySet [<Question: What's up?>]>

# Django provides a rich database lookup API that's entirely driven by
# keyword arguments.
>>> Question.objects.filter(id=1)
<QuerySet [<Question: What's up?>]>
>>> Question.objects.filter(question_text__startswith='What')
<QuerySet [<Question: What's up?>]>

# Get the question that was published this year.
>>> from django.utils import timezone
>>> current_year = timezone.now().year
>>> Question.objects.get(pub_date__year=current_year)
<Question: What's up?>

# Request an ID that doesn't exist, this will raise an exception.
>>> Question.objects.get(id=2)
Traceback (most recent call last):
    ...
DoesNotExist: Question matching query does not exist.

# Lookup by a primary key is the most common case, so Django provides a
# shortcut for primary-key exact lookups.
# The following is identical to Question.objects.get(id=1).
>>> Question.objects.get(pk=1)
<Question: What's up?>

# Make sure our custom method worked.
>>> q = Question.objects.get(pk=1)
>>> q.was_published_recently()
True

# Give the Question a couple of Choices. The create call constructs a new
# Choice object, does the INSERT statement, adds the choice to the set
# of available choices and returns the new Choice object. Django creates
# a set to hold the "other side" of a ForeignKey relation
# (e.g. a question's choice) which can be accessed via the API.
>>> q = Question.objects.get(pk=1)

# Display any choices from the related object set -- none so far.
>>> q.choice_set.all()
<QuerySet []>

# Create three choices.
>>> q.choice_set.create(choice_text='Not much', votes=0)
<Choice: Not much>
>>> q.choice_set.create(choice_text='The sky', votes=0)
<Choice: The sky>
>>> c = q.choice_set.create(choice_text='Just hacking again', votes=0)

# Choice objects have API access to their related Question objects.
>>> c.question
<Question: What's up?>

# And vice versa: Question objects get access to Choice objects.
>>> q.choice_set.all()
<QuerySet [<Choice: Not much>, <Choice: The sky>, <Choice: Just hacking again>]>
>>> q.choice_set.count()
3

# The API automatically follows relationships as far as you need.
# Use double underscores to separate relationships.
# This works as many levels deep as you want; there's no limit.
# Find all Choices for any question whose pub_date is in this year
# (reusing the 'current_year' variable we created above).
>>> Choice.objects.filter(question__pub_date__year=current_year)
<QuerySet [<Choice: Not much>, <Choice: The sky>, <Choice: Just hacking again>]>

# Let's delete one of the choices. Use delete() for that.
>>> c = q.choice_set.filter(choice_text__startswith='Just hacking')
>>> c.delete()