1、项目开发准备
Go版本:1.16.2

开发工具:GoLand

使用框架:Gin

ORM框架:GORM

数据库:MySQL
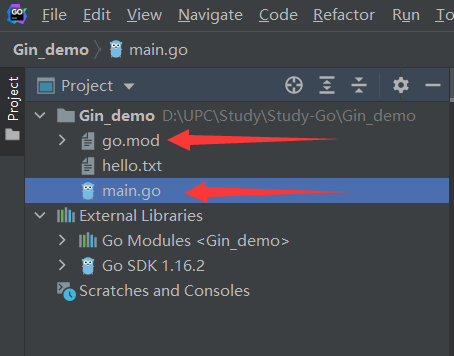
2、项目结构

3、项目环境准备:Gin和GORM
1、开启GO111MODULE并修改Go代理(用下面两个命令把下图中标出的两个地方修改成跟我一样的配置)
go env -w GO111MODULE=on
go env -w GOPROXY=https://goproxy.cn,direct(修改这个是因为原有的谷歌代理在国内不行)
2、安装Gin(在GoLand工具命令行下执行以下命令)
go get -u github.com/gin-gonic/gingo get -u gorm.io/gorm
【注意:这一步执行完后,它会自动在go.mod文件中引入响应的依赖】
3、安装Gorm
4、安装mysql数据库驱动
go get -u gorm.io/driver/mysql

4、项目源码
//go.mod文件源码

module Gin_demo

go 1.16

//通过命令【go get -u github.com/gin-gonic/gin】安装gin框架
//引入gin框架后,会自动在这里引入依赖
require (
    github.com/gin-gonic/gin v1.7.2 // indirect
    github.com/go-playground/validator/v10 v10.6.1 // indirect
    github.com/golang/protobuf v1.5.2 // indirect
    github.com/json-iterator/go v1.1.11 // indirect
    github.com/leodido/go-urn v1.2.1 // indirect
    github.com/modern-go/concurrent v0.0.0-20180306012644-bacd9c7ef1dd
    github.com/modern-go/reflect2 v1.0.1 // indirect
    github.com/ugorji/go v1.2.6 // indirect
    golang.org/x/crypto v0.0.0-20210513164829-c07d793c2f9a // indirect
    golang.org/x/sys v0.0.0-20210521203332-0cec03c779c1 // indirect
    golang.org/x/text v0.3.6 // indirect
    gopkg.in/yaml.v2 v2.4.0 // indirect
    gorm.io/driver/mysql v1.1.0 // indirect
    gorm.io/gorm v1.21.10 // indirect
)
main.go 文件源码
package main

import (
    "fmt"
    "github.com/gin-gonic/gin"
    "gorm.io/driver/mysql"
    "gorm.io/gorm"
    "io/ioutil"
    "log"
    "math/rand"
    "net/http"
    "time"
)
//此方法在该项目中未用,不用管
func sayHello(w http.ResponseWriter, r *http.Request) {
    b, _ := ioutil.ReadFile("./hello.txt")
    _, _ = fmt.Fprintln(w, string(b))
}

type User struct {
    gorm.Model
    //'gorm:"type:varchar(20);not null"'
    Name     string
    Phone    string
    Password string
}

func main() {
    db := InitDB()
    //传统的Web服务写法
    //http.HandleFunc("/hello", sayHello)
    //err := http.ListenAndServe(":9090", nil)
    //if err != nil {
    //    fmt.Printf("http server faile,err:%v
", err)
    //    return
    //}
    //fmt.Println("项目启动成功")

    //利用Gin框架的web写法,来源于gin官网
    r := gin.Default()
    r.POST("/api/auth/register", func(c *gin.Context) {
        //获取参数
        name := c.PostForm("name")
        phone := c.PostForm("phone")
        password := c.PostForm("password")
        //数据验证
        if len(phone) != 11 {
            c.JSON(http.StatusUnprocessableEntity, gin.H{"code": 422,
        "msg": "手机号格式不正确"})
            return
        }

        if len(password) < 6 {
            c.JSON(http.StatusUnprocessableEntity, gin.H{"code": 422,
        "msg": "密码不能少于6位"})
            return
        }
        if len(name) == 0 {
            name = RandomString(10)
            return
        }
        log.Print(name, phone, password)

        //判断手机号是否存在
        if isPhoneExist(db, phone) {
            c.JSON(http.StatusUnprocessableEntity, gin.H{"code": 422,
        "msg": "用户已存在,不能注册"})
            return
        }

        //创建新用户
        newUser := User{
            Name:     name,
            Phone:    phone,
            Password: password,
        }
        db.Create(&newUser)

        //返回结果
        c.JSON(200, gin.H{
            "message": "注册成功",
        })
    })
    _ = r.Run() // listen and serve on 0.0.0.0:8080
    panic(r.Run())

}
func isPhoneExist(db *gorm.DB, phone string) bool {
    var user User
    db.Where("phone = ?", phone).First(&user)
    if user.ID != 0 {
        return true
    }
    return false
}

//随机产生英文字符,可设定长度
func RandomString(n int) string {
    var letters =[]byte("asdfghjklzxcvbnmqwertyuiopASDFGHJKLZXCVBNMQWERTYUIOP")
    result := make([]byte, n)

    rand.Seed(time.Now().Unix())
    for i := range result {
        result[i] = letters[rand.Intn(len(letters))]

    }

    return string(result)
}

func InitDB() *gorm.DB {
    //前提是你要先在本机用Navicat创建一个名为go_db的数据库
    host := "localhost"
    port := "3306"
    database := "go_db"
    username := "root"
    password := "123456"
    charset := "utf8"
    dsn := fmt.Sprintf("%s:%s@tcp(%s:%s)/%s?charset=%s&parseTime=true",
        username,
        password,
        host,
        port,
        database,
        charset)
    //这里 gorm.Open()函数与之前版本的不一样,大家注意查看官方最新gorm版本的用法
    db, err := gorm.Open(mysql.Open(dsn), &gorm.Config{})
    if err != nil {
        panic("Error to Db connection, err: " + err.Error())
    }
    //这个是gorm自动创建数据表的函数。它会自动在数据库中创建一个名为users的数据表
    _ = db.AutoMigrate(&User{})
    return db
}
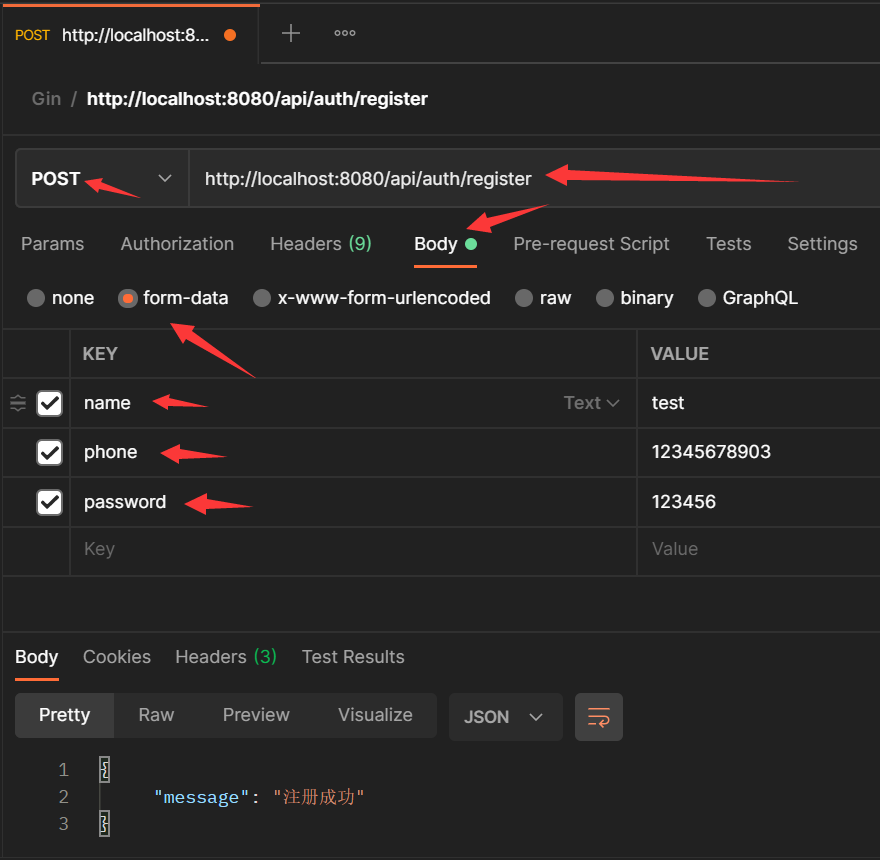
5、用Postman测试接口,按照代码中的参数传入测试

《全文完》
有不懂的小伙伴欢迎留言交流!