作者:Grey
原文地址:ZooKeeper学习笔记三:使用ZooKeeper实现一个简单的配置中心
前置知识
完成ZooKeeper集群搭建以及熟悉ZooKeeperAPI基本使用
需求
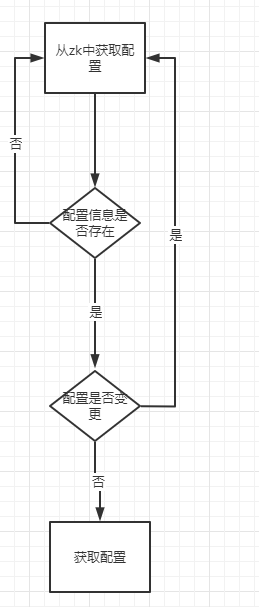
很多程序往往是通过心跳检测来判断配置的变更,通过zk的回调机制,我们可以实现比心跳更为快速的配置检测机制,包括配置的新增,修改和删除
流程也比较简单:
环境准备
一个zk集权,ip和端口分别为:
- 192.168.205.145:2181
- 192.168.205.146:2181
- 192.168.205.147:2181
- 192.168.205.148:2181
定义主方法
App.java
public class App {
    public static void main(String[] args) {
		// 需要监控的路径是/AppConf
        String path = "/AppConf";
        while (true) {
            ConfigCenter configCenter = new ConfigCenter(path);
            String conf = configCenter.getConf();
			// 配置不为空则拿到最新的配置
            if (null != conf && !conf.trim().isEmpty()) {
                System.out.println(conf);
            }
			// 睡眠一段时间
            pending(1000);
        }
    }
}
zk初始化工具类
参考ZooKeeperAPI基本使用中的ZookeeperConfig类,主要的方法为:
public class ZookeeperConfig {
    private static final String ADDRESS = "192.168.205.145:2181,192.168.205.146:2181,192.168.205.147:2181,192.168.205.148:2181";
    private static ZooKeeper zk;
    static CountDownLatch latch;
	// 获取一个zk客户端
    public static ZooKeeper create() {
        latch = new CountDownLatch(1);
        try {
            zk = new ZooKeeper(ADDRESS, 3000, new DefaultWatch());
            latch.await();
        } catch (IOException | InterruptedException e) {
            e.printStackTrace();
        }
        return zk;
    }
...
}
实现配置中心逻辑
配置中心的入口方法为:getConf()
public String getConf() {
        aWait();
        return value;
}
其中aWait()方法用于监听配置信息的变动(比如修改,删除,增加),并且通过CountDownLatch阻塞运行,zk一旦监听到配置信息的变动,即会触发回调,并执行countDown(),这样前面的CountDownLatch即可往下运行:
 public void aWait() {
        zk.exists(conf, this, this, "dasdfa");
        try {
            latch.await();
        } catch (InterruptedException e) {
            e.printStackTrace();
        }
    }
ConfigCenter类实现了Watcher, AsyncCallback.StatCallback, AsyncCallback.DataCallback三个接口,所以监听方法和回调方法都在ConfigCenter中实现,其中,监听方法:
 @Override
    public void process(WatchedEvent event) {

        Event.EventType type = event.getType();
        switch (type) {
            case None:
                break;
            case NodeCreated:
                System.out.println("node created");
                zk.getData(conf, this, this, "node created");
                latch.countDown();
                break;
            case NodeDeleted:
                try {
                    System.out.println("config deleted");
                    this.value = "";
                    latch = new CountDownLatch(1);
                } catch (Exception e) {
                    e.printStackTrace();
                }
                break;
            case NodeDataChanged:
                System.out.println("node changed");
                zk.getData(conf, this, this, "node changed");
                latch.countDown();
                break;
            case NodeChildrenChanged:
                break;
            case DataWatchRemoved:
                break;
            case ChildWatchRemoved:
                break;
            case PersistentWatchRemoved:
                break;
        }
    }
如上,当监听到节点创建和修改的时候,触发getData,当监听到节点删除的时候,重新初始化CountDownLatch,让线程阻塞。
回调方法如下:
@Override
    public void processResult(int rc, String path, Object ctx, Stat stat) {
        if (stat != null) {
            zk.getData(conf, this, this, "getData");
        }
    }

    @Override
    public void processResult(int rc, String path, Object ctx, byte[] data, Stat stat) {
        if (data != null) {
            this.value = new String(data);
            latch.countDown();
        }
    }
方法1表示,当节点存在(stat!=null)的时候,获取一次数据(重新注册监听)。
方法2表示,当节点数据存在的时候,将节点数据取出,并且countDown(),解除阻塞。
运行效果
先把zk中的/AppConf节点删除,执行App.java,程序阻塞
通过zkCli.sh连接任意zk服务端,创建一个/AppConf节点,并赋值
[zk: localhost:2181(CONNECTED) 58] create /AppConf "hello"
Created /AppConf
控制台同时打印出:
node created
hello
hello
hello
hello
hello
hello
hello
hello
继续通过zkCli重新设置/AppConf节点的值
[zk: localhost:2181(CONNECTED) 59] set /AppConf "world"
[zk: localhost:2181(CONNECTED) 60]
配置信息立马生效,控制台打印
...
hello
hello
node changed
world
world
world
...
通过zkCli.sh删除/AppConf节点,控制台阻塞运行,并打印
config deleted
通过zkCli.sh重新创建/AppConf节点,
[zk: localhost:2181(CONNECTED) 61] create /AppConf "hello2"
Created /AppConf
控制台立即解除阻塞,并打印
config deleted
node created
hello2
hello2
..