一. 响应式系统升级
1. Vue.js 2.x 中响应式系统的核心是 Object.definePropertry
2. Vue.js 3.x 中使用 Proxy 对象重写响应式系统
- 可以一次性监听所有属性
- 可以监听动态新增的属性
- 可以监听删除的属性
- 可以监听数组的索引和length属性
详细解释:
Object.defineProperty Vs Proxy
1. Object.defineProperty 无法一次性监听所有属性, Proxy 可以
const personInfo = {
  name: 'zhangsan',
  age: 18,
  sex: '男'
}
const proxy = new Proxy(personInfo, {
  get(target, key) { },
  set(target, key, newValue) { }
})

Object.keys(personInfo).forEach(key => {
  Object.defineProperty(personInfo, key, {
    set() { },
    get() { }
  })
})
2. Object.defineProperty 无法监听动态新增的属性, Proxy 可以
const personInfo = {
  name: 'zhangsan',
  age: 18,
  sex: '男'
}

const proxy = new Proxy(personInfo, {
  get(target, key) {
    console.log('get', key)
  },
  set(target, key, newValue) {
    target[key] = newValue
    return true
  }
})
Object.keys(personInfo).forEach(key => {
  Object.defineProperty(personInfo, key, {
    set() { },
    get() { }
  })
})
personInfo.from = '上海'

console.log(proxy) // Proxy 生效 Object.defineProperty 不生效
3. 可以监听删除的属性?
const personInfo = {
  name: 'zhangsan',
  age: 18,
  sex: '男'
}

const proxy = new Proxy(personInfo, {
  get(target, key) {
    console.log('get', key)
  },
  set(target, key, newValue) {
    target[key] = newValue
    return true
  }
})

Object.keys(personInfo).forEach(key => {
  Object.defineProperty(personInfo, key, {
    set() { },
    get() { }
  })
})

delete personInfo.age
console.log(personInfo) // proxy 生效 Object.defineProperty不生效
4. 可以监听数组的索引和length属性
const personInfo = [1, 2, 3, 4]

const proxy = new Proxy(personInfo, {
  get(target, key) {
    console.log('get', key)
  },
  set(target, key, newValue) {
    target[key] = newValue
    return true
  }
})

personInfo.forEach((item, index) => {
  Object.defineProperty(personInfo, index, {
    set() { },
    get() { }
  })
})


personInfo[0] = 8 // 都生效
personInfo[5] = 6 // proxy 生效
personInfo.push(99) // proxy 生效
二. 编译优化
1. Vue.js 2.x 通过标记静态节点,优化 diff 的过程
2. Vue.js 3.x 通过标记和提升所有的静态根节点,diff 的时候只需要对比动态节点内容
- Fragments ( 升级 Vetur 插件 )
- 静态提升
- Patch flag
- 缓冲事件处理函数
详细解释:
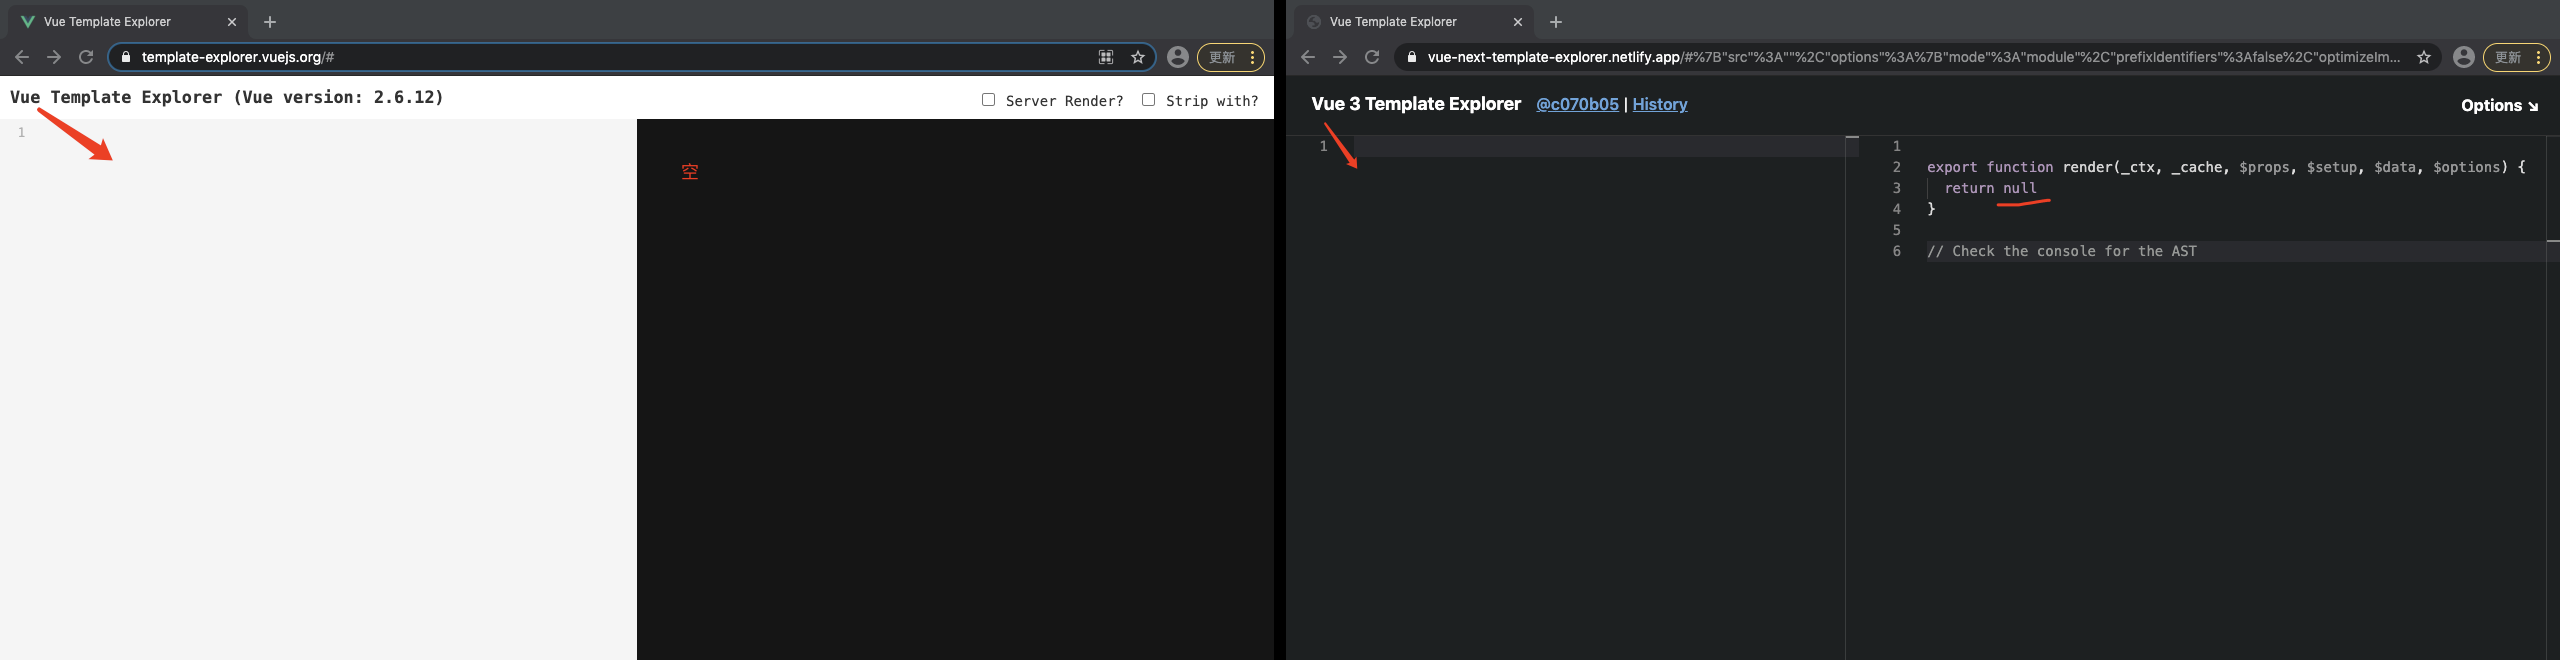
此处我们用到线上编译器来查看 vue 2.x 与 vue3.x 的编译区别~
1. 首先看一下,当文件内部,不包含任何内容时,Vue2.x 编译是空的,Vue 3.x 编译内部包含 render 函数,返回为null
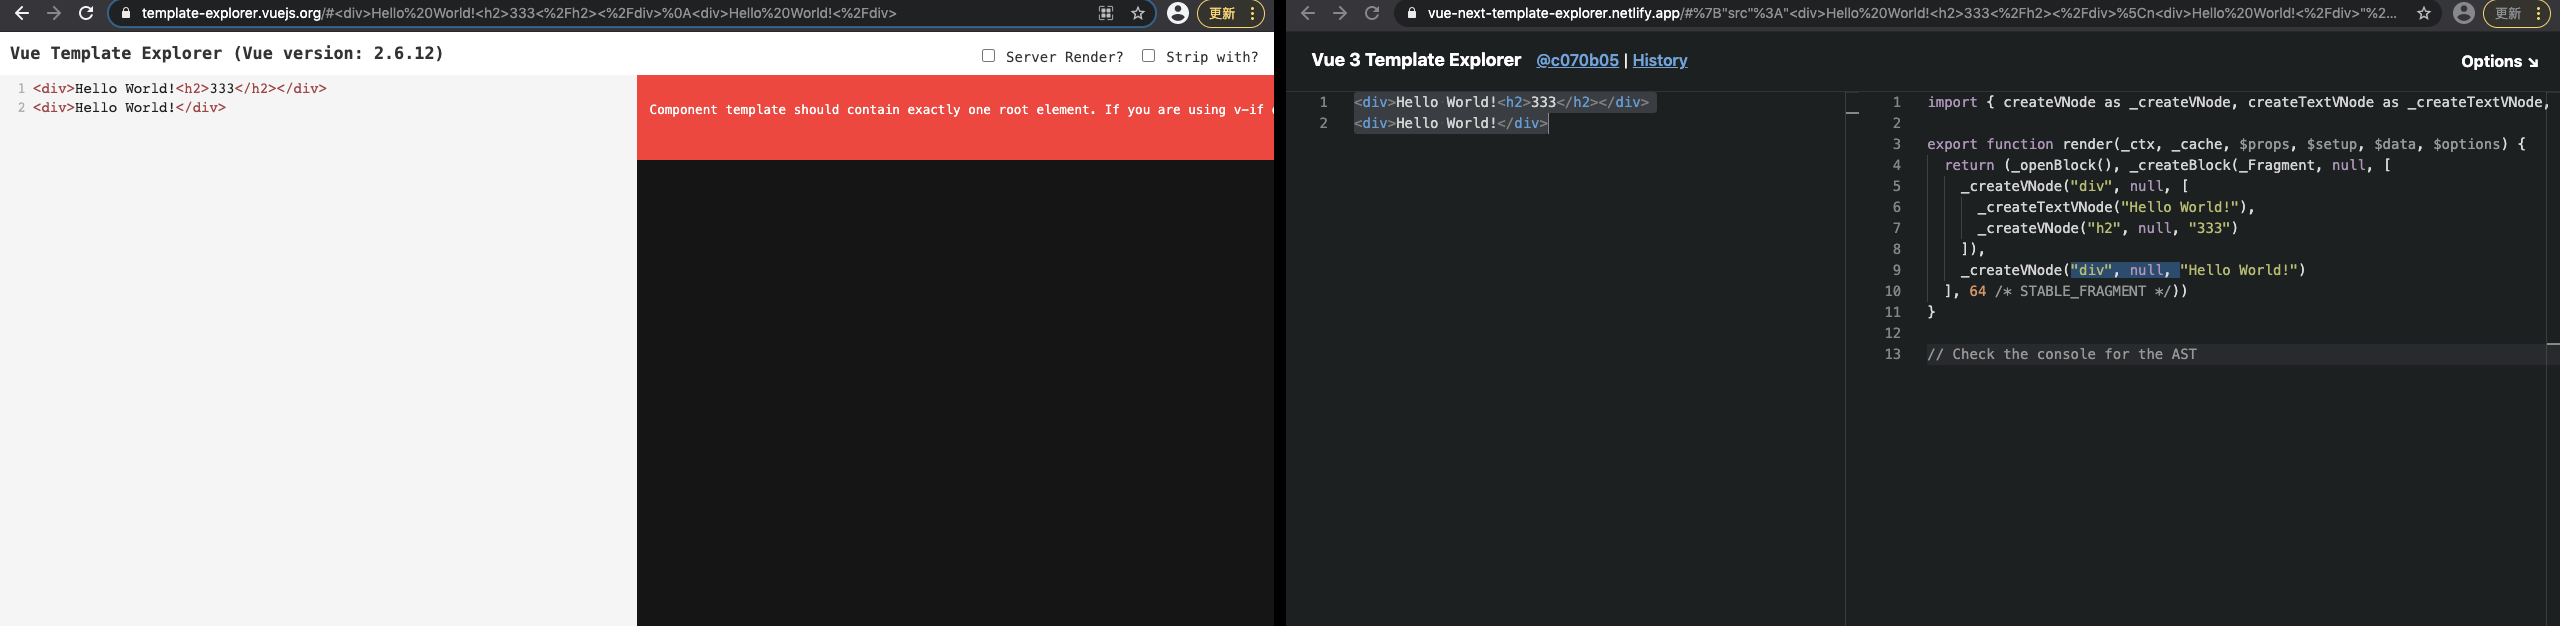
2. 我们先放入一个 Dom, 可以看到 vue2.x 和 vue 3.x 编译的部分完完全全重构了,之前 Vue2.x 采用,_c 的模式创建标签,_v 为 Vnode 节点, 而当前的 Vue 3.x 通过 _createBlock 生成 block tree
- Vue 2.x 数据更新并触发重新渲染的粒度是组件级的,单个组件内部需要遍历该组件的整个 vnode 树
- Vue.js 3.0 做到了通过编译阶段对静态模板的分析,编译生成了 Block tree。Block tree 是一个将模版基于动态节点指令切割的嵌套区块,每个区块内部的节点结构是固定的。每个区块只需要追踪自身包含的动态节点。

3. 新引入Fragments(片段)特性:Vue 3.x 模板中不需要再创建一个唯一的根节点,模板里可以直接放文本内容或者很多同级的标签, Vue2.x 需要唯一的节点
4. 静态提升:静态节点都会被提升到render 的外部,只有初始化时会被创建,再次调用render时不会再次创建,可以直接重用这些静态节点对应的vnode
5. Patch flag
6. 缓存事件处理函数减少了不必要的更新操作
三. 源码体积的优化
1. Vue.js 3.x 移除了一些不常用的API
- 例如:inline-template, filter 等
2. Tree-shaking
详细解释:移除一些不常用的API这里我们很好解释,在这里我们就重点讲一下 Tree-shaking, Tree-shaking就是把无用的模块进行“剪枝”,很多没有用到的API就不会打包到最后的包里。
tree-shaking的原理是: 依赖 ES2015 模块语法的静态结构(即 import 和 export),通过编译阶段的静态分析,找到没有引入的模块并打上标记。
举例说明一下:
1. import 的引用
// src/assets/index.js

export function testA() {
  console.log('A')
}

export function testB() {
  console.log('B')
}

// src/assets/data.json

{
  "name": "colin",
  "gender": "male"
}

// src/main.js

import { createApp } from 'vue'
import App from './App.vue'

// 测试代码开始
import { testA } from './assets/js/index'
import { name } from './assets/data.json'

console.log(name)

// 测试代码结束

createApp(App).mount('#app')
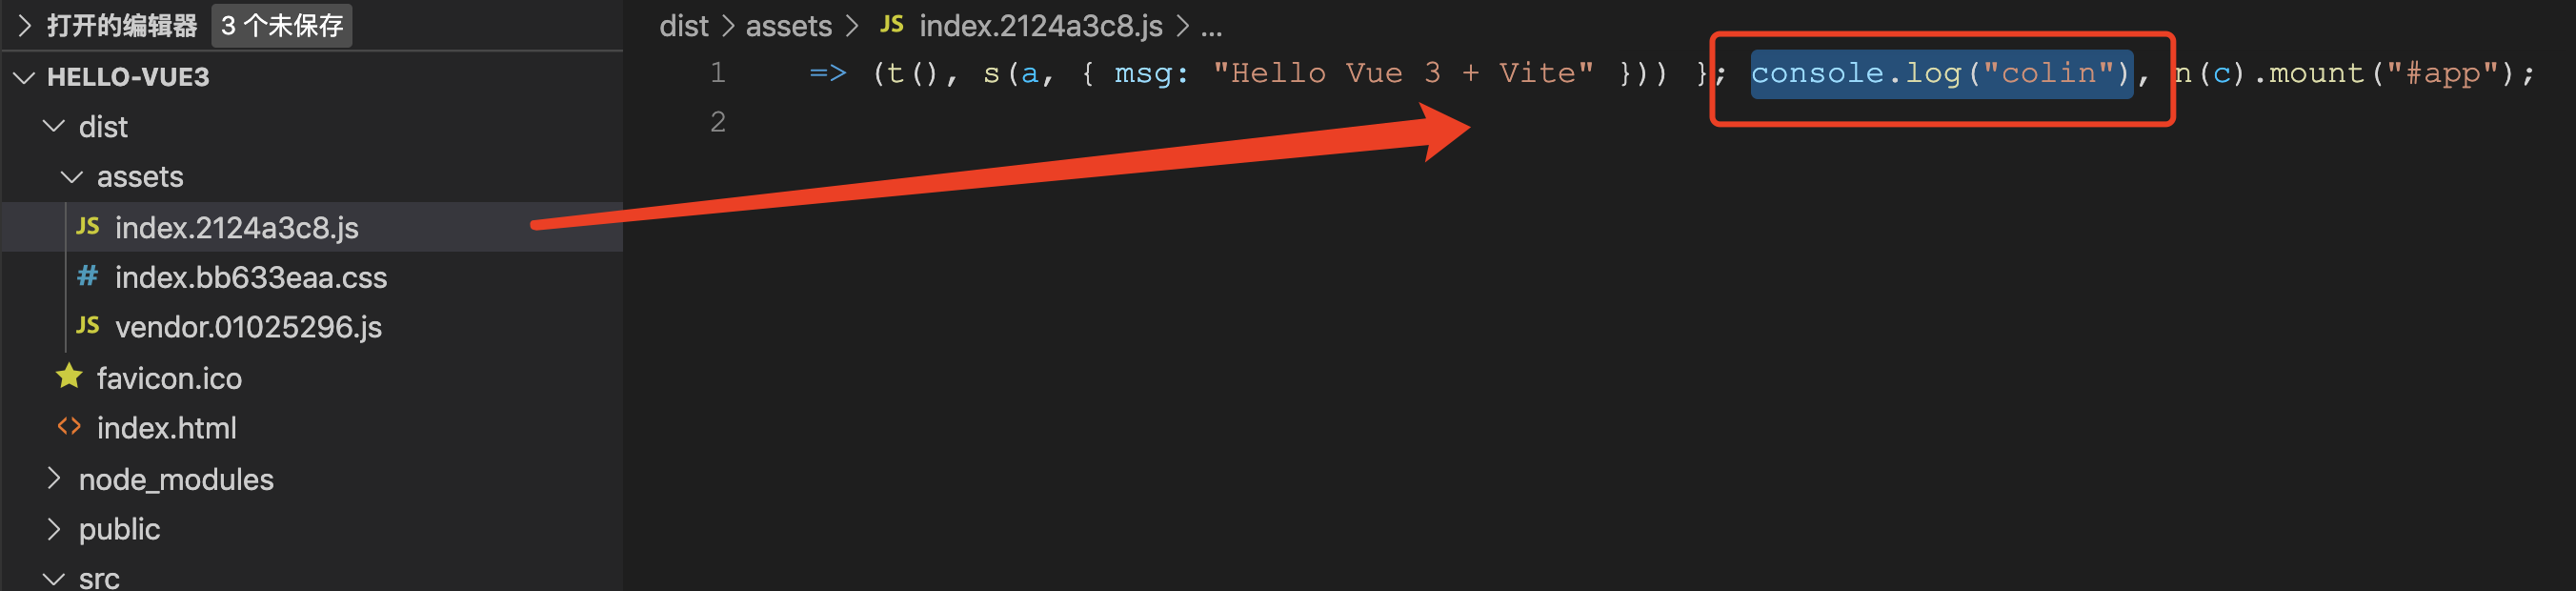
以上代码,我们将 testA 方法引用,但未使用,data.json 引用,同时使用后,npm run build 打包,我们会发现,data.json 文件
内容已被打印,但testA 在打包后的文件内,没有发现被引用的情况
修改 main.js
import { createApp } from 'vue'
import App from './App.vue'

// 测试代码开始

import { testA } from './assets/js/index'
import { name } from './assets/data.json'

console.log(testA())
console.log(name)

// 测试代码结束

createApp(App).mount('#app')
进行再次打包,我们会看到 testA 已经被成功的打印,但在打包的js中,我们并没有找到 testB 方法,并且也没有找到 assets/data.json 下的 gender 字段,所以此处我们的按需加载已经完成了,但这只是Tree-sharking的一部分

2. require 引用
修改 main.js 文件
import { createApp } from 'vue'
import App from './App.vue'

// 测试代码开始

const test = require('./assets/js/index')

// 测试代码结束

createApp(App).mount('#app')
打包后,我们会发现 我们通过 require 引用的文件,即使未使用,但还是打包在压缩包内

从这上面一点,我们发现,Tree-sharking 只支持 import 或者 export 的形式,也就是 依赖ES6 内部的静态分析。
所谓静态分析就是不执行代码,从字面量上对代码进行分析,ES6之前的模块化,比如我们可以动态require一个模块,只有执行后才知道引用的什么模块,这个就不能通过静态分析去做优化。
这是 ES6 modules 在设计时的一个重要考量,也是为什么没有直接采用 CommonJS,正是基于这个基础上,才使得 tree-shaking 成为可能,这也是为什么 rollup 和 webpack 2 都要用 ES6 module syntax 才能 tree-shaking。