这一篇我们将一起感受学习一个小型的、活生生的应用,而不是继续深入分析哪些单个的特性。我们将会一起感受一下,前面所讨论过的所有片段如何才能真正的组合在一起,形成一个真实的、可以运行的应用。
GutHub是一款菜谱管理应用。我们学习它有两个目的,第一是用它来管理美味的菜谱,第二是用它来学习angularjs的方方面面:
这款应用的特性如下:
a) 两列布局
b) 在左侧有一个导航栏
c) 允许你创建新菜谱
d) 允许你浏览现有的菜谱列表
主视图位于右侧,主视图将会根据具体的URL刷新,可惜显示菜谱列表、菜谱项目详情、以及用来添加或编辑菜谱的表单。
模型、控制器和模版(视图)之间的关系
这三种东西是如何协作的,应用应该用什么样的视角来看待它们。
模型就是真理。你的整个应用都是由模型驱动的——视图中所有展示的内容都是视图、被存储起来的内容是模型,几乎所有的内容都是模型。所以请把“模型就是真理”这句话多读几遍。同时花一点时间思考一下模型,思考一下对象中的属性应该是怎样的内容、应该如何从服务器端获取模型,以及如何保存它。通过视图绑定技术,视图会根据数据模型自动刷新,所以模型总是应用的焦点。
控制器将会负责业务逻辑:应该如何获取模型、可以在模型上执行何种操作、视图需要模型上的何种信息,如何如何转换模型以获取想要的信息。表单校验任务、对服务器调用、使用正确的数据启用视图,以及与此相关的几乎所有的事情都是控制器的职责。
最有,模版代表模型的展现形式,以及用户应该如何与应用进行交互。模版主要用来做一下事情:
n 展示模型
n 定义用户与应用之间的交互方式
n 给应用提供样式,并且判断何时以及怎样显示一些元素
n 过滤并格式化数据
视图是模版和模型融合之后产生的东西。模版中不应该包含任何业务逻辑和行为,只有控制器才能具备这些特性。但是你可能会问,DOM操作应该放到那里呢?DOM操作并不会发生在控制器或模版中。它由angular指令负责(有时候也可以通过服务进行操作,DOM操作放到放到服务中可以避免重复代码)。
模型
对于当前这款应用,我们将会让模型保持超级简单。这里的模型就是一些菜谱,它们将是真个应用的唯一的模型对象,其他所有的东西都是构建在模型之上。
每一天菜谱都具有一下特性:
- 一个ID,这个ID将会被持久化到服务器
- 一个名称
- 一个简短的描述
- 烹饪指南
- 是否是特色菜
- 配料数组,每一项都包含重量、单位及名称
就这么多,超级简单,应用中所有的东西都围绕这个简单的模型而构建,下面是一天简单的菜谱:


 1 {
 2   "id":"1",
 3   "title":"热姜汁藕片",
 4   "description":"藕片切得越薄越容易入味。",
 5   "ingredients":[
 6     {
 7       "amount":"450",
 8       "amountUnits":"g",
 9       "ingredientName":"姜"
10     },
11     {
12       "amount":"450",
13       "amountUnits":"g",
14       "ingredientName":"藕"
15     },
16     {
17       "amount":"0",
18       "amountUnits":"0",
19       "ingredientName":"香油"
20     },
21     {
22       "amount":"3",
23       "amountUnits":"g",
24       "ingredientName":"食盐"
25     },
26     {
27       "amount":"50",
28       "amountUnits":"mml",
29       "ingredientName":"白醋"
30     }
31   ],
32   "instructions":"1、准备食材
 2、姜用工具磨成姜蓉
 3、姜用工具磨成姜蓉
 4、藕片入开水汆一下,大概3分钟断生,捞出
 5、锅里倒入白醋
 6、烧至沸腾后加入姜蓉
 7、30秒后加入香油和盐,将热姜汁淋入藕片上,腌制20分钟左右即可食用"
33
34 }
我们继续来看,围绕这个简单的模型如何构建更加复杂的UI功能。
控制器、指令及服务器
我们要完成这个应用需要几个指令和控制器代码,然后再来看所需要的控制器。
服务
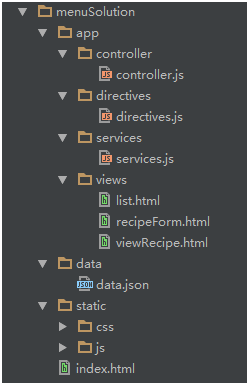
文件位置menuSolutionappservicesservices.js
 1 var services=angular.module('guthub.services',['ngResource']);
 2 services.factory('Recipe',['$resource', function ($resource) {
 3     return $resource('/recipes/:id',{id:'@id'});
 4 }]);
 5
 6 services.factory('MultiRecipeLoader',['Recipe','$q', function (Recipe, $q) {
 7     return function () {
 8         var delay=$q.defer();
 9         Recipe.query(function (recipes) {
10             delay.resolve(recipes);
11         }, function () {
12             delay.reject('无法取出食谱');
13         });
14         return delay.promise;
15     };
16 }]);
17
18 services.factory('RecipeLoader',['Recipe','$route','$q', function (Recipe,$route,$q) {
19     return function () {
20         var delay=$q.defer();
21         Recipe.get(
22             {id:$route.current.params.recipeId},
23             function (recipe) {
24                 delay.resolve();
25             },
26             function () {
27                 delay.reject('无法取出食谱'+ $route.current.params.recipeId);
28             }
29         );
30
31         return delay.promise;
32     };
33 }]);
在以往的章节中已经接触过了服务,这里我们再来深入理解下。在上面的代码中我们实现了三个服务。其中有一个菜谱服务,它返回的东西叫做Angular Resource。Resource将会封装底层的$http服务,所以你的代码只要负责处理对象就可以了。只要一行代码——return $resource(当然需要依赖services.guthub模块),我们就可以把菜谱作为参数传给任何控制器了,然后菜谱对象就会被注入到控制器中。这样依赖,每个菜谱都具备了下面这些内置的方法:
Recipe.get();
Recipe.save();
Recipe.delete();
Recipe.query();
Recipe.remove();
注:如果你打算使用Recipe.delete();,并且希望在ie中使用它,你必须这样调用它Recipe[delete](),这是因为在IE中delete是一个关键字。
假设我们现在有一个菜谱对象,必要的信息都已经放在就这个对象里面了,包括Id。然后通过下面这些代码我们就可以把它保存起来:
var recipe=new Recipe(obj);//假设id=13
recipe.$save();
以上代码会向/recipe/13路径发起一次POST请求。
其次,还有两个服务,正两个服务都是加载器:一个是单个菜单加载器,另个一是所有菜单加载器。当我们连接到路由上去,就会用到这两个加载器。它们的核心工作原理非常相似。这两个服务的工作流程如下:
- 创建一个延迟对象(这些都是angularjs中的promise,用来对异步函数的链式调用)
- 向服务端发起一次调用
- 在服务端返回数据之后解析延迟对象
- 返回promise,angularjs中的路由将会机制将会使用这个对象
Promise是一个接口,他用来处理的对象具有这样的特点:在未来的某一时刻(主要是异步调用)会从服务端返回或者被填充属性。其核心是,promise是一个带有then函数的对象.
使用promise机制的优点如下:
- 可以对函数链式调用,所以你不会陷入代码缩进噩梦中。
- 在调用链的过程中,可以保证上一个函数调用完之后才会调用下一个函数。
- 每一个then()都带有两个参数(两个都是函数),一个是成功之后的回调,一个是出错之后的处理器。
- 如果调用链中出现了错误,错误将会冒泡传递到其余错误处理函数中。所以,最终来说,所有的错误都可以在任意一个回调函数中处理。
你可能会问,resolve(解决)方法和reject(拒绝)方法又是什么呢?在angular中延迟调用是实现promise的一种方式。调用resolve方法会填充promise(也就是调用success函数),而reject方法将会调用promise的错误处理函数。
指令
现在我们来看看应用中的指令。在目前这款应用中我们会用到如下两条指令。
Butterbar
当路由发生变化同时页面还在加载时,这一指令将会显示和隐藏信息的操作。指令将会被嵌入到路由的变化机制中,然后根据页面的状态自动隐藏或显示其标签中的内容。
Focus
Focus指令要你过来确保特定的输入项(或元素)能否获得焦点。
文件位置 menuSolutionappdirectivesdirectives.js
 1 var directives=angular.module('guthub.directives',[]);
 2 directives.directive('butterbar',['$rootScope', function ($rootScope) {
 3     return {
 4         link: function (scope,element,attrs) {
 5             element.addClass('hide');
 6             $rootScope.$on('$routeChangeStart', function () {
 7                 element.removeClass('hide');
 8             });
 9             $rootScope.$on('$routeChangeSuccess', function () {
10                 element.addClass('hide');
11             });
12         }
13     }
14 }]);
15
16 directives.directive('focus', function () {
17     return {
18         link: function (scope, element, sttrs) {
19             element[0].focus();
20         }
21     };
22 });
以上指令将会返回一个对象,这个对象只有一个link属性。
1、 指令的处理过程分为两个步骤。在编译过程中,找到绑定在DOM元素上的指令,然后进行处理。所有的DOM操作都发生在编译阶段,在这一阶段结束之后,会产生一个内联函数。
2、 链接阶段中,第一步所产生的DOM模版会变链接到作用域上,会根据需要添加的监控器或者监听器,从而在作用域和元素之间进行动态绑定。这样一来,与作用域相关的所有内容都是在链接阶段进行的。
可以像下面这样使用butterbar指令:
<div butterbar> my loading text……</div>
在一开始的时候只是简单把它隐藏起来,然后在作用域上添加两个监听器。每当路由器发生变化时,它就会显示内部元素。每当路由成功完成变化之后,它又会把butterbar隐藏起来。
另外还有一个有趣的东西是,那就是如何把$tootScope注入到指令中。所有指令都会被直接连接到angularjs的依赖注入系统中。
第二个focus指令更加简单。它实在调用当前元素上的focus()方法而已。你可以在任何元素上添加focus属性来调用它。
<input type=”text” focus/>
当页面加载完成之后,文本框会自动获取焦点。
控制器
文件位置 menuSolutionappcontrollercontroller.js
写完指令和服务之后,终于改写控制器了,这里我们需要5个控制器。所有这些控制器都位于同一个文件夹中
 1 var app=angular.module('guthub',['guthub.services','guthub.directives']);
 2 //第一个控制器:List控制器,他的任务是显示系统中所有菜谱
 3 //请关注List控制器重要的一件事:在构造器中它不会到i服务器中获取菜谱。相反它会处理一个已经获取到的菜谱列表
 4 app.controller('ListController',['$scope','recipes', function ($scope, recipes) {
 5     $scope.recipes=recipes;
 6 }]);
 7
 8 //其他控制器与List控制器非常相似
 9 //edit函数只是把URL地址改成编辑的地址,然后angular就会去做剩余的工作
10 app.controller('ViewController',['$scope','$location','recipe', function ($scope,$location,recipe) {
11     $scope.recipe=recipe;
12     $scope.edit= function () {
13       $location.path('/edit/'+recipe.id);
14     }
15 }]);
16
17
18
19 app.controller('EditController',['$scope','$location','recipe', function ($scope,$location,recipe) {
20     $scope.recipe=recipe;
21     $scope.save= function (recipe) {
22         $scope.recipe.save(function () {
23             $location.path('/view/'+recipe.id);
24         });
25     };
26     $scope.remove= function () {
27         delete $scope.recipe;
28         $location.path('/');
29     };
30 }]);
31
32 app.controller('NewController',['$scope','$location','Recipe', function ($scope,$location,Recipe) {
33     $scope.recipe=new Recipe(
34         {
35             ingredients:[{}]
36         }
37     );
38
39     $scope.save= function () {
40         $scope.recipe.$save(function (recipe) {
41             $locale.path('/view/'+recipe.id);
42         })
43     }
44 }]);
45
46
47 app.controller('IngredientsController',['$scope', function ($scope) {
48     $scope.AddIngredient= function () {
49         var ingredients=$scope.recipe.ingredients;
50         ingredients[ingredients.length]={};
51     };
52     $scope.removeIngredient= function (index) {
53         $scope.recipe.ingredients.splice(index,1);
54     }
55 }]);
56
57
58
59
60 //创建路由
61 app.config([
62     '$routeProvider',
63     function ($routeProvider) {
64         $routeProvider.when('/', {
65             controller: 'ListController',
66             resolve: {
67                 recipes: function (MultiRecipeLoader) {
68                     return MultiRecipeLoader();
69                 }
70             },
71             templateUrl: '/views/list.html'
72         }).when('/edit/:recipeId', {
73             controller: 'EditController',
74             resolve: {
75                 recipe: function (RecipeLoader) {
76                     return RecipeLoader();
77                 }
78             },
79             templateUrl: '/views/recipeForm.html'
80         }).when('/view/:recipeId', {
81             controller: 'ViewController',
82             resolve: {
83                 recipe: function (RecipeLoader) {
84                     return RecipeLoader();
85                 }
86             },
87             templateUrl: '/views/viewRecipe.html'
88         }).when('/new', {
89             controller: 'NewController',
90             templateUrl: '/views/recipeForm.html'
91         }).otherwise({redirectTo: '/'});
92     }
93 ]);
94
95
你可能注意到了,edit和New这两个控制器的路由都指向了相同的模版URL——-/views/recipeForm.html,是怎么回事呢?因为我们会根据关联控制器的不同,在菜谱模版中显示不同的元素。
做完这些之后,我们来看看模版。看看这些控制器是如何把它们关联起来的,以及如何管理显示给最终用户的内容。
模版
我们会从最外层的主模版入手,也是就index.html。他就是我们单页应用的根。其他模版都会加载到这个模版的内部。
模版位置menuSolutionappviews
主要的模版:
 1 <!DOCTYPE html>
 2 <html ng-app="guthub">
 3 <head>
 4     <meta charset="UTF-8">
 5     <title>GutHub</title>
 6     <script src="static/js/angular.js" type="text/javascript"></script>
 7     <script src="static/js/angular-resource.js" type="text/javascript"></script>
 8     <script src="static/js/angular-route.min.js" type="text/javascript"></script>
 9     <script src="app/directives/directives.js" type="text/javascript"></script>
10     <script src="app/services/services.js" type="text/javascript"></script>
11     <script src="app/controller/controller.js" type="text/javascript"></script>
12     <link rel="stylesheet" href="static/css/bootstrap.css"/>
13     <link rel="stylesheet" href="static/css/guthub.css"/>
14 </head>
15 <body>
16 <div butterbar>Loading......</div>
17 <div class="container">
18     <div class="row">
19         <header>
20             <h1>GutHub</h1>
21         </header>
22         <div class="span2">
23             <div id="focus"><a href="/#/new">New Recipe</a><br/></div>
24             <div><a href="/#/">Recipe List</a></div>
25         </div>
26         <div class="span2">
27             <div ng-view></div>
28         </div>
29     </div>
30
31 </div>
32 </body>
33 </html>
在这个模版中有几个比较有趣的元素需要注意,其中大部分已经聊过。其中包括ng-app、ng-view、butterbar 明显还缺少ng-controller。
现在我们来看每个控制器上的模版:
菜谱列表模版:
1 <h3>Recipe List</h3>
2 <ul class="recips">
3     <li ng-repeat="recipe in recipes">
4         <div>
5             <a ng-href="/#/view/{{recipe.id}}">{{recipe.title}}</a>
6         </div>
7     </li>
8 </ul>
这是一个平淡无奇模版,只有两个地方非常的有趣,一个是ng-repeat标签使用的非常标准。它会从作用域中获取菜单列表,然后遍历它们;另一个是使用ng-href代替了href,这纯粹是为了在angular加载过程中产生错误链接,ng-href无论在何时可以保证都不会把存在缺陷的连接展示给用户。这个模版完了,你可能会问,我怎么没看到控制器呢?而且我们也没有定义主控制器(Main controller)。这正式路由映射派上用场的地方。我们之前说的路由会跳转到列表模版,它上面绑定了List Controller,如过引用了变量之类的东西那么变量就位于List Controller 作用于内。
第二个模版:
 1 <h2>{{recipe.title}}</h2>
 2 <div>{{recipe.description}}</div>
 3 <ul class="list-unstyled">
 4     <li ng-repeat="ingredient in recipe.ingredients">
 5         <span>{{ingredient.amount}}</span>
 6         <span>{{ingredient.amountUnits}}</span>
 7         <span>{{ingredient.ingredientName}}</span>
 8     </li>
 9 </ul>
10
11 <h3>Intructions</h3>
12 <div>{{recipe.instructions}}</div>
13 <form ng-submit="edit()" class="form-horizontal">
14     <div class="form-actions">
15         <button class="btn btn-primary">修改</button>
16     </div>
17 </form>
18
19
菜谱表单模版:
 1 <h2>Edit Recipe</h2>
 2 <form name="recipeForm" ng-submit="save()" class="form-horizontal">
 3     <div class="control-group">
 4         <label class="control-label" for="title">标题:</label>
 5
 6         <div class="controls">
 7             <input type="text" ng-model="recipe.title" id="title" class="input-xlarge" focus/>
 8         </div>
 9     </div>
10
11     <div class="control-group">
12         <label class="control-label" for="description">描述:</label>
13
14         <div class="controls">
15             <input type="text" ng-model="recipe.description" id="description" class="input-xlarge" focus/>
16         </div>
17     </div>
18
19
20     <div class="control-group">
21         <label class="control-label" for="ingredients">原材料:</label>
22         <ul class="controls" ng-controller="IngredientsController">
23             <li ng-repeat="i in recipe.ingredients">
24                 <input type="text" ng-model="i.amount" class=""/>
25                 <input type="text" ng-model="i.amountUnits" class=""/>
26                 <input type="text" ng-model="i.ingredientName" class=""/>
27                 <button class="btn btn-primary" ng-click="removeIngredient($index)">
28                     <i class="glyphicon-minus-sign"></i>
29                     删除
30                 </button>
31             </li>
32             <button type="button" class="btn btn-primary" ng-click="AddIngredient()">
33                 <i class="glyphicon-plus-sign"></i> 添加
34             </button>
35         </ul>
36         <input type="text" ng-model="recipe.ingredients" id="ingredients" class="input-xlarge" focus/>
37
38     </div>
39
40
41     <div class="control-group">
42         <label class="control-label" for="instructions">做法:</label>
43
44         <div class="controls">
45             <input type="text" ng-model="recipe.instructions" id="instructions" class="input-xxlarge" focus/>
46         </div>
47     </div>
48
49     <div class="form-actions">
50         <button class="btn btn-primary" ng-click="save()">保存</button>
51         <button class="btn btn-primary" ng-show="!recipe.id" ng-click="remove()">删除</button>
52     </div>
53 </form>
项目架构图:
这个项目比较简单、就不上效果图了。大家可以写一个自己的demo来熟悉angular的各个模块。