http://www.codeproject.com/KB/scripting/Javascript_DataGrid.aspx
Introduction
The MVC pattern is the way of breaking an application or GUI control into three parts: the controller, the model, and the view. The MVC pattern was designed to deal with input, data processing, and rendering the data into the GUI realm. The user input, data processing and rendering the data are separated and handled by the view, model, and controller objects.
The controller interprets the mouse and keyboard inputs from the user and maps these commands to the view and model objects to change the state. The model manages one or more data elements. The view manages the client area of the display and is responsible for presenting the data to the user. A view typically has a kit of the methods that know how to render the graphics. A controller is an object that is responsible for user interaction with the application. A controller accepts input from the user and forces the view and the model to perform actions. For instance, if the user clicks the mouse button or clicks some item on interface, the controller is responsible for determining how the app should respond to the end-user. The model, view, and controller are related. Therefore, they must reference each other (the picture below show the Model-View-Controller relationships).
I think that the MVC paradigm is the best way of breaking the GUI control, that is why I choose this pattern, and I do like this pattern. It doesn't matter what environment you use, whether it's a Java, C# or even JavaScript. The idea is to break the application into three logic classes.
                 --------------
                 |   Model    |
                 --------------
                /\           /\
                /             \
               /               \
              /                 \
             /                   \
      -------------- <------ --------------
      |    View    |         | Controller |
      --------------         --------------
Background
My passion is AJAX applications and JavaScript controls. I don't like to use ActiveX or Java applets in the browser. Sure, there are many reasons why you have to do this, but in most cases I think it is better to implement it via JavaScript code. I'm talking about GUI controls.
Code
As stated above, the MVC paradigm supposes to break an application or GUI control into three logic classes. There are three logic classes in this control.
var dataSource = new DataSource();//implements the model
var view = new View(idHolder,columnsWSize,dataSource);
var controller = new Controller(view, dataSource);
The controller class handles all events and forces the dataSource and view classes to perform certain actions.
this.onRemoveRow = function(rowId)
{
    view.removeRow(rowId);
    dataSource.removeRow(rowId);
}
this.onUpdateRow = function(rowID)
{
    view.setGridUnselectedState();
    view.setRowWriteState(rowID);
}
this.onAddRow = function()
{
    view.setGridUnselectedState();
    view.setRowAddState();
}
view.dataClickedEventHandler = function()
{
    thisRef.hideAllMenu();
    view.setGridUnselectedState();
    event.cancelBubble = true;
}
....
The dataSource class has a kit of the methods which work with data.
var dataHeaders = new Array();
var dataRows = new Array();
var sortDirection= asc;
var sortIndex = 0;

function sortItems(data1,data2)
{
    var data1Value = data1[sortIndex];
    var data2Value = data2[sortIndex];

    if(data1Value==null)
        data1Value = "";

    if(data2Value==null)
        data2Value = "";
    data1Value = data1Value.toUpperCase();
    data2Value = data2Value.toUpperCase();

    if(sortDirection==asc)
    {
        if(data1Value < data2Value)
            return -1;
        else
        if(data1Value > data2Value)
            return 1;
        else
            return 0;
    }
    else
    {
        if(data1Value > data2Value)
            return -1;
        else
            if(data1Value < data2Value)
                return 1;
            else
                return 0;
    }
}
this.clear = function()
{
    dataHeaders = new Array();
    dataRows = new Array();
    sortDirection= asc;
    sortIndex = 0;
}
...
The view class has kit of the methods to work with GUI.
this.isRowWriteState = function(rowId)
{
    for(var index=0;index < dataContent.rows.length;index++)
    {
        if(dataContent.rows[index].cells
            [dataContent.rows[index].cells.length-1].firstChild.children
            [1]!=null && dataContent.rows[index].rowId == rowId)
                return true;
    }
}
this.setRowSelectedState  = function(rowId)
{
    for(var index=0; index < dataContent.rows.length; index++)
    {
        if(dataContent.rows[index].rowId==rowId)
        {
            for(var index1 = 0; index1 <
                dataContent.rows[index].cells.length; index1++)
            {
                var width = dataContent.rows[index].cells[index1].style.width;
                dataContent.rows[index].cells[index1].style.cssText =
                    styleCellSelectedData;
                dataContent.rows[index].cells[index1].style.width = width;
            }
            break;
        }

    }
    this.selectedRowId = rowId;
}
this.setGridReadState = function()
{
    for(var index=0;index < dataContent.rows.length;index++)
    {
        //if the stub column has buttons that means the row is in write state
        if(dataContent.rows[index].cells[dataContent.rows
            [index].cells.length-1].firstChild.children[1]!=null)
            {
                this.setRowReadState(dataContent.rows[index].rowId);
            }
    }
}
this.setGridNotAddState = function()
{
if(data.children.length==2)
    data.children[0].parentElement.removeChild(data.children[0]);
}
...
Disadvantages
There are a couple of disadvantages in this grid. It supports only Internet Explorer (I didn't have much time to write extra code for it to be a cross browser control). But this is a minor disadvantage; the major disadvantage is of code execution. The execution is not very good during resizing the column and creation. Since it deals with junking the text in cells, I wrote the utility method that did junking:
function junkTextToWSize(str , wSize , cssText)
{
    var textLabel = document.getElementById("uxTextLabel");
    if(textLabel==null)
    {
        textLabel = document.createElement("");
        textLabel.id = "uxTextLabel";
        document.body.appendChild(textLabel);
    }
    textLabel.innerText = str;
    textLabel.style.cssText = cssText;
    textLabel.style.visibility = "hidden";
    textLabel.style.position = "absolute";

    if(textLabel.offsetWidth>=wSize)
    {
        textLabel.innerText = "..."+textLabel.innerText
        while(textLabel.offsetWidth>=wSize)
        {
            textLabel.innerText = textLabel.innerText.substr
                        (0,textLabel.innerText.length-1);
        }
        var retString = textLabel.innerText.substr
            (3,textLabel.innerText.length-3)+"...";
        return retString;
    }

    else
    return str;
}
This method creates a temp span element to check the size of text. If the text label is too long, it has to be junked and be with the suffix "�". The call of the offsetWidth is too expensive for IE. I wrote the simple function to try out the offsetWidth calling.
function buildTable()
{
      var table = document.all.uxTest.appendChild
          (document.createElement("<table>"));
      for(var index=0; index<401; index++ )
      {
         var row = table.insertRow();
         for(var index1=0; index1 < 11; index1++)
         {

              var cell = row.insertCell()
              cell.innerText = index+"string"+index1;
              // var offsetWidth = cell.offsetWidth;

         }
      }
}
buildTable();
This calling will take about 6 seconds, but if you uncommented the "var offsetWidth = cell.offsetWidth;" it would take over 1 minute to execute. That is why I set the limit of rows in grid to 300 rows. I'm still interested on how to count the width of the text without calling the offsetwidth property.
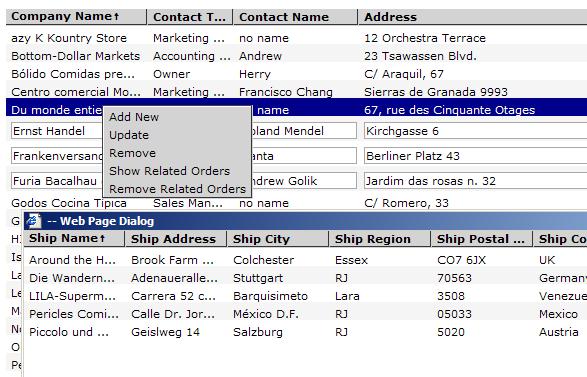
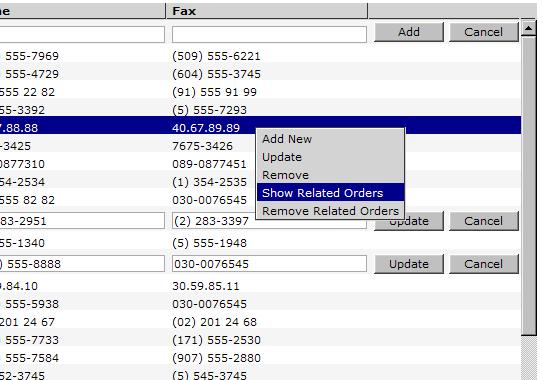
Grid features
This grid supports dragging columns, resizing columns, and sorting columns. The double click on the column header will cause sorting the grid by the clicked header column. In order to resize columns, you need to move the header separator, holding the mouse button. It will cause junking the text labels in resizing column if they are too long to be in the cell. To drag a column you need to move the mouse on the header, holding the mouse button.
The grid also has two kind of menus: the selected row menu and the grid menu. Right-clicking on row will cause an appearance of the selected row menu and right-clicking anywhere out of rows will cause an appearance of the grid menu. The grid has two events "onRowUpdated" and "onRowAdded". These events fire on "Add","Update" button click and return the obj that contains new values for grid row.
In order to set row into "add", "update" state you need call the grid methods "grid.addRow()", "grid.updateRow(rowId)".
Using the code
It's pretty simple to use it in any web application.
var grid = new GolikGrid(null,
 [150,30,150,100,150,150,150,150,150,150],500,900 ,"uxGridHolder");
var dataSource = grid.getDataSource();
dataSource.addHeaderItem("Company Name");
dataSource.addHeaderItem("Contact Name");
dataSource.addHeaderItem("Company Title");
dataSource.addHeaderItem("Address");
dataSource.addHeaderItem("City");
dataSource.addHeaderItem("Region");
dataSource.addHeaderItem("Postal Code");
dataSource.addHeaderItem("Country");
dataSource.addHeaderItem("Phone");
dataSource.addHeaderItem("Fax");

dataSource.addRowItem(1,new Array("Wilman Kala","Serch",
    "Owner/Marketing Assistant","Adenauerallee 900",
    "Seattle","SP","51100","Germany","0241-039123","089-0877451"));
dataSource.addRowItem(2,new Array("Wilman Kala","Serch",
    "Owner/Marketing Assistant","Adenauerallee 900",
    "Seattle","SP","51100","Germany","0241-039123","089-0877451"));
dataSource.addRowItem(3,new Array("Wilman Kala","Serch",
    "Owner/Marketing Assistant","Adenauerallee 900",
    "Seattle","SP","51100","Germany","0241-039123","089-0877451"));
dataSource.addRowItem(4,new Array("HILARION-Abastos","Dima",
    "Sales Representative","Luisenstr. 48","Sao Paulo",
    "WA","8200","Denmark","(5) 555-4729","(171) 555-9199"));
grid.dataBind();
var grid = new GolikGid(param1,param2,param3,param4,param5);
Param1- the id of the grid, can be omitted andnullcan be passed instead of the real id.
Note: if you are going to use one grid, you can ignore this param and passnullbut if you going to use a number of grids, you have to pass the unique id for each grid.Param2� the array of the widths for columns.
Note: it's better to set column the actual width of the text otherwise it has to call the "junkTextToWSize" method which would be causing the overload.Param3- the height of the grid.Param4- the width of the grid.Param5� the id holder for the grid.
Note: if the param is omitted andnullis passed, the grid will be added to the body element instead of to the specified element.
dataSource.addRowItem(param1,param2);
Param1- the id of the row.Param2� the array of cells.
Init menu
As I said before there are two kind of menus in grid: item menu and grid menu. The grid menu takes place on right mouse click on anywhere out of rows(on scroll bars, headers, freespace where supposed to be rows) and row menu takes place by right-clicking on rows. It's pretty simple to build your own menus. All you need to do is create an object, where "key" will be treated as a menu item name and value as menu item handler, then pass it in corresponding methods.
var rowMenuItems = {"Add New":onMenuAddNew,"Update":onMenuUpdateRow,
    "Remove":onMenuRemoveRow,"Refresh":onMenuRefresh};
var gridMenuItems = {"Refresh":onMenuRefresh,
    "Remove Column":onMenuRemoveColumn,
    "Add New Row":onMenuAddNew,"Help":onMenuHelp};
grid.setItemMenu(rowMenuItems);
grid.setGridMenu(gridMenuItems);
You also need to implement all declared handlers for menu items. For example, "Help" grid menu item handler:
function onMenuHelp()
{
    window.open("about:blank");
}
Adding, updating, and removing rows in grid
There are no native events for grid to get row into "update", "add" state, but there are two events that fire when that actions are completed.
//assign the event handler for onRowUpdated and onRowAdded event
grid.onRowUpdated = onGridRowUpdated;
grid.onRowAdded = onGridRowAdded;
In order to set row into update state, you need to call "grid.updateRow(rowId)" somewhere. For example, "Update" row menu item handler.
function onMenuUpdateRow()
{
    grid.updateRow(grid.getSelectedRowId());
}
Since the "onMenuUpdateRow" is a handler of row menu, there is an ability to get "selected RowId" by calling the "grid.getSelectedRowId()" method. This calling sets selected row into update state. The user can cancel updating by cliking the cancel button. Once the user clicks "update" button, the grid fire event "grid.onRowUpdated".
For example, "onGridRowUpdated" event handler.
function onGridRowUpdated(row)
{
    var updateResult = "The grid row has been updated.\n";
    updateResult+=   "ID "+row.id+"\n";
    updateResult+=   "Company Name:  "+row
        ["Company Name"]+"\n";
    updateResult+=   "Contact Name:  "+row
        ["Contact Name"]+"\n";
    updateResult+=   "Company Title:  "+row
        ["Company Title"]+"\n";
    updateResult+=   "Address:  "+row
        ["Address"]+"\n";
    updateResult+=   "City: "+row["City"]+"\n";
    updateResult+=   "Region: "+row
        ["Region"]+"\n";
    updateResult+=   "Postal Code: "+row
        ["Postal Code"]+"\n";
    updateResult+=   "Country: "+row
        ["Country"]+"\n";
    updateResult+=   "Phone: "+row
        ["Phone"]+"\n";
    updateResult+=   "Fax: "+row["Fax"]+"\n";
    alert(updateResult);
    customDataSource.updateRow(row.id,new Array(
        row["Company Name"] ,row["Contact Name"],
        row["Company Title"],row["Address"],
        row["City"],row["Region"],
        row["Postal Code"],row["Country"],
        row["Phone"],row["Fax"]));
}
This event handler has an argument that contains the data of an updated row. Each value can be accessed with header name then saved somewhere (in current sample it's custom datasource object that is implemented as presistent storage until page is refreshed).
It is the same story with "Add New" row menu item handler.
function onMenuAddNew()
{
    grid.addRow();
}
function onGridRowAdded(row)
{
    var updateResult = "The grid row has been added.\n";
    updateResult+=   "Company Name:  "+row
       ["Company Name"]+"\n";
    updateResult+=   "Contact Name:  "+row
       ["Contact Name"]+"\n";
    updateResult+=   "Company Title:  "+row
       ["Company Title"]+"\n";
    updateResult+=   "Address:  "+row
       ["Address"]+"\n";
    updateResult+=   "City: "+row
       ["City"]+"\n";
    updateResult+=   "Region: "+row
       ["Region"]+"\n";
    updateResult+=   "Postal Code: "+row
       ["Postal Code"]+"\n";
    updateResult+=   "Country: "+row
       ["Country"]+"\n";
    updateResult+=   "Phone: "+row
       ["Phone"]+"\n";
    updateResult+=   "Fax: "+row
       ["Fax"]+"\n";
    customDataSource.addRowItem(new Array(row["Company Name"],
       row["Contact Name"],row["Company Title"],
       row["Address"],row["City"],
       row["Region"],row["Postal Code"],
       row["Country"],row["Phone"],row["Fax"]));

    if(window.confirm("The row has been successfully added,
        refresh the grid?"))
        initGrid();
}
The "onMenuAddNew" row menu item handler doesn't require the row id, so this row menu event handler can be added to grid menu. On adding a new row, you have to assign the new unique id for this row, so you need to put in persistent storage then re-init the grid to see the new item.
The "onMenuRemoveRow" row menu item handler can't be added to grid menu as it requires the id of the removing row that is accessible only in row menu item context.
function onMenuRemoveRow()
{
    var selectedId = grid.getSelectedRowId();
    if(window.confirm("Are sure you want to remove this item?"))
    {
        grid.removeRow(selectedId);
        customDataSource.removeRow(selectedId);
     }
}
This approach introduces a flexible way to build your own menus, but it's not necessary to build a menu only. You can do any modification on a grid by other ways. For example, it could be a nice toolbar having "remove, update, add, refresh" icons.