本文将引导快速使用 MMSkeleton ,介绍用摄像头测试实时姿态估计。
- MMSkeleton: https://github.com/open-mmlab/mmskeleton
安装
首先安装 MMDetection ,可见 MMDetection 使用。
然后安装 MMSkeleton ,
# 启用 Python 虚拟环境
conda activate open-mmlab

# 下载 MMSkeleton
git clone https://github.com/open-mmlab/mmskeleton.git
cd mmskeleton

# 安装 MMSkeleton
python setup.py develop

# 安装 nms op for person estimation
cd mmskeleton/ops/nms/
python setup_linux.py develop
cd ../../../
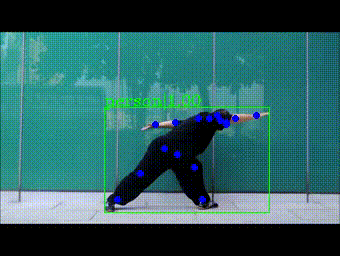
现有模型,视频测试
配置
configs/pose_estimation/pose_demo.yaml:
processor_cfg:
  video_file: resource/data_example/ta_chi.mp4
  detection_cfg:
    model_cfg: ../mmdetection/configs/cascade_rcnn/cascade_rcnn_r50_fpn_1x_coco.py
    checkpoint_file: ../mmdetection/checkpoints/cascade_rcnn_r50_fpn_1x_coco_20200316-3dc56deb.pth
    bbox_thre: 0.8
选用的检测模型,如下:
运行
# verify that mmskeleton and mmdetection installed correctly
# python mmskl.py pose_demo [--gpus $GPUS]
python mmskl.py pose_demo --gpus 1
结果将会存到 work_dir/pose_demo/ta_chi.mp4。
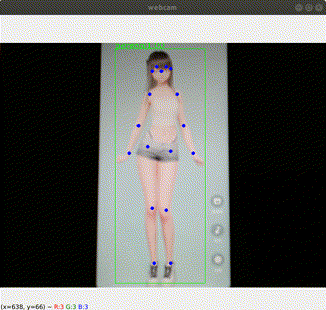
现有模型,WebCam 测试
配置
configs/apis/pose_estimator.cascade_rcnn+hrnet.yaml:
detection_cfg:
  model_cfg: mmdetection/configs/cascade_rcnn/cascade_rcnn_r50_fpn_1x_coco.py
  checkpoint_file: mmdetection/checkpoints/cascade_rcnn_r50_fpn_1x_coco_20200316-3dc56deb.pth
  bbox_thre: 0.8
estimation_cfg:
  model_cfg: mmskeleton/configs/pose_estimation/hrnet/pose_hrnet_w32_256x192_test.yaml
  checkpoint_file: mmskeleton://pose_estimation/pose_hrnet_w32_256x192
  data_cfg:
    image_size:
      - 192
      - 256
    pixel_std: 200
    image_mean:
      - 0.485
      - 0.456
      - 0.406
    image_std:
      - 0.229
      - 0.224
      - 0.225
    post_process: true
确认 detection_cfg estimation_cfg 的路径正确。
写码
编写 webcam.py,主要代码如下:
def main():
  args = parse_args()

  win_name = args.win_name
  cv.namedWindow(win_name, cv.WINDOW_NORMAL)

  with Camera(args.cam_idx, args.cam_width, args.cam_height, args.cam_fps) as cam:
    cfg = mmcv.Config.fromfile(args.cfg_file)
    detection_cfg = cfg["detection_cfg"]

    print("Loading model ...")
    model = init_pose_estimator(**cfg, device=0)
    print("Loading model done")

    for frame in cam.reads():
      res = inference_pose_estimator(model, frame)

      res_image = pose_demo.render(
          frame, res["joint_preds"], res["person_bbox"],
          detection_cfg.bbox_thre)

      cv.imshow(win_name, res_image)

      key = cv.waitKey(1) & 0xFF
      if key == 27 or key == ord("q"):
        break

  cv.destroyAllWindows()
运行
$ python webcam.py
--cam_idx 2 --cam_width 640 --cam_height 480 --cam_fps 10
--cfg_file configs/apis/pose_estimator.cascade_rcnn+hrnet.yaml
Args
  win_name: webcam
  cam_idx: 2
  cam_ 640
  cam_height: 480
  cam_fps: 10
  cfg_file: configs/apis/pose_estimator.cascade_rcnn+hrnet.yaml
CAM: 640.0x480.0 10.0
Loading model ...
Loading model done
效果,
摄像头参数,可见 WebCam 摄像头使用。
更多
GoCoding 个人实践的经验分享,可关注公众号!