##本人在安装过程中,可能因为系统环境因素或是其他原因,参考网上的文章没有一篇是非常顺利的,所以自己总结一下。
##安装过程中非常坎坷,有些地方反复了好几次,弄的有点模糊,但模糊的地方在文中我会指出。
安装环境:
CentOS7-x86_64
postgresql9.4
postgis2.4
mysql_fdw2.12
mysql_5.5
步骤:
一、安装MySQL
1. 下载rpm
[root@localhost ~]# wget http://dev.mysql.com/get/mysql57-community-release-el7-8.noarch.rpm
2. 安装rpm
[root@localhost ~]# yum localinstall mysql57-community-release-el7-8.noarch.rpm
3. 检查mysql源是否安装成功
[root@localhost ~]# yum repolist enabled | grep "mysql.*-community.*"

4. 修改安装源
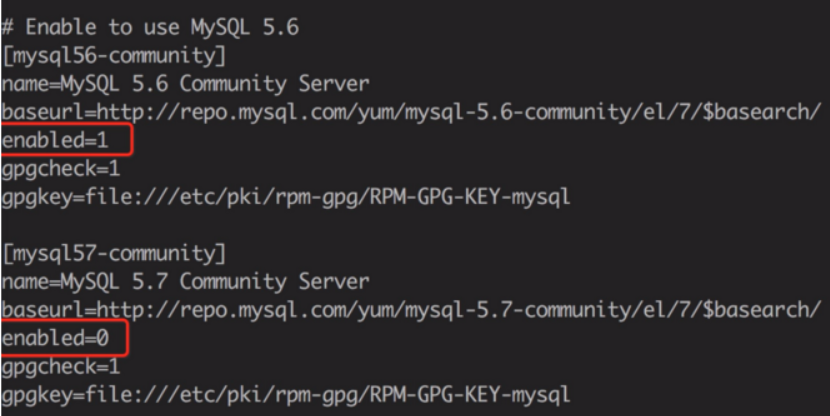
[root@localhost ~]# vim /etc/yum.repos.d/mysql-community.repo
#改变默认安装的mysql版本。比如要安装5.6版本,将5.7源的enabled=1改成enabled=0。然后再将5.6源的enabled=0改成enabled=1即可。
5. 安装MySQL
[root@localhost ~]# yum install mysql-community-server
6. 启动MySQL服务
[root@localhost ~]# systemctl start mysqld
7. 启动MySQL服务
[root@localhost ~]# systemctl enable mysqld
[root@localhost ~]# systemctl daemon-reload
8. 修改root本地登录密码
1)查看mysql密码
[root@localhost ~]# grep 'temporary password' /var/log/mysqld.log

##这里我命令执行没有反应,找到mysqld.log文件也没有密码的踪影。
##网上说清除一下数据,再重启,再获取,可好像是针对5.7以上版本,我5.5版本没有效果(以下备注一下命令)
[root@localhost ~]# rm -rf /var/lib/mysql
[root@localhost ~]# systemctl restart mysqld
[root@localhost ~]# grep 'temporary password' /var/log/mysqld.log
##后来我是mysql -uroot方式进入MySQL,并重新设了一下密码即可。
2)修改密码
#三种方式推荐第二种
9.添加远程登录用户
二、安装MySQL_fdw
##重头戏来了!!在这里环境装了一茬又一茬,命令有时候都不一样,我把所有安装的都列出来,具体哪个有用哪个没用留待后面删减。
1.postgresql环境
[root@localhost ~]# yum install -y postgresql94-server

[root@localhost ~]# yum install -y postgresql94-contrib

[root@localhost ~]# yum install -y postgresql94-devel

2.mysql环境
##我这安装时显示没有资源
[root@localhost ~]# yum install -y mysql-client #MariaDB-client-10.2.6-1.el7.centos.x86_64
[root@localhost ~]# yum install -y mysql-devel #MariaDB-devel-10.2.6-1.el7.centos.x86_64

##下面三个命令是在安装mysql时应该就会安装,我这边没用到,记下备用
[root@localhost ~]# wget https://dev.mysql.com/get/mysql57-community-release-el7-11.noarch.rpm
[root@localhost ~]# rpm -ivh mysql57-community-release-el7-11.noarch.rpm
[root@localhost ~]# yum install -y mysql-community* --skip-broken
##大招!!安装很多mysql环境,我这边没用到,记下备用
[root@localhost ~]# yum install mysql-*
3.安装mysql_fdw
##下载mysql_fdw
[root@localhost ~]# wget -c http://api.pgxn.org/dist/mysql_fdw/2.1.2/mysql_fdw-2.1.2.zip
##将下载后的压缩文件放到linux服务器上
[root@localhost ~]# unzip mysql_fdw-2.1.2.zip
##进入mysql_fdw文件夹
[root@localhost ~]# cd mysql_fdw-2.1.2
##设置环境
[root@localhost mysql_fdw-2.1.2]# export PATH=/usr/pgsql-9.4/bin/:/usr/lib64/mysql:$PATH make USE_PGXS=1
##安装
[root@localhost mysql_fdw-2.1.2]# make install
4.测试mysql_fdw
##安装到这一步后,表示编译成功了。接下来看一下是否安装成功。
##登陆postgresql
[root@localhost ~]# su - postgres
-bash-4.2$ psql
postgres=# CREATE EXTENSION mysql_fdw;
##如果这里报错

##则需要创建一个连接,解决方案如下
[root@localhost ~]# ln -s /usr/lib64/mysql/libmysqlclient.so.18.0.0 /usr/pgsql-9.4/lib/libmysqlclient.so
或者
[root@localhost ~]# sudo yum install libmysqlclient-dev
##如果这步报错,libmysqlclient.so找不到。可以直接全系统找,找到粘贴到mysql位置下即可(这段记录有点模糊)
[root@localhost ~]# locate libmysqlclient.so