Activity(活动)
- Activity(活动)是一种展示型组件,它主要用于实现应用功能逻辑,并通过界面显示数据或接收用户输入。
- 一个应用程序可以包含零个或多个活动。没有活动的应用程序,用户将无法看到程序界面,这种应用程序通常在后台运行,不涉及用户交互。
活动的基本操作
- 为活动绑定自定义视图:setContentView(R.layout.activity_main);
- 启动另一个活动:startActivity(intent);
- 结束活动:finish();
实例1:具有页面跳转功能的App
具体结果如图

- 新建一个ActivityWork的工程

- 新建第二个Activity文件
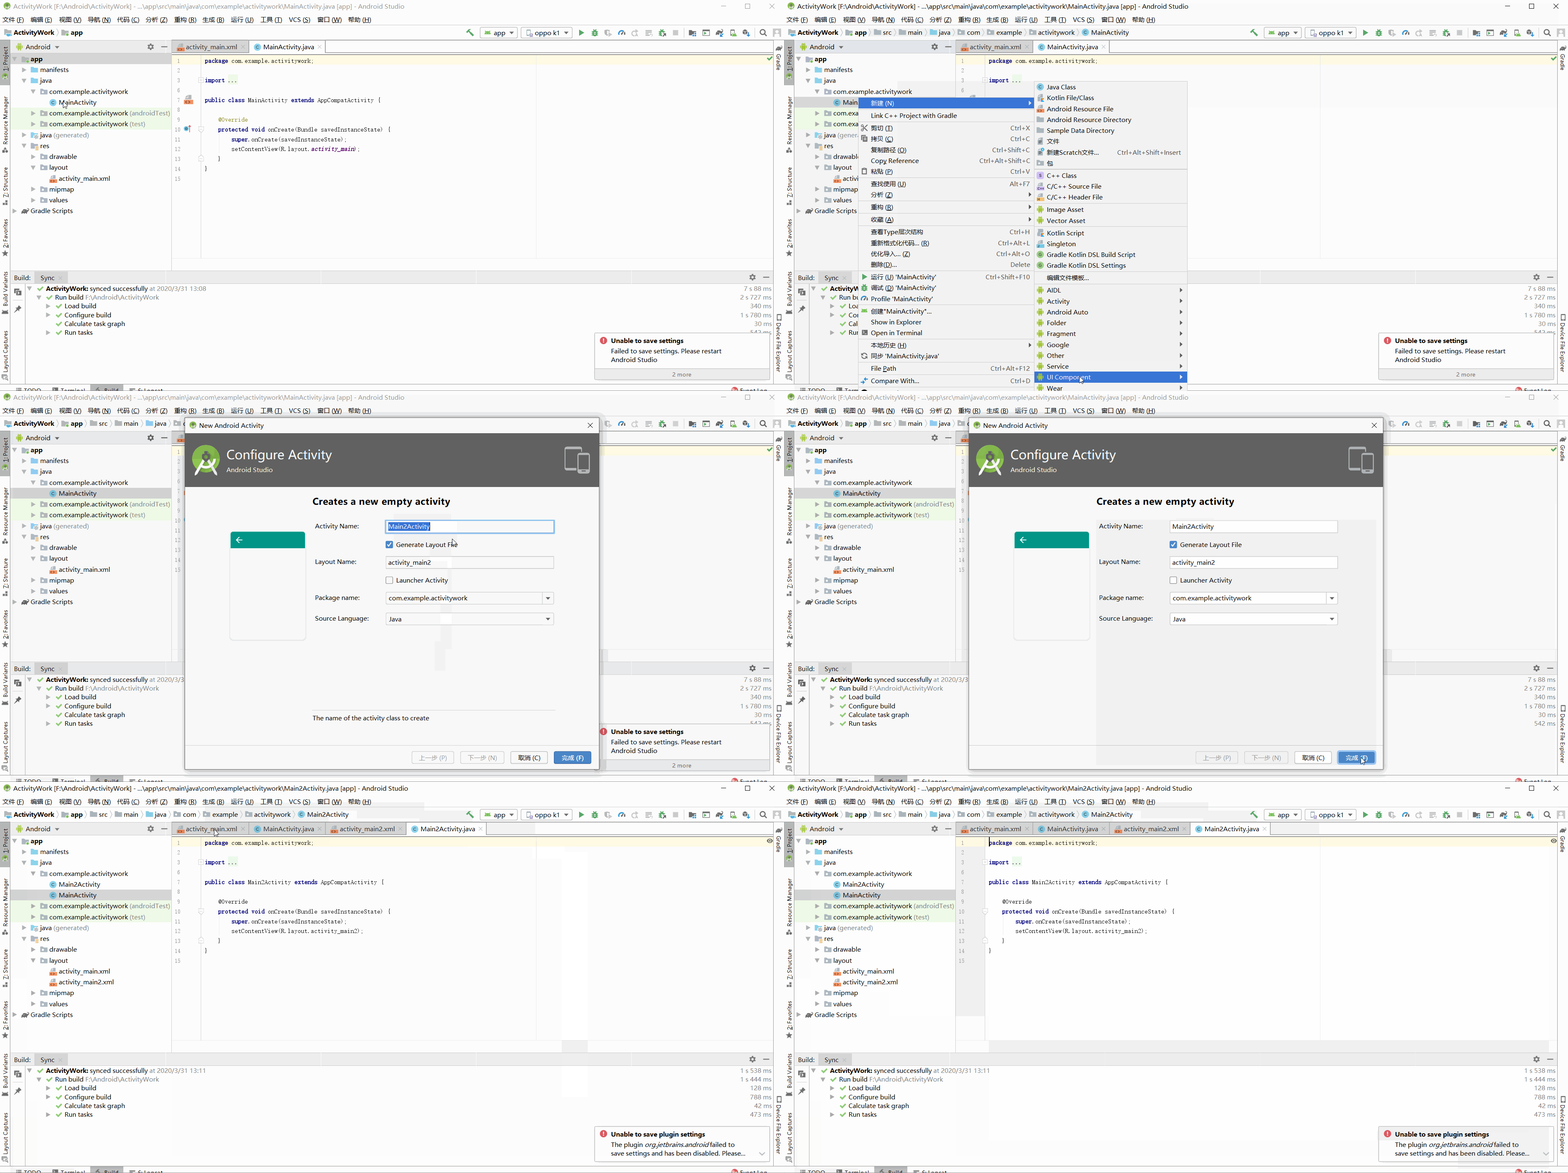
- 在两个界面分别新建一个按钮,具体如图:
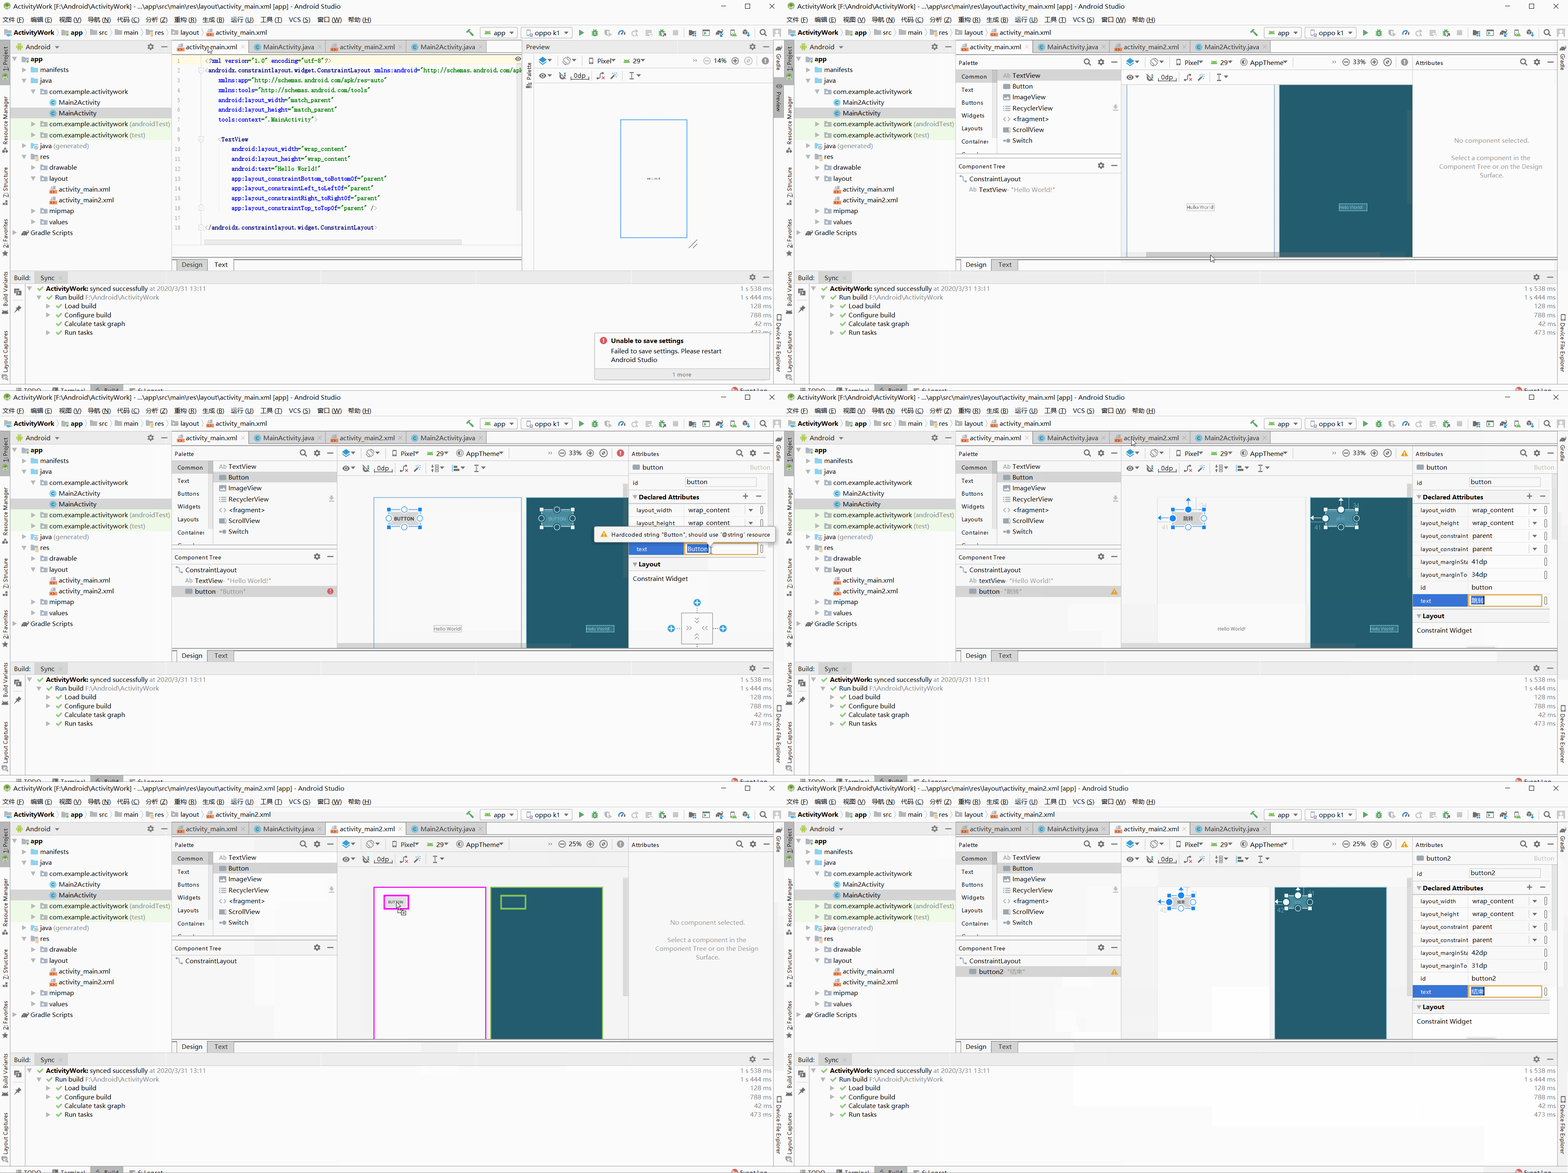
- 分别编辑上图中的两个Java程序,具体代码如下:
 1 import androidx.appcompat.app.AppCompatActivity;
 2
 3 import android.content.Intent;
 4 import android.os.Bundle;
 5 import android.view.View;
 6 import android.widget.Button;
 7
 8 public class MainActivity extends AppCompatActivity {
 9     private Button button;
10
11     @Override
12     protected void onCreate(Bundle savedInstanceState) {
13         super.onCreate(savedInstanceState);
14         setContentView(R.layout.activity_main);
15
16         button = (Button)findViewById(R.id.button);
17
18         button.setOnClickListener(new View.OnClickListener() {
19             @Override
20             public void onClick(View v) {
21                 Intent intent = new Intent(MainActivity.this,Main2Activity.class);
22                 startActivity(intent);
23             }
24         });
25     }
26 }
MainActivity.java
 1 import androidx.appcompat.app.AppCompatActivity;
 2
 3 import android.os.Bundle;
 4 import android.view.View;
 5 import android.widget.Button;
 6
 7 public class Main2Activity extends AppCompatActivity {
 8     private Button button2;
 9
10     @Override
11     protected void onCreate(Bundle savedInstanceState) {
12         super.onCreate(savedInstanceState);
13         setContentView(R.layout.activity_main2);
14
15         button2 = (Button)findViewById(R.id.button2);
16         button2.setOnClickListener(new View.OnClickListener() {
17             @Override
18             public void onClick(View v) {
19                 finish();
20             }
21         });
22     }
23 }
Main2Activity.java
- 运行之后,如上图所示!!!
Activity的生命周期
- Activity的生命周期指Activity从创建到被销毁的整个过程。在一个生命周期内,Activity可能存在多种状态。深入了解Activity的生命周期,有助于更合理管理应用程序资源,设计出效率更高的应用。
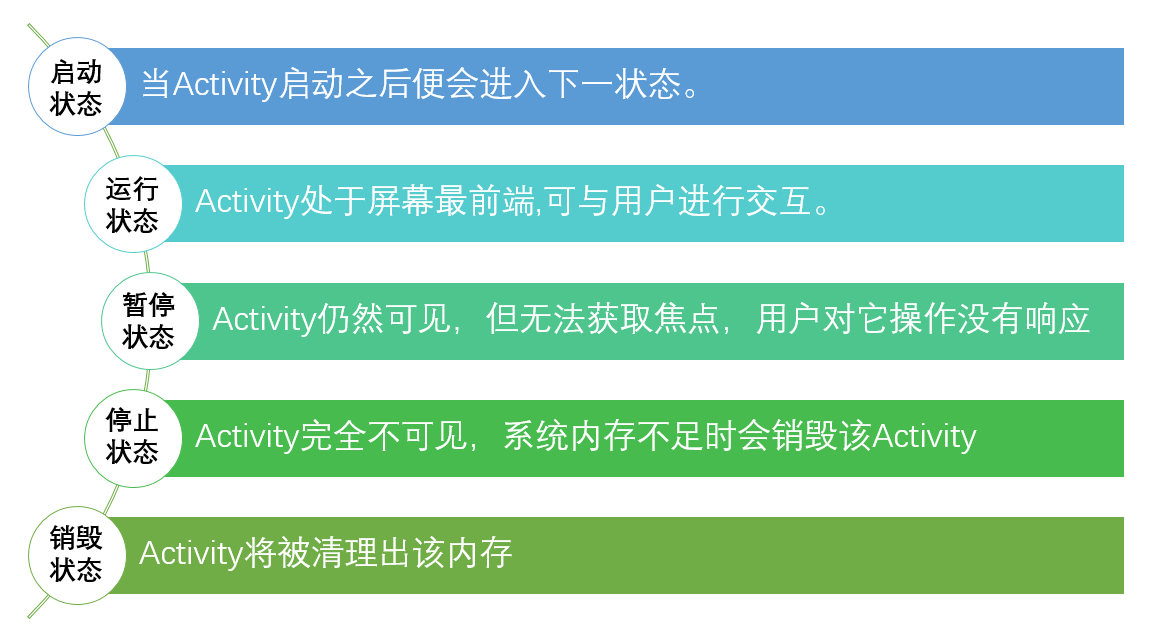
- Activity生命周期包括创建、可见、获取焦点、失去焦点、不可见、重新可见、销毁等环节,每个环节Activity都定义了相关的回调方法,具体如下:
| 名称 | 调用时间 |
|---|---|
| onCreate(Bundle savedInstanceState) | Activity创建时调用,通常做一些初始化设置。 |
| onStart() | Activity 变为在屏幕上对用户可见时调用。 |
| onResume() | Activity获取焦点时调用。 |
| onPause() | 当前Activity被其他Activity覆盖或屏幕锁屏时调用。 |
| onStop() | Activity对用户不可见时调用。 |
| onRestart() | 重新启动已经停止的 Activity 时调用。 |
| onDestroy() | Activity销毁时调用。 该方法被调用可能是因为有人直接调用 finish() 方法或者系统决定停止该活动以释放资源。 |
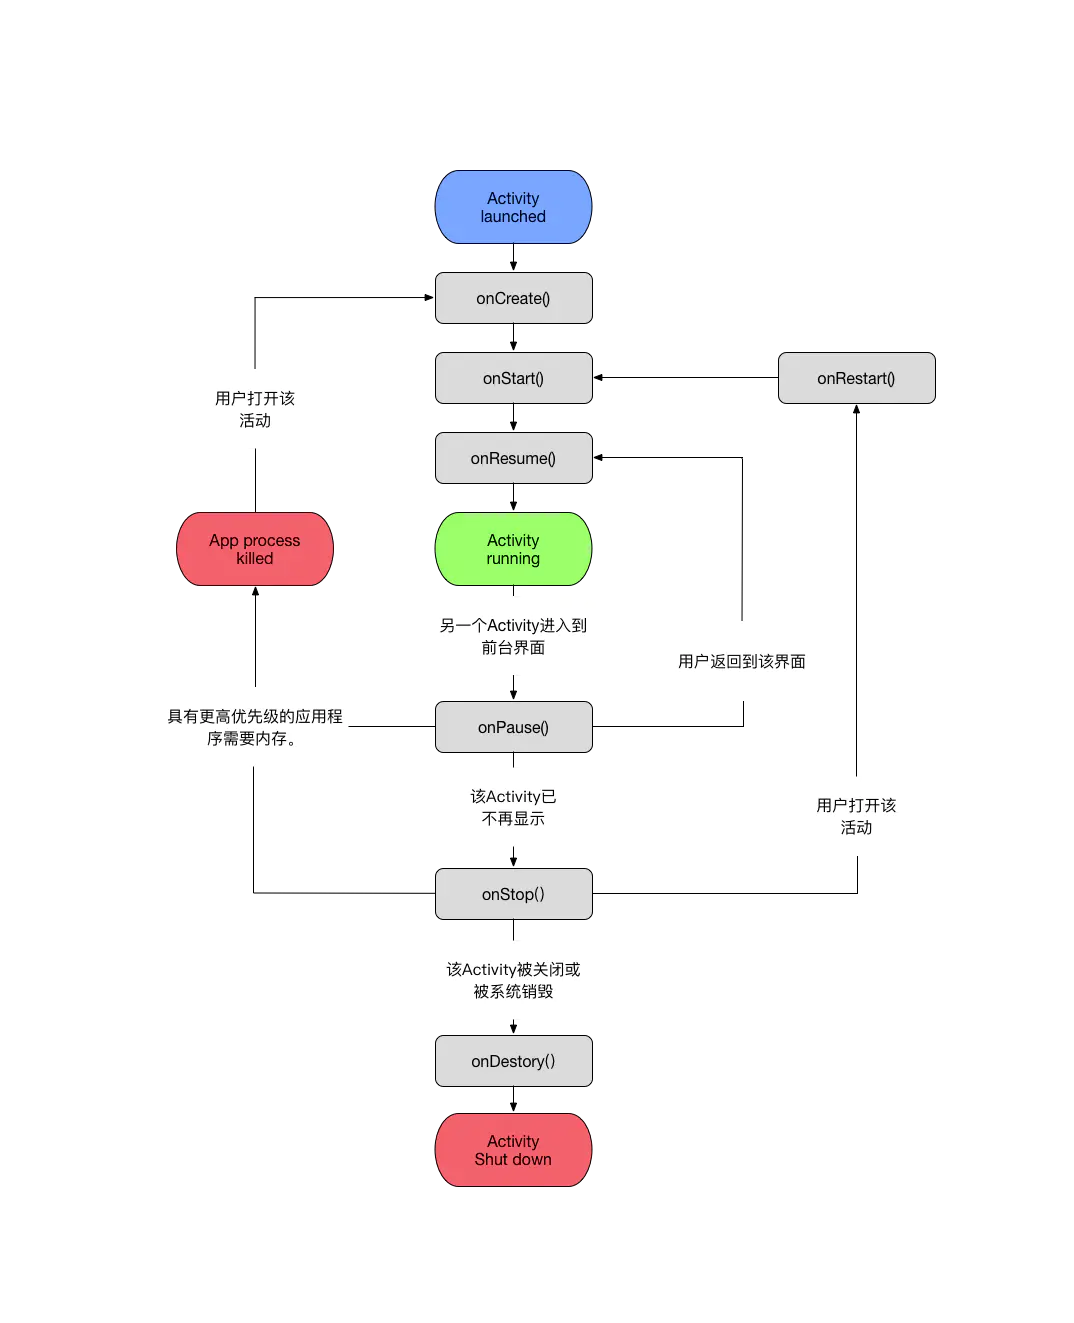
- Activity 生命周期中方法的调用过程如图所示,可以很直观地了解到 Activity 的整个生命周期。
- Activity 的生命周期表现在三个层面,如图所示,可以更清楚地了解 Activity 的运行机制。
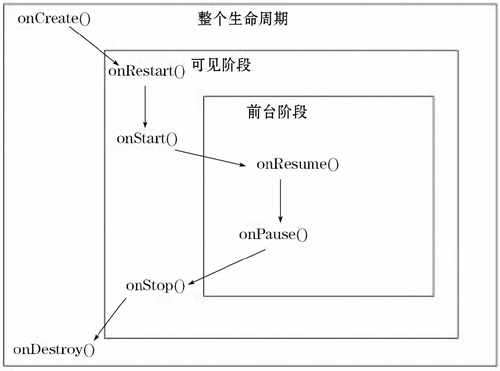
- 如果 Activity 离开可见阶段,长时间失去焦点,就很可能被系统销毁以释放资源。当然,即使该 Activity 被销毁掉,用户对该 Activity 所做的更改也会被保存在 Bundle 对象中,当用户需要重新显示该 Activity 时,Android 系统会根据之前保存的用户更改信息将该 Activity 重建。
Activity的数据传递
- 使用putExtra()传递数据
- putExtra(name, value)方法可将指定的数据封装到Intent对象中。其中,name为表示数据名称的字符串,value为要传递的各种数据类型的值。
- 要获取Intent对象中封装的数据,可调用各种getXXXExtra()方法。
1. 使用Inten的putExtra传递
| 名称 | 调用时间 |
| getCharExtra(Stringname,chardefaultValue) | 获取指定name的char类型数据。 |
| getFloatExtra(Stringname,floatdefaultValue) | 获取指定name的float类型数据。 |
| getFloatArrayExtra(Stringname) | 获取指定name的float类型数组。 |
| getlntArrayExtra(Stringname) | 获取指定name的int类型数组。 |
| getlntExtra(Stringname,intdefaultValue) | 获取指定name的int类型数据。 |
| getStringArrayExtra(Stringname) | 获取指定name的String类型数组。 |
| getstringExtra(Stringname) | 获取指定name的String类型数据。 |
| getSerializableExtra(Stringname) | 获取指定name的对象数据。 |
- 这是两个实现数据传输、接受界面xml文件
activity_main.xml
 1 <?xml version="1.0" encoding="utf-8"?>
 2 <androidx.constraintlayout.widget.ConstraintLayout
 3     xmlns:android="http://schemas.android.com/apk/res/android"
 4     xmlns:app="http://schemas.android.com/apk/res-auto"
 5     xmlns:tools="http://schemas.android.com/tools"
 6     android:layout_width="match_parent"
 7     android:layout_height="match_parent"
 8     tools:context=".MainActivity">
 9
10     <Button
11         android:id="@+id/button"
12         android:layout_width="wrap_content"
13         android:layout_height="wrap_content"
14         android:layout_marginStart="41dp"
15         android:layout_marginTop="34dp"
16         android:text="跳转"
17         app:layout_constraintStart_toStartOf="parent"
18         app:layout_constraintTop_toTopOf="parent" />
19
20 </androidx.constraintlayout.widget.ConstraintLayout>
activity_main2.xml
 1 <?xml version="1.0" encoding="utf-8"?>
 2 <androidx.constraintlayout.widget.ConstraintLayout
 3     xmlns:android="http://schemas.android.com/apk/res/android"
 4     xmlns:app="http://schemas.android.com/apk/res-auto"
 5     xmlns:tools="http://schemas.android.com/tools"
 6     android:layout_width="match_parent"
 7     android:layout_height="match_parent"
 8     tools:context=".Main2Activity">
 9
10     <TextView
11         android:id="@+id/textView"
12         android:layout_width="wrap_content"
13         android:layout_height="wrap_content"
14         android:layout_marginTop="84dp"
15         android:text="TextView"
16         android:textSize="30sp"
17         app:layout_constraintStart_toStartOf="parent"
18         app:layout_constraintTop_toTopOf="parent" />
19 </androidx.constraintlayout.widget.ConstraintLayout>
- 两个Java文件
MainActivity.java
 1 import androidx.appcompat.app.AppCompatActivity;
 2
 3 import android.content.Intent;
 4 import android.os.Bundle;
 5 import android.view.View;
 6 import android.widget.Button;
 7
 8 public class MainActivity extends AppCompatActivity {
 9
10     private Button button;
11     @Override
12     protected void onCreate(Bundle savedInstanceState) {
13         super.onCreate(savedInstanceState);
14         setContentView(R.layout.activity_main);
15
16         button = findViewById(R.id.button);
17         button.setOnClickListener(new View.OnClickListener() {
18             @Override
19             public void onClick(View v) {
20                 Intent intent = new Intent(MainActivity.this,Main2Activity.class);
21                 //使用putExtra传递数据
22                 intent.putExtra("name","zhangsan");
23                 intent.putExtra("score",95);
24
25                 startActivity(intent);
26             }
27         });
28     }
29 }
Main2Activity.java
 1 import androidx.appcompat.app.AppCompatActivity;
 2
 3 import android.content.Intent;
 4 import android.os.Bundle;
 5 import android.widget.TextView;
 6
 7 import androidx.appcompat.app.AppCompatActivity;
 8
 9 public class Main2Activity extends AppCompatActivity {
10
11     private TextView textView;
12
13     @Override
14     protected void onCreate(Bundle savedInstanceState) {
15         super.onCreate(savedInstanceState);
16         setContentView(R.layout.activity_main2);
17
18         Intent intent = getIntent();
19
20         //使用getExtra接收数据
21         String name = intent.getStringExtra("name");
22         int score = intent.getIntExtra("score", 0);
23
24         textView = findViewById(R.id.textView);
25         textView.setText("name=" + name + ",score=" + score);
26     }
27 }
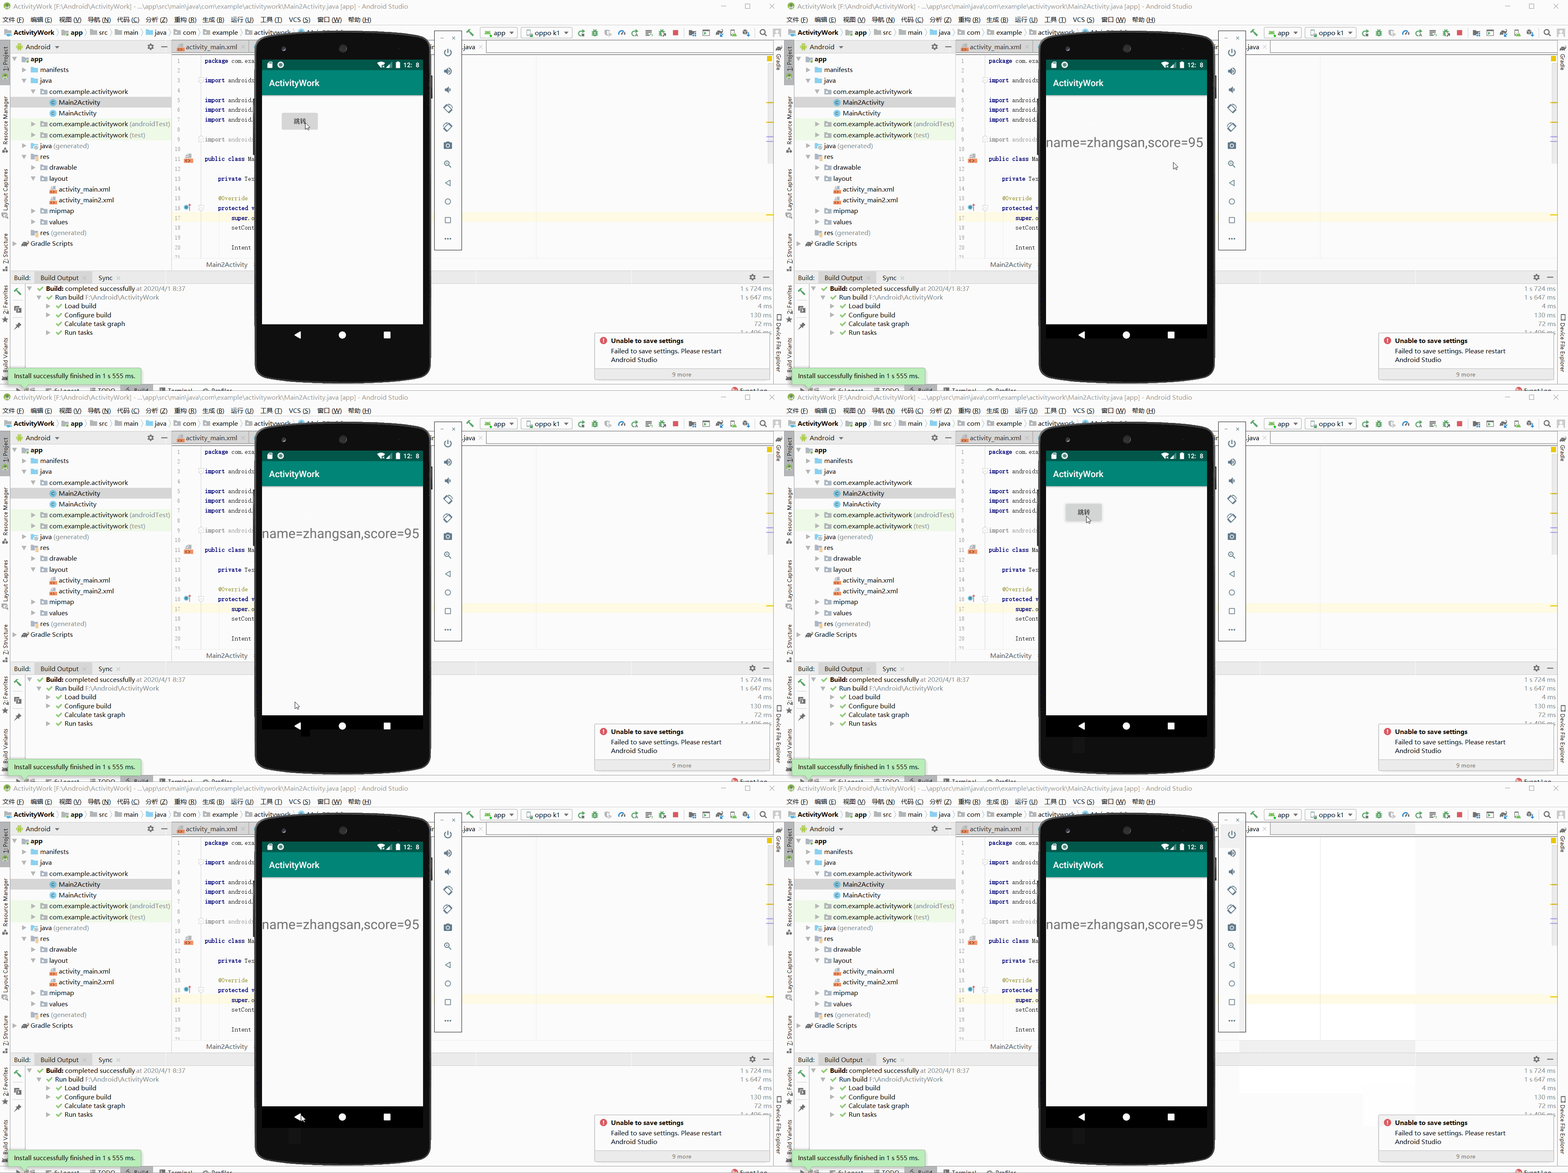
- 实现如图:
2. 使用Intention的Bundle传递
- 将各种数据封装到一个Bundle对象中,再将Bundle对象封装到Intent对象中传递给启动的活动。
- Bundle对象的各种putXXX(String key, XXX value)方法,可将XXX类型的数据封装到其中,对应的用getXXX(String key)方法从其中获取数据。
- Bundle对象准备好之后,调用putExtras(bundle)或putExtra(name,bundle)方法将其封装到Intent对象中。
- 要从Intent对象中获取Bundle对象时,调用对应的getExtras()或getBundleExtra()方法即可。
操作步骤与putExtra()传递数据类似,只需更改上面四个文件中的两个Java文件,具体代码如下:
MainActivity.java
 1 import androidx.appcompat.app.AppCompatActivity;
 2
 3 import android.content.Intent;
 4 import android.os.Bundle;
 5 import android.view.View;
 6 import android.widget.Button;
 7
 8 public class MainActivity extends AppCompatActivity {
 9
10     private Button button;
11     @Override
12     protected void onCreate(Bundle savedInstanceState) {
13         super.onCreate(savedInstanceState);
14         setContentView(R.layout.activity_main);
15
16         button = findViewById(R.id.button);
17         button.setOnClickListener(new View.OnClickListener() {
18             @Override
19             public void onClick(View v) {
20                 Intent intent = new Intent(MainActivity.this,Main2Activity.class);
21
22                 //使用Bundle传递数据
23             Bundle bundle = new Bundle();
24             bundle.putString("name","zhangsan");
25             bundle.putInt("score",95);
26             intent.putExtras(bundle);
27
28                 startActivity(intent);
29             }
30         });
31     }
32 }
Main2Activity.java
 1 import androidx.appcompat.app.AppCompatActivity;
 2
 3 import android.content.Intent;
 4 import android.os.Bundle;
 5 import android.widget.TextView;
 6
 7 import androidx.appcompat.app.AppCompatActivity;
 8
 9 public class Main2Activity extends AppCompatActivity {
10
11     private TextView textView;
12
13     @Override
14     protected void onCreate(Bundle savedInstanceState) {
15         super.onCreate(savedInstanceState);
16         setContentView(R.layout.activity_main2);
17
18         Intent intent = getIntent();
19
20         //使用Bundle接收数据
21         Bundle bundle = intent.getExtras();
22         String name = bundle.getString("name");
23         int score = bundle.getInt("score",0);
24
25         textView = findViewById(R.id.textView);
26         textView.setText("name=" + name + ",score=" + score);
27     }
28 }
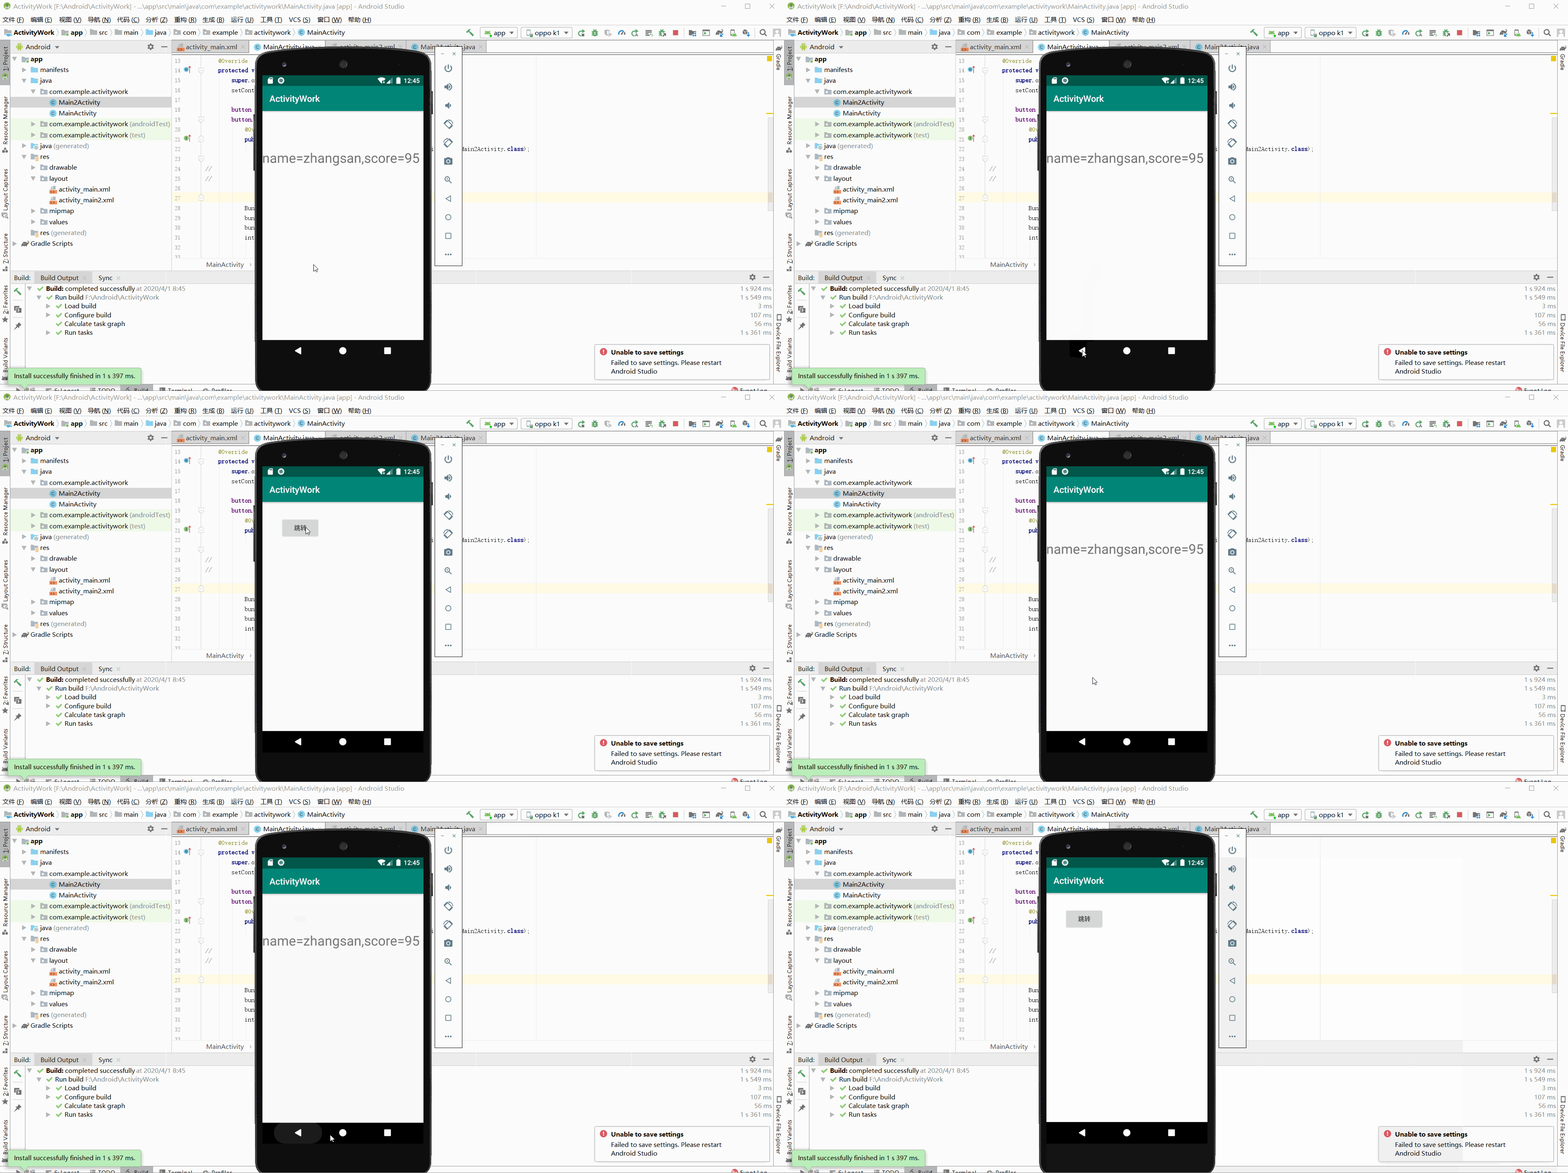
- 运行显示如图:
- 以下几种就不做详细赘述,只提供代码。
3. 使用静态变量传递数据
第一个Activity
1 Intent intent = new Intent(MainActivity.this,TwoActivity.class);
2 TwoActivity.name="牛逼";
3 TwoActivity.str="你说";
4 startActivity(intent);
第二个Activity
1 //静态变量
2 protected static String name;
3 protected static String str;
4 tv.setText(str+name);
4. 使用序列化对象Seriazable
工具类
 1 import java.io.Serializable;
 2 class DataBean implements Serializable {
 3  private String name;
 4  private String sex;
 5  public String getName() {
 6  return name;
 7  }
 8  public void setName(String name) {
 9  this.name = name;
10  }
11  public String getSex() {
12  return sex;
13  }
14  public void setSex(String sex) {
15  this.sex = sex;
16  }
17 }
第一个Activity
1 //创建意图
2  Intent intent = new Intent(MainActivity.this,TwoActivity.class);
3  DataBean bean = new DataBean();
4  //通过set方法把数据保存到DataBean对象中
5  bean.setName("啦啦");
6  bean.setSex("男");
7  intent.putExtra("key", bean);
8  startActivity(intent);
第二个Activity
1 Intent intent = getIntent();
2  //反序列化数据对象
3  Serializable se = intent.getSerializableExtra("key");
4  if(se instanceof DataBean){
5   //获取到携带数据的DataBean对象db
6   DataBean db = (DataBean) se;
7   tv.setText(db.getName()+"==="+db.getSex());
8  }
5. SharedPreferences传递数据
第一个Activity中
1 SharedPreferences sp = this.getSharedPreferences("info", 1);
2  //获取sp编辑器
3  Editor edit = sp.edit();
4  edit.putString("data", str);
5  edit.commit();
6  //创建意图对象
7  Intent intent = new Intent(MainActivity.this,TwoActivity.class);
8  //激活意图
9  startActivity(intent);
第二个Activity中
SharedPreferences sp = this.getSharedPreferences("info", 1);
//设置数据
tv.setText(sp.getString("data", ""));
6. 使用Activity销毁时传递数据
第一个Activity中
1  Intent intent = new Intent(MainActivity.this,TwoActivity.class);
2   //用一种特殊方式开启Activity
3  startActivityForResult(intent, 11);
4 //设置数据
5 protected void onActivityResult(int requestCode, int resultCode, Intent data) {
6  super.onActivityResult(requestCode, resultCode, data);
7  String str = data.getStringExtra("data");
8  tvOne.setText(str);
9 }
第二个activity中
1 //设置返回的数据
2  Intent intent = new Intent();
3  intent.putExtra("data", edtOne.getText().toString().trim());
4  setResult(3, intent);
5  //关闭当前activity
6  finish();
7. 获取活动返回的数据
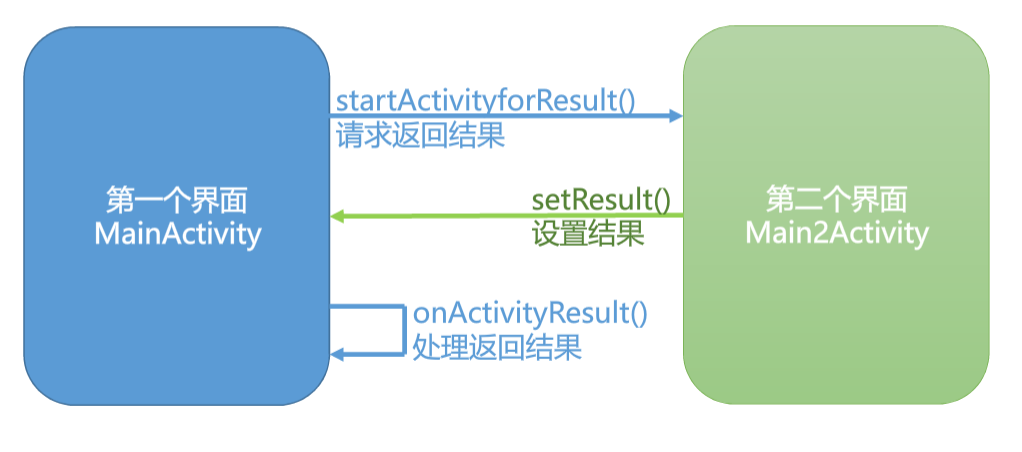
- startActivityForResult(intent,requestCode)方法来启动活动,请求返回结果:
- 参数intent是一个Intent对象,用于封装需要传递给活动的数据;
- 参数requestCode为请求码,是一个整数,用来标识当前请求;一个活动可能会接收到其他不同活动的请求,从活动返回时,它会原样返回接收到的请求码;
- 在处理返回结果时,可通过请求码判断是不是从所请求的活动返回。
-
在第二个Activity中,用setResult(resultCode,intent)方法设置返回结果resultCode为结果代码,intent为封装了返回数据的Intent对象。
-
在第一个Activity中需重写onActivityResult(int requestCode,int resultCodey, Intent data)方法来处理返回结果:
-
requestCode为从所请求的活动返回的它所接收到的请求码;
-
resultCode为结果代码,常量RESULTCANCELED表示用户取消了操作,RESULT_OK表示用户正确完成了操作; - data为请求活动返回的Intent对象,从中可获取返回的数据。
-
activity_main.xml
 1 <?xml version="1.0" encoding="utf-8"?>
 2 <androidx.constraintlayout.widget.ConstraintLayout
 3     xmlns:android="http://schemas.android.com/apk/res/android"
 4     xmlns:app="http://schemas.android.com/apk/res-auto"
 5     xmlns:tools="http://schemas.android.com/tools"
 6     android:layout_width="match_parent"
 7     android:layout_height="match_parent"
 8     tools:context=".MainActivity">
 9
10     <TextView
11         android:id="@+id/textView"
12         android:layout_width="wrap_content"
13         android:layout_height="wrap_content"
14         android:text="Hello World!"
15         app:layout_constraintBottom_toBottomOf="parent"
16         app:layout_constraintLeft_toLeftOf="parent"
17         app:layout_constraintRight_toRightOf="parent"
18         app:layout_constraintTop_toTopOf="parent" />
19
20     <Button
21         android:id="@+id/button"
22         android:layout_width="wrap_content"
23         android:layout_height="wrap_content"
24         android:layout_marginStart="70dp"
25         android:layout_marginLeft="70dp"
26         android:layout_marginTop="90dp"
27         android:text="Button"
28         app:layout_constraintStart_toStartOf="parent"
29         app:layout_constraintTop_toTopOf="parent" />
30
31 </androidx.constraintlayout.widget.ConstraintLayout>
activity_main2.xml
 1 <?xml version="1.0" encoding="utf-8"?>
 2 <androidx.constraintlayout.widget.ConstraintLayout
 3     xmlns:android="http://schemas.android.com/apk/res/android"
 4     xmlns:app="http://schemas.android.com/apk/res-auto"
 5     xmlns:tools="http://schemas.android.com/tools"
 6     android:layout_width="match_parent"
 7     android:layout_height="match_parent"
 8     tools:context=".Main2Activity">
 9
10     <Button
11         android:id="@+id/button2"
12         android:layout_width="wrap_content"
13         android:layout_height="wrap_content"
14         android:layout_marginStart="82dp"
15         android:layout_marginLeft="82dp"
16         android:layout_marginTop="153dp"
17         android:text="Button"
18         app:layout_constraintStart_toStartOf="parent"
19         app:layout_constraintTop_toTopOf="parent" />
20 </androidx.constraintlayout.widget.ConstraintLayout>
MainActivity.java
 1 import android.content.Intent;
 2 import android.os.Bundle;
 3 import android.view.View;
 4 import android.widget.Button;
 5 import android.widget.TextView;
 6
 7 import androidx.annotation.Nullable;
 8 import androidx.appcompat.app.AppCompatActivity;
 9
10 /**
11  * 点击Button将从第一个界面跳到第二个界面,第二个界面点击Button将跳回到第一个界面,并将数据返回第一个界面
12  */
13 public class MainActivity extends AppCompatActivity {
14
15     private Button button;
16     private TextView textView;
17
18     @Override
19     protected void onCreate(Bundle savedInstanceState) {
20         super.onCreate(savedInstanceState);
21         setContentView(R.layout.activity_main);
22
23         textView = findViewById(R.id.textView);
24
25         button = findViewById(R.id.button);
26         button.setOnClickListener(new View.OnClickListener() {
27             @Override
28             public void onClick(View v) {
29                 Intent intent = new Intent(MainActivity.this, Main2Activity.class);
30                 //请求返回结果
31                 startActivityForResult(intent, 1);
32             }
33         });
34     }
35
36     /**
37      * 返回结果处理
38      *
39      * @param requestCode
40      * @param resultCode
41      * @param data
42      */
43     @Override
44     protected void onActivityResult(int requestCode, int resultCode, @Nullable Intent data) {
45         super.onActivityResult(requestCode, resultCode, data);
46         if (requestCode == 1) {
47             if (resultCode == 1) {
48                 //取出返回结果
49                 String string = data.getStringExtra("ExtraData");
50                 //将返回结果设置到textView上
51                 textView.setText(string);
52             }
53         }
54
55     }
56 }
Main2Activity.java
 1 import android.content.Intent;
 2 import android.os.Bundle;
 3 import android.view.View;
 4 import android.widget.Button;
 5
 6 import androidx.appcompat.app.AppCompatActivity;
 7
 8 public class Main2Activity extends AppCompatActivity {
 9
10     private Button button2;
11
12     @Override
13     protected void onCreate(Bundle savedInstanceState) {
14         super.onCreate(savedInstanceState);
15         setContentView(R.layout.activity_main2);
16
17         button2 = findViewById(R.id.button2);
18         button2.setOnClickListener(new View.OnClickListener() {
19             @Override
20             public void onClick(View v) {
21                 Intent intent = new Intent();
22                 intent.putExtra("ExtraData", "从第二个界面来的数据");
23                 //设置返回结果,将“ExtraData”的值 通过intent返回
24                 setResult(1, intent);
25                 finish();
26             }
27         });
28     }
29 }
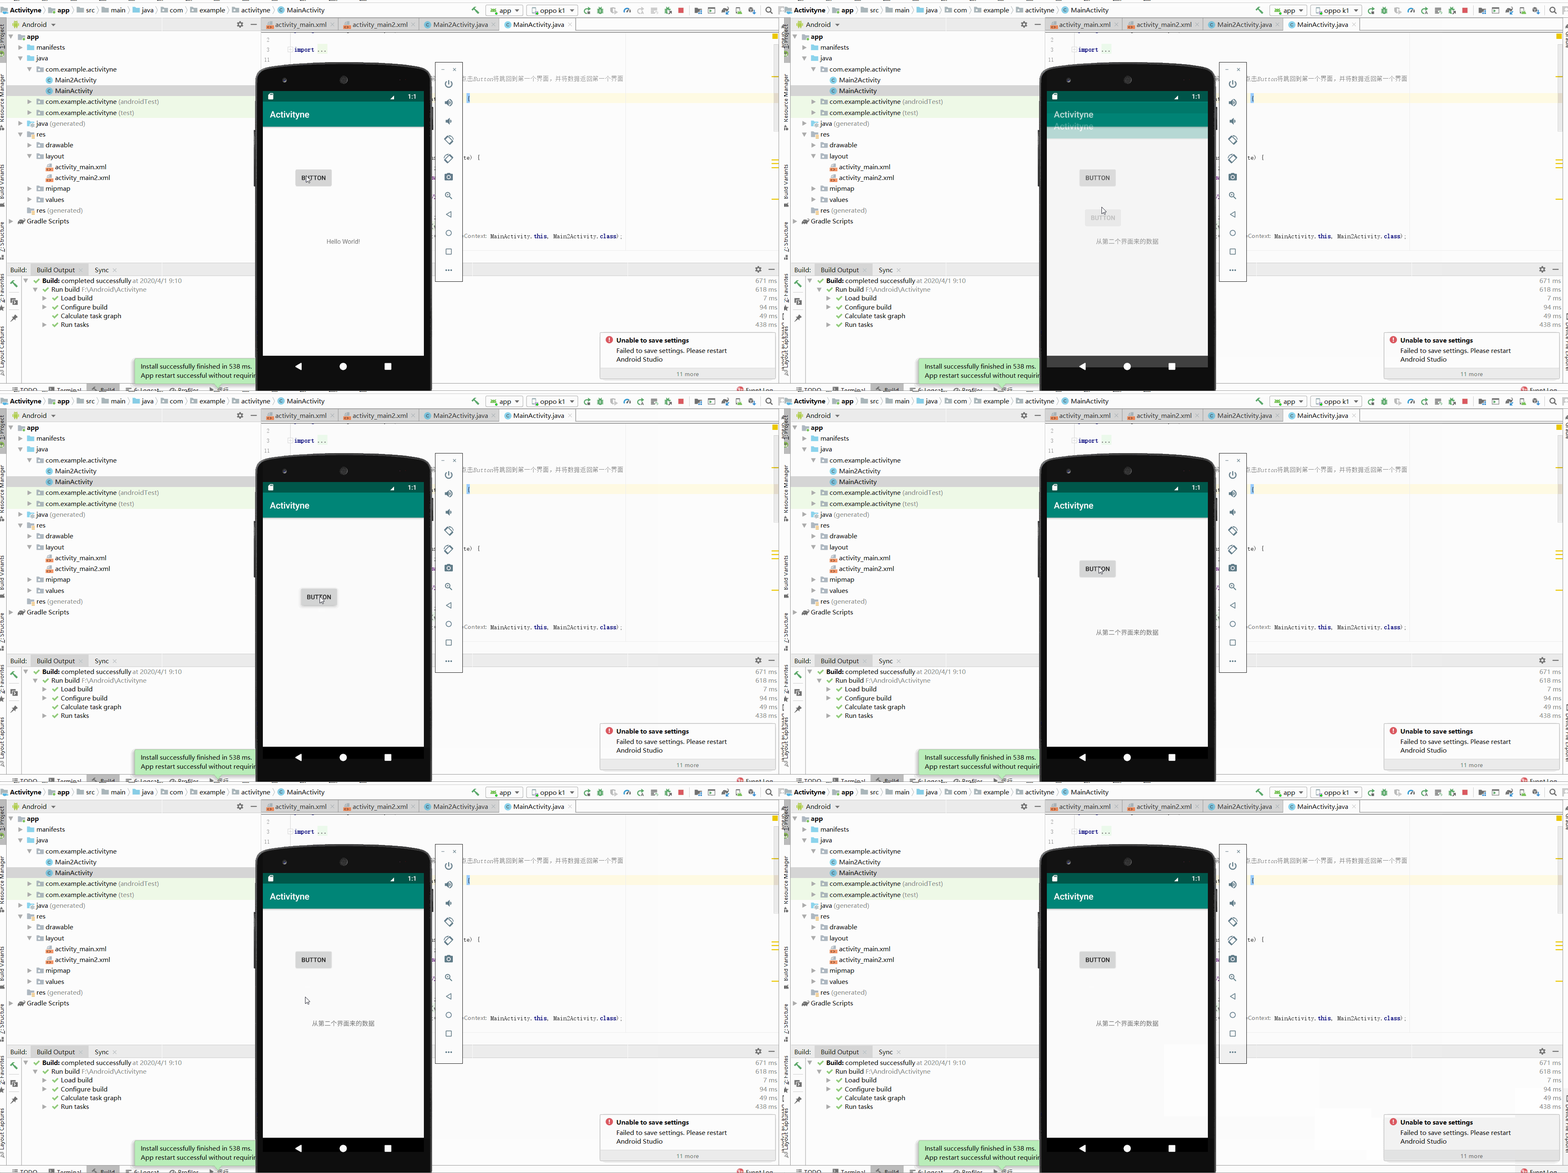
- 运行如图:
- 关于Android的Activity就介绍这么多,如有问题请留言!!!
- 引用参考1:Android之Activity之间的数据通信方式大全(一)
- 引用参考2:Android五种数据传递方法汇总
- 引用参考3:关于Android Activity之间传递数据的6种方式