21 使用Git分布式版本控制系统
21.1 分布式版本控制系统
21.2 使用Git服务程序
在正式使用前,我们还需要弄清楚Git的三种重要模式,分别是已提交、已修改和已暂存:
已提交(committed):表示数据文件已经顺利提交到Git数据库中。
已修改(modified):表示数据文件已经被修改,但未被保存到Git数据库中。
已暂存(staged):表示数据文件已经被修改,并会在下次提交时提交到Git数据库中。
提交前的数据文件可能会被随意修改或丢失,但只要把文件快照顺利提交到Git数据库中,那就可以完全放心了,流程为:
1.在工作目录中修改数据文件。
2.将文件的快照放入暂存区域。
3.将暂存区域的文件快照提交到Git仓库中。
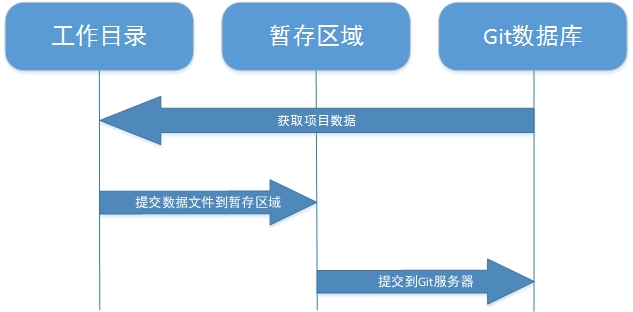
Git的工作流程图
执行yum命令来安装Git服务程序:
[root@linuxprobe ~]# yum install -y git
Loaded plugins: langpacks, product-id, subscription-manager
………………省略部分安装过程………………
Installing:
 git                    x86_64       1.8.3.1-4.el7            rhel7       4.3 M
Installing for dependencies:
 perl-Error             noarch       1:0.17020-2.el7          rhel7        32 k
 perl-Git               noarch       1.8.3.1-4.el7            rhel7        52 k
 perl-TermReadKey       x86_64       2.30-20.el7              rhel7        31 k
………………省略部分安装过程………………
Complete!
首次安装Git服务程序后需要设置下用户名称、邮件信息和编辑器,这些信息会随着文件每次都提交到Git数据库中,用于记录提交者的信息,而Git服务程序的配置文档通常会有三份,针对当前用户和指定仓库的配置文件优先级最高:
| 配置文件 | 作用 |
|---|---|
| /etc/gitconfig | 保存着系统中每个用户及仓库通用配置信息。 |
| ~/.gitconfig ~/.config/git/config | 针对于当前用户的配置信息。 |
| 工作目录/.git/config | 针对于当前仓库数据的配置信息。 |
第一个要配置的是你个人的用户名称和电子邮件地址,这两条配置很重要,每次 Git 提交时都会引用这两条信息,记录是谁提交了文件,并且会随更新内容一起被永久纳入历史记录:
[root@linuxprobe ~]# git config --global user.name "Liu Chuan"
[root@linuxprobe ~]# git config --global user.email "root@linuxprobe.com"
设置vim为默认的文本编辑器:
[root@linuxprobe ~]# git config --global core.editor vim
嗯,此时查看下刚刚配置的Git工作环境信息吧:
[root@linuxprobe ~]# git config --list
user.name=Liu Chuan
user.email=root@linuxprobe.com
core.editor=vim
21.2.1 提交数据
我们可以简单的把工作目录理解成是一个被Git服务程序管理的目录,Git会时刻的追踪目录内文件的改动,另外在安装好了Git服务程序后,默认就会创建好了一个叫做master的分支,我们直接可以提交数据到主线了。
创建本地的工作目录:
[root@linuxprobe ~]# mkdir linuxprobe
[root@linuxprobe ~]# cd linuxprobe/
将该目录初始化转成Git的工作目录:
[root@linuxprobe linuxprobe]# git init
Initialized empty Git repository in /root/linuxprobe/.git/
Git只能追踪类似于txt文件、网页、程序源码等文本文件的内容变化,而不能判断图片、视频、可执行命令等这些二进制文件的内容变化,所以先来尝试往里面写入一个新文件吧。
[root@linuxprobe linuxprobe]# echo "Initialization Git repository" > readme.txt
将该文件添加到暂存区:
[root@linuxprobe linuxprobe]# git add readme.txt
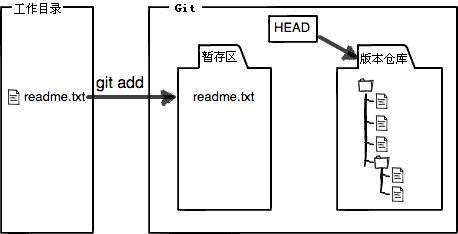
添加到暂存区后再次修改文件的内容:
[root@linuxprobe linuxprobe]# echo "Something not important" >> readme.txt
将暂存区的文件提交到Git版本仓库,命令格式为“git commit -m "提交说明”:
[root@linuxprobe linuxprobe]# git commit -m "add the readme file"
[master (root-commit) 0b7e029] add the readme file
 1 file changed, 1 insertion(+)
 create mode 100644 readme.txt
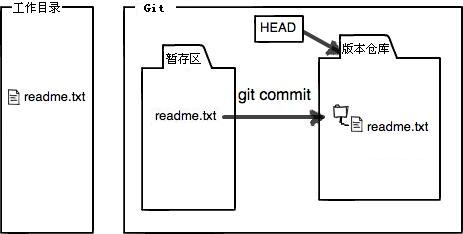
查看当前工作目录的状态(咦,为什么文件还是提示被修改了?):
[root@linuxprobe linuxprobe]# git status
# On branch master
# Changes not staged for commit:
#   (use "git add ..." to update what will be committed)
#   (use "git checkout -- ..." to discard changes in working directory)
#
#	modified:   readme.txt
#
no changes added to commit (use "git add" and/or "git commit -a")
因为提交操作只是将文件在暂存区中的快照版本提交到Git版本数据库,所以当你将文件添加到暂存区后,如果又对文件做了修改,请一定要再将文件添加到暂存区后提交到Git版本数据库:
第一次修改 -> git add -> 第二次修改 -> git add -> git commit
查看当前文件内容与Git版本数据库中的差别:
[root@linuxprobe linuxprobe]# git diff readme.txt
diff --git a/readme.txt b/readme.txt
index cb06697..33d16d0 100644
--- a/readme.txt
+++ b/readme.txt
@@ -1 +1,2 @@
 Initialization Git repository
+Something not important
那么现在把文件提交到Git版本数据库吧:
[root@linuxprobe linuxprobe]# git add readme.txt
[root@linuxprobe linuxprobe]# git commit -m "added a line of words"
[master f7814dc] added a line of words
 1 file changed, 1 insertion(+)
再来查看下当前Git版本仓库的状态:
[root@linuxprobe linuxprobe]# git status
# On branch master
nothing to commit, working directory clean
有些时候工作目录内的文件会比较多,懒的把文件一个个提交到暂存区,可以先设置下要忽略上传的文件(写入到"工作目录/.gitignore"文件中),然后使用"git add ."命令来将当前工作目录内的所有文件都一起添加到暂存区域。
//忽略所有以.a为后缀的文件。
*.a
//但是lib.a这个文件除外,依然会被提交。
!lib.a
//忽略build目录内的所有文件。
build/
//忽略build目录内以txt为后缀的文件。
build/*.txt
//指定忽略名字为git.c的文件。
git.c
先在工作目录中创建一个名字为git.c的文件:
[root@linuxprobe linuxprobe]# touch git.c
然后创建忽略文件列表:
[root@linuxprobe linuxprobe]# vim .gitignore
git.c
添加将当前工作目录中的所有文件快照上传到暂存区:
[root@linuxprobe linuxprobe]# git add .
[root@linuxprobe linuxprobe]# git commit -m "add the .gitignore file"
[master c2cce40] add the .gitignore file
 1 file changed, 1 insertion(+)
 create mode 100644 .gitignore
经过刚刚的实验,大家一定发现“添加到暂存区”真是个很麻烦的步骤,虽然使用暂存区的方式可以让提交文件更加的准确,但有时却略显繁琐,如果对要提交的文件完全有把握,我们完全可以追加-a参数,这样Git会将以前所有追踪过的文件添加到暂存区后自动的提交,从而跳过了上传暂存区的步骤,再来修改下文件:
[root@linuxprobe linuxprobe]# echo "Modified again" >> readme.txt
文件被直接提交到Git数据库:
[root@linuxprobe linuxprobe]# git commit -a -m "Modified again"
[master f587f3d] Modified again
 1 file changed, 1 insertion(+)
[root@linuxprobe linuxprobe]# git status
# On branch master
nothing to commit, working directory clean
比如想把git.c也提交上去,便可以这样强制添加文件:
[root@linuxprobe linuxprobe]# git add -f git.c
然后重新提交一次(即修改上次的提交操作):
[root@linuxprobe linuxprobe]# git commit --amend
Modified again
# Please enter the commit message for your changes. Lines starting
# with '#' will be ignored, and an empty message aborts the commit.
# On branch master
# Changes to be committed:
#   (use "git reset HEAD^1 ..." to unstage)
#
#       new file:   git.c
#       modified:   readme.txt
#
//我们简单浏览下提交描述,然后输入:wq!保存并退出。
[master c6f4adf] Modified again
 2 files changed, 1 insertion(+)
 create mode 100644 git.c
21.2.2 移除数据
有些时候会想把已经添加到暂存区的文件移除,但仍然希望文件在工作目录中不丢失,换句话说,就是把文件从追踪清单中删除。
先添加一个新文件,并上传到暂存区:
[root@linuxprobe linuxprobe]# touch database
[root@linuxprobe linuxprobe]# git add database
查看当前的Git状态:
[root@linuxprobe linuxprobe]# git status
# On branch master
# Changes to be committed:
#   (use "git reset HEAD ..." to unstage)
#
#	new file:   database
#
将该文件从Git暂存区域的追踪列表中移除(并不会删除当前工作目录内的数据文件):
[root@linuxprobe linuxprobe]# git rm --cached database
rm 'database'
[root@linuxprobe linuxprobe]# ls
database  git.c  readme.txt
此时文件已经是未追踪状态了:
[root@linuxprobe linuxprobe]# git status
# On branch master
# Untracked files:
#   (use "git add ..." to include in what will be committed)
#
#	database
nothing added to commit but untracked files present (use "git add" to track)
而如果我们想将文件数据从Git暂存区和工作目录中一起删除,可以这样操作:
再将database文件提交到Git暂存区:
[root@linuxprobe linuxprobe]# git add .
使用git rm命令可以直接删除暂存区内的追踪信息及工作目录内的数据文件:
但如果在删除之前数据文件已经被放入到暂存区域的话,Git会担心你勿删未提交的文件而提示报错信息,此时可追加强制删除-f参数。
[root@linuxprobe linuxprobe]# git rm -f database
rm 'database'
[root@linuxprobe linuxprobe]# ls
git.c  readme.txt
查看当前Git的状态:
[root@linuxprobe linuxprobe]# git status
# On branch master
nothing to commit, working directory clean
21.2.3 移动数据
Git不像其他版本控制系统那样跟踪文件的移动操作,如果要修改文件名称,则需要使用git mv命令:
[root@linuxprobe linuxprobe]# git mv readme.txt introduction.txt
发现下次提交时会有一个改名操作:
[root@linuxprobe linuxprobe]# git status
# On branch master
# Changes to be committed:
#   (use "git reset HEAD ..." to unstage)
#
#	renamed:    readme.txt -> introduction.txt
#
提交文件到Git版本仓库:
[root@linuxprobe linuxprobe]# git commit -m "changed name"
[master c2674b7] changed name
 1 file changed, 0 insertions(+), 0 deletions(-)
 rename readme.txt => introduction.txt (100%)
其实我们还可以这样来修改文件名,首先将工作目录下的数据文件改名:
[root@linuxprobe linuxprobe]# mv introduction.txt readme.txt
然后删除Git版本仓库内的文件快照:
[root@linuxprobe linuxprobe]# git rm introduction.txt
rm 'introduction.txt'
最后再将新的文件添加进入:
[root@linuxprobe linuxprobe]# git add readme.txt
[root@linuxprobe linuxprobe]# git commit -m "changed the file name again"
[master d97dd0b] changed the file name again
 1 file changed, 0 insertions(+), 0 deletions(-)
 rename introduction.txt => readme.txt (100%)
21.2.4 历史记录
在完成上面的实验后,我们已经不知不觉有了很多次的提交操作了,可以用git log命令来查看提交历史记录:
[root@linuxprobe linuxprobe]# git log
commit d97dd0beafa082933e044f9213809564ce2bc617
Author: Liu Chuan <root@linuxprobe.com>
Date: Mon Jan 18 01:30:52 2016 -0500

 changed the file name again

commit c2674b7194f1f794dbb980e5d68137dec658672b
Author: Liu Chuan <root@linuxprobe.com>
Date: Mon Jan 18 01:14:56 2016 -0500

 changed name

commit c6f4adf87e2d16e39335b621e8a14f58217fcbc4
Author: Liu Chuan <root@linuxprobe.com>
Date: Mon Jan 18 01:12:06 2016 -0500

 Modified again

commit c2cce402ca019f4cbbf5f0bb5eb41a7e2fe277c3
Author: Liu Chuan <root@linuxprobe.com>
Date: Mon Jan 18 01:11:21 2016 -0500

 add the .gitignore file

commit f7814dc9297799fa000159b0e291142024f0a11a
Author: Liu Chuan <root@linuxprobe.com>
Date: Mon Jan 18 01:10:25 2016 -0500

 added a line of words

commit 0b7e02927d36e82eaa2ef7353d6910a30bf16119
Author: Liu Chuan <root@linuxprobe.com>
Date: Mon Jan 18 01:08:38 2016 -0500

 add the readme file
像上面直接执行git log命令后会看到所有的更新记录(按时间排序,最近更新的会在上面),历史记录会除了保存文件快照,还会详细的记录着文件SHA-1校验和,作者的姓名,邮箱及更新时间,如果只想看最近几条记录,可以直接这样操作:
[root@linuxprobe linuxprobe]# git log -2
commit d97dd0beafa082933e044f9213809564ce2bc617
Author: Liu Chuan <root@linuxprobe.com>
Date: Mon Jan 18 01:30:52 2016 -0500

 changed the file name again

commit c2674b7194f1f794dbb980e5d68137dec658672b
Author: Liu Chuan <root@linuxprobe.com>
Date: Mon Jan 18 01:14:56 2016 -0500

 changed name
我也常用-p参数来展开显示每次提交的内容差异,例如仅查看最近一次的差异:
[root@linuxprobe linuxprobe]# git log -p -1
commit d97dd0beafa082933e044f9213809564ce2bc617
Author: Liu Chuan <root@linuxprobe.com>
Date: Mon Jan 18 01:30:52 2016 -0500

 changed the file name again

diff --git a/introduction.txt b/introduction.txt
deleted file mode 100644
index f3c8232..0000000
--- a/introduction.txt
+++ /dev/null
@@ -1,3 +0,0 @@
-Initialization Git repository
-Something not important
-Modified again
diff --git a/readme.txt b/readme.txt
new file mode 100644
index 0000000..f3c8232
--- /dev/null
+++ b/readme.txt
@@ -0,0 +1,3 @@
+Initialization Git repository
+Something not important
+Modified again
(END)
我们还可以使用--stat参数来简要的显示数据增改行数,这样就能够看到提交中修改过的内容、对文件添加或移除的行数,并在最后列出所有增减行的概要信息(仅看最近两次的提交历史):
[root@linuxprobe linuxprobe]# git log --stat -2
commit d97dd0beafa082933e044f9213809564ce2bc617
Author: Liu Chuan <root@linuxprobe.com>
Date: Mon Jan 18 01:30:52 2016 -0500

 changed the file name again

 introduction.txt | 3 ---
 readme.txt | 3 +++
 2 files changed, 3 insertions(+), 3 deletions(-)

commit c2674b7194f1f794dbb980e5d68137dec658672b
Author: Liu Chuan <root@linuxprobe.com>
Date: Mon Jan 18 01:14:56 2016 -0500

 changed name

 introduction.txt | 3 +++
 readme.txt | 3 ---
 2 files changed, 3 insertions(+), 3 deletions(-)
还有一个超级常用的--pretty参数,它可以根据不同的格式为我们展示提交的历史信息,比如每行显示一条提交记录:
[root@linuxprobe linuxprobe]# git log --pretty=oneline
d97dd0beafa082933e044f9213809564ce2bc617 changed the file name again
c2674b7194f1f794dbb980e5d68137dec658672b changed name
c6f4adf87e2d16e39335b621e8a14f58217fcbc4 Modified again
c2cce402ca019f4cbbf5f0bb5eb41a7e2fe277c3 add the .gitignore file
f7814dc9297799fa000159b0e291142024f0a11a added a line of words
0b7e02927d36e82eaa2ef7353d6910a30bf16119 add the readme file
以更详细的模式输出最近两次的历史记录:
[root@linuxprobe linuxprobe]# git log --pretty=fuller -2
commit d97dd0beafa082933e044f9213809564ce2bc617
Author: Liu Chuan <root@linuxprobe.com>
AuthorDate: Mon Jan 18 01:30:52 2016 -0500
Commit: Liu Chuan <root@linuxprobe.com>
CommitDate: Mon Jan 18 01:30:52 2016 -0500

 changed the file name again

commit c2674b7194f1f794dbb980e5d68137dec658672b
Author: Liu Chuan <root@linuxprobe.com>
AuthorDate: Mon Jan 18 01:14:56 2016 -0500
Commit: Liu Chuan <root@linuxprobe.com>
CommitDate: Mon Jan 18 01:14:56 2016 -0500

 changed name
还可以使用format参数来指定具体的输出格式,这样非常便于后期编程的提取分析哦,常用的格式有:
| %s | 提交说明。 |
|---|---|
| %cd | 提交日期。 |
| %an | 作者的名字。 |
| %cn | 提交者的姓名。 |
| %ce | 提交者的电子邮件。 |
| %H | 提交对象的完整SHA-1哈希字串。 |
| %h | 提交对象的简短SHA-1哈希字串。 |
| %T | 树对象的完整SHA-1哈希字串。 |
| %t | 树对象的简短SHA-1哈希字串。 |
| %P | 父对象的完整SHA-1哈希字串。 |
| %p | 父对象的简短SHA-1哈希字串。 |
| %ad | 作者的修订时间。 |
另外作者和提交者是不同的,作者才是对文件作出实际修改的人,而提交者只是最后将此文件提交到Git版本数据库的人。
查看当前所有提交记录的简短SHA-1哈希字串与提交者的姓名:
[root@linuxprobe linuxprobe]# git log --pretty=format:"%h %cn"d97dd0b Liu Chuan
c2674b7 Liu Chuan
c6f4adf Liu Chuan
c2cce40 Liu Chuan
f7814dc Liu Chuan
0b7e029 Liu Chuan
21.2.5 还原数据
还原数据是每一个版本控制的基本功能,先来随意修改下文件吧:
[root@linuxprobe linuxprobe]# echo "Git is a version control system" >> readme.txt
然后将文件提交到Git版本数据库:
[root@linuxprobe linuxprobe]# git add readme.txt
[root@linuxprobe linuxprobe]# git commit -m "Introduction software"
[master a41441f] Introduction software
 1 file changed, 1 insertion(+)
此时觉得写的不妥,想要还原某一次提交的文件快照:
[root@linuxprobe linuxprobe]# git log --pretty=oneline
a41441f985549a0b91f22f535ebc611c530b5b27 Introduction software
d97dd0beafa082933e044f9213809564ce2bc617 changed the file name again
c2674b7194f1f794dbb980e5d68137dec658672b changed name
c6f4adf87e2d16e39335b621e8a14f58217fcbc4 Modified again
c2cce402ca019f4cbbf5f0bb5eb41a7e2fe277c3 add the .gitignore file
f7814dc9297799fa000159b0e291142024f0a11a added a line of words
0b7e02927d36e82eaa2ef7353d6910a30bf16119 add the readme file
Git服务程序中有一个叫做HEAD的版本指针,当用户申请还原数据时,其实就是将HEAD指针指向到某个特定的提交版本而已,但是因为Git是分布式版本控制系统,所以不可能像SVN那样使用1、2、3、4来定义每个历史的提交版本号,为了避免历史记录冲突,故使用了SHA-1计算出十六进制的哈希字串来区分每个提交版本,像刚刚最上面最新的提交版本号就是5cee15b32d78259985bac4e0cbb0cdad72ab68ad,另外默认的HEAD版本指针会指向到最近的一次提交版本记录哦,而上一个提交版本会叫HEAD,上上一个版本则会叫做HEAD^,当然一般会用HEAD5来表示往上数第五个提交版本哦。
好啦,既然我们已经锁定了要还原的历史提交版本,就可以使用git reset命令来还原数据了:
[root@linuxprobe linuxprobe]# git reset --hard HEAD^
HEAD is now at d97dd0b changed the file name again
再来看下文件的内容吧(怎么样,内容果然已经还原了吧~):
[root@linuxprobe linuxprobe]# cat readme.txt
Initialization Git repository
Something not important
Modified again
刚刚的操作实际上就是改变了一下HEAD版本指针的位置,说白了就是你将HEAD指针放在那里,那么你的当前工作版本就会定位在那里,要想把内容再还原到最新提交的版本,先查看下提交版本号吧:
[root@linuxprobe linuxprobe]# git log --pretty=oneline
d97dd0beafa082933e044f9213809564ce2bc617 changed the file name again
c2674b7194f1f794dbb980e5d68137dec658672b changed name
c6f4adf87e2d16e39335b621e8a14f58217fcbc4 Modified again
c2cce402ca019f4cbbf5f0bb5eb41a7e2fe277c3 add the .gitignore file
f7814dc9297799fa000159b0e291142024f0a11a added a line of words
0b7e02927d36e82eaa2ef7353d6910a30bf16119 add the readme file
怎么搞得?竟然没有了Introduction software这个提交版本记录??
原因很简单,因为我们当前的工作版本是历史的一个提交点,这个历史提交点还没有发生过Introduction software更新记录,所以当然就看不到了,要是想“还原到未来”的历史更新点,可以用git reflog命令来查看所有的历史记录:
[root@linuxprobe linuxprobe]# git reflog
d97dd0b HEAD@{0}: reset: moving to HEAD^
a41441f HEAD@{1}: commit: Introduction software
d97dd0b HEAD@{2}: commit: changed the file name again
c2674b7 HEAD@{3}: commit: changed name
c6f4adf HEAD@{4}: commit (amend): Modified again
f587f3d HEAD@{5}: commit: Modified again
c2cce40 HEAD@{6}: commit: add the .gitignore file
f7814dc HEAD@{7}: commit: added a line of words
0b7e029 HEAD@{8}: commit (initial): add the readme file
找到历史还原点的SHA-1值后,就可以还原文件了,另外SHA-1值没有必要写全,Git会自动去匹配:x
[root@linuxprobe linuxprobe]# git reset --hard 5cee15b
HEAD is now at 5cee15b Introduction software
[root@localhost linuxprobe]# cat readme.txt
Initialization Git repository
Something not important
Modified again
Git is a version control system
如是只是想把某个文件内容还原,就不必这么麻烦,直接用git checkout命令就可以的,先随便写入一段话:
[root@linuxprobe linuxprobe]# echo "Some mistakes words" >> readme.txt
[root@linuxprobe linuxprobe]# cat readme.txt
Initialization Git repository
Something not important
Modified again
Git is a version control system
Some mistakes words
哎呀,我们突然发现不应该写一句话的,可以手工删除(当内容比较多的时候会很麻烦),还可以将文件内容从暂存区中恢复:
[root@linuxprobe linuxprobe]# git checkout -- readme.txt
[root@linuxprobe linuxprobe]# cat readme.txt
Initialization Git repository
Something not important
Modified again
Git is a version control system
checkou规则是如果暂存区中有该文件,则直接从暂存区恢复,如果暂存区没有该文件,则将还原成最近一次文件提交时的快照。
出现问题?大胆提问!
因读者们硬件不同或操作错误都可能导致实验配置出错,请耐心再仔细看看操作步骤吧,不要气馁~
Linux技术交流请加A群:560843(满),B群:340829(推荐),点此查看全国群。
*本群特色:通过口令验证确保每一个群员都是《Linux就该这么学》的读者,答疑更有针对性,不定期免费领取定制礼品。
21.2.6 管理标签
当版本仓库内的数据有个大的改善或者功能更新,我们经常会打一个类似于软件版本号的标签,这样通过标签就可以将版本库中的某个历史版本给记录下来,方便我们随时将特定历史时期的数据取出来用,另外打标签其实只是向某个历史版本做了一个指针,所以一般都是瞬间完成的,感觉很方便吧。
在Git中打标签非常简单,给最近一次提交的记录打个标签:
[root@linuxprobe linuxprobe]# git tag
v1.0
查看所有的已有标签:
[root@linuxprobe linuxprobe]# git tag
v1.0
查看此标签的详细信息:
[root@linuxprobe linuxprobe]# git show v1.0
commit a41441f985549a0b91f22f535ebc611c530b5b27
Author: Liu Chuan <root@linuxprobe.com>
Date: Mon Jan 18 01:37:45 2016 -0500

 Introduction software

diff --git a/readme.txt b/readme.txt
index f3c8232..955efba 100644
--- a/readme.txt
+++ b/readme.txt
@@ -1,3 +1,4 @@
 Initialization Git repository
 Something not important
 Modified again
+Git is a version control system
还可以创建带有说明的标签,用-a指定标签名,-m指定说明文字:
[root@linuxprobe linuxprobe]# git tag v1.1 -m "version 1.1 released" d316fb
我们为同一个提交版本设置了两次标签,来把之前的标签删除吧:
[root@linuxprobe linuxprobe]# git tag -d v1.0
Deleted tag 'v1.0' (was d316fb2)
[root@localhost linuxprobe]# git tag
v1.1
21.3 管理分支结构
分支即是平行空间,假设你在为某个手机系统研发拍照功能,代码已经完成了80%,但如果将这不完整的代码直接提交到git仓库中,又有可能影响到其他人的工作,此时我们便可以在该软件的项目之上创建一个名叫“拍照功能”的分支,这种分支只会属于你自己,而其他人看不到,等代码编写完成后再与原来的项目主分支合并下即可,这样即能保证代码不丢失,又不影响其他人的工作。

一般在实际的项目开发中,我们要尽量保证master分支是非常稳定的,仅用于发布新版本,平时不要随便直接修改里面的数据文件,而工作的时候则可以新建不同的工作分支,等到工作完成后在合并到master分支上面,所以团队的合作分支看起来会像上面图那样。
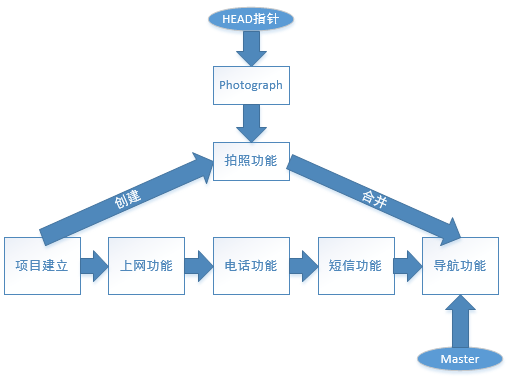
另外如前面所讲,git会将每次的提交操作串成一个时间线,而在前面的实验中实际都是在对master分支进行操作,Git会在创建分支后默认创建一个叫做Photograph的指针,所以我们还需要再将HEAD指针切换到“Photograph”的位置才正式使用上了新分支哦,这么说起来可能比较抽象,赶紧学习下面的实验吧。
21.3.1 创建分支
首先创建分支:
[root@linuxprobe linuxprobe]# git branch linuxprobe
切换至分支:
[root@linuxprobe linuxprobe]# git checkout linuxprobe
Switched to branch 'linuxprobe'
查看当前分支的情况(会列出该仓库中所有的分支,当前的分支前有*号):
[root@linuxprobe linuxprobe]# git branch
* linuxprobe
 master
我们对文件再追加一行字符串吧:
[root@linuxprobe linuxprobe]# echo "Creating a new branch is quick." >> readme.txt
将文件提交到git仓库:
[root@linuxprobe linuxprobe]# git add readme.txt
[root@linuxprobe linuxprobe]# git commit -m "new branch"
[linuxprobe 2457d98] new branch
 1 file changed, 1 insertion(+)
为了让大家更好理解分支的作用,我们在提交文件后再切换回master分支:
[root@linuxprobe linuxprobe]# git checkout master
Switched to branch 'master'
然后查看下文件内容,发现并没有新追加的字符串哦:
[root@linuxprobe linuxprobe]# cat readme.txt
Initialization Git repository
Something not important
Modified again
Git is a version control system
21.3.2 合并分支
现在,我们想把linuxprobe的工作成果合并到master分支上了,则可以使用"git merge"命令来将指定的的分支与当前分支合并:
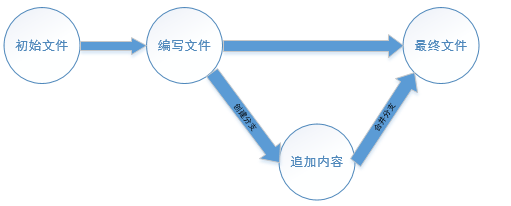
[root@linuxprobe linuxprobe]# git merge linuxprobe
Updating a41441f..2457d98
Fast-forward
 readme.txt | 1 +
 1 file changed, 1 insertion(+)
查看合并后的readme.txt文件:
[root@linuxprobe linuxprobe]# cat readme.txt
Initialization Git repository
Something not important
Modified again
Git is a version control system
Creating a new branch is quick.
确认合并完成后,就可以放心地删除linuxprobe分支了:
[root@linuxprobe linuxprobe]# git branch -d linuxprobe
Deleted branch linuxprobe (was 2457d98).
删除后,查看branch,就只剩下master分支了:
[root@linuxprobe linuxprobe]# git branch
* master
21.3.3 内容冲突
但是Git并不能每次都为我们自动的合并分支,当遇到了内容冲突比较复杂的情况,则必须手工将差异内容处理掉,比如这样的情况:

创建分支并切换到该分支命令:git checkout -b 分支名称
创建一个新分支并切换到该分支命令:
[root@linuxprobe linuxprobe]# git checkout -b linuxprobe
Switched to a new branch 'linuxprobe'
修改readme.txt文件内容:
[root@linuxprobe linuxprobe]# vim readme.txt
Initialization Git repository
Something not important
Modified again
Git is a version control system
Creating a new branch is quick.
Creating a new branch is quick & simple.
在linuxprobe分支上提交:
[root@linuxprobe linuxprobe]# git add readme.txt
[root@linuxprobe linuxprobe]# git commit -m "Creating a new branch is quick & simple. "
[linuxprobe 882a128] Creating a new branch is quick & simple.
 1 file changed, 1 insertion(+)
切换到master分支:
[root@linuxprobe linuxprobe]# git checkout master
Switched to branch 'master'
在在master分支上修改readme.txt文件同一行的内容:
[root@linuxprobe linuxprobe]# vim readme.txt
Initialization Git repository
Something not important
Modified again
Git is a version control system
Creating a new branch is quick.
Creating a new branch is quick AND simple.
提交至Git版本仓库:
[root@linuxprobe linuxprobe]# git add readme.txt
Creating a new branch is quick AND simple.
[root@linuxprobe linuxprobe]# git commit -m "Creating a new branch is quick AND simple. "
[master c21741c] Creating a new branch is quick AND simple.
 1 file changed, 1 insertion(+)
那么此时,我们在master与linuxprobe分支上都分别对中readme.txt文件进行了修改并提交了,那这种情况下Git就没法再为我们自动的快速合并了,它只能告诉我们readme.txt文件的内容有冲突,需要手工处理冲突的内容后才能继续合并:
[root@linuxprobe linuxprobe]# git merge linuxprobe
Auto-merging readme.txt
CONFLICT (content): Merge conflict in readme.txt
Automatic merge failed; fix conflicts and then commit the result.
冲突的内容为:
[root@localhost linuxprobe]# vim readme.txt
Initialization Git repository
Something not important
Modified again
Git is a version control system
Creating a new branch is quick.
<<<<<<< HEAD
Creating a new branch is quick AND simple.
=======
Creating a new branch is quick & simple.
>>>>>>> linuxprobe
Git用< <<<<<<,=======,>>>>>>>分割开了各个分支冲突的内容,我们需要手工的删除这些符号,并将内容修改为:
Initialization Git repository
Something not important
Modified again
Git is a version control system
Creating a new branch is quick.
Creating a new branch is quick and simple.
解决冲突内容后则可顺利的提交:
[root@linuxprobe linuxprobe]# git add readme.txt
[root@linuxprobe linuxprobe]# git commit -m "conflict fixed"
[master 90c607a] conflict fixed
查看Git历史提交记录(可以看到分支的变化):
[root@linuxprobe linuxprobe]# git log --graph --pretty=oneline --abbrev-commit
* 90c607a conflict fixed
|
| * 882a128 Creating a new branch is quick & simple.
* | c21741c Creating a new branch is quick AND simple.
|/
* 2457d98 new branch
* a41441f Introduction software
* d97dd0b changed the file name again
* c2674b7 changed name
* c6f4adf Modified again
* c2cce40 add the .gitignore file
* f7814dc added a line of words
* 0b7e029 add the readme file
最后,放心的删除linuxprobe分支吧:
[root@linuxprobe linuxprobe]# git branch -d linuxprobe
Deleted branch linuxprobe (was 882a128).
[root@linuxprobe linuxprobe]# git branch
* master
21.4 部署Git服务器
Git是分布式的版本控制系统,我们只要有了一个原始Git版本仓库,就可以让其他主机克隆走这个原始版本仓库,从而使得一个Git版本仓库可以被同时分布到不同的主机之上,并且每台主机的版本库都是一样的,没有主次之分,极大的保证了数据安全性,并使得用户能够自主选择向那个Git服务器推送文件了,其实部署一个git服务器是非常简单的事情,我们需要用到两台主机,分别是:
| 主机名称 | 操作系统 | IP地址 |
|---|---|---|
| Git服务器 | 红帽RHEL7操作系统 | 192.168.10.10 |
| Git客户端 | 红帽RHEL7操作系统 | 192.168.10.20 |
首先我们分别在Git服务器和客户机中安装Git服务程序(刚刚实验安装过就不用安装了):
[root@linuxprobe ~]# yum install git
Loaded plugins: langpacks, product-id, subscription-manager
This system is not registered to Red Hat Subscription Management. You can use subscription-manager to register.
Package git-1.8.3.1-4.el7.x86_64 already installed and latest version
Nothing to do
然后创建Git版本仓库,一般规范的方式要以.git为后缀:
[root@linuxprobe ~]# mkdir linuxprobe.git
修改Git版本仓库的所有者与所有组:
[root@linuxprobe ~]# chown -Rf git:git linuxprobe.git/
初始化Git版本仓库:
[root@linuxprobe ~]# cd linuxprobe.git/
[root@linuxprobe linuxprobe.git]# git --bare init
Initialized empty Git repository in /root/linuxprobe.git/
其实此时你的Git服务器就已经部署好了,但用户还不能向你推送数据,也不能克隆你的Git版本仓库,因为我们要在服务器上开放至少一种支持Git的协议,比如HTTP/HTTPS/SSH等,现在用的最多的就是HTTPS和SSH,我们切换至Git客户机来生成SSH密钥:
[root@linuxprobe ~]# ssh-keygen
Generating public/private rsa key pair.
Enter file in which to save the key (/root/.ssh/id_rsa):
Created directory '/root/.ssh'.
Enter passphrase (empty for no passphrase):
Enter same passphrase again:
Your identification has been saved in /root/.ssh/id_rsa.
Your public key has been saved in /root/.ssh/id_rsa.pub.
The key fingerprint is:
65:4a:53:0d:4f:ee:49:4f:94:24:82:16:7a:dd:1f:28 root@linuxprobe.com
The key's randomart image is:
+--[ RSA 2048]----+
|        .o+oo.o. |
|       .oo *.+.  |
|      ..+ E * o  |
|       o = + = . |
|        S   o o  |
|                 |
|                 |
|                 |
|                 |
+-----------------+
将客户机的公钥传递给Git服务器:
[root@linuxprobe ~]# ssh-copy-id 192.168.10.10
root@192.168.10.10's password:
Number of key(s) added: 1
Now try logging into the machine, with: "ssh '192.168.10.10'"
and check to make sure that only the key(s) you wanted were added.
此时就已经可以从Git服务器中克隆版本仓库了(此时目录内没有文件是正常的):
[root@linuxprobe ~]# git clone root@192.168.10.10:/root/linuxprobe.git
Cloning into 'linuxprobe'...
warning: You appear to have cloned an empty repository.
[root@linuxprobe ~]# cd linuxprobe
[root@linuxprobe linuxprobe]#
初始化下Git工作环境:
[root@linuxprobe ~]# git config --global user.name "Liu Chuan"
[root@linuxprobe ~]# git config --global user.email "root@linuxprobe.com"
[root@linuxprobe ~]# git config --global core.editor vim
向Git版本仓库中提交一个新文件:
[root@linuxprobe linuxprobe]# echo "I successfully cloned the Git repository" > readme.txt
[root@linuxprobe linuxprobe]# git add readme.txt
[root@linuxprobe linuxprobe]# git status
# On branch master
#
# Initial commit
#
# Changes to be committed:
#   (use "git rm --cached ..." to unstage)
#
#	new file:   readme.txt
#
[root@linuxprobe linuxprobe]# git commit -m "Clone the Git repository"
[master (root-commit) c3961c9] Clone the Git repository
 Committer: root
1 file changed, 1 insertion(+)
 create mode 100644 readme.txt
[root@linuxprobe linuxprobe]# git status
# On branch master
nothing to commit, working directory clean
但是这次的操作还是只将文件提交到了本地的Git版本仓库,并没有推送到远程Git服务器,所以我们来定义下远程的Git服务器吧:
[root@linuxprobe linuxprobe]# git remote add server root@192.168.10.10:/root/linuxprobe.git
将文件提交到远程Git服务器吧:
[root@linuxprobe linuxprobe]# git push -u server master
Counting objects: 3, done.
Writing objects: 100% (3/3), 261 bytes | 0 bytes/s, done.
Total 3 (delta 0), reused 0 (delta 0)
To root@192.168.10.10:/root/linuxprobe.git
 * [new branch]      master -> master
Branch master set up to track remote branch master from server.
为了验证真的是推送到了远程的Git服务,你可以换个目录再克隆一份版本仓库(虽然在工作中毫无意义):
[root@linuxprobe linuxprobe]# cd ../Desktop
[root@linuxprobe Desktop]# git clone root@192.168.10.10:/root/linuxprobe.git
Cloning into 'linuxprobe'...
remote: Counting objects: 3, done.
remote: Total 3 (delta 0), reused 0 (delta 0)
Receiving objects: 100% (3/3), done.
[root@linuxprobe Desktop]# cd linuxprobe/
[root@linuxprobe linuxprobe]# cat readme.txt
I successfully cloned the Git repository
21.5 Github托管服务
其实自己部署一台Git服务器或许很有意思,但想到你要保证这台主机能够7*24小时稳定运行,还要保证各种权限及版本库的安全就觉得很累吧,

Github顾名思义是一个Git版本库的托管服务,是目前全球最大的软件仓库,拥有上百万的开发者用户,也是软件开发和寻找资源的最佳途径,Github不仅可以托管各种Git版本仓库,还拥有了更美观的Web界面,您的代码文件可以被任何人克隆,使得开发者为开源项贡献代码变得更加容易,当然也可以付费购买私有库,这样高性价比的私有库真的是帮助到了很多团队和企业。
大多数用户都是为了寻找资源而爱上Github的,首先进入网站,点击注册(Sign up):

填写注册信息:
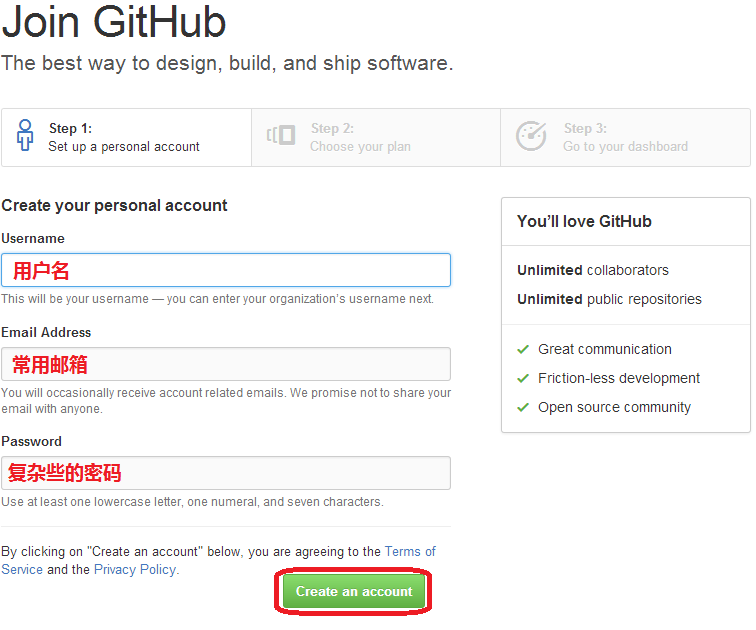
选择仓库类型:
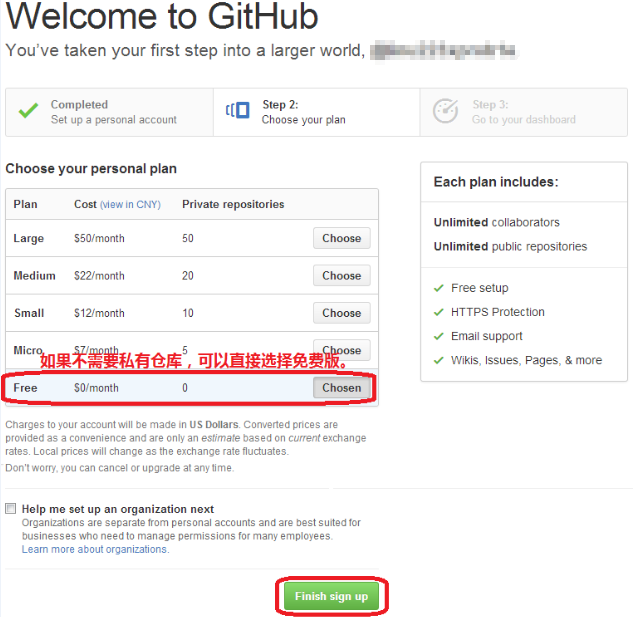
好棒,我们的GitHub帐号注册完成了:

我们在向Github推送文件时,可以选择SSH协议模式,在本机生成密钥文件(上面实验已经做过,就不需要再生成了):
[root@linuxprobe ~]# ssh-keygen
Generating public/private rsa key pair.
Enter file in which to save the key (/root/.ssh/id_rsa):
Created directory '/root/.ssh'.
Enter passphrase (empty for no passphrase):
Enter same passphrase again:
Your identification has been saved in /root/.ssh/id_rsa.
Your public key has been saved in /root/.ssh/id_rsa.pub.
The key fingerprint is:
88:91:4c:db:85:b6:b4:69:ba:44:4d:b1:89:da:48:78 root@linuxprobe.com
The key's randomart image is:
+--[ RSA 2048]----+
|    . .o.        |
| . o ==+         |
|. E *=++         |
| o +.o*.         |
|  o.oo. S        |
|    o            |
|   . .           |
|    .            |
|                 |
+-----------------+
[root@linuxprobe ~]# ssh-add
点击进入Github的帐户配置页面:

点击添加SSH公钥:
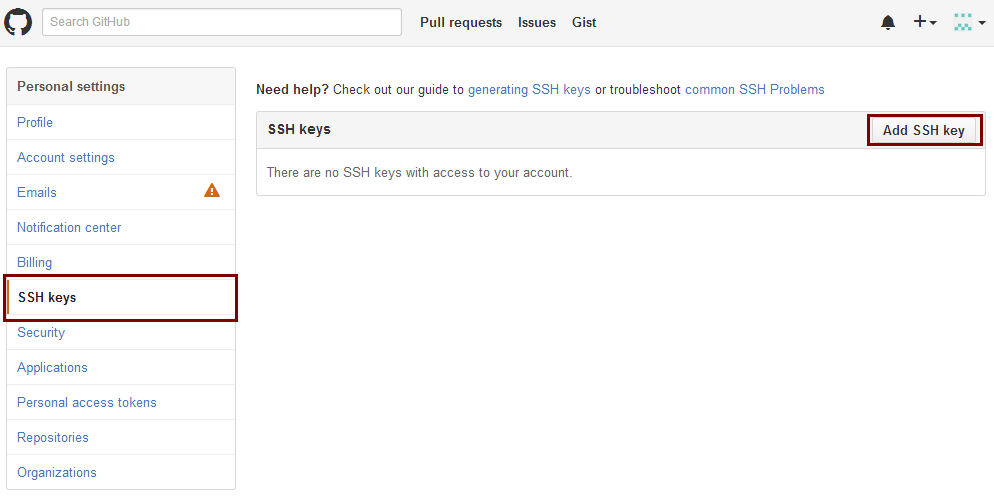
将本机中的ssh公钥(.ssh/id_rsa.pub)复制到页面中,填写ssh公钥信息: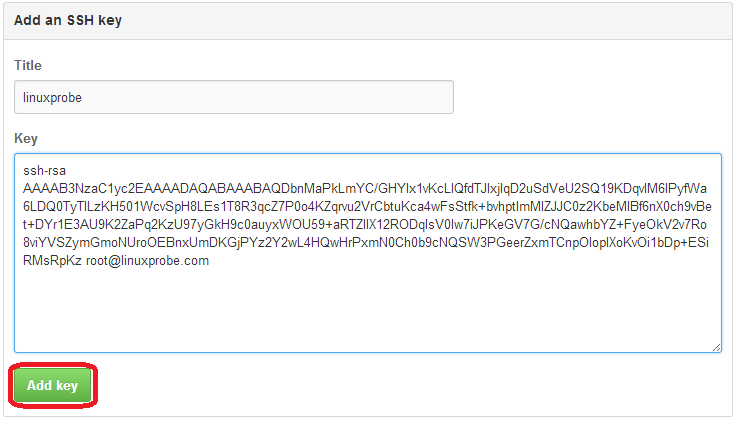
查看ssh公钥信息:

好的,现在我们的准备工作已经妥当,让我们在Github上创建自己第一个Git版本仓库吧,点击创建一个新的版本仓库:

填写版本仓库的信息:
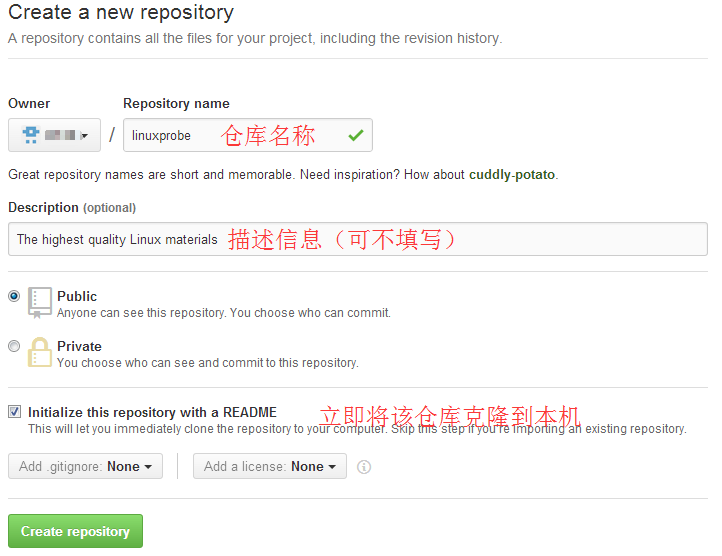
创建成功后会自动跳转到该仓库的页面:
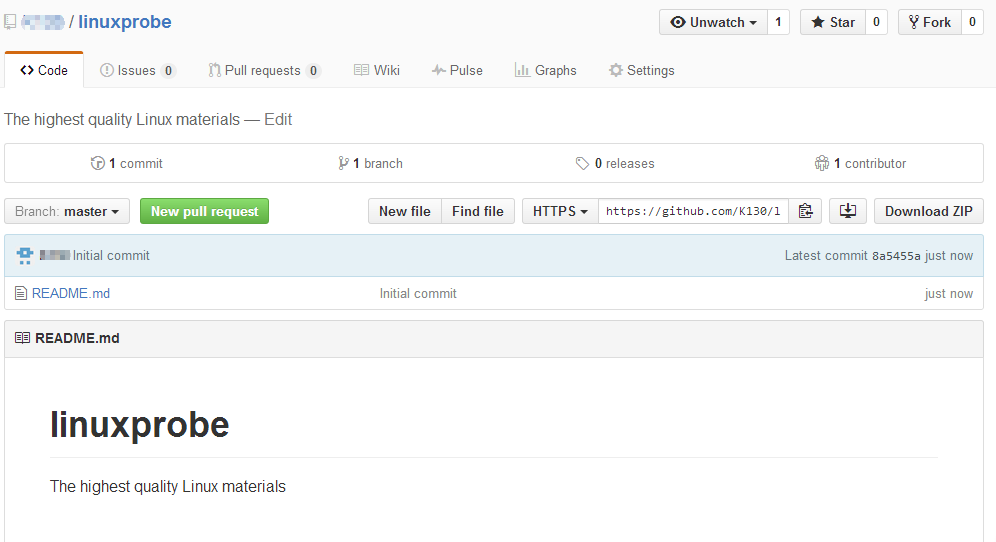
复制版本仓库的克隆地址:

尝试把版本仓库克隆到本地(这个版本库我会一直保留,大家可以动手克隆下试试。):
[root@linuxprobe ~]# git clone  https://github.com/K130/linuxprobe.git
Cloning into 'linuxprobe'...
remote: Counting objects: 3, done.
remote: Total 3 (delta 0), reused 0 (delta 0), pack-reused 0
Unpacking objects: 100% (3/3), done.
[root@linuxprobe ~]# cat linuxprobe/
.git/      README.md
[root@linuxprobe ~]# cat linuxprobe/README.md
# linuxprobe
The highest quality Linux materials
将该Github版本仓库添加到本机的远程列表中:
[root@linuxprobe linuxprobe]# git remote add linuxprobe git@github.com:K130/linuxprobe.git
[root@linuxprobe linuxprobe]# git remote
linuxprobe
origin
编写一个新文件:
[root@linuxprobe ~]# cd linuxprobe/
[root@linuxprobe linuxprobe]# echo "Based on the RHEL&Centos system" > features
将该文件提交到本地的Git版本仓库:
[root@linuxprobe linuxprobe]# git add features
[root@linuxprobe linuxprobe]# git commit -m "add features"
然后将本地的Git仓库同步到远程Git服务器上(第一次请加上参数-u,代表关联本地与远程):
[root@linuxprobe linuxprobe]# git push -u linuxprobe  masterCounting objects: 4, done.
Delta compression using up to 4 threads.
Compressing objects: 100% (2/2), done.
Writing objects: 100% (3/3), 303 bytes | 0 bytes/s, done.
Total 3 (delta 0), reused 0 (delta 0)
To git@github.com:K130/linuxprobe.git
   8a5455a..f1bc411  master -> master
Branch master set up to track remote branch master from linuxprobe.
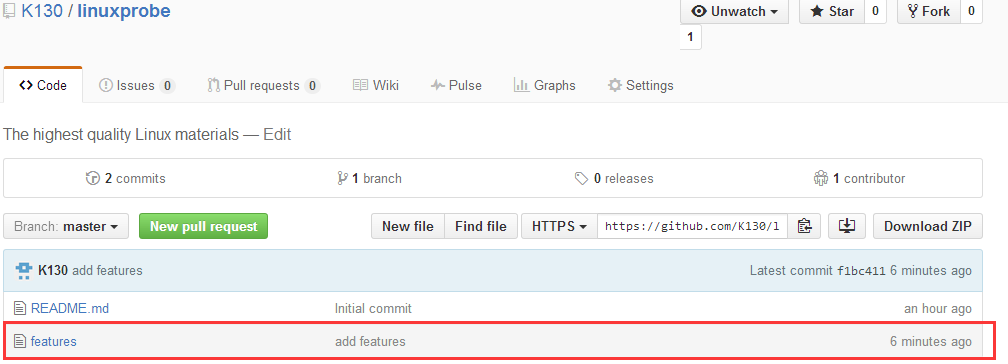
刷新一下Web页面,果然看到版本仓库已经同步了:
