setstate源码
方法入口
// setState方法入口如下:
ReactComponent.prototype.setState = function (partialState, callback) {
  // 将setState事务放入队列中
  this.updater.enqueueSetState(this, partialState);
  if (callback) {
    this.updater.enqueueCallback(this, callback, 'setState');
  }};
replaceState:
replaceState: function (newState, callback) {
  this.updater.enqueueReplaceState(this, newState);
  if (callback) {
    this.updater.enqueueCallback(this, callback, 'replaceState');
  }},
  // replaceState中取名为newState,有完全替换的含义。同样也是以队列的形式来管理的。
enqueueSetState
enqueueSetState: function (publicInstance, partialState) {
    // 先获取ReactComponent组件对象
    var internalInstance = getInternalInstanceReadyForUpdate(publicInstance, 'setState');

    if (!internalInstance) {
      return;
    }

    // 如果_pendingStateQueue为空,则创建它。可以发现队列是数组形式实现的
    var queue = internalInstance._pendingStateQueue || (internalInstance._pendingStateQueue = []);
    queue.push(partialState);

    // 将要更新的ReactComponent放入数组中
    enqueueUpdate(internalInstance);}
其中getInternalInstanceReadyForUpdate源码如下
function getInternalInstanceReadyForUpdate(publicInstance, callerName) {
  // 从map取出ReactComponent组件,还记得mountComponent时把ReactElement作为key,将ReactComponent存入了map中了吧,ReactComponent是React组件的核心,包含各种状态,数据和操作方法。而ReactElement则仅仅是一个数据类。
  var internalInstance = ReactInstanceMap.get(publicInstance);
  if (!internalInstance) {
    return null;
  }

 return internalInstance;}
enqueueUpdate源码如下:
function enqueueUpdate(component) {
  ensureInjected();

  // 如果不是正处于创建或更新组件阶段,则处理update事务
  if (!batchingStrategy.isBatchingUpdates) {
    batchingStrategy.batchedUpdates(enqueueUpdate, component);
    return;
  }

  // 如果正在创建或更新组件,则暂且先不处理update,只是将组件放在dirtyComponents数组中
  dirtyComponents.push(component);}
batchedUpdates
batchedUpdates: function (callback, a, b, c, d, e) {
  var alreadyBatchingUpdates = ReactDefaultBatchingStrategy.isBatchingUpdates;
  // 批处理最开始时,将isBatchingUpdates设为true,表明正在更新
  ReactDefaultBatchingStrategy.isBatchingUpdates = true;

  // The code is written this way to avoid extra allocations
  if (alreadyBatchingUpdates) {
    callback(a, b, c, d, e);
  } else {
    // 以事务的方式处理updates,后面详细分析transaction
    transaction.perform(callback, null, a, b, c, d, e);
  }}
var RESET_BATCHED_UPDATES = {
  initialize: emptyFunction,
  close: function () {
    // 事务批更新处理结束时,将isBatchingUpdates设为了false
    ReactDefaultBatchingStrategy.isBatchingUpdates = false;
  }};var TRANSACTION_WRAPPERS = [FLUSH_BATCHED_UPDATES, RESET_BATCHED_UPDATES];
enqueueUpdate包含了React避免重复render的逻辑。
mountComponent 和 updateComponent 方法在执行的最开始,会调用到 batchedUpdates 进行批处理更新,此时会将isBatchingUpdates设置为true,也就是将状态标记为现在正处于更新阶段了。
之后React以事务的方式处理组件update,事务处理完后会调用wrapper.close() 。
而TRANSACTION_WRAPPERS 中包含了RESET_BATCHED_UPDATES 这个wrapper,故最终会调用RESET_BATCHED_UPDATES.close(), 它最终会将isBatchingUpdates设置为false。
故 getInitialState,componentWillMount, render,componentWillUpdate 中 setState 都不会引起 updateComponent。
但在componentDidMount 和 componentDidUpdate中则会。
事务
事务通过wrapper进行封装。
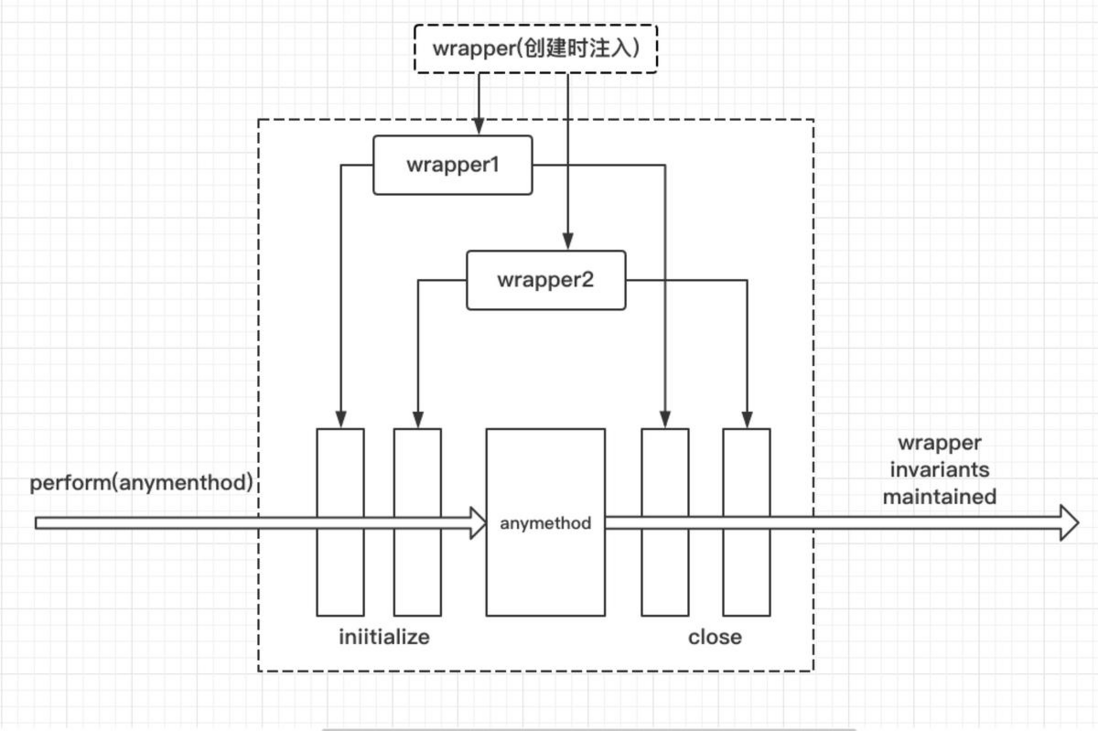
一个wrapper包含一对 initialize 和 close 方法。比如 RESET_BATCHED_UPDATES:
var RESET_BATCHED_UPDATES = {
  // 初始化调用
  initialize: emptyFunction,
  // 事务执行完成,close时调用
  close: function () {
    ReactDefaultBatchingStrategy.isBatchingUpdates = false;
  }};
transcation被包装在wrapper中,比如:
var TRANSACTION_WRAPPERS = [FLUSH_BATCHED_UPDATES, RESET_BATCHED_UPDATES];
transaction 是通过transaction.perform(callback, args…)方法进入的,它会先调用注册好的wrapper 中的initialize方法,然后执行perform方法中的callback,最后再执行close方法。
下面分析transaction.perform(callback, args…)
  perform: function (method, scope, a, b, c, d, e, f) {
    var errorThrown;
    var ret;
    try {
      this._isInTransaction = true;
      errorThrown = true;
      // 先运行所有wrapper中的initialize方法
      this.initializeAll(0);

      // 再执行perform方法传入的callback
      ret = method.call(scope, a, b, c, d, e, f);
      errorThrown = false;
    } finally {
      try {
        if (errorThrown) {
          // 最后运行wrapper中的close方法
          try {
            this.closeAll(0);
          } catch (err) {}
        } else {
          // 最后运行wrapper中的close方法
          this.closeAll(0);
        }
      } finally {
        this._isInTransaction = false;
      }
    }
    return ret;
  },

  initializeAll: function (startIndex) {
    var transactionWrappers = this.transactionWrappers;
    // 遍历所有注册的wrapper
    for (var i = startIndex; i < transactionWrappers.length; i++) {
      var wrapper = transactionWrappers[i];
      try {
        this.wrapperInitData[i] = Transaction.OBSERVED_ERROR;
        // 调用wrapper的initialize方法
        this.wrapperInitData[i] = wrapper.initialize ? wrapper.initialize.call(this) : null;
      } finally {
        if (this.wrapperInitData[i] === Transaction.OBSERVED_ERROR) {
          try {
            this.initializeAll(i + 1);
          } catch (err) {}
        }
      }
    }
  },

  closeAll: function (startIndex) {
    var transactionWrappers = this.transactionWrappers;
    // 遍历所有wrapper
    for (var i = startIndex; i < transactionWrappers.length; i++) {
      var wrapper = transactionWrappers[i];
      var initData = this.wrapperInitData[i];
      var errorThrown;
      try {
        errorThrown = true;
        if (initData !== Transaction.OBSERVED_ERROR && wrapper.close) {
          // 调用wrapper的close方法,如果有的话
          wrapper.close.call(this, initData);
        }
        errorThrown = false;
      } finally {
        if (errorThrown) {
          try {
            this.closeAll(i + 1);
          } catch (e) {}
        }
      }
    }
    this.wrapperInitData.length = 0;
  }
更新组件: runBatchedUpdates
前面分析到enqueueUpdate中调用transaction.perform(callback, args...)后,发现,callback还是enqueueUpdate方法啊,那岂不是死循环了?不是说好的setState会调用updateComponent,从而自动刷新View的吗? 我们还是要先从transaction事务说起。
我们的wrapper中注册了两个wrapper,如下:
var TRANSACTION_WRAPPERS = [FLUSH_BATCHED_UPDATES, RESET_BATCHED_UPDATES];
RESET_BATCHED_UPDATES 用来管理isBatchingUpdates状态,我们前面在分析setState是否立即生效时已经讲解过了。
那FLUSH_BATCHED_UPDATES用来干嘛呢?
var FLUSH_BATCHED_UPDATES = {
  initialize: emptyFunction,
  close: ReactUpdates.flushBatchedUpdates.bind(ReactUpdates)};
var flushBatchedUpdates = function () {
  // 循环遍历处理完所有dirtyComponents
  while (dirtyComponents.length || asapEnqueued) {
    if (dirtyComponents.length) {
      var transaction = ReactUpdatesFlushTransaction.getPooled();
      // close前执行完runBatchedUpdates方法,这是关键
      transaction.perform(runBatchedUpdates, null, transaction);
      ReactUpdatesFlushTransaction.release(transaction);
    }

    if (asapEnqueued) {
      asapEnqueued = false;
      var queue = asapCallbackQueue;
      asapCallbackQueue = CallbackQueue.getPooled();
      queue.notifyAll();
      CallbackQueue.release(queue);
    }
  }};
FLUSH_BATCHED_UPDATES会在一个transaction的close阶段运行runBatchedUpdates,从而执行update。
function runBatchedUpdates(transaction) {
  var len = transaction.dirtyComponentsLength;
  dirtyComponents.sort(mountOrderComparator);

  for (var i = 0; i < len; i++) {
    // dirtyComponents中取出一个component
    var component = dirtyComponents[i];

    // 取出dirtyComponent中的未执行的callback,下面就准备执行它了
    var callbacks = component._pendingCallbacks;
    component._pendingCallbacks = null;

    var markerName;
    if (ReactFeatureFlags.logTopLevelRenders) {
      var namedComponent = component;
      if (component._currentElement.props === component._renderedComponent._currentElement) {
        namedComponent = component._renderedComponent;
      }
    }
    // 执行updateComponent
    ReactReconciler.performUpdateIfNecessary(component, transaction.reconcileTransaction);

    // 执行dirtyComponent中之前未执行的callback
    if (callbacks) {
      for (var j = 0; j < callbacks.length; j++) {
        transaction.callbackQueue.enqueue(callbacks[j], component.getPublicInstance());
      }
    }
  }}
runBatchedUpdates循环遍历dirtyComponents数组,主要干两件事。
- 首先执行performUpdateIfNecessary来刷新组件的view
- 执行之前阻塞的callback。
下面来看performUpdateIfNecessary:
performUpdateIfNecessary: function (transaction) {
    if (this._pendingElement != null) {
      // receiveComponent会最终调用到updateComponent,从而刷新View
      ReactReconciler.receiveComponent(this, this._pendingElement, transaction, this._context);
    }

    if (this._pendingStateQueue !== null || this._pendingForceUpdate) {
      // 执行updateComponent,从而刷新View。这个流程在React生命周期中讲解过
      this.updateComponent(transaction, this._currentElement, this._currentElement, this._context, this._context);
    }
  },
最后惊喜的看到了receiveComponent和updateComponent吧。
receiveComponent最后会调用updateComponent,而updateComponent中会执行React组件存在期的生命周期方法,
如componentWillReceiveProps, shouldComponentUpdate, componentWillUpdate,render, componentDidUpdate。
从而完成组件更新的整套流程。
整体流程回顾:
1.enqueueSetState将state放入队列中,并调用enqueueUpdate处理要更新的Component
2.如果组件当前正处于update事务中,则先将Component存入dirtyComponent中。否则调用batchedUpdates处理。
3.batchedUpdates发起一次transaction.perform()事务
4.开始执行事务初始化,运行,结束三个阶段
5.初始化:事务初始化阶段没有注册方法,故无方法要执行
6.运行:执行setSate时传入的callback方法,一般不会传callback参数
7.结束:更新isBatchingUpdates为false,并执行FLUSH_BATCHED_UPDATES这个wrapper中的close方法
8.FLUSH_BATCHED_UPDATES在close阶段,会循环遍历所有的dirtyComponents,调用updateComponent刷新组件,并执行它的pendingCallbacks, 也就是setState中设置的callback。
看完理论, 我们再用一个例子巩固下.
再看一个例子:
class Example extends React.Component {
 constructor() {
   super();
   this.state = {
    val: 0
   };
}
componentDidMount() {
  this.setState({val: this.state.val + 1});
  console.log('第 1 次 log:', this.state.val);
  this.setState({val: this.state.val + 1});
  console.log('第 2 次 log:', this.state.val);

 setTimeout(() => {
  this.setState({val: this.state.val + 1});
  console.log('第 3 次 log:', this.state.val);
  this.setState({val: this.state.val + 1});
  console.log('第 4 次 log:', this.state.val);
 }, 0);
}
 render() {
  return null;
 }
};
前两次在isBatchingUpdates 中,没有更新state, 输出两个0。
后面两次会同步更新, 分别输出2, 3;
很显然,我们可以将4次setState简单规成两类:
- componentDidMount是一类
- setTimeOut中的又是一类,因为这两次在不同的调用栈中执行。
我们先看看在componentDidMount中setState的调用栈:

再看看在setTimeOut中的调用栈:

我们重点看看在componentDidMount中的sw3e调用栈 :
发现了batchedUpdates方法。
原来在setState调用之前,就已经处于batchedUpdates执行的事务之中了。
那batchedUpdates方法是谁调用的呢?我们再往上追溯一层,原来是ReactMount.js中的_renderNewRootComponent方法。
也就是说,整个将React组件渲染到DOM的过程就处于一个大的事务中了。
接下来就很容易理解了: 因为在componentDidMount中调用setState时,batchingStrategy的isBatchingUpdates已经被设置为true,所以两次setState的结果并没有立即生效,而是被放进了dirtyComponents中。
这也解释了两次打印this.state.val都是0的原因,因为新的state还没被应用到组件中。
再看setTimeOut中的两次setState,因为没有前置的batchedUpdate调用,所以batchingStrategy的isBatchingUpdates标志位是false,也就导致了新的state马上生效,没有走到dirtyComponents分支。
也就是说,setTimeOut中的第一次执行,setState时,this.state.val为1;
而setState完成后打印时this.state.val变成了2。
第二次的setState同理。
通过上面的例子,我们就知道setState 是可以同步更新的,但是还是尽量避免直接使用, 仅作了解就可以了。
如果你非要玩一些骚操作,写出这样的代码去直接去操作this.state:
this.state.count = this.state.count + 1;
this.state.count = this.state.count + 1;
this.state.count = this.state.count + 1;
this.setState();
我只能说, 大胸弟, 你很骚。吾有旧友叼似汝,而今坟草丈许高。