点九图简介
Android为了使用同一张图作为不同数量文字的背景,设计了一种可以指定区域拉伸的图片格式“.9.png”,这种图片格式就是点九图。
注意:这种图片格式只能被使用于Android开发。在ios开发中,可以在代码中指定某个点进行拉伸,而在Android中不行,所以在Android中想要达到这个效果,只能使用点九图(下文会啪啪打脸,其实是可以的,只是很少人这样使用,兼容性不知道怎么样,点击跳转)

点九图实质
点九图的本质实际上是在图片的四周各增加了1px的像素,并使用纯黑(#FF000000)的线进行标记,其它的与原图没有任何区别。可以参考以下图片:
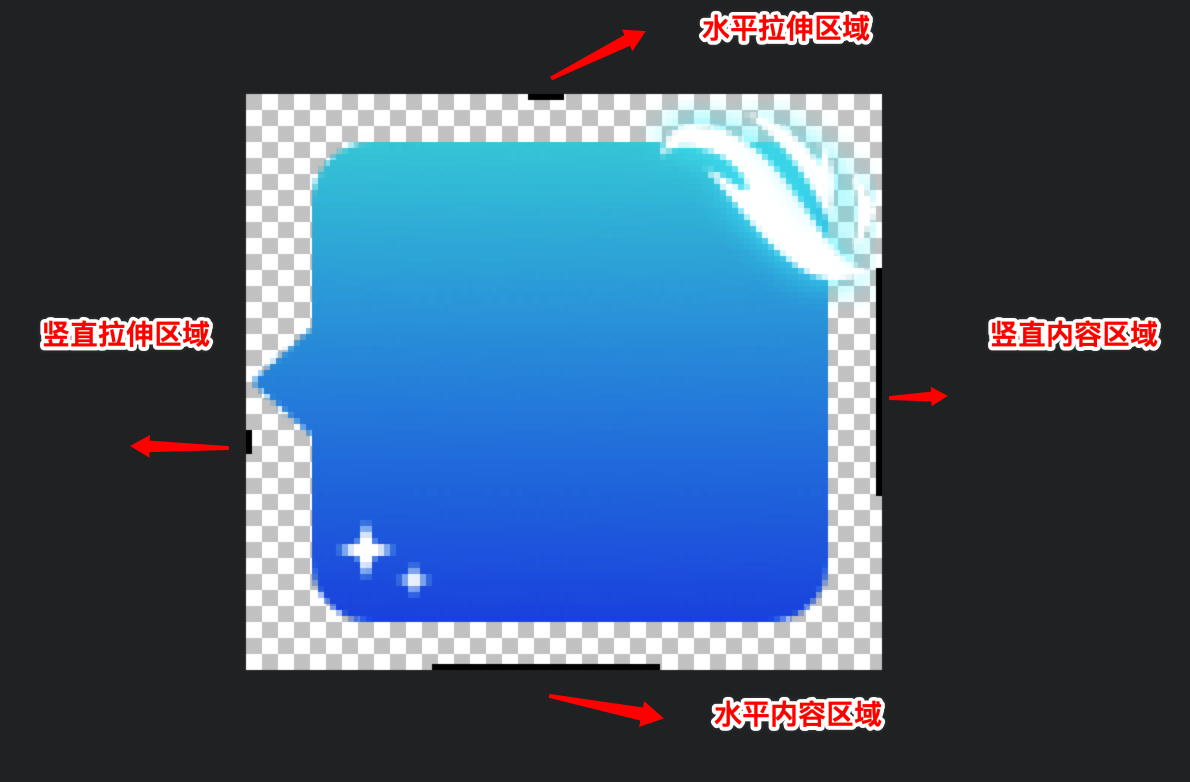
| 标记位置 | 含义 |
|---|---|
| 左-黑点 | 纵向拉伸区域 |
| 上-黑点 | 横向拉伸区域 |
| 右-黑线 | 纵向显示区域 |
| 下-黑线 | 横向显示区域 |
点九图在 Android 中的应用
点九图在 Android 中主要有三种应用方式
- 直接放在 res 目录中的 drawable 或者 mipmap 目录中
- 放在 assert 目录中
- 从网络下载
第一种方式是我们最常用的,直接调用 setBackgroundResource 或者 setImageResource 方法,这样的话图片及可以做到自动拉伸。
而对于第二种或者第三种方式,如果我们直接去加载 .9.png,你会发现图片或者图片背景根本无法拉伸。纳尼,这是为甚么呢。下面,且听老衲慢慢道来。
Android 并不是直接使用点九图,而是在编译时将其转换为另外一种格式,这种格式是将其四周的黑色像素保存至Bitmap类中的一个名为 mNinePatchChunk 的 byte[] 中,并抹除掉四周的这一个像素的宽度;接着在使用时,如果 Bitmap 的这个 mNinePatchChunk 不为空,且为 9patch chunk,则将其构造为 NinePatchDrawable,否则将会被构造为 BitmapDrawable,最终设置给 view。
因此,在 Android 中,我们如果想动态使用网络下载的点九图,一般需要经过以下步骤:
- 使用 sdk 目录下的 aapt 工具将点九图转化为 png 图片
- 解析图片的时候,判断是否含有 NinePatchChunk,有的话,转化为 NinePatchDrawable
public static void setNineImagePatch(View view, File file, String url) {
    if (file.exists()) {
        Bitmap bitmap = BitmapFactory.decodeFile(file.getAbsolutePath());
        byte[] chunk = bitmap.getNinePatchChunk();
        if (NinePatch.isNinePatchChunk(chunk)) {
            NinePatchDrawable patchy = new NinePatchDrawable(view.getResources(), bitmap, chunk, new Rect(), null);
            view.setBackground(patchy);
        }

    }
}
点九图上传服务器流程

aapt 转换命令
单个图片文件转换
./aapt s -i xxx.9.png -o xxx.png
批量转换
# 批量转换
./aapt c -S inputDir -C outputDir
# inputDir 为原始.9图文件夹,outputDir 为输出文件夹
执行成功实例
jundeMacBook-Pro:一期气泡 junxu$ ./aapt c -S /Users/junxu/Desktop/一期气泡/气泡需求整理 -C /Users/junxu/Desktop/一期气泡/output
Crunching PNG Files in source dir: /Users/junxu/Desktop/一期气泡/气泡需求整理
To destination dir: /Users/junxu/Desktop/一期气泡/output
注意:
若不是标准的点九图,在转换的过程会报错,这时候请设计重新提供新的点九图
实际开发当中遇到的问题
小屏手机适配问题
刚开始,我们的切图是按照 2 倍图切的,这样在小屏幕手机上会手机气泡高度过大的问题。

原因分析:
该现象的本质是点九图图片的高度大于单行文本消息的高度。
解决方案一(暂时不可取):
- 我尝试去压缩点九图,但最终再部分手机上面显示错乱,不知道是不是压缩点九图的方法错了。
解决方案二
对于低分辨率的手机和高分辨的手机分别下发不同的图片 url,我们尝试过得方案是当 density < 2 的时候,采用一倍图图片,density >= 2 采用二倍图图片。
解决方案三
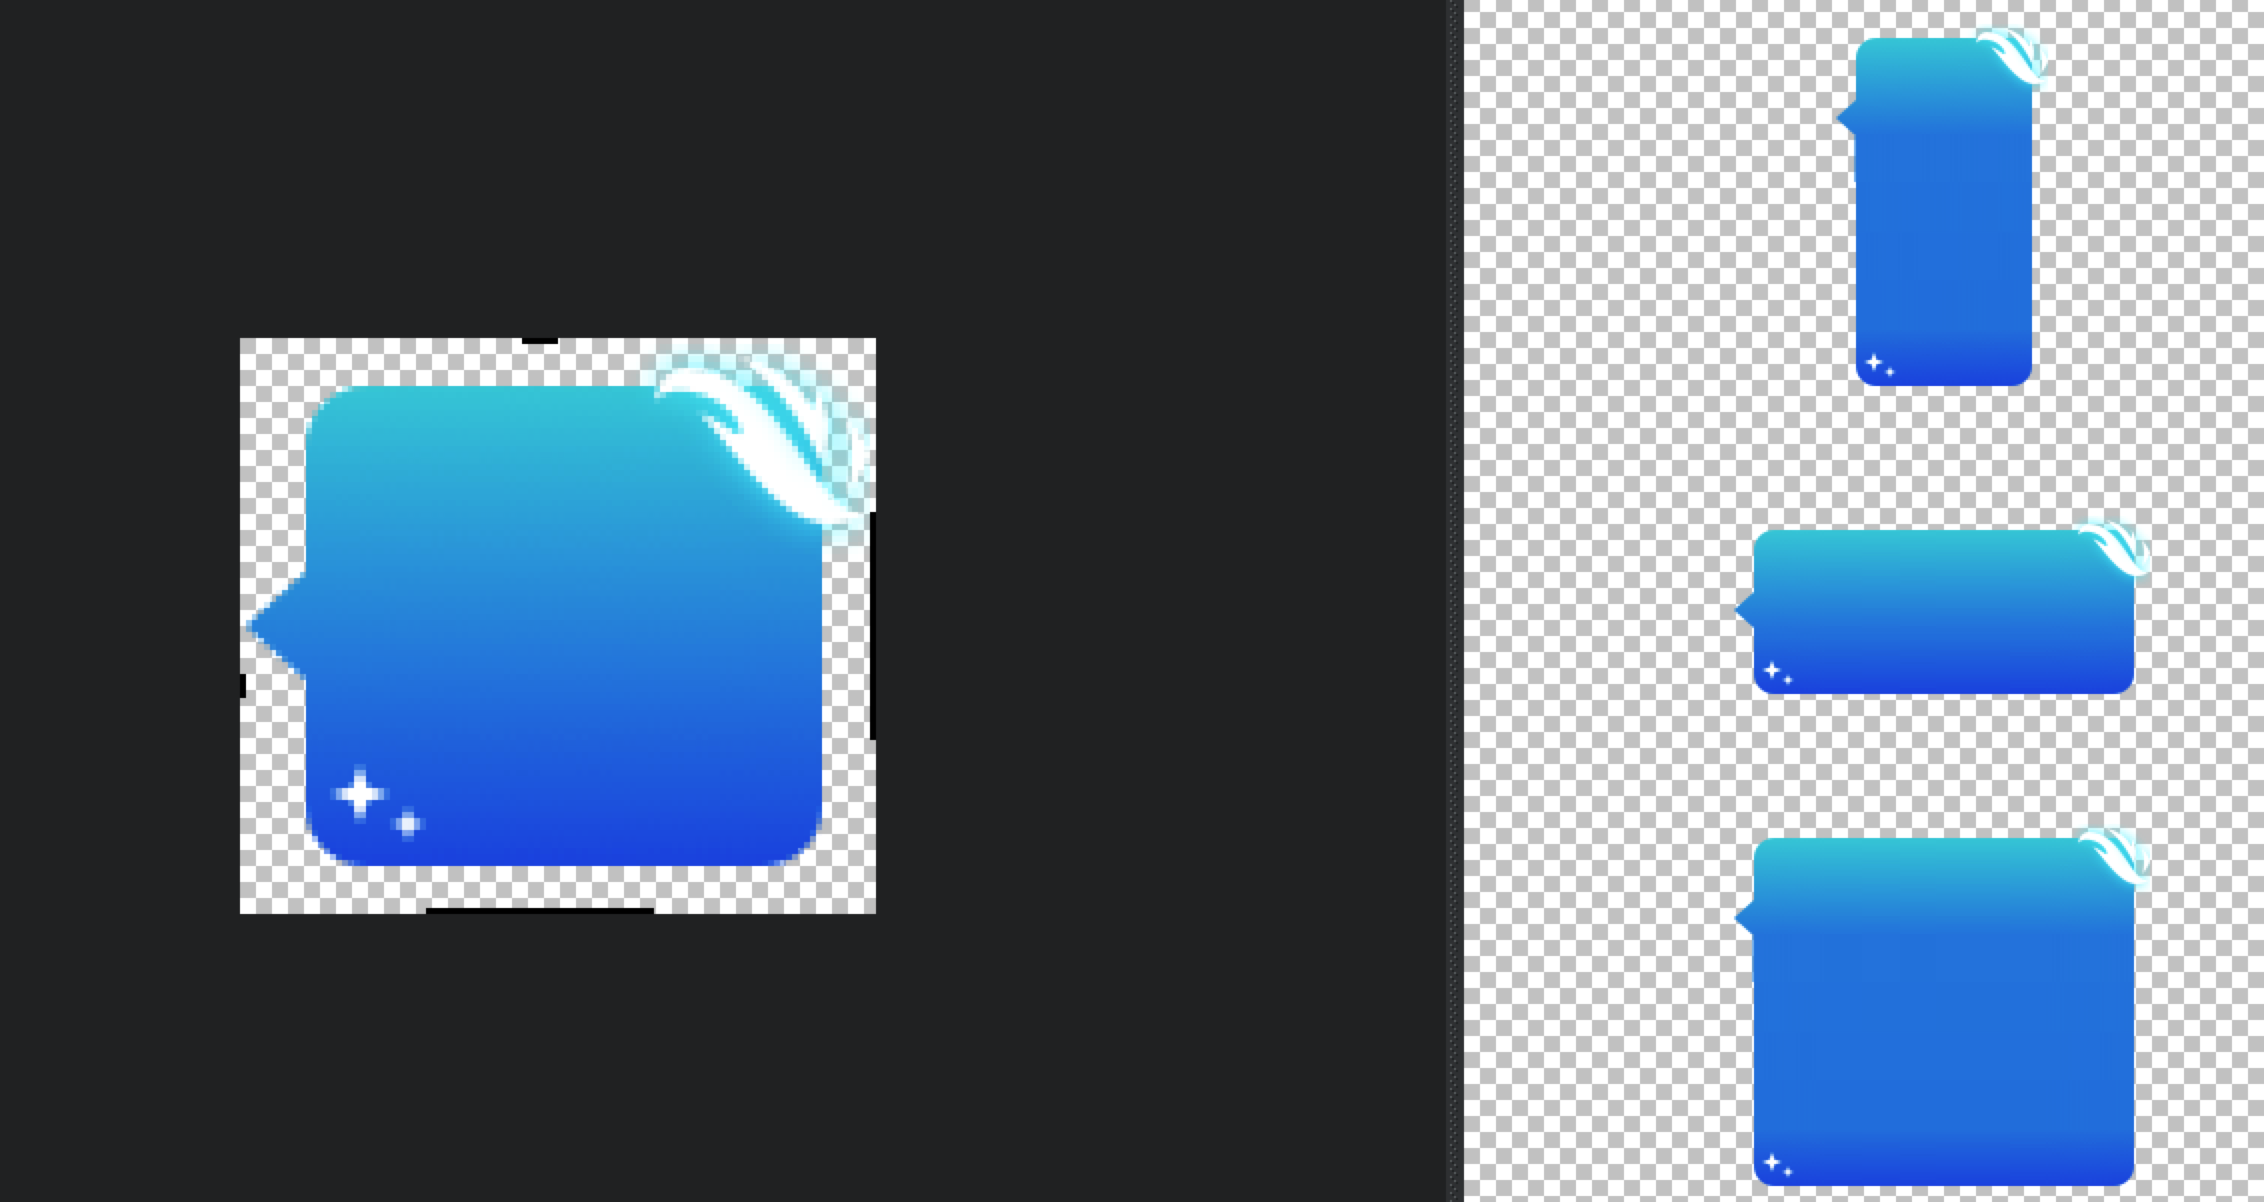
可能有人会有这样的疑问呢,为什么要采用一倍图,两倍图的解决方案呢?直接让 UI 设计师给一套图,点九图图片的高度适中不就解决了。是啊,我们也是这样想得,但他们说对于有一些装饰的点九图,如果缩小高度,一些装饰图案他们不太好切。比如下面图片中的星星。
小结
说到底,方案二,方案三其实都是折中的一种方案,如果直接能够做到点九图缩放,那就完美解决了。而 Android 中 res 目录中的 drawable 或者 mipmap 的点九图确实能做到,去看了相关的代码,目前也没有发现什么好的解决方案,如果你有好的解决方案话,欢迎留言交流。
点九图的 padding 在部分手机上面失效
这个是部分 Android 手机的 bug,解决方法见:https://stackoverflow.com/questions/11065996/ninepatchdrawable-does-not-get-padding-from-chunk
public class NinePatchChunk {

    private static final String TAG = "NinePatchChunk";

    public final Rect mPaddings = new Rect();

    public int mDivX[];
    public int mDivY[];
    public int mColor[];

    private static float density = IMO.getInstance().getResources().getDisplayMetrics().density;

    private static void readIntArray(final int[] data, final ByteBuffer buffer) {
        for (int i = 0, n = data.length; i < n; ++i)
            data[i] = buffer.getInt();
    }

    private static void checkDivCount(final int length) {
        if (length == 0 || (length & 0x01) != 0)
            throw new IllegalStateException("invalid nine-patch: " + length);
    }

    public static Rect getPaddingRect(final byte[] data) {
        NinePatchChunk deserialize = deserialize(data);
        if (deserialize == null) {
            return new Rect();
        }
    }

    public static NinePatchChunk deserialize(final byte[] data) {
        final ByteBuffer byteBuffer =
                ByteBuffer.wrap(data).order(ByteOrder.nativeOrder());

        if (byteBuffer.get() == 0) {
            return null; // is not serialized
        }

        final NinePatchChunk chunk = new NinePatchChunk();
        chunk.mDivX = new int[byteBuffer.get()];
        chunk.mDivY = new int[byteBuffer.get()];
        chunk.mColor = new int[byteBuffer.get()];

        try {
            checkDivCount(chunk.mDivX.length);
            checkDivCount(chunk.mDivY.length);
        } catch (Exception e) {
            return null;
        }


        // skip 8 bytes
        byteBuffer.getInt();
        byteBuffer.getInt();


        chunk.mPaddings.left = byteBuffer.getInt();
        chunk.mPaddings.right = byteBuffer.getInt();
        chunk.mPaddings.top = byteBuffer.getInt();
        chunk.mPaddings.bottom = byteBuffer.getInt();


        // skip 4 bytes
        byteBuffer.getInt();

        readIntArray(chunk.mDivX, byteBuffer);
        readIntArray(chunk.mDivY, byteBuffer);
        readIntArray(chunk.mColor, byteBuffer);

        return chunk;
    }
}

NinePatchDrawable patchy = new NinePatchDrawable(view.getResources(), bitmap, chunk, NinePatchChunk.getPaddingRect(chunk), null);
view.setBackground(patchy);
动态下载点九图会导致聊天气泡闪烁
- 这里我们采取的方案是预下载(预下载 10 个)
- 聊天气泡采用内存缓存,磁盘缓存,确保 RecyclerView 快速滑动的时候不会闪烁
理解点九图
以下内容参考腾讯音乐的 Android动态布局入门及NinePatchChunk解密
回顾NinePatchDrawable的构造方法第三个参数bitmap.getNinePatchChunk(),作者猜想,aapt命令其实就是在bitmap图片中,加入了NinePatchChunk的信息,那么我们是不是只要能自己构造出这个东西,就可以让任何图片按照我们想要的方式拉升了呢?
可是查了一堆官方文档,似乎并找不到相应的方法来获得这个byte[]类型的chunk参数。
既然无法知道这个chunk如何生成,那么能不能从解析的角度逆向得出这个NinePatchChunk的生成方法呢?
下面就需要从源码入手了。
NinePatchChunk.java
public static NinePatchChunk deserialize(byte[] data) {
    ByteBuffer byteBuffer =
            ByteBuffer.wrap(data).order(ByteOrder.nativeOrder());
    byte wasSerialized = byteBuffer.get();
    if (wasSerialized == 0) return null;
    NinePatchChunk chunk = new NinePatchChunk();
    chunk.mDivX = new int[byteBuffer.get()];
    chunk.mDivY = new int[byteBuffer.get()];
    chunk.mColor = new int[byteBuffer.get()];
    checkDivCount(chunk.mDivX.length);
    checkDivCount(chunk.mDivY.length);
    // skip 8 bytes
    byteBuffer.getInt();
    byteBuffer.getInt();
    chunk.mPaddings.left = byteBuffer.getInt();
    chunk.mPaddings.right = byteBuffer.getInt();
    chunk.mPaddings.top = byteBuffer.getInt();
    chunk.mPaddings.bottom = byteBuffer.getInt();
    // skip 4 bytes
    byteBuffer.getInt();
    readIntArray(chunk.mDivX, byteBuffer);
    readIntArray(chunk.mDivY, byteBuffer);
    readIntArray(chunk.mColor, byteBuffer);
    return chunk;
}
其实从这部分解析byte[] chunk的源码,我们已经可以反推出来大概的结构了。如下图,
按照上图中的猜想以及对.9.png的认识,直觉感受到,mDivX,mDivY,mColor这三个数组是最关键的,但是具体是什么,就要继续看源码了。
ResourceTypes.h
/**
 * This chunk specifies how to split an image into segments for
 * scaling.
 *
 * There are J horizontal and K vertical segments.  These segments divide
 * the image into J*K regions as follows (where J=4 and K=3):
 *
 *      F0   S0    F1     S1
 *   +-----+----+------+-------+
 * S2|  0  |  1 |  2   |   3   |
 *   +-----+----+------+-------+
 *   |     |    |      |       |
 *   |     |    |      |       |
 * F2|  4  |  5 |  6   |   7   |
 *   |     |    |      |       |
 *   |     |    |      |       |
 *   +-----+----+------+-------+
 * S3|  8  |  9 |  10  |   11  |
 *   +-----+----+------+-------+
 *
 * Each horizontal and vertical segment is considered to by either
 * stretchable (marked by the Sx labels) or fixed (marked by the Fy
 * labels), in the horizontal or vertical axis, respectively. In the
 * above example, the first is horizontal segment (F0) is fixed, the
 * next is stretchable and then they continue to alternate. Note that
 * the segment list for each axis can begin or end with a stretchable
 * or fixed segment.
 * /
正如源码中,注释的一样,这个NinePatch Chunk把图片从x轴和y轴分成若干个区域,F区域代表了固定,S区域代表了拉伸。mDivX,mDivY描述了所有S区域的位置起始,而mColor描述了,各个Segment的颜色,通常情况下,赋值为源码中定义的NO_COLOR = 0x00000001就行了。就以源码注释中的例子来说,mDivX,mDivY,mColor如下:
mDivX = [ S0.start, S0.end, S1.start, S1.end];
mDivY = [ S2.start, S2.end, S3.start, S3.end];
mColor = [c[0],c[1],...,c[11]]
对于mColor这个数组,长度等于划分的区域数,是用来描述各个区域的颜色的,而如果我们这个只是描述了一个bitmap的拉伸方式的话,是不需要颜色的,即源码中NO_COLOR = 0x00000001
说了这么多,我们还是通过一个简单例子来说明如何构造一个按中心点拉伸的 NinePatchDrawable 吧,
Bitmap bitmap = BitmapFactory.decodeFile(filepath);
int[] xRegions = new int[]{bitmap.getWidth() / 2, bitmap.getWidth() / 2 + 1};
int[] yRegions = new int[]{bitmap.getWidth() / 2, bitmap.getWidth() / 2 + 1};
int NO_COLOR = 0x00000001;
int colorSize = 9;
int bufferSize = xRegions.length * 4 + yRegions.length * 4 + colorSize * 4 + 32;

ByteBuffer byteBuffer = ByteBuffer.allocate(bufferSize).order(ByteOrder.nativeOrder());
// 第一个byte,要不等于0
byteBuffer.put((byte) 1);

//mDivX length
byteBuffer.put((byte) 2);
//mDivY length
byteBuffer.put((byte) 2);
//mColors length
byteBuffer.put((byte) colorSize);

//skip
byteBuffer.putInt(0);
byteBuffer.putInt(0);

//padding 先设为0
byteBuffer.putInt(0);
byteBuffer.putInt(0);
byteBuffer.putInt(0);
byteBuffer.putInt(0);

//skip
byteBuffer.putInt(0);

// mDivX
byteBuffer.putInt(xRegions[0]);
byteBuffer.putInt(xRegions[1]);

// mDivY
byteBuffer.putInt(yRegions[0]);
byteBuffer.putInt(yRegions[1]);

// mColors
for (int i = 0; i < colorSize; i++) {
    byteBuffer.putInt(NO_COLOR);
}

return byteBuffer.array();
create-a-ninepatch-ninepatchdrawable-in-runtime
在 stackoverflow 上面也找到牛逼的类,可以动态创建点九图,并拉伸图片,啪啪打脸,刚开始说到 android 中无法想 ios 一样动态指定图片拉伸区域。
public class NinePatchBuilder {
    int width, height;
    Bitmap bitmap;
    Resources resources;
    private ArrayList<Integer> xRegions = new ArrayList<Integer>();
    private ArrayList<Integer> yRegions = new ArrayList<Integer>();

    public NinePatchBuilder(Resources resources, Bitmap bitmap) {
        width = bitmap.getWidth();
        height = bitmap.getHeight();
        this.bitmap = bitmap;
        this.resources = resources;
    }

    public NinePatchBuilder(int width, int height) {
        this.width = width;
        this.height = height;
    }

    public NinePatchBuilder addXRegion(int x, int width) {
        xRegions.add(x);
        xRegions.add(x + width);
        return this;
    }

    public NinePatchBuilder addXRegionPoints(int x1, int x2) {
        xRegions.add(x1);
        xRegions.add(x2);
        return this;
    }

    public NinePatchBuilder addXRegion(float xPercent, float widthPercent) {
        int xtmp = (int) (xPercent * this.width);
        xRegions.add(xtmp);
        xRegions.add(xtmp + (int) (widthPercent * this.width));
        return this;
    }

    public NinePatchBuilder addXRegionPoints(float x1Percent, float x2Percent) {
        xRegions.add((int) (x1Percent * this.width));
        xRegions.add((int) (x2Percent * this.width));
        return this;
    }

    public NinePatchBuilder addXCenteredRegion(int width) {
        int x = (int) ((this.width - width) / 2);
        xRegions.add(x);
        xRegions.add(x + width);
        return this;
    }

    public NinePatchBuilder addXCenteredRegion(float widthPercent) {
        int width = (int) (widthPercent * this.width);
        int x = (int) ((this.width - width) / 2);
        xRegions.add(x);
        xRegions.add(x + width);
        return this;
    }

    public NinePatchBuilder addYRegion(int y, int height) {
        yRegions.add(y);
        yRegions.add(y + height);
        return this;
    }

    public NinePatchBuilder addYRegionPoints(int y1, int y2) {
        yRegions.add(y1);
        yRegions.add(y2);
        return this;
    }

    public NinePatchBuilder addYRegion(float yPercent, float heightPercent) {
        int ytmp = (int) (yPercent * this.height);
        yRegions.add(ytmp);
        yRegions.add(ytmp + (int) (heightPercent * this.height));
        return this;
    }

    public NinePatchBuilder addYRegionPoints(float y1Percent, float y2Percent) {
        yRegions.add((int) (y1Percent * this.height));
        yRegions.add((int) (y2Percent * this.height));
        return this;
    }

    public NinePatchBuilder addYCenteredRegion(int height) {
        int y = (int) ((this.height - height) / 2);
        yRegions.add(y);
        yRegions.add(y + height);
        return this;
    }

    public NinePatchBuilder addYCenteredRegion(float heightPercent) {
        int height = (int) (heightPercent * this.height);
        int y = (int) ((this.height - height) / 2);
        yRegions.add(y);
        yRegions.add(y + height);
        return this;
    }

    public byte[] buildChunk() {
        if (xRegions.size() == 0) {
            xRegions.add(0);
            xRegions.add(width);
        }
        if (yRegions.size() == 0) {
            yRegions.add(0);
            yRegions.add(height);
        }

        int NO_COLOR = 1;//0x00000001;
        int COLOR_SIZE = 9;//could change, may be 2 or 6 or 15 - but has no effect on output
        int arraySize = 1 + 2 + 4 + 1 + xRegions.size() + yRegions.size() + COLOR_SIZE;
        ByteBuffer byteBuffer = ByteBuffer.allocate(arraySize * 4).order(ByteOrder.nativeOrder());
        byteBuffer.put((byte) 1);//was translated
        byteBuffer.put((byte) xRegions.size());//divisions x
        byteBuffer.put((byte) yRegions.size());//divisions y
        byteBuffer.put((byte) COLOR_SIZE);//color size

        //skip
        byteBuffer.putInt(0);
        byteBuffer.putInt(0);

        //padding -- always 0 -- left right top bottom
        byteBuffer.putInt(0);
        byteBuffer.putInt(0);
        byteBuffer.putInt(0);
        byteBuffer.putInt(0);

        //skip
        byteBuffer.putInt(0);

        for (int rx : xRegions)
            byteBuffer.putInt(rx); // regions left right left right ...
        for (int ry : yRegions)
            byteBuffer.putInt(ry);// regions top bottom top bottom ...

        for (int i = 0; i < COLOR_SIZE; i++)
            byteBuffer.putInt(NO_COLOR);

        return byteBuffer.array();
    }

    public NinePatch buildNinePatch() {
        byte[] chunk = buildChunk();
        if (bitmap != null)
            return new NinePatch(bitmap, chunk, null);
        return null;
    }

    public NinePatchDrawable build() {
        NinePatch ninePatch = buildNinePatch();
        if (ninePatch != null)
            return new NinePatchDrawable(resources, ninePatch);
        return null;
    }
}
运行一下测试代码
mLlRoot = findViewById(R.id.ll_root);
try {
    InputStream is = getAssets().open("sea.png");
    Bitmap bitmap = BitmapFactory.decodeStream(is);
    for (int i = 0; i < 5; i++) {
        NinePatchDrawable ninePatchDrawable = NinePatchHelper.buildMulti(this, bitmap);
        TextView textView = new TextView(this);
        textView.setTextSize(25);
        textView.setPadding(20, 10, 20, 10);
        textView.setText(strArray[i]);
        textView.setGravity(Gravity.CENTER_VERTICAL);
        LinearLayout.LayoutParams layoutParams = new LinearLayout.LayoutParams(LinearLayout.LayoutParams.WRAP_CONTENT, LinearLayout.LayoutParams.WRAP_CONTENT);
        layoutParams.leftMargin = 20;
        layoutParams.rightMargin = 20;
        textView.setLayoutParams(layoutParams);
        if (Build.VERSION.SDK_INT >= Build.VERSION_CODES.JELLY_BEAN) {
            textView.setBackground(ninePatchDrawable);
        }
        mLlRoot.addView(textView);
    }
} catch (IOException e) {
    e.printStackTrace();
}
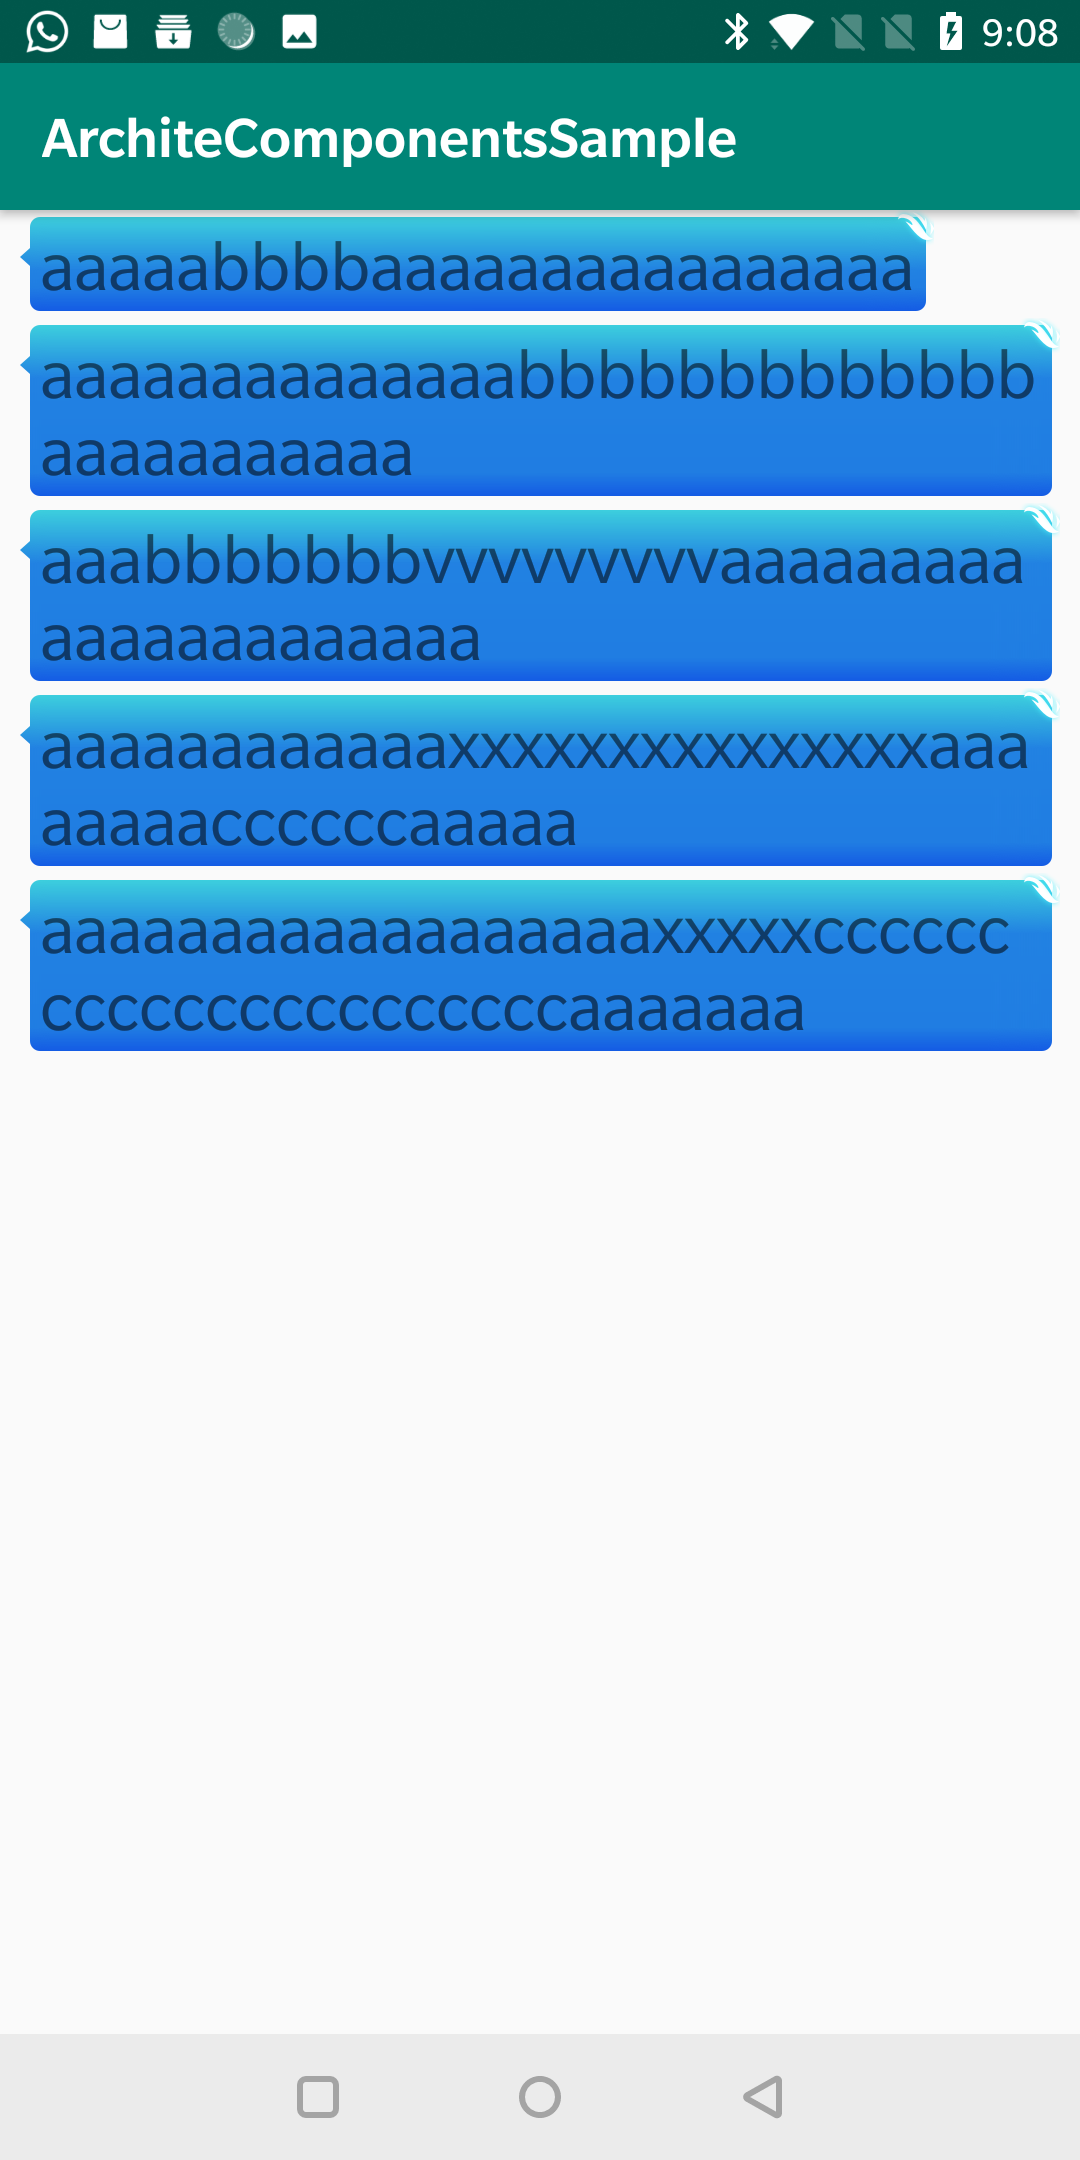
可以看到,我们的图片完美拉伸
参考文章
- https://cloud.tencent.com/developer/article/1168755?
- https://mp.weixin.qq.com/s?__biz=MzI1NjEwMTM4OA==&mid=2651232105&idx=1&sn=fcc4fa956f329f839f2a04793e7dd3b9&mpshare=1&scene=21&srcid=0719Nyt7J8hsr4iYwOjVPXQE#wechat_redirect
推荐阅读
Rxjava 2.x 源码系列 - 变换操作符 Map(上)
java 源码系列 - 带你读懂 Reference 和 ReferenceQueue
扫一扫,欢迎关注我的微信公众号 stormjun94(徐公码字), 目前是一名程序员,不仅分享 Android开发相关知识,同时还分享技术人成长历程,包括个人总结,职场经验,面试经验等,希望能让你少走一点弯路。