Spring Boot 默认集成了Spring MVC,下面为Spring MVC一些常用注解。
开发环境:IntelliJ IDEA 2019.2.2
Spring Boot版本:2.1.8
新建一个名称为demo的Spring Boot项目。
一、Controller注解
Controller注解用于修饰Java类,被修饰的类充当MVC中的控制器角色。
Controller注解使用了@Component修饰,使用Controller注解修饰的类,会被@ComponentScan检测,并且会作为Spring的bean被放到容器
中。
package com.example.demo;

import org.springframework.stereotype.Controller;
import org.springframework.web.bind.annotation.RequestMapping;
import org.springframework.web.bind.annotation.ResponseBody;

@Controller
public class DemoController {

    @RequestMapping("/index")
    @ResponseBody
    public String index(){
        return "index";
    }
}
运行项目后,浏览器访问:http://localhost:8080/index,页面显示:
index
二、RestController注解
RestController注解是为了更方便使用@Controller和@ResponseBody。
@ResponseBody修饰控制器方法,方法的返回值将会被写到HTTP的响应体中,所返回的内容不放到模型中,也不会被解释为视图的名称。
下面例子等同于上面例子。
package com.example.demo;

import org.springframework.web.bind.annotation.RequestMapping;
import org.springframework.web.bind.annotation.RestController;

@RestController
public class DemoController {

    @RequestMapping("/index")
    public String index(){
        return "index";
    }
}
三、RequestMapping注解
RequestMapping注解可修饰类或方法,主要用于映射请求与处理方法。
当用于修饰类并设置了URL时,表示为各个请求设置了URL前缀。
RequestMapping注解主要有以下属性:
(1)path与value:用于配置映射的url;
(2)method:映射的HTTP方法,如GET、POST、PUT、DELETE;
也可以使用默认配置了@RequestMapping的method属性的几个注解:
@GetMapping等同于RequestMapping(method="RequestMethod.GET")
@PostMapping、@PutMapping、@DeleteMapping类似。
(3)params:为映射的请求配置参数标识;
(4)consumes:配置请求的数据类型,如XML或JSON等;
(5)produces:配置响应的数据类型,如“application/json”返回json数据;
package com.example.demo;

import org.springframework.web.bind.annotation.GetMapping;
import org.springframework.web.bind.annotation.RequestMapping;
import org.springframework.web.bind.annotation.RequestMethod;
import org.springframework.web.bind.annotation.RestController;

@RestController
@RequestMapping("/oa")
public class DemoController {

    @RequestMapping(value = "/index1")
    public String index1(){
        return "index1";
    }

    @RequestMapping(value = "/index2", method = RequestMethod.GET)
    public String index2(){
        return "index2";
    }

    @GetMapping(value = "/index3")
    public String index3(){
        return "index3";
    }
}
浏览器分别访问:
http://localhost:8080/oa/index1
http://localhost:8080/oa/index2
http://localhost:8080/oa/index3
页面分别显示:
index1
index2
index3
四、PathVariable注解
PathVariable注解主要用于修饰方法参数,表示该方法参数是请求URL的变量。
package com.example.demo;

import org.springframework.web.bind.annotation.GetMapping;
import org.springframework.web.bind.annotation.PathVariable;
import org.springframework.web.bind.annotation.RestController;

@RestController
public class DemoController {

    @GetMapping("/index1/{name}")
    public String index1(@PathVariable String name){
        return "index1: " + name;
    }

    //可以为@PathVariable配置属性值,显式绑定方法参数与URL变量的值
    @GetMapping("/index2/{name}")
    public String index2(@PathVariable("name") String lc){
        return "index2: " + lc;
    }
}
浏览器访问http://localhost:8080/index1/a
页面显示:
a
访问http://localhost:8080/index1/b
页面显示:
b
五、RequestParam注解
RequestParam注解用于获取请求体中的请求参数,如表单提交后获取页面控件name值。
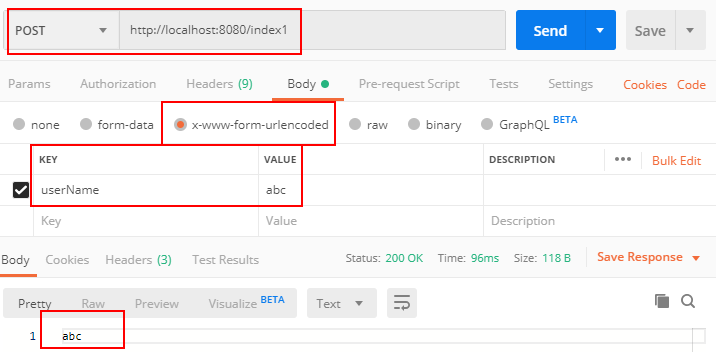
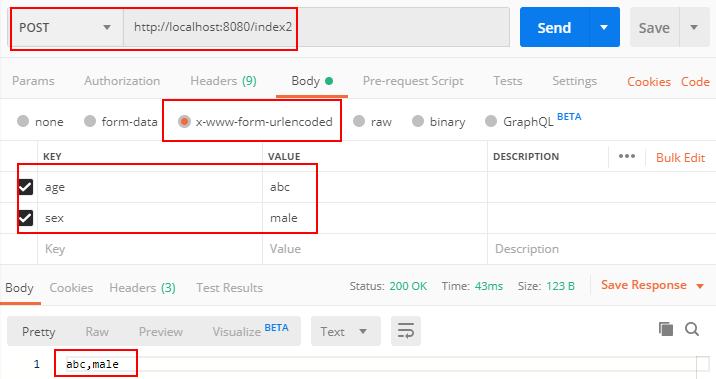
package com.example.demo;

import org.springframework.web.bind.annotation.PostMapping;
import org.springframework.web.bind.annotation.RequestParam;
import org.springframework.web.bind.annotation.RestController;

import java.util.Map;

@RestController
public class DemoController {

    @PostMapping("/index1")
    public String index1(@RequestParam String userName){
        return userName;
    }

    //map存放所有请求参数
    @PostMapping("/index2")
    public String index2(@RequestParam Map<String,String> map){
        String age = map.get("age");
        String sex = map.get("sex");
        return age + "," + sex;
    }
}
随便在电脑中如桌面新建一个html文件:
<html>
<body>
  <form method="post" action="http://localhost:8080/index1">
    <input type="text" name="userName" value="abc" />
    <input type="submit" value="提交1" />
  </form>
  <form method="post" action="http://localhost:8080/index2">
    <input type="text" name="age" value="22" />
    <input type="password" name="sex" value="male" />
    <input type="submit" value="提交2" />
  </form>
</body>
</html>
浏览器打开后,如果点击“提交1”按钮后,页面跳到http://localhost:8080/index1,显示abc。
如果点击“提交2”按钮后,页面跳到http://localhost:8080/index2,显示22,male。
用Postman测试:
六、RequestBody注解
注解@RequestBody接收的参数是来自requestBody中,即请求体。
一般用于处理application/json、application/xml等类型的数据。
GET方式无请求体,所以使用@RequestBody接收数据时,前端只能用POST方式进行提交。
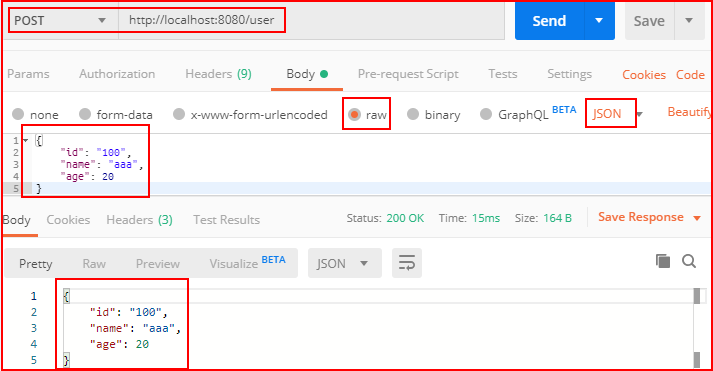
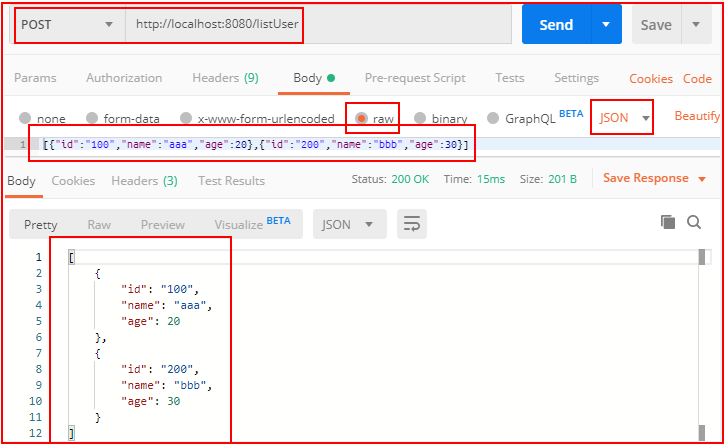
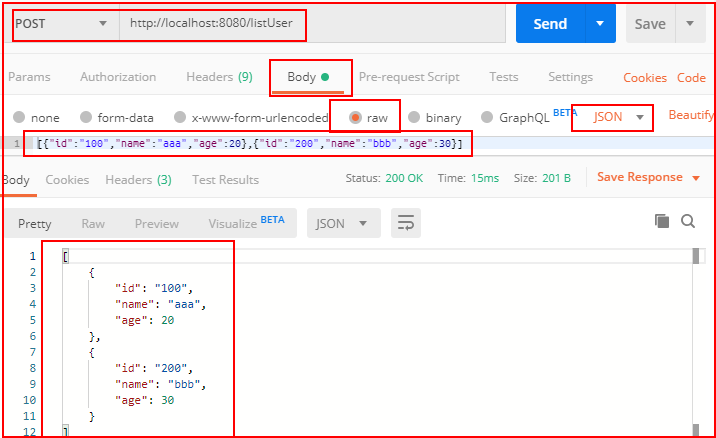
package com.example.demo;

import com.example.demo.entity.User;
import com.example.demo.service.UserService;
import org.springframework.web.bind.annotation.*;

import javax.annotation.Resource;
import java.util.List;
import java.util.Map;

@RestController
public class DemoController {
    @Resource
    UserService userService;

    //前端json数据传递到实体中
    @PostMapping("/user")
    @ResponseBody
    public User user(@RequestBody User user){
        return user;
    }

    //前端json数据传递到实体集合中
    @PostMapping("/listUser")
    @ResponseBody
    public List<User>  listUser(@RequestBody List<User> list){
        return list;
    }

    //前端json数据传递到非实体中
    @PostMapping("/map")
    @ResponseBody
    public String map(@RequestBody Map<String,Object> map){
        return map.get("id").toString() + "," + map.get("name").toString() + "," + map.get("age").toString();
    }

}
用Postman测试:
七、文件上传
使用RequestParam注解可以实现文件上传。
package com.example.demo;

import org.springframework.web.bind.annotation.PostMapping;
import org.springframework.web.bind.annotation.RequestParam;
import org.springframework.web.bind.annotation.RestController;
import org.springframework.web.multipart.MultipartFile;

import java.io.File;
import java.io.IOException;

@RestController
public class DemoController {

    @PostMapping("/upload")
    public String upload(@RequestParam("file") MultipartFile file) throws IOException {
        String fileName = file.getOriginalFilename();
        String filePath = "D:/";
        File dest = new File(filePath + fileName);
        file.transferTo(dest);
        return "上传成功";
    }

}
随便新建一个html文件
<html>
<body>
  <form method="post" action="http://localhost:8080/upload" enctype="multipart/form-data">
    <input type="file" name="file" />
    <input type="submit" value="提交" />
  </form>
</body>
</html>
浏览器打开后,选择一个文件,点击提交后,文件保存到了D盘。