1. 添加进度条
-
第三方包 -- nprogress https://github.com/rstacruz/nprogress
// 导入 NProgress 包对应的JS和CSS
import NProgress from 'nprogress'
import 'nprogress/nprogress.css'
// 在 request 拦截器中,展示进度条 NProgress.start() axios.interceptors.request.use(config => { // console.log(config) NProgress.start() config.headers.Authorization = window.sessionStorage.getItem('token') // 在最后必须 return config return config }) // 在 response 拦截器中,隐藏进度条 NProgress.done() axios.interceptors.response.use(config => { NProgress.done() return config })
2. Build 命令期间移除所有的Console
-
用到的第三方插件 -- babel-plugin-transform-remove-console
-
通过
babel.config.js文件配置{ "plugins": ["transform-remove-console"] }// with options { "plugins": [ ["transform-remove-console", { "exclude": [ "error", "warn"] }] ] }
-
-
根据不同的环境决定是否移除console
// 这是项目发布阶段需要用到的插件
const prodPlugins = []
if (process.env.NODE_ENV === 'production') {
  prodPlugins.push('transform-remove-console')
}

module.exports = {
  presets: [
    '@vue/cli-plugin-babel/preset'
  ],
  plugins: [
    [
      'component',
      {
        libraryName: 'element-ui',
        styleLibraryName: 'theme-chalk'
      }
    ],
    ...prodPlugins
  ]
}
3. 生成打包报告
-
3.1 通过命令行参数的形式生成报告
// --report 选项可以生成report.html 以帮助分析包内容 vue-cli-service build --report -
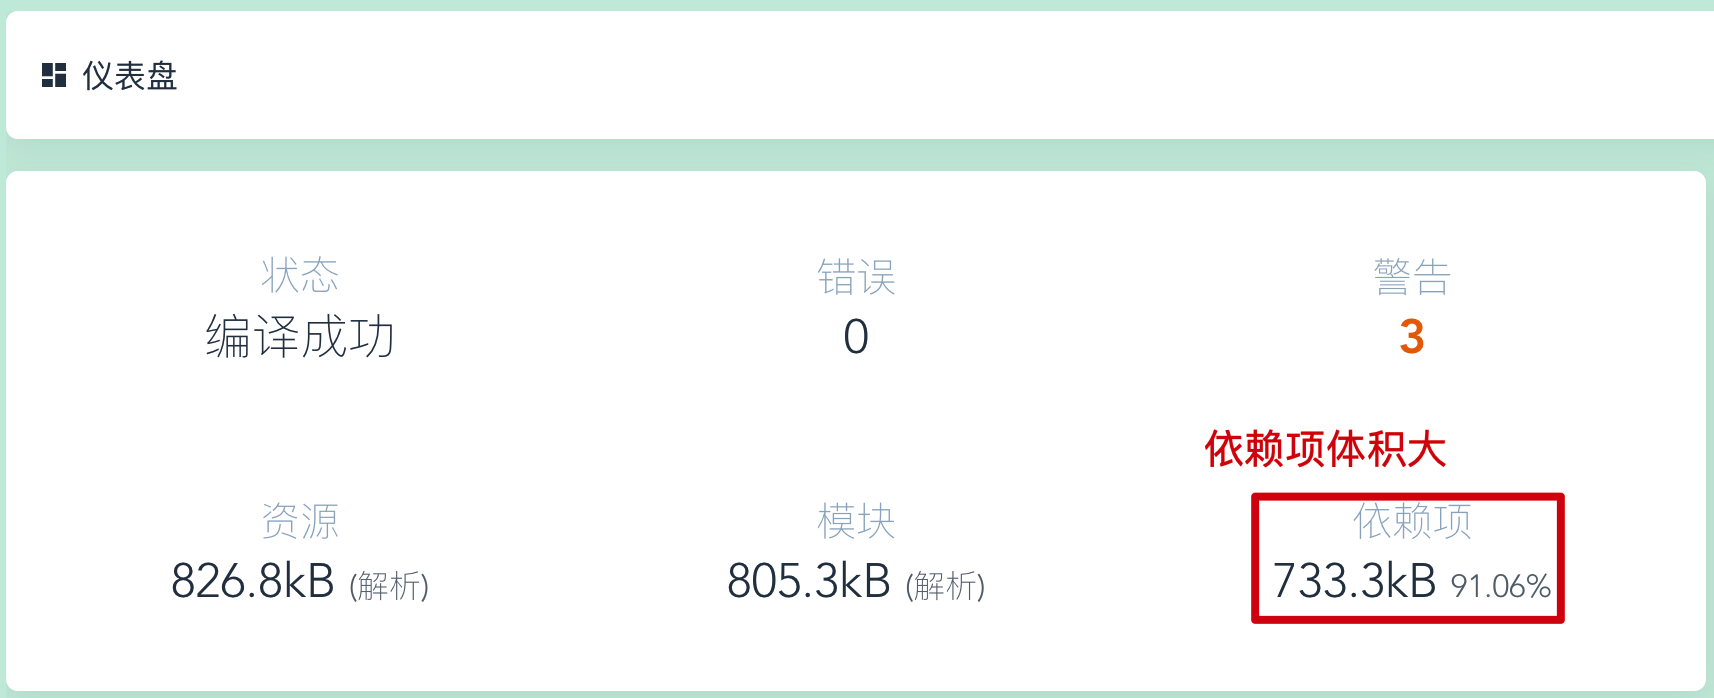
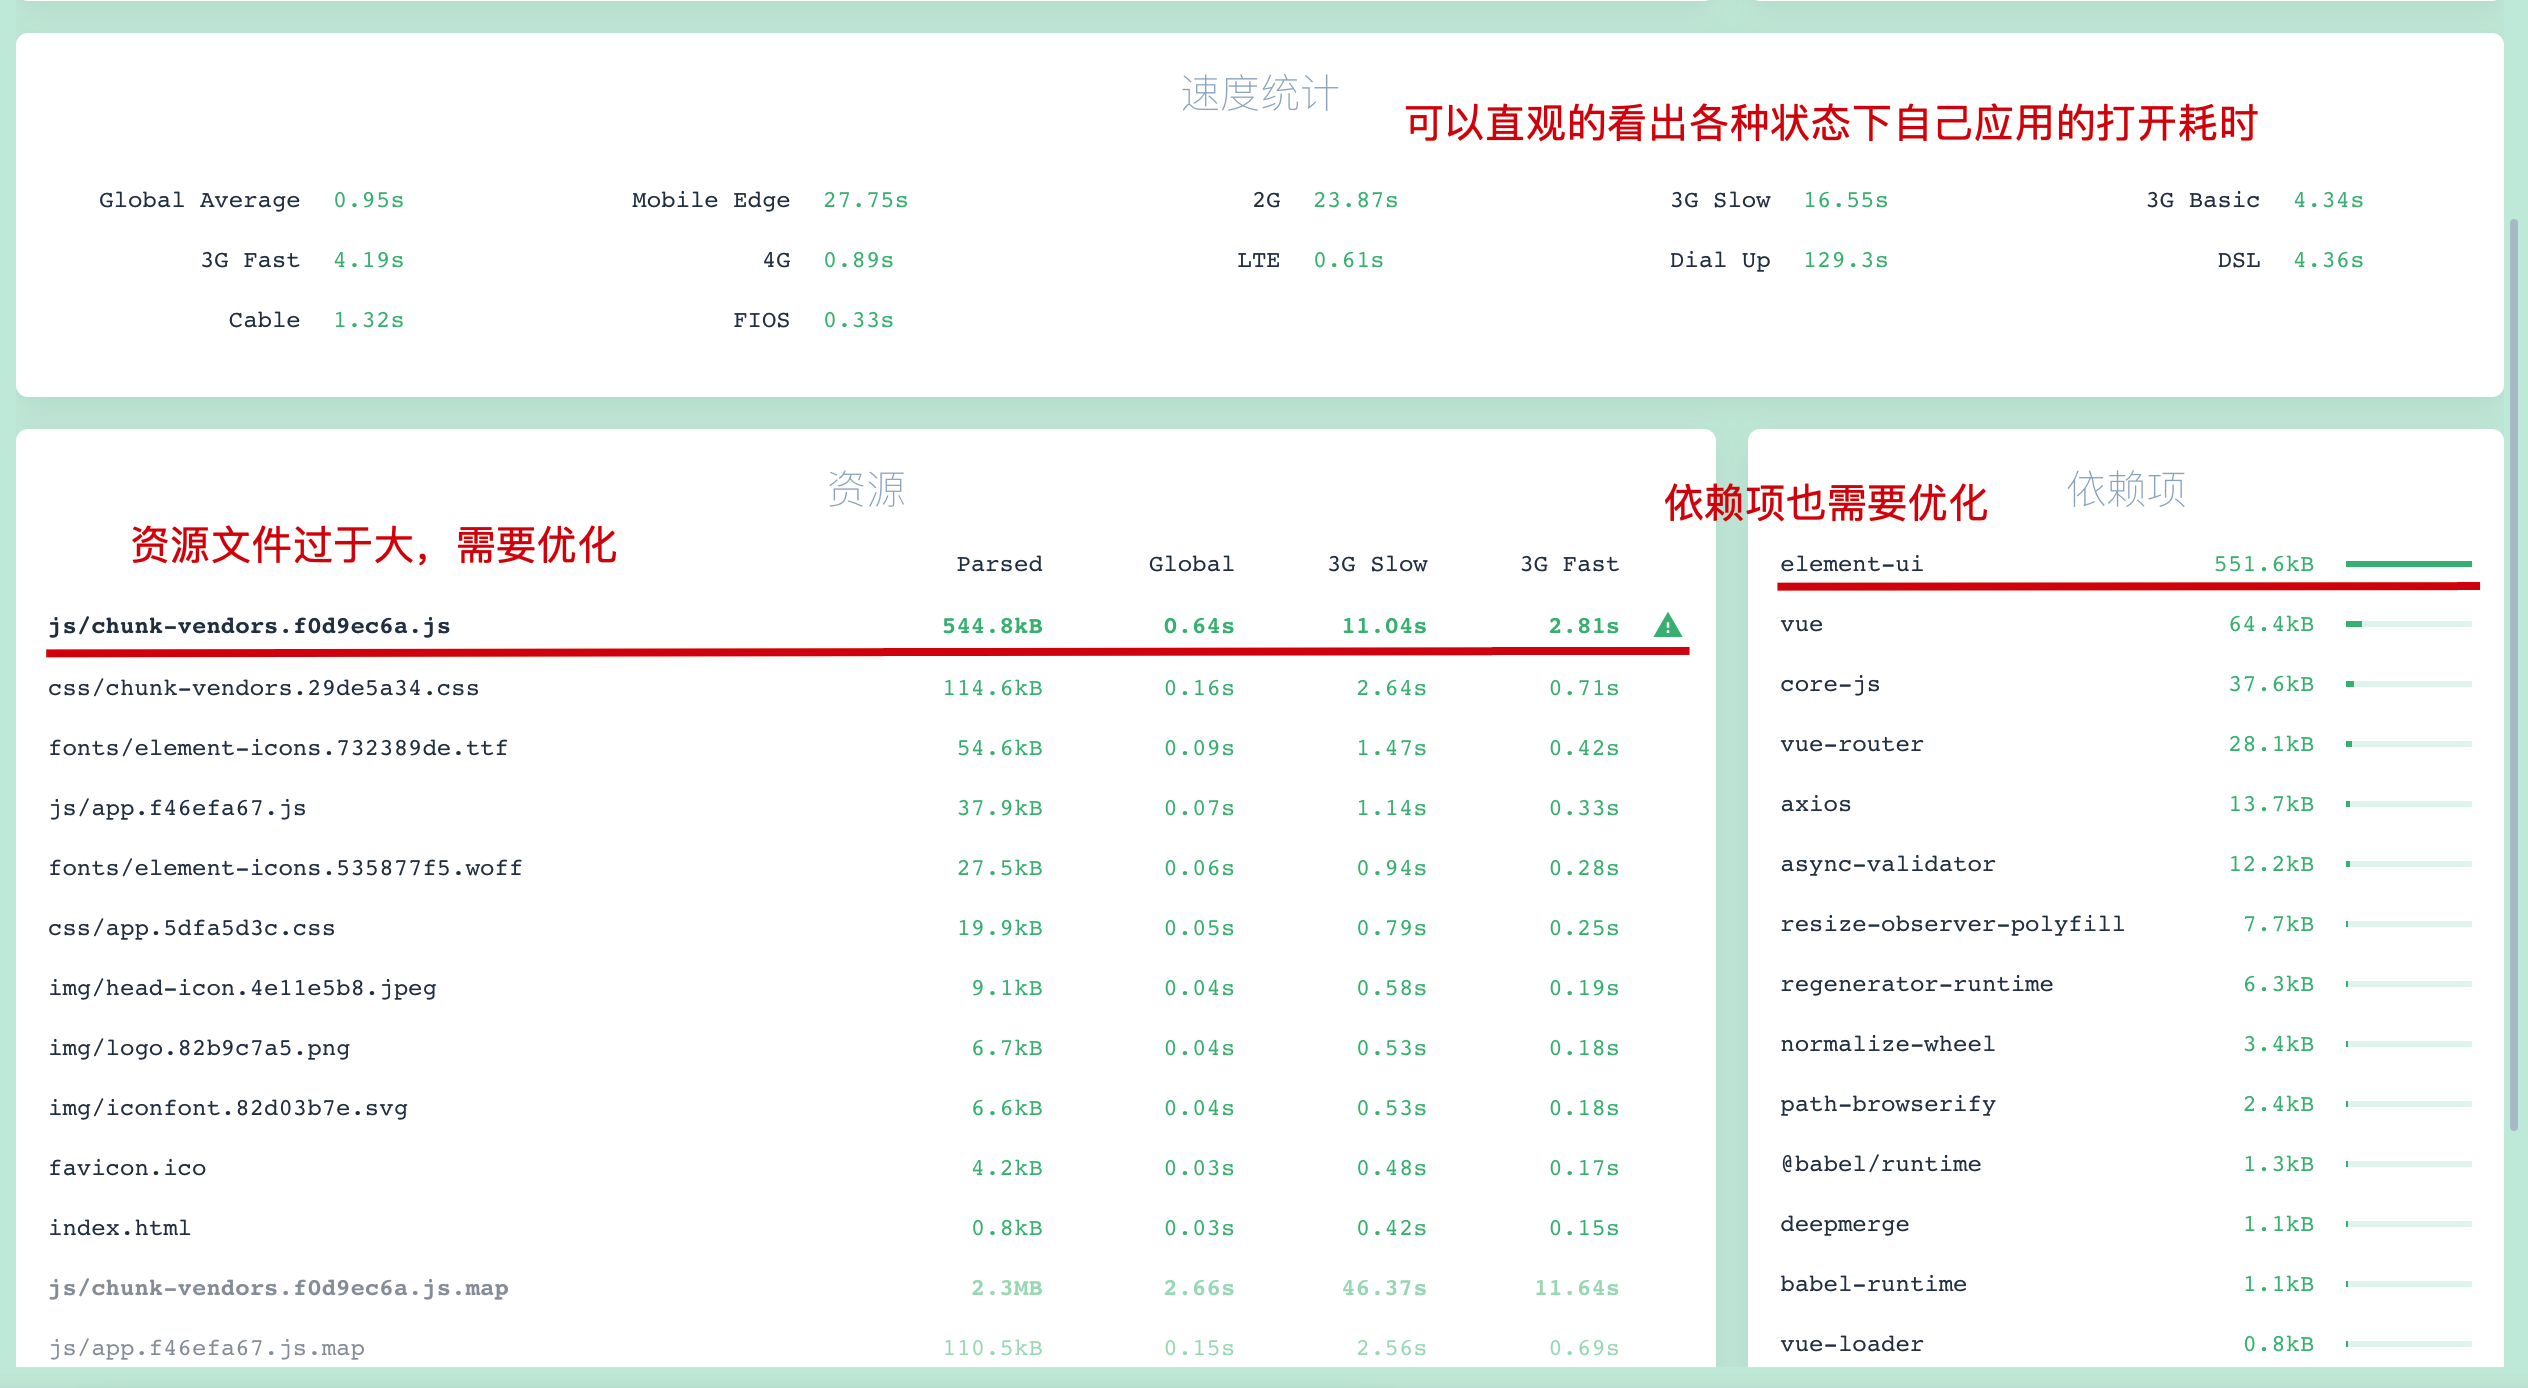
3.2 通过可视化的UI面板直接查看报告
在可视化的UI面板中, 通过
控制台和分析面板,可以方便的看到项目中所存在的问题
4. 为开发模式与发布模式指定不同的打包入口
默认情况下,Vue项目的开发模式与发布模式,共用同一个打包的入口文件(即src/main.js)为了将项目的开发过程与发布过程分离,我们可以为两种模式,各自指定打包的入口文件,即:
- 开发模式的入口文件为
src/main-dev.js - 发布模式的入口文件为
src/main-prod.js
实现方式
在vue.config.js到处的配置对象中,新增节点,来自定义webpack的打包配置
configureWebpack 和chainWebpack 的作用相同,唯一的区别就是他们修改webpack配置的方式不同
-
chainWebpack通过
链式编程的形式,来修改默认的webpack配置 -
configureWebpack通过
操作对象的形式,来修改默认的webpack配置module.exports = { chainWebpack: config => { config.when(process.env.NODE_ENV === 'production', config => { config.entry('app').clear().add('./src/main-prod.js') }) config.when(process.env.NODE_ENV === 'development', config => { config.entry('app').clear().add('./src/main-dev.js') }) } }
5. 第三方库启用CDN
默认情况下,通过import语法导入的第三方依赖包, 最终会被打包合并到同一个文件中,从而导致打包成功后, 单文件体积过大的问题,如图

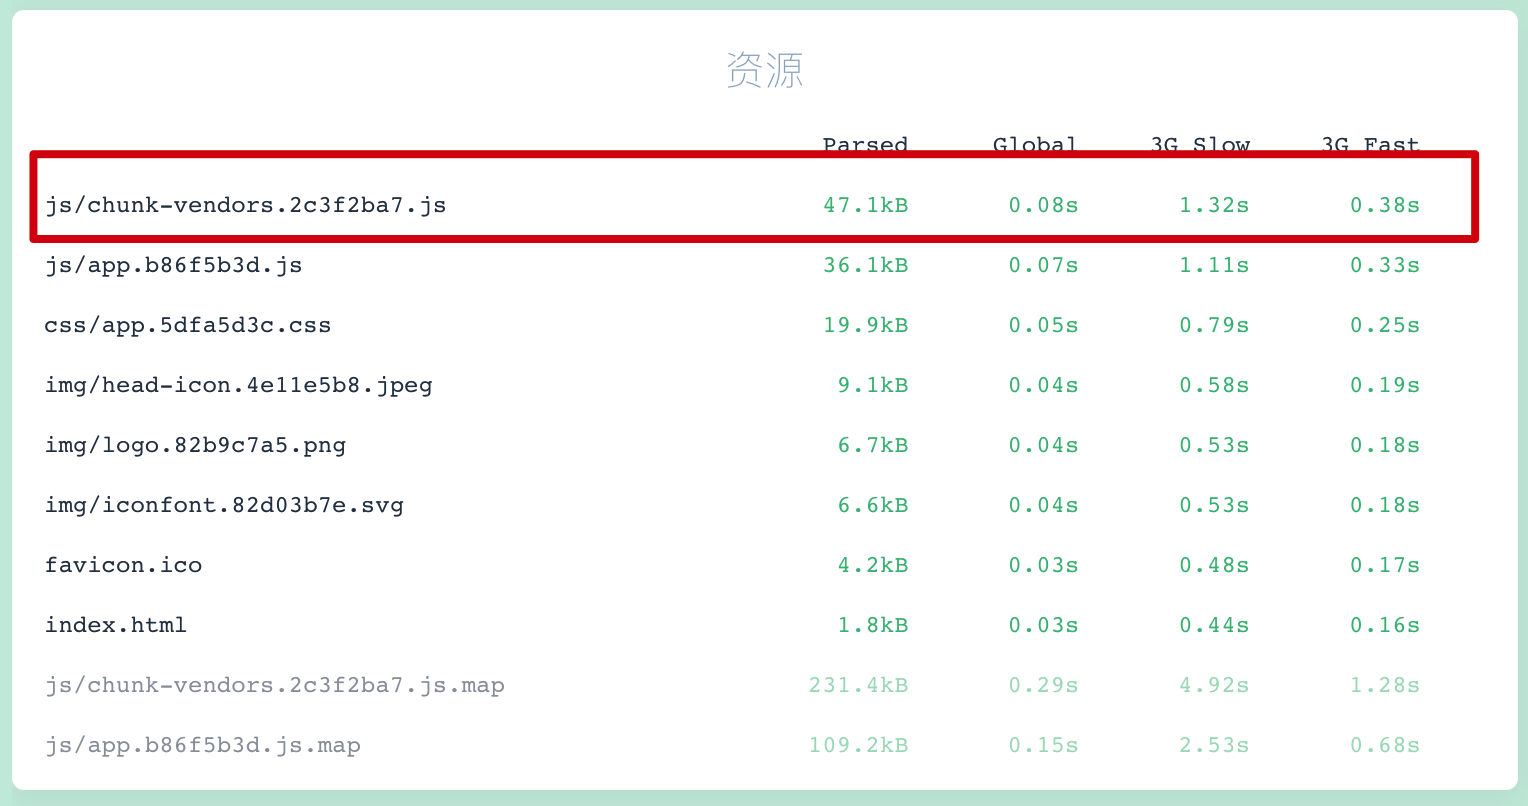
为了解决上述问题, 可以通过webpack的externals节点,来配置并加载外部的CDN资源。凡是声明在externals中的第三方包,都不会被打包,如图
- 5.1 vue.config.js文件中配置externals节点
只有发布模式的时候,才有必要配置externals
// 其中key为包的名字,value为挂载到window中全局的变量名字
config.set('externals', {
  vue: 'Vue',
  'vue-router': 'VueRouter',
  axios: 'axios',
  lodash: '_',
  echarts: 'echarts',
  nprogress: 'NProgress',
  'vue-quill-editor': 'VueQuillEditor'
})
-
5.2 需要在public/index.html文件的头部,添加对应的CDN资源引用(对应main-prod.js中的样式引入需要删除)
<!-- nprogress 的样式表文件 --> <link rel="stylesheet" href="https://cdn.staticfile.org/nprogress/0.2.0/nprogress.min.css" /> <!-- 富文本编辑器 的样式表文件 --> <link rel="stylesheet" href="https://cdn.staticfile.org/quill/1.3.4/quill.core.min.css" /> <link rel="stylesheet" href="https://cdn.staticfile.org/quill/1.3.4/quill.snow.min.css" /> <link rel="stylesheet" href="https://cdn.staticfile.org/quill/1.3.4/quill.bubble.min.css" /> <!-- element-ui 的样式表文件 --> <link rel="stylesheet" href="https://cdn.staticfile.org/element-ui/2.8.2/theme-chalk/index.css" /> -
5.3 需要在public/index.html文件的头部,添加如下的CDN资源引用
<script src="https://cdn.staticfile.org/vue/2.5.22/vue.min.js"></script> <script src="https://cdn.staticfile.org/vue-router/3.0.1/vue-router.min.js"></script> <script src="https://cdn.staticfile.org/axios/0.18.0/axios.min.js"></script> <script src="https://cdn.staticfile.org/lodash.js/4.17.11/lodash.min.js"></script> <script src="https://cdn.staticfile.org/echarts/4.1.0/echarts.min.js"></script> <script src="https://cdn.staticfile.org/nprogress/0.2.0/nprogress.min.js"></script> <!-- 富文本编辑器的 js 文件 --> <script src="https://cdn.staticfile.org/quill/1.3.4/quill.min.js"></script> <script src="https://cdn.jsdelivr.net/npm/vue-quill-editor@3.0.4/dist/vue-quill-editor.js"></script> <!-- element-ui 的 js 文件 --> <script src="https://cdn.staticfile.org/element-ui/2.8.2/index.js"></script> -
5.4 通过CDN优化ElementUI
-
ElementUI的优化有点不一样,需要将elementUI的按需加载删除
import './plugins/element.js' -
public/index.html中加入ElementUI的CDN引入
<!-- element-ui 的样式表文件 -->
<link rel="stylesheet" href="https://cdn.staticfile.org/element-ui/2.8.2/theme-chalk/index.css" />
<!-- element-ui 的 js 文件 -->
<script src="https://cdn.staticfile.org/element-ui/2.8.2/index.js"></script>
-
6. 首页内容定制
- 不同的打包环境下,首页内容可能会有所不同。我们可以通过插件的方式进行定制
// 生产模式
config.when(process.env.NODE_ENV === 'production', config => {
  config.entry('app').clear().add('./src/main-prod.js')

  config.plugin('html').tap(args => {
    args[0].isProd = true
    return args
  })
})

// 开发模式
config.when(process.env.NODE_ENV === 'development', config => {
  config.entry('app').clear().add('./src/main-dev.js')

  config.plugin('html').tap(args => {
    args[0].isProd = false
    return args
  })
})
-
在public/index.html首页中,可以根据isProd的值,来决定如何渲染页面结构:
<!- 按需渲染页面的标题 -->
<title><%= htmlWebpackPlugin.options.isProd ? '' : 'dev - ' %>电商后台管理系统</title>
<!- 按需加载外部的CDN资源 --> <% if(htmlWebpackPlugin.options.isProd){ %> <!- 通过externals加载的外部CDN资源 --> <% } %>例:
  <head>
    <meta charset="utf-8" />
    <meta http-equiv="X-UA-Compatible" content="IE=edge" />
    <meta name="viewport" content="width=device-width,initial-scale=1.0" />
    <link rel="icon" href="<%= BASE_URL %>favicon.ico" />
    <title><%= htmlWebpackPlugin.options.isProd ? '' : 'dev - ' %>电商后台管理系统</title>

    <% if(htmlWebpackPlugin.options.isProd){ %>
    <!-- nprogress 的样式表文件 -->
    <link rel="stylesheet" href="https://cdn.staticfile.org/nprogress/0.2.0/nprogress.min.css" />
    <!-- 富文本编辑器 的样式表文件 -->
    <link rel="stylesheet" href="https://cdn.staticfile.org/quill/1.3.4/quill.core.min.css" />
    <link rel="stylesheet" href="https://cdn.staticfile.org/quill/1.3.4/quill.snow.min.css" />
    <link rel="stylesheet" href="https://cdn.staticfile.org/quill/1.3.4/quill.bubble.min.css" />
    <!-- element-ui 的样式表文件 -->
    <link rel="stylesheet" href="https://cdn.staticfile.org/element-ui/2.8.2/theme-chalk/index.css" />

    <script src="https://cdn.staticfile.org/vue/2.5.22/vue.min.js"></script>
    <script src="https://cdn.staticfile.org/vue-router/3.0.1/vue-router.min.js"></script>
    <script src="https://cdn.staticfile.org/axios/0.18.0/axios.min.js"></script>
    <script src="https://cdn.staticfile.org/lodash.js/4.17.11/lodash.min.js"></script>
    <script src="https://cdn.staticfile.org/echarts/4.1.0/echarts.min.js"></script>
    <script src="https://cdn.staticfile.org/nprogress/0.2.0/nprogress.min.js"></script>
    <!-- 富文本编辑器的 js 文件 -->
    <script src="https://cdn.staticfile.org/quill/1.3.4/quill.min.js"></script>
    <script src="https://cdn.jsdelivr.net/npm/vue-quill-editor@3.0.4/dist/vue-quill-editor.js"></script>

    <!-- element-ui 的 js 文件 -->
    <script src="https://cdn.staticfile.org/element-ui/2.8.2/index.js"></script>

    <% } %>
  </head>
7. 路由懒加载
当打包构建项目时,JavaScript包会变得非常大,影响页面加载。如果我们能把不同而路由对应的组件分割成不同的代码块,然后当路由被访问的时候才加载对应组件,这样就更高效了
具体需要3步:
-
安装@babel/plugin-syntax-dynamic-import包
-
在babel.config.js配置文件中声明该插件
-
将路由改为按需加载的形式,实例代码如下:
// import Login from './components/Login.vue'
const Login = () => import(/* webpackChunkName: "login_home_welcome" */ './components/Login.vue')
// import Home from './components/Home.vue'
const Home = () => import(/* webpackChunkName: "login_home_welcome" */ './components/Home.vue')
// import Welcome from './components/Welcome.vue'
const Welcome = () => import(/* webpackChunkName: "login_home_welcome" */ './components/Welcome.vue')
/* webpackChunkName: "login_home_welcome" */作用: key值决定了将打包的js文件放在相同文件或者不同的文件