Lab 3: User Environments实验报告
tags:mit-6.828 os
概述:
本文是lab3的实验报告,主要介绍JOS中的进程,异常处理,系统调用。内容上分为三部分:
- 用户环境建立,可以加载用户ELF文件并执行。(目前还没有文件系统,需要在内核代码硬编码需要加载的用户程序)
- 建立异常处理机制,异常发生时能从用户态进入内核进行处理,然后返回用户态。
- 借助异常处理机制,提供系统调用的能力。
Part A: User Environments and Exception Handling
本实验指的用户环境和UNIX中的进程是一个概念,之所有没有使用进程是强调JOS的用户环境和UNIX进程将提供不同的接口。
JOS使用ENV数据结构记录用户环境,本实验只会创建一个用户环境,lab4将会支持多用户环境。内核维护了三个全局变量,
struct Env *envs = NULLstruct Env *curenv = NULLstatic struct Env *env_free_list
和lab2管理物理页的思路一样,envs指向一个ENV结构的数组,curenv指向当前正在运行的环境,env_free_list指向一个ENV结构的链表,保存未在运行的环境。ENV结构定义在inc/env.h中:
struct Env {
	struct Trapframe env_tf;	// Saved registers
	struct Env *env_link;		// Next free Env
	envid_t env_id;			// Unique environment identifier
	envid_t env_parent_id;		// env_id of this env's parent
	enum EnvType env_type;		// Indicates special system environments
	unsigned env_status;		// Status of the environment
	uint32_t env_runs;		// Number of times environment has run

	// Address space
	pde_t *env_pgdir;		// Kernel virtual address of page dir
};
各个字段解释如下:
- env_tf:Trapframe结构定义在inc/trap.h中,相当于寄存器的一个快照,当前用户环境重新运行时,该结构中保存的寄存器信息将被重新载入到寄存器运行。
- env_link:指向下一个ENV结构,用于构建链表使用。
- env_id:用户环境的id
- env_parent_id:当前用户环境父节点的id
- env_type:对于大部分用户环境是ENV_TYPE_USER,后面将会介绍特殊的系统服务环境
- env_status:当前用户环境状态
- env_pgdir:页目录地址
Exercise 1
实验要求修改kern/mpap.c中的mem_init()函数,在其中分配一个ENV结构的数组给全局变量,并将线性地址UENVS映射到envs起始处。
思路和lab2中的pages数组的分配一样:
在mem_init()分配完pages数组后,添加如下语句:
	envs = (struct Env*)boot_alloc(sizeof(struct Env) * NENV);
	memset(envs, 0, sizeof(struct Env) * NENV);
这样就完成了envs的初始化。
同样在mem_init()中映射完UPAGES后,映射UENVS:
boot_map_region(kern_pgdir, UENVS, PTSIZE, PADDR(envs), PTE_U);
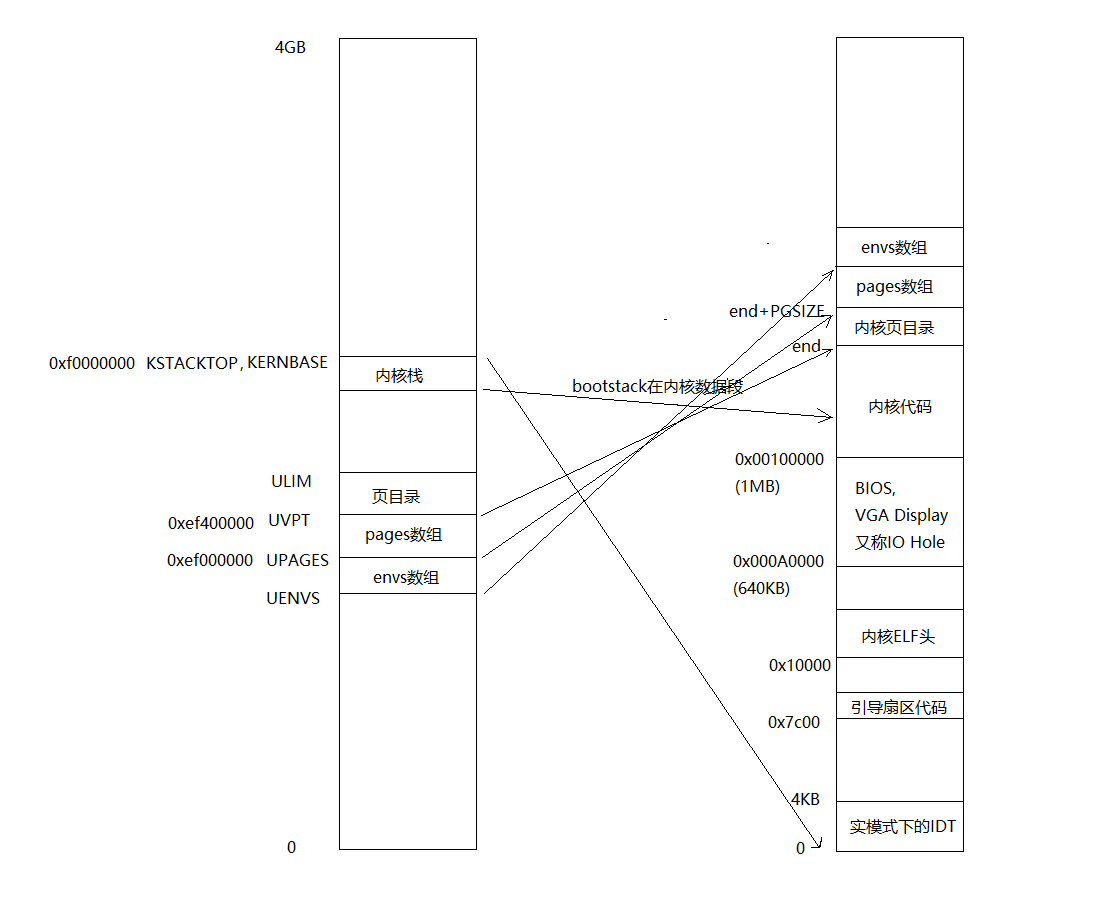
这样执行完mem_init()后内核线性地址空间到物理地址空间的映射关系可用下图表示:
由于现在还没有文件系统,我们将直接把用户二进制程序直接嵌入到内核中。obj/kern/kernel.sym中类似_binary_obj_user_hello_start,_binary_obj_user_hello_end,_binary_obj_user_hello_size这种符号就是用户程序的起始线性地址,终止线性地址。
观察kern/init.c中的i386_init()函数会发现多了如下语句:
	env_init();
#if defined(TEST)
	// Don't touch -- used by grading script!
	ENV_CREATE(TEST, ENV_TYPE_USER);
#else
	// Touch all you want.
	ENV_CREATE(user_hello, ENV_TYPE_USER);		//会调用env_create(_binary_obj_user_hello_start, ENV_TYPE_USER)
#endif // TEST*
	env_run(&envs[0]);							//envs[0]已经在env_create的时候初始化过了
ENV_CREATE(user_hello, ENV_TYPE_USER);这个宏相当于调用env_create(_binary_obj_user_hello_start, ENV_TYPE_USER)
env_init(), env_create(), env_run()这三个函数都没有实现,需要在Exercise2中完成。
Exercise 2:
完成kern/evn.c中的如下函数,使mem_init()的env_run(&envs[0])能正常执行。
- env_init()
- env_setup_vm()
- region_alloc()
- load_icode()
- env_create()
- env_run()
env_init():
作用:初始化envs数组,构建env_free_list链表,注意顺序,envs[0]应该在链表头部位置。实现如下:
// Mark all environments in 'envs' as free, set their env_ids to 0,
// and insert them into the env_free_list.
// Make sure the environments are in the free list in the same order
// they are in the envs array (i.e., so that the first call to
// env_alloc() returns envs[0]).
//
void
env_init(void)
{
	// Set up envs array
	// LAB 3: Your code here.
	env_free_list = NULL;
	for (int i = NENV - 1; i >= 0; i--) {	//前插法构建链表
		envs[i].env_id = 0;
		envs[i].env_link = env_free_list;
		env_free_list = &envs[i];
	}

	// Per-CPU part of the initialization
	env_init_percpu();    //加载全局描述符表(GDT)
}
env_init_percpu()加载全局描述符表并且初始化段寄存器gs, fs, es, ds, ss。GDT定义在kern/env.c中:
struct Segdesc gdt[] =
{
	// 0x0 - unused (always faults -- for trapping NULL far pointers)
	SEG_NULL,

	// 0x8 - kernel code segment
	[GD_KT >> 3] = SEG(STA_X | STA_R, 0x0, 0xffffffff, 0),

	// 0x10 - kernel data segment
	[GD_KD >> 3] = SEG(STA_W, 0x0, 0xffffffff, 0),

	// 0x18 - user code segment
	[GD_UT >> 3] = SEG(STA_X | STA_R, 0x0, 0xffffffff, 3),

	// 0x20 - user data segment
	[GD_UD >> 3] = SEG(STA_W, 0x0, 0xffffffff, 3),

	// 0x28 - tss, initialized in trap_init_percpu()
	[GD_TSS0 >> 3] = SEG_NULL
};

struct Pseudodesc gdt_pd = {
	sizeof(gdt) - 1, (unsigned long) gdt
};
env_setup_vm():
参数:
- struct Env *e:ENV结构指针
返回值:0表示成功,-E_NO_MEM表示失败,没有足够物理地址。
作用:初始化e指向的Env结构代表的用户环境的线性地址空间,设置e->env_pgdir字段。
// Initialize the kernel virtual memory layout for environment e.
// Allocate a page directory, set e->env_pgdir accordingly,
// and initialize the kernel portion of the new environment's address space.
// Do NOT (yet) map anything into the user portion
// of the environment's virtual address space.
//
// Returns 0 on success, < 0 on error.  Errors include:
//	-E_NO_MEM if page directory or table could not be allocated.
//
static int
env_setup_vm(struct Env *e)
{
	int i;
	struct PageInfo *p = NULL;

	// Allocate a page for the page directory
	if (!(p = page_alloc(ALLOC_ZERO)))  //分配一个物理页
		return -E_NO_MEM;

	// Now, set e->env_pgdir and initialize the page directory.
	//
	// Hint:
	//    - The VA space of all envs is identical above UTOP
	//	(except at UVPT, which we've set below).
	//	See inc/memlayout.h for permissions and layout.
	//	Can you use kern_pgdir as a template?  Hint: Yes.
	//	(Make sure you got the permissions right in Lab 2.)
	//    - The initial VA below UTOP is empty.
	//    - You do not need to make any more calls to page_alloc.
	//    - Note: In general, pp_ref is not maintained for
	//	physical pages mapped only above UTOP, but env_pgdir
	//	is an exception -- you need to increment env_pgdir's
	//	pp_ref for env_free to work correctly.
	//    - The functions in kern/pmap.h are handy.

	// LAB 3: Your code here.
	p->pp_ref++;
	e->env_pgdir = (pde_t *) page2kva(p);  //刚分配的物理页作为页目录使用
	memcpy(e->env_pgdir, kern_pgdir, PGSIZE); //继承内核页目录

	// UVPT maps the env's own page table read-only.
	// Permissions: kernel R, user R
	e->env_pgdir[PDX(UVPT)] = PADDR(e->env_pgdir) | PTE_P | PTE_U;  //唯一需要修改的是UVPT需要映射到当前环境的页目录物理地址e->env_pgdir处,而不是内核的页目录物理地址kern_pgdir处

	return 0;
}
总的思路就是给e指向的Env结构分配页目录,并且继承内核的页目录结构,唯一需要修改的是UVPT需要映射到当前环境的页目录物理地址e->env_pgdir处,而不是内核的页目录物理地址kern_pgdir处。设置完页目录也就确定了当前用户环境线性地址空间到物理地址空间的映射。
region_alloc()
参数:
- struct Env *e:需要操作的用户环境
- void *va:虚拟地址
- size_t len:长度
作用:操作e->env_pgdir,为[va, va+len)分配物理空间。
// Allocate len bytes of physical memory for environment env,
// and map it at virtual address va in the environment's address space.
// Does not zero or otherwise initialize the mapped pages in any way.
// Pages should be writable by user and kernel.
// Panic if any allocation attempt fails.
//
static void
region_alloc(struct Env *e, void *va, size_t len)
{
	// LAB 3: Your code here.
	// (But only if you need it for load_icode.)
	//
	// Hint: It is easier to use region_alloc if the caller can pass
	//   'va' and 'len' values that are not page-aligned.
	//   You should round va down, and round (va + len) up.
	//   (Watch out for corner-cases!)
	void *begin = ROUNDDOWN(va, PGSIZE), *end = ROUNDUP(va+len, PGSIZE);
	while (begin < end) {
		struct PageInfo *pg = page_alloc(0); //分配一个物理页
		if (!pg) {
			panic("region_alloc failed
");
		}
		page_insert(e->env_pgdir, pg, begin, PTE_W | PTE_U);   //修改e->env_pgdir,建立线性地址begin到物理页pg的映射关系
		begin += PGSIZE;    //更新线性地址
	}
}
总的来说还是用lab2实现的函数操作e->env_pgdir结构。
load_icode()
参数:
- struct Env *e:需要操作的用户环境
- uint8_t *binary:可执行用户代码的起始地址
作用:加载binary地址开始处的ELF文件。
// Set up the initial program binary, stack, and processor flags
// for a user process.
// This function is ONLY called during kernel initialization,
// before running the first user-mode environment.
//
// This function loads all loadable segments from the ELF binary image
// into the environment's user memory, starting at the appropriate
// virtual addresses indicated in the ELF program header.
// At the same time it clears to zero any portions of these segments
// that are marked in the program header as being mapped
// but not actually present in the ELF file - i.e., the program's bss section.
//
// All this is very similar to what our boot loader does, except the boot
// loader also needs to read the code from disk.  Take a look at
// boot/main.c to get ideas.
//
// Finally, this function maps one page for the program's initial stack.
//
// load_icode panics if it encounters problems.
//  - How might load_icode fail?  What might be wrong with the given input?
//
static void
load_icode(struct Env *e, uint8_t *binary)
{
	// Hints:
	//  Load each program segment into virtual memory
	//  at the address specified in the ELF segment header.
	//  You should only load segments with ph->p_type == ELF_PROG_LOAD.
	//  Each segment's virtual address can be found in ph->p_va
	//  and its size in memory can be found in ph->p_memsz.
	//  The ph->p_filesz bytes from the ELF binary, starting at
	//  'binary + ph->p_offset', should be copied to virtual address
	//  ph->p_va.  Any remaining memory bytes should be cleared to zero.
	//  (The ELF header should have ph->p_filesz <= ph->p_memsz.)
	//  Use functions from the previous lab to allocate and map pages.
	//
	//  All page protection bits should be user read/write for now.
	//  ELF segments are not necessarily page-aligned, but you can
	//  assume for this function that no two segments will touch
	//  the same virtual page.
	//
	//  You may find a function like region_alloc useful.
	//
	//  Loading the segments is much simpler if you can move data
	//  directly into the virtual addresses stored in the ELF binary.
	//  So which page directory should be in force during
	//  this function?
	//
	//  You must also do something with the program's entry point,
	//  to make sure that the environment starts executing there.
	//  What?  (See env_run() and env_pop_tf() below.)

	// LAB 3: Your code here.
	struct Elf *ELFHDR = (struct Elf *) binary;
	struct Proghdr *ph;				//Program Header
	int ph_num;						//Program entry number
	if (ELFHDR->e_magic != ELF_MAGIC) {
		panic("binary is not ELF format
");
	}
	ph = (struct Proghdr *) ((uint8_t *) ELFHDR + ELFHDR->e_phoff);
	ph_num = ELFHDR->e_phnum;

	lcr3(PADDR(e->env_pgdir));			//这步别忘了,虽然到目前位置e->env_pgdir和kern_pgdir除了PDX(UVPT)这一项不同,其他都一样。
										//但是后面会给e->env_pgdir增加映射关系

	for (int i = 0; i < ph_num; i++) {
		if (ph[i].p_type == ELF_PROG_LOAD) {		//只加载LOAD类型的Segment
			region_alloc(e, (void *)ph[i].p_va, ph[i].p_memsz);
			memset((void *)ph[i].p_va, 0, ph[i].p_memsz);		//因为这里需要访问刚分配的内存,所以之前需要切换页目录
			memcpy((void *)ph[i].p_va, binary + ph[i].p_offset, ph[i].p_filesz); //应该有如下关系:ph->p_filesz <= ph->p_memsz。搜索BSS段
		}
	}

	lcr3(PADDR(kern_pgdir));

	e->env_tf.tf_eip = ELFHDR->e_entry;
	// Now map one page for the program's initial stack
	// at virtual address USTACKTOP - PGSIZE.

	// LAB 3: Your code here.
	region_alloc(e, (void *) (USTACKTOP - PGSIZE), PGSIZE);
}
这里相当于实现一个ELF可执行文件加载器,不熟悉ELF文件结构的同学可以参考我之前的笔记ELF格式。ELF文件以一个ELF文件头开始,通过ELFHDR->e_magic字段判断该文件是否是ELF格式的,然后通过ELFHDR->e_phoff获取程序头距离ELF文件的偏移,ph指向的就是程序头的起始位置,相当于一个数组,程序头记录了有哪些Segment需要加载,加载到线性地址的何处?ph_num保存了总共有多少Segment。遍历ph数组,分配线性地址p_va开始的p_memsz大小的空间。并将ELF文件中binary + ph[i].p_offset偏移处的Segment拷贝到线性地址p_va处。
有一点需要注意,在执行for循环前,需要加载e->env_pgdir,也就是这句lcr3(PADDR(e->env_pgdir));因为我们要将Segment拷贝到用户的线性地址空间内,而不是内核的线性地址空间。
加载完Segment后需要设置e->env_tf.tf_eip = ELFHDR->e_entry;也就是程序第一条指令的位置。
最后region_alloc(e, (void *) (USTACKTOP - PGSIZE), PGSIZE);为用户环境分配栈空间。
env_create()
参数:
- uint8_t *binary:将要加载的可执行文件的起始位置
- enum EnvType type:用户环境类型
作用:从env_free_list链表拿一个Env结构,加载从binary地址开始处的ELF可执行文件到该Env结构。
// Allocates a new env with env_alloc, loads the named elf
// binary into it with load_icode, and sets its env_type.
// This function is ONLY called during kernel initialization,
// before running the first user-mode environment.
// The new env's parent ID is set to 0.
//
void
env_create(uint8_t *binary, enum EnvType type)
{
	// LAB 3: Your code here.
	struct Env *e;
	int r;
	if ((r = env_alloc(&e, 0) != 0)) {
		panic("create env failed
");
	}

	load_icode(e, binary);
	e->env_type = type;
}
env_alloc(), load_icode()前面已经实现了,所以不难理解。
env_run(struct Env *e)
参数:
- struct Env *e:需要执行的用户环境
作用:执行e指向的用户环境
// Context switch from curenv to env e.
// Note: if this is the first call to env_run, curenv is NULL.
//
// This function does not return.
//
void
env_run(struct Env *e)
{
	// Step 1: If this is a context switch (a new environment is running):
	//	   1. Set the current environment (if any) back to
	//	      ENV_RUNNABLE if it is ENV_RUNNING (think about
	//	      what other states it can be in),
	//	   2. Set 'curenv' to the new environment,
	//	   3. Set its status to ENV_RUNNING,
	//	   4. Update its 'env_runs' counter,
	//	   5. Use lcr3() to switch to its address space.
	// Step 2: Use env_pop_tf() to restore the environment's
	//	   registers and drop into user mode in the
	//	   environment.

	// Hint: This function loads the new environment's state from
	//	e->env_tf.  Go back through the code you wrote above
	//	and make sure you have set the relevant parts of
	//	e->env_tf to sensible values.

	// LAB 3: Your code here.
	if (curenv != NULL && curenv->env_status == ENV_RUNNING) {
		curenv->env_status = ENV_RUNNABLE;
	}
	curenv = e;
	e->env_status = ENV_RUNNING;
	e->env_runs++;
	lcr3(PADDR(e->env_pgdir));    //加载线性地址空间
	env_pop_tf(&e->env_tf);       //弹出env_tf结构到寄存器
}
该函数首先设置curenv,然后修改e->env_status,e->env_runs两个字段。
接着加载线性地址空间,最后将e->env_tf结构中的寄存器快照弹出到寄存器,这样就会从新的%eip地址处读取指令进行解析。
Trapframe结构和env_pop_tf()函数如下:
struct PushRegs {
	/* registers as pushed by pusha */
	uint32_t reg_edi;
	uint32_t reg_esi;
	uint32_t reg_ebp;
	uint32_t reg_oesp;		/* Useless */
	uint32_t reg_ebx;
	uint32_t reg_edx;
	uint32_t reg_ecx;
	uint32_t reg_eax;
} __attribute__((packed));

struct Trapframe {
	struct PushRegs tf_regs;
	uint16_t tf_es;
	uint16_t tf_padding1;
	uint16_t tf_ds;
	uint16_t tf_padding2;
	uint32_t tf_trapno;
	/* below here defined by x86 hardware */
	uint32_t tf_err;
	uintptr_t tf_eip;
	uint16_t tf_cs;
	uint16_t tf_padding3;
	uint32_t tf_eflags;
	/* below here only when crossing rings, such as from user to kernel */
	uintptr_t tf_esp;
	uint16_t tf_ss;
	uint16_t tf_padding4;
} __attribute__((packed));

// Restores the register values in the Trapframe with the 'iret' instruction.
// This exits the kernel and starts executing some environment's code.
//
// This function does not return.
//
void
env_pop_tf(struct Trapframe *tf)
{
	asm volatile(
		"	movl %0,%%esp
"				//将%esp指向tf地址处
		"	popal
"						//弹出Trapframe结构中的tf_regs值到通用寄存器
		"	popl %%es
"					//弹出Trapframe结构中的tf_es值到%es寄存器
		"	popl %%ds
"					//弹出Trapframe结构中的tf_ds值到%ds寄存器
		"	addl $0x8,%%esp
" /* skip tf_trapno and tf_errcode */
		"	iret
"						//中断返回指令,具体动作如下:从Trapframe结构中依次弹出tf_eip,tf_cs,tf_eflags,tf_esp,tf_ss到相应寄存器
		: : "g" (tf) : "memory");
	panic("iret failed");  /* mostly to placate the compiler */
}
PushRegs结构保存的正是通用寄存器的值,env_pop_tf()第一条指令,将将%esp指向tf地址处,也就是将栈顶指向Trapframe结构开始处,Trapframe结构开始处正是一个PushRegs结构,popal将PushRegs结构中保存的通用寄存器值弹出到寄存器中,接着按顺序弹出寄存器%es, %ds。最后执行iret指令,该指令是中断返回指令,具体动作如下:从Trapframe结构中依次弹出tf_eip,tf_cs,tf_eflags,tf_esp,tf_ss到相应寄存器。你会发现和Trapframe结构从上往下是完全一致的。
最后总结下这些函数的调用关系:
env_create()
    -->env_alloc()
        -->env_setup_vm()
    -->load_icode()
        -->region_alloc()
现在i386_init()函数中的env_run(&envs[0]);调用应该能正常执行,并且将控制转移到hello(user/hello.c)程序中。我们用GDB在env_pop_tf()函数设置断点,然后通过指令si,单步调试,观察iret指令前后寄存器的变化。iret指令后执行的第一条指令应该是cmpl指令(lib/entry.S中的start label处)然后进入hello中执行(可以查看hello的反汇编obj/user/hello.asm),如果顺利将会执行到一条int指令,这是一个系统调用,将字符显示到控制台,但是现在还不起作用。
The target architecture is assumed to be i8086
[f000:fff0]    0xffff0:	ljmp   $0xf000,$0xe05b
0x0000fff0 in ?? ()
+ symbol-file obj/kern/kernel
(gdb) b env_pop_tf                //设置断点
Breakpoint 1 at 0xf0102d5f: file kern/env.c, line 470.
(gdb) c
Continuing.
The target architecture is assumed to be i386
=> 0xf0102d5f <env_pop_tf>:	push   %ebp

Breakpoint 1, env_pop_tf (tf=0xf01b2000) at kern/env.c:470
470	{
(gdb) si                        //单步
=> 0xf0102d60 <env_pop_tf+1>:	mov    %esp,%ebp
0xf0102d60	470	{
(gdb)                           //单步
=> 0xf0102d62 <env_pop_tf+3>:	sub    $0xc,%esp
0xf0102d62	470	{
(gdb)                           //单步
=> 0xf0102d65 <env_pop_tf+6>:	mov    0x8(%ebp),%esp
471		asm volatile(
(gdb)                           //单步
=> 0xf0102d68 <env_pop_tf+9>:	popa
0xf0102d68	471		asm volatile(
(gdb)                           //单步
=> 0xf0102d69 <env_pop_tf+10>:	pop    %es
0xf0102d69 in env_pop_tf (tf=<error reading variable: Unknown argument list address for `tf'.>)
    at kern/env.c:471
471		asm volatile(
(gdb)                           //单步
=> 0xf0102d6a <env_pop_tf+11>:	pop    %ds
0xf0102d6a	471		asm volatile(
(gdb)                           //单步
=> 0xf0102d6b <env_pop_tf+12>:	add    $0x8,%esp
0xf0102d6b	471		asm volatile(
(gdb)                           //单步
=> 0xf0102d6e <env_pop_tf+15>:	iret
0xf0102d6e	471		asm volatile(
(gdb) info registers            //在执行iret前,查看寄存器信息
eax            0x0	0
ecx            0x0	0
edx            0x0	0
ebx            0x0	0
esp            0xf01b2030	0xf01b2030
ebp            0x0	0x0
esi            0x0	0
edi            0x0	0
eip            0xf0102d6e	0xf0102d6e <env_pop_tf+15>
eflags         0x96	[ PF AF SF ]
cs             0x8	8        //0x8正是内核代码段的段选择子
ss             0x10	16
ds             0x23	35
es             0x23	35
fs             0x23	35
gs             0x23	35
(gdb) si                          //单步执行,指令应该执行iret指令
=> 0x800020:	cmp    $0xeebfe000,%esp
0x00800020 in ?? ()
(gdb) info registers              //执行iret指令后,差看寄存器
eax            0x0	0
ecx            0x0	0
edx            0x0	0
ebx            0x0	0
esp            0xeebfe000	0xeebfe000
ebp            0x0	0x0
esi            0x0	0
edi            0x0	0
eip            0x800020	0x800020
eflags         0x2	[ ]
cs             0x1b	27      //0x18是用户代码段的在GDT中的偏移,用户权限是0x3,所以选择子正好是0x1b
ss             0x23	35     //这些寄存器值都是在env_alloc()中被设置好的
ds             0x23	35
es             0x23	35
fs             0x23	35
gs             0x23	35
(gdb) b *0x800a1c              //通过查看obj/user/hello.asm找到断点位置
Breakpoint 2 at 0x800a1c
(gdb) c
Continuing.
=> 0x800a1c:	int    $0x30   //系统调用指令,现在还不起作用

Breakpoint 2, 0x00800a1c in ?? ()
(gdb)
观察执行iret前后的cs段寄存器的值,执行iret前cs的值0x8正是内核代码段的段选择子(GD_KT定义在inc/memlayout.h中),执行后cs的值0x1b,0x18是用户代码段的在GDT中的偏移(GD_UT定义在inc/memlayout.h中),用户权限是0x3,所以选择子正好是0x1b。
现在来看env_alloc()函数:
// Allocates and initializes a new environment.
// On success, the new environment is stored in *newenv_store.
//
// Returns 0 on success, < 0 on failure.  Errors include:
//	-E_NO_FREE_ENV if all NENV environments are allocated
//	-E_NO_MEM on memory exhaustion
//
int
env_alloc(struct Env **newenv_store, envid_t parent_id)
{
	int32_t generation;
	int r;
	struct Env *e;

	if (!(e = env_free_list))
		return -E_NO_FREE_ENV;

	// Allocate and set up the page directory for this environment.
	if ((r = env_setup_vm(e)) < 0)
		return r;

	// Generate an env_id for this environment.
	generation = (e->env_id + (1 << ENVGENSHIFT)) & ~(NENV - 1);
	if (generation <= 0)	// Don't create a negative env_id.
		generation = 1 << ENVGENSHIFT;
	e->env_id = generation | (e - envs);

	// Set the basic status variables.
	e->env_parent_id = parent_id;
	e->env_type = ENV_TYPE_USER;
	e->env_status = ENV_RUNNABLE;
	e->env_runs = 0;

	// Clear out all the saved register state,
	// to prevent the register values
	// of a prior environment inhabiting this Env structure
	// from "leaking" into our new environment.
	memset(&e->env_tf, 0, sizeof(e->env_tf));

	// Set up appropriate initial values for the segment registers.
	// GD_UD is the user data segment selector in the GDT, and
	// GD_UT is the user text segment selector (see inc/memlayout.h).
	// The low 2 bits of each segment register contains the
	// Requestor Privilege Level (RPL); 3 means user mode.  When
	// we switch privilege levels, the hardware does various
	// checks involving the RPL and the Descriptor Privilege Level
	// (DPL) stored in the descriptors themselves.
	e->env_tf.tf_ds = GD_UD | 3;    //设置ds
	e->env_tf.tf_es = GD_UD | 3;    //设置es
	e->env_tf.tf_ss = GD_UD | 3;    //设置ss
	e->env_tf.tf_esp = USTACKTOP;   //设置esp
	e->env_tf.tf_cs = GD_UT | 3;    //设置cs
	// You will set e->env_tf.tf_eip later.

	// commit the allocation
	env_free_list = e->env_link;
	*newenv_store = e;

	cprintf("[%08x] new env %08x
", curenv ? curenv->env_id : 0, e->env_id);
	return 0;
}
这里就是设置e->env_tf结构的地方,设置完后再执行iret指令,寄存器就会加载这些设置了的值。豁然开朗了。
Handling Interrupts and Exceptions
Basics of Protected Control Transfer
阅读Chapter 9, Exceptions and Interrupts熟悉x86中断和异常机制。
中断和异常都是保护控制转换。在Intel体系语义下,中断是一种由处理器之外的异步事件引起的保护控制转换,比如外部设备的通知。异常是由正在执行的代码引起的同步的保护控制转换,比如访问无效内存,或者除以0。
为了防止中断发生时,当前运行的代码不会跳转到内核的任意位置执行,x86提供了两种机制:
- 中断描述符表:处理器确保异常或中断发生时,只会跳转到由内核定义的代码点处执行。x86允许256种不同的中断或异常进入点,每一个都有一个向量号,从0到255。CPU使用向量号作为IDT的索引,取出一个IDT描述符,根据IDT描述符可以获取中断处理函数cs和eip的值,从而进入中断处理函数执行。
- 任务状态段(TSS):当x86异常发生,并且发生了从用户模式到内核模式的转换时,处理器也会进行栈切换。一个叫做task state segment (TSS)的结构指定了栈的位置。TSS是一个很大的数据结构,由于JOS中内核模式就是指权限0,所以处理器只使用TSS结构的ESP0和SS0两个字段来定义内核栈,其它字段不使用。那么内核如何找到这个TSS结构的呢?JOS内核维护了一个
static struct Taskstate ts;的变量,然后在trap_init_percpu()函数中,设置TSS选择子(使用ltr指令)。
void
trap_init_percpu(void)
{
    // Setup a TSS so that we get the right stack
    // when we trap to the kernel.
    ts.ts_esp0 = KSTACKTOP;
    ts.ts_ss0 = GD_KD;
    ts.ts_iomb = sizeof(struct Taskstate);
    // Initialize the TSS slot of the gdt.
    gdt[GD_TSS0 >> 3] = SEG16(STS_T32A, (uint32_t) (&ts),
                    sizeof(struct Taskstate) - 1, 0);
    gdt[GD_TSS0 >> 3].sd_s = 0;
    // Load the TSS selector (like other segment selectors, the
    // bottom three bits are special; we leave them 0)
    ltr(GD_TSS0);       //设置TSS选择子
    // Load the IDT
    lidt(&idt_pd);
}
到目前我们已经碰到很多除通用寄存器之外的寄存器了,下图总结了各种寄存器:
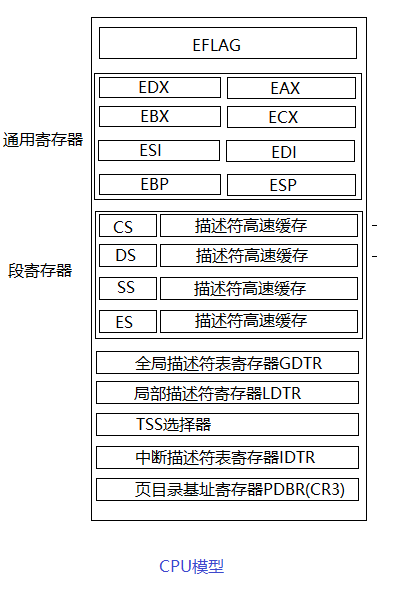
- TSS选择器就是刚才用ltr指令设置的。中断发生时,自动通过该寄存器找到TSS结构(JOS中是ts这个变量),将栈寄存器SS和ESP分别设置为其中的SS0和ESP0两个字段的值,这样栈就切换到了内核栈。
- GDTR就是全局描述符表寄存器,之前已经设置过了。
- PDBR是页目录基址寄存器,通过该寄存器找到页目录和页表,将虚拟地址映射为物理地址。
- IDTR是中断描述符表寄存器,通过这个寄存器中的值可以找到中断表。
Types of Exceptions and Interrupts
0-31号中断都是同步中断,缺页中断就是14号,31号以上的中断可以由int指令,或者外部设备触发。在JOS中,将用48号中断作为系统调用中断。
An Example
假设处理器正在执行代码,这时遇到一条除法指令尝试除以0,处理器将会做如下动作:
- 将栈切换到TSS的SS0和ESP0字段定义的内核栈中,在JOS中两个值分别是GD_KD和KSTACKTOP。
- 处理器在内核栈中压入如下参数:
                     +--------------------+ KSTACKTOP
                     | 0x00000 | old SS   |     " - 4
                     |      old ESP       |     " - 8
                     |     old EFLAGS     |     " - 12
                     | 0x00000 | old CS   |     " - 16
                     |      old EIP       |     " - 20 <---- ESP
                     +--------------------+
- 除以0的异常中断号是0,处理器读取IDT的第0项,从中解析出CS:EIP。
- CS:EIP处的异常处理函数执行。
对于一些异常来说,除了压入上图五个word,还会压入错误代码,如下所示:
                     +--------------------+ KSTACKTOP
                     | 0x00000 | old SS   |     " - 4
                     |      old ESP       |     " - 8
                     |     old EFLAGS     |     " - 12
                     | 0x00000 | old CS   |     " - 16
                     |      old EIP       |     " - 20
                     |     error code     |     " - 24 <---- ESP
                     +--------------------+
仔细观察压入的数据和Trapframe结构,你会发现是一致的。
Exercise 4
需要我们修改trapentry.S和trap.c建立异常处理函数,在trap_init()中建立并且加载IDT。
在trapentry.S中加入如下代码:
#define TRAPHANDLER(name, num)
    .globl name;        /* define global symbol for 'name' */
    .type name, @function;  /* symbol type is function */
    .align 2;       /* align function definition */
    name:           /* function starts here */
    pushl $(num);
    jmp _alltraps
/* Use TRAPHANDLER_NOEC for traps where the CPU doesn't push an error code.
* It pushes a 0 in place of the error code, so the trap frame has the same
* format in either case.
*/
#define TRAPHANDLER_NOEC(name, num)
    .globl name;
    .type name, @function;
    .align 2;
    name:
    pushl $0;
    pushl $(num);
    jmp _alltraps
.text

/*
 * Lab 3: Your code here for generating entry points for the different traps.
 */
	TRAPHANDLER_NOEC(th0, 0)
	TRAPHANDLER_NOEC(th1, 1)
	TRAPHANDLER_NOEC(th3, 3)
	TRAPHANDLER_NOEC(th4, 4)
	TRAPHANDLER_NOEC(th5, 5)
	TRAPHANDLER_NOEC(th6, 6)
	TRAPHANDLER_NOEC(th7, 7)
	TRAPHANDLER(th8, 8)
	TRAPHANDLER_NOEC(th9, 9)
	TRAPHANDLER(th10, 10)
	TRAPHANDLER(th11, 11)
	TRAPHANDLER(th12, 12)
	TRAPHANDLER(th13, 13)
	TRAPHANDLER(th14, 14)
	TRAPHANDLER_NOEC(th16, 16)

	TRAPHANDLER_NOEC(th_syscall, T_SYSCALL)

/*
 * Lab 3: Your code here for _alltraps
 */
	//参考inc/trap.h中的Trapframe结构。tf_ss,tf_esp,tf_eflags,tf_cs,tf_eip,tf_err在中断发生时由处理器压入,所以现在只需要压入剩下寄存器(%ds,%es,通用寄存器)
	//切换到内核数据段
	_alltraps:
	pushl %ds
	pushl %es
	pushal
	pushl $GD_KD
	popl %ds
	pushl $GD_KD
	popl %es
	pushl %esp	//压入trap()的参数tf,%esp指向Trapframe结构的起始地址
	call trap       //调用trap()函数
我们使用TRAPHANDLER和TRAPHANDLER_NOEC宏创建0~16号中断的中断处理函数。TRAPHANDLER和TRAPHANDLER_NOEC创建的函数都会跳转到_alltraps处,这里参考inc/trap.h中的Trapframe结构,tf_ss,tf_esp,tf_eflags,tf_cs,tf_eip,tf_err在中断发生时由处理器压入,所以现在只需要压入剩下寄存器(%ds,%es,通用寄存器)。然后将%esp压入栈中(也就是压入trap()的参数tf),这里不明白的同学回顾下lab1函数调用的过程。最后跳转到trap()函数执行。
现在异常处理函数有了,还没有建立IDT,下面修改trap_init():
#define SETGATE(gate, istrap, sel, off, dpl)
{
    (gate).gd_off_15_0 = (uint32_t) (off) & 0xffff;
    (gate).gd_sel = (sel);
    (gate).gd_args = 0;
    (gate).gd_rsv1 = 0;
    (gate).gd_type = (istrap) ? STS_TG32 : STS_IG32;
    (gate).gd_s = 0;
    (gate).gd_dpl = (dpl);
    (gate).gd_p = 1;
    (gate).gd_off_31_16 = (uint32_t) (off) >> 16;
}


void
trap_init(void)
{
	extern struct Segdesc gdt[];

	// LAB 3: Your code here.
	void th0();
	void th1();
	void th3();
	void th4();
	void th5();
	void th6();
	void th7();
	void th8();
	void th9();
	void th10();
	void th11();
	void th12();
	void th13();
	void th14();
	void th16();
	void th_syscall();
	SETGATE(idt[0], 0, GD_KT, th0, 0);		//格式如下:SETGATE(gate, istrap, sel, off, dpl),定义在inc/mmu.h中
	SETGATE(idt[1], 0, GD_KT, th1, 0);  //设置idt[1],段选择子为内核代码段,段内偏移为th1
	SETGATE(idt[3], 0, GD_KT, th3, 3);
	SETGATE(idt[4], 0, GD_KT, th4, 0);
	SETGATE(idt[5], 0, GD_KT, th5, 0);
	SETGATE(idt[6], 0, GD_KT, th6, 0);
	SETGATE(idt[7], 0, GD_KT, th7, 0);
	SETGATE(idt[8], 0, GD_KT, th8, 0);
	SETGATE(idt[9], 0, GD_KT, th9, 0);
	SETGATE(idt[10], 0, GD_KT, th10, 0);
	SETGATE(idt[11], 0, GD_KT, th11, 0);
	SETGATE(idt[12], 0, GD_KT, th12, 0);
	SETGATE(idt[13], 0, GD_KT, th13, 0);
	SETGATE(idt[14], 0, GD_KT, th14, 0);
	SETGATE(idt[16], 0, GD_KT, th16, 0);

	SETGATE(idt[T_SYSCALL], 0, GD_KT, th_syscall, 3);		//为什么门的DPL要定义为3,参考《x86汇编语言-从实模式到保护模式》p345

	// Per-CPU setup
	trap_init_percpu();
}
该函数会在进入内核时由i386_init()调用。我们添加的代码就是建立IDT,trap_init_percpu()中的lidt(&idt_pd);正式加载IDT。
Part B: Page Faults, Breakpoints Exceptions, and System Calls
Handling Page Faults
缺页中断中断号是14,发生时引发缺页中断的线性地址将会被存储到CR2寄存器中。
Exercise 5
修改trap_dispatch(),将页错误分配给page_fault_handler()处理。在trap_dispatch()添加如下代码:
	// LAB 3: Your code here.
	if (tf->tf_trapno == T_PGFLT) {
		page_fault_handler(tf);
		return;
	}
The Breakpoint Exception
断点异常中断号是3,调试器常常插入一字节的int3指令临时替代某条指令,从而引发断点异常。
Exercise 6
修改trap_dispatch(),使得当断点异常发生时调用内核的monitor。在trap_dispatch()继续添加如下代码:
	if (tf->tf_trapno == T_BRKPT) {
		monitor(tf);
		return;
	}
System calls
JOS使用int指令实现系统调用,使用0x30作为中断号。应用使用寄存器传递系统调用号和参数。系统调用号保存在%eax,五个参数依次保存在%edx, %ecx, %ebx, %edi, %esi中。返回值保存在%eax中。
Exercise 7
需要我们做如下几件事:
- 为中断号T_SYSCALL添加一个中断处理函数
- 在trap_dispatch()中判断中断号如果是T_SYSCALL,调用定义在kern/syscall.c中的syscall()函数,并将syscall()保存的返回值保存到tf->tf_regs.reg_eax等将来恢复到eax寄存器中。
- 修改kern/syscall.c中的syscall()函数,使能处理定义在inc/syscall.h中的所有系统调用。
步骤一如下:分别在trapentry.S和trap.c的trap_init()函数中添加如下代码:
TRAPHANDLER_NOEC(th_syscall, T_SYSCALL)
SETGATE(idt[T_SYSCALL], 0, GD_KT, th_syscall, 3); //为什么门的DPL要定义为3,参考《x86汇编语言-从实模式到保护模式》p345
步骤二:在trap.c的trap_dispatch()中添加如下代码:
	if (tf->tf_trapno == T_SYSCALL) { //如果是系统调用,按照前文说的规则,从寄存器中取出系统调用号和五个参数,传给kern/syscall.c中的syscall(),并将返回值保存到tf->tf_regs.reg_eax
		tf->tf_regs.reg_eax = syscall(tf->tf_regs.reg_eax, tf->tf_regs.reg_edx, tf->tf_regs.reg_ecx,
			tf->tf_regs.reg_ebx, tf->tf_regs.reg_edi, tf->tf_regs.reg_esi);
		return;
	}
步骤三:修改kern/syscall.c中的syscall()
// Dispatches to the correct kernel function, passing the arguments.
int32_t
syscall(uint32_t syscallno, uint32_t a1, uint32_t a2, uint32_t a3, uint32_t a4, uint32_t a5)
{
	// Call the function corresponding to the 'syscallno' parameter.
	// Return any appropriate return value.
	// LAB 3: Your code here.
	int32_t ret;
	switch (syscallno) {    //根据系统调用号调用相应函数
		case SYS_cputs:
			sys_cputs((char *)a1, (size_t)a2);
			ret = 0;
			break;
		case SYS_cgetc:
			ret = sys_cgetc();
			break;
		case SYS_getenvid:
			ret = sys_getenvid();
			break;
		case SYS_env_destroy:
			ret = sys_env_destroy((envid_t)a1);
			break;
		default:
			return -E_INVAL;
	}

	return ret;
}
现在回顾一下系统调用的完成流程:以user/hello.c为例,其中调用了cprintf(),注意这是lib/print.c中的cprintf,该cprintf()最终会调用lib/syscall.c中的sys_cputs(),sys_cputs()又会调用lib/syscall.c中的syscall(),该函数将系统调用号放入%eax寄存器,五个参数依次放入in DX, CX, BX, DI, SI,然后执行指令int 0x30,发生中断后,去IDT中查找中断处理函数,最终会走到kern/trap.c的trap_dispatch()中,我们根据中断号0x30,又会调用kern/syscall.c中的syscall()函数(注意这时候我们已经进入了内核模式CPL=0),在该函数中根据系统调用号调用kern/print.c中的cprintf()函数,该函数最终调用kern/console.c中的cputchar()将字符串打印到控制台。当trap_dispatch()返回后,trap()会调用env_run(curenv);,该函数前面讲过,会将curenv->env_tf结构中保存的寄存器快照重新恢复到寄存器中,这样又会回到用户程序系统调用之后的那条指令运行,只是这时候已经执行了系统调用并且寄存器eax中保存着系统调用的返回值。任务完成重新回到用户模式CPL=3。
Exercise 8
用户程序执行后都会走到lib/libmain.c中的libmain(),需要修改该函数初始化其中的const volatile struct Env *thisenv;变量。
void
libmain(int argc, char **argv)
{
	// set thisenv to point at our Env structure in envs[].
	// LAB 3: Your code here.
	envid_t envid = sys_getenvid();    //系统调用,我们已经在Exercise 7中实现了
	thisenv = envs + ENVX(envid);      //获取Env结构指针

	// save the name of the program so that panic() can use it
	if (argc > 0)
		binaryname = argv[0];

	// call user main routine
	umain(argc, argv);

	// exit gracefully
	exit();
}
如果一切顺利:user/hello.c:
void
umain(int argc, char **argv)
{
	cprintf("hello, world
");
	cprintf("i am environment %08x
", thisenv->env_id);  //现在我们已经初始化了thisenv变量了,所以可以打印处来了O(∩_∩)O
}
将先打印出'hello, world',然后打印'i am environment 00001000'。
Page faults and memory protection
操作系统依赖处理器的来实现内存保护。当程序试图访问无效地址或没有访问权限时,处理器在当前指令停住,引发中断进入内核。如果内核能够修复,则在刚才的指令处继续执行,否则程序将无法接着运行。系统调用也为内存保护带来了问题。大部分系统调用接口让用户程序传递一个指针参数给内核。这些指针指向的是用户缓冲区。通过这种方式,系统调用在执行时就可以解引用这些指针。但是这里有两个问题:
- 在内核中的page fault要比在用户程序中的page fault更严重。如果内核在操作自己的数据结构时出现 page faults,这是一个内核的bug,而且异常处理程序会中断整个内核。但是当内核在解引用由用户程序传递来的指针时,它需要一种方法去记录此时出现的任何page faults都是由用户程序带来的。
- 内核通常比用户程序有着更高的内存访问权限。用户程序很有可能要传递一个指针给系统调用,这个指针指向的内存区域是内核可以进行读写的,但是用户程序不能。此时内核必须小心的去解析这个指针,否则的话内核的重要信息很有可能被泄露。
Exercise 9
需要我们做两件事情:
- 首先如果页错误发生在内核态时应该直接panic。
- 实现kern/pmap.c中的user_mem_check()工具函数,该函数检测用户环境是否有权限访问线性地址区域[va, va+len)。然后对在kern/syscall.c中的系统调用函数使用user_mem_check()工具函数进行内存访问权限检查。
第一步:在page_fault_handler()中添加如下代码:
	if ((tf->tf_cs & 3) == 0) //内核态发生缺页中断直接panic
		panic("page_fault_handler():page fault in kernel mode!
");
第二步:修改kern/pmap.c中的user_mem_check(),进行检查
// Check that an environment is allowed to access the range of memory
// [va, va+len) with permissions 'perm | PTE_P'.
// Normally 'perm' will contain PTE_U at least, but this is not required.
// 'va' and 'len' need not be page-aligned; you must test every page that
// contains any of that range.  You will test either 'len/PGSIZE',
// 'len/PGSIZE + 1', or 'len/PGSIZE + 2' pages.
//
// A user program can access a virtual address if (1) the address is below
// ULIM, and (2) the page table gives it permission.  These are exactly
// the tests you should implement here.
//
// If there is an error, set the 'user_mem_check_addr' variable to the first
// erroneous virtual address.
//
// Returns 0 if the user program can access this range of addresses,
// and -E_FAULT otherwise.
//
int
user_mem_check(struct Env *env, const void *va, size_t len, int perm)
{
	// LAB 3: Your code here.
	cprintf("user_mem_check va: %x, len: %x
", va, len);
	uint32_t begin = (uint32_t) ROUNDDOWN(va, PGSIZE);
	uint32_t end = (uint32_t) ROUNDUP(va+len, PGSIZE);
	uint32_t i;
	for (i = (uint32_t)begin; i < end; i += PGSIZE) {
		pte_t *pte = pgdir_walk(env->env_pgdir, (void*)i, 0);
		if ((i >= ULIM) || !pte || !(*pte & PTE_P) || ((*pte & perm) != perm)) {        //具体检测规则
			user_mem_check_addr = (i < (uint32_t)va ? (uint32_t)va : i);                //记录无效的那个线性地址
			return -E_FAULT;
		}
	}
	cprintf("user_mem_check success va: %x, len: %x
", va, len);
	return 0;
}

//
// Checks that environment 'env' is allowed to access the range
// of memory [va, va+len) with permissions 'perm | PTE_U | PTE_P'.
// If it can, then the function simply returns.
// If it cannot, 'env' is destroyed and, if env is the current
// environment, this function will not return.
//
void
user_mem_assert(struct Env *env, const void *va, size_t len, int perm)
{
	if (user_mem_check(env, va, len, perm | PTE_U) < 0) {
		cprintf("[%08x] user_mem_check assertion failure for "
			"va %08x
", env->env_id, user_mem_check_addr);
		env_destroy(env);	// may not return
	}
}
有了工具函数,我们看kern/syscall.c中的系统调用函数只有sys_cputs()参数中有指针,所以需要对其进行检测:
// Print a string to the system console.
// The string is exactly 'len' characters long.
// Destroys the environment on memory errors.
static void
sys_cputs(const char *s, size_t len)
{
	// Check that the user has permission to read memory [s, s+len).
	// Destroy the environment if not.

	// LAB 3: Your code here.
	user_mem_assert(curenv, s, len, 0);
	// Print the string supplied by the user.
	cprintf("%.*s", len, s);
}
所有做完后,运行user/buggyhello,将会看到如下输出:
	[00001000] user_mem_check assertion failure for va 00000001
	[00001000] free env 00001000
	Destroyed the only environment - nothing more to do!
结束实验9实际上实验10也一并做完了。
总结
至此,lab3的所有实验都已完成。如果顺利运行./grade-lab3会看到:
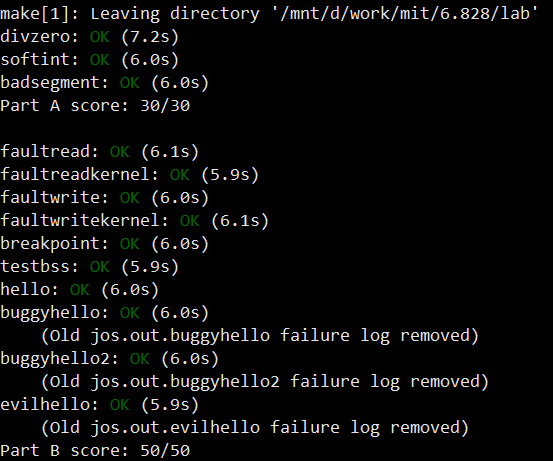
回顾下,本实验大致做了三件事:
- 进程建立,可以加载用户ELF文件并执行。
- 内核维护一个名叫envs的Env数组,每个Env结构对应一个进程,Env结构最重要的字段有Trapframe env_tf(该字段中断发生时可以保持寄存器的状态),pde_t *env_pgdir(该进程的页目录地址)。进程对应的内核数据结构可以用下图总结:
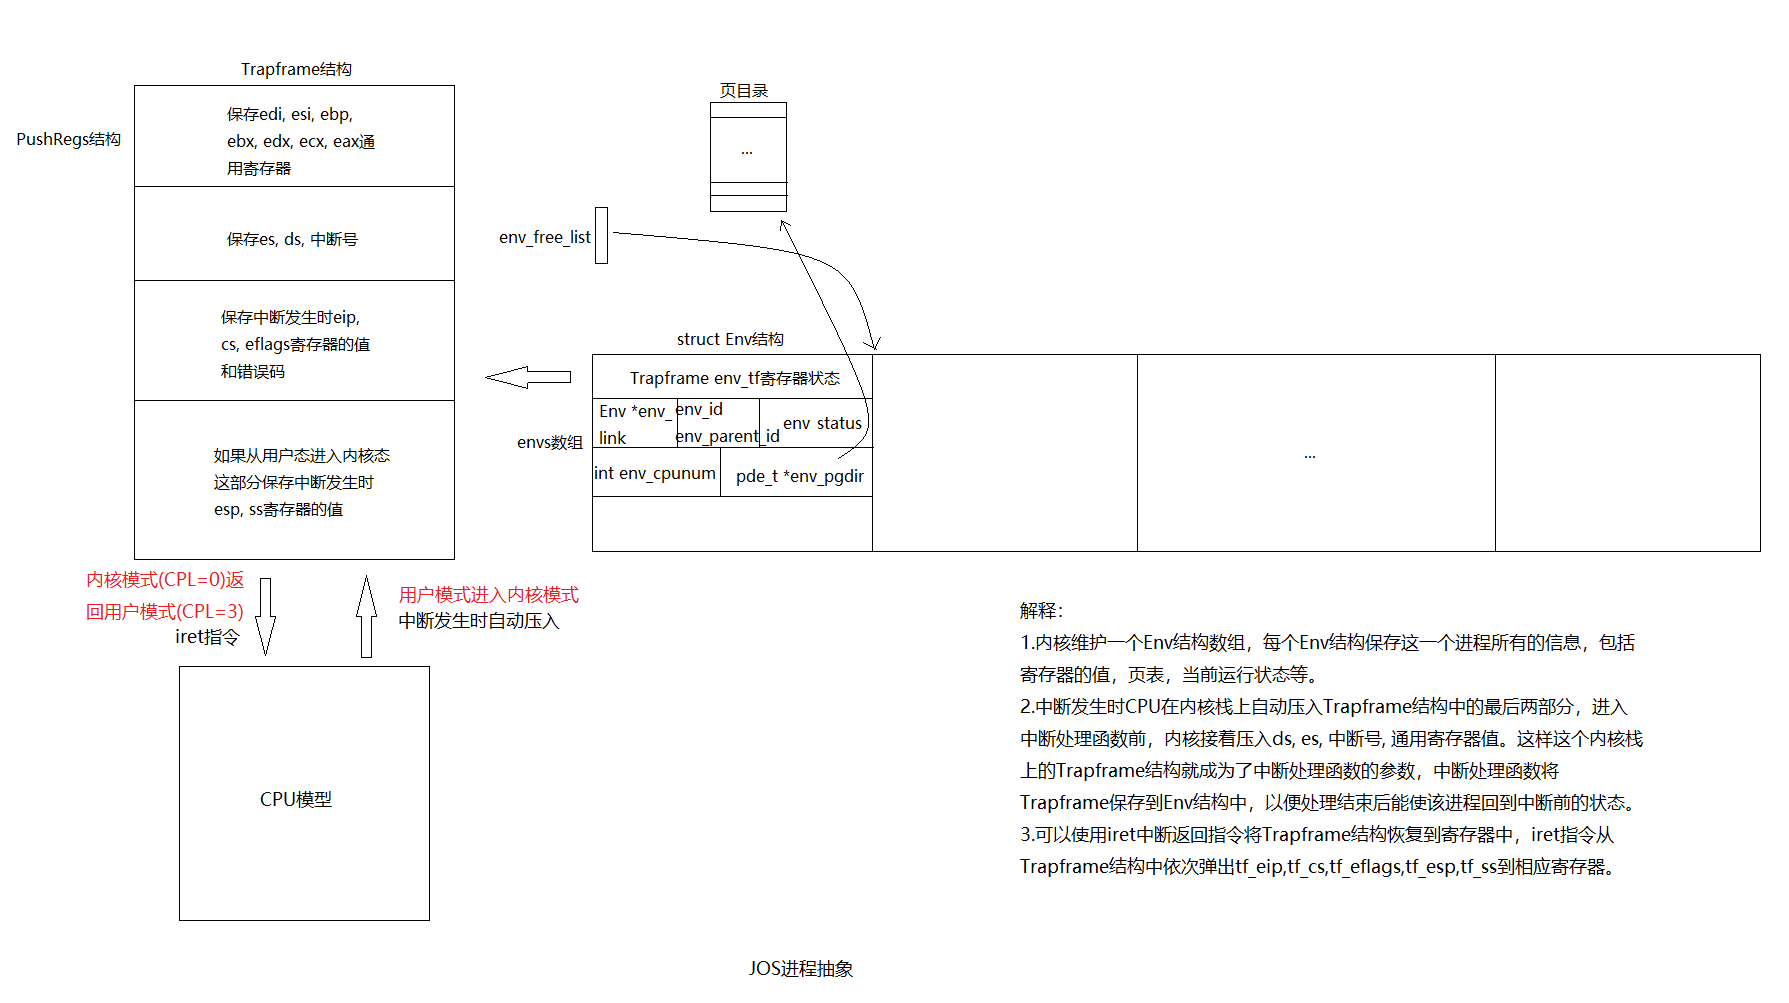
- 定义了env_init(),env_create()等函数,初始化Env结构,将Env结构Trapframe env_tf中的寄存器值设置到寄存器中,从而执行该Env。
- 内核维护一个名叫envs的Env数组,每个Env结构对应一个进程,Env结构最重要的字段有Trapframe env_tf(该字段中断发生时可以保持寄存器的状态),pde_t *env_pgdir(该进程的页目录地址)。进程对应的内核数据结构可以用下图总结:
- 创建异常处理函数,建立并加载IDT,使JOS能支持中断处理。要能说出中断发生时的详细步骤。需要搞清楚内核态和用户态转换方式:通过中断机制可以从用户环境进入内核态。使用iret指令从内核态回到用户环境。中断发生过程以及中断返回过程和系统调用原理可以总结为下图:
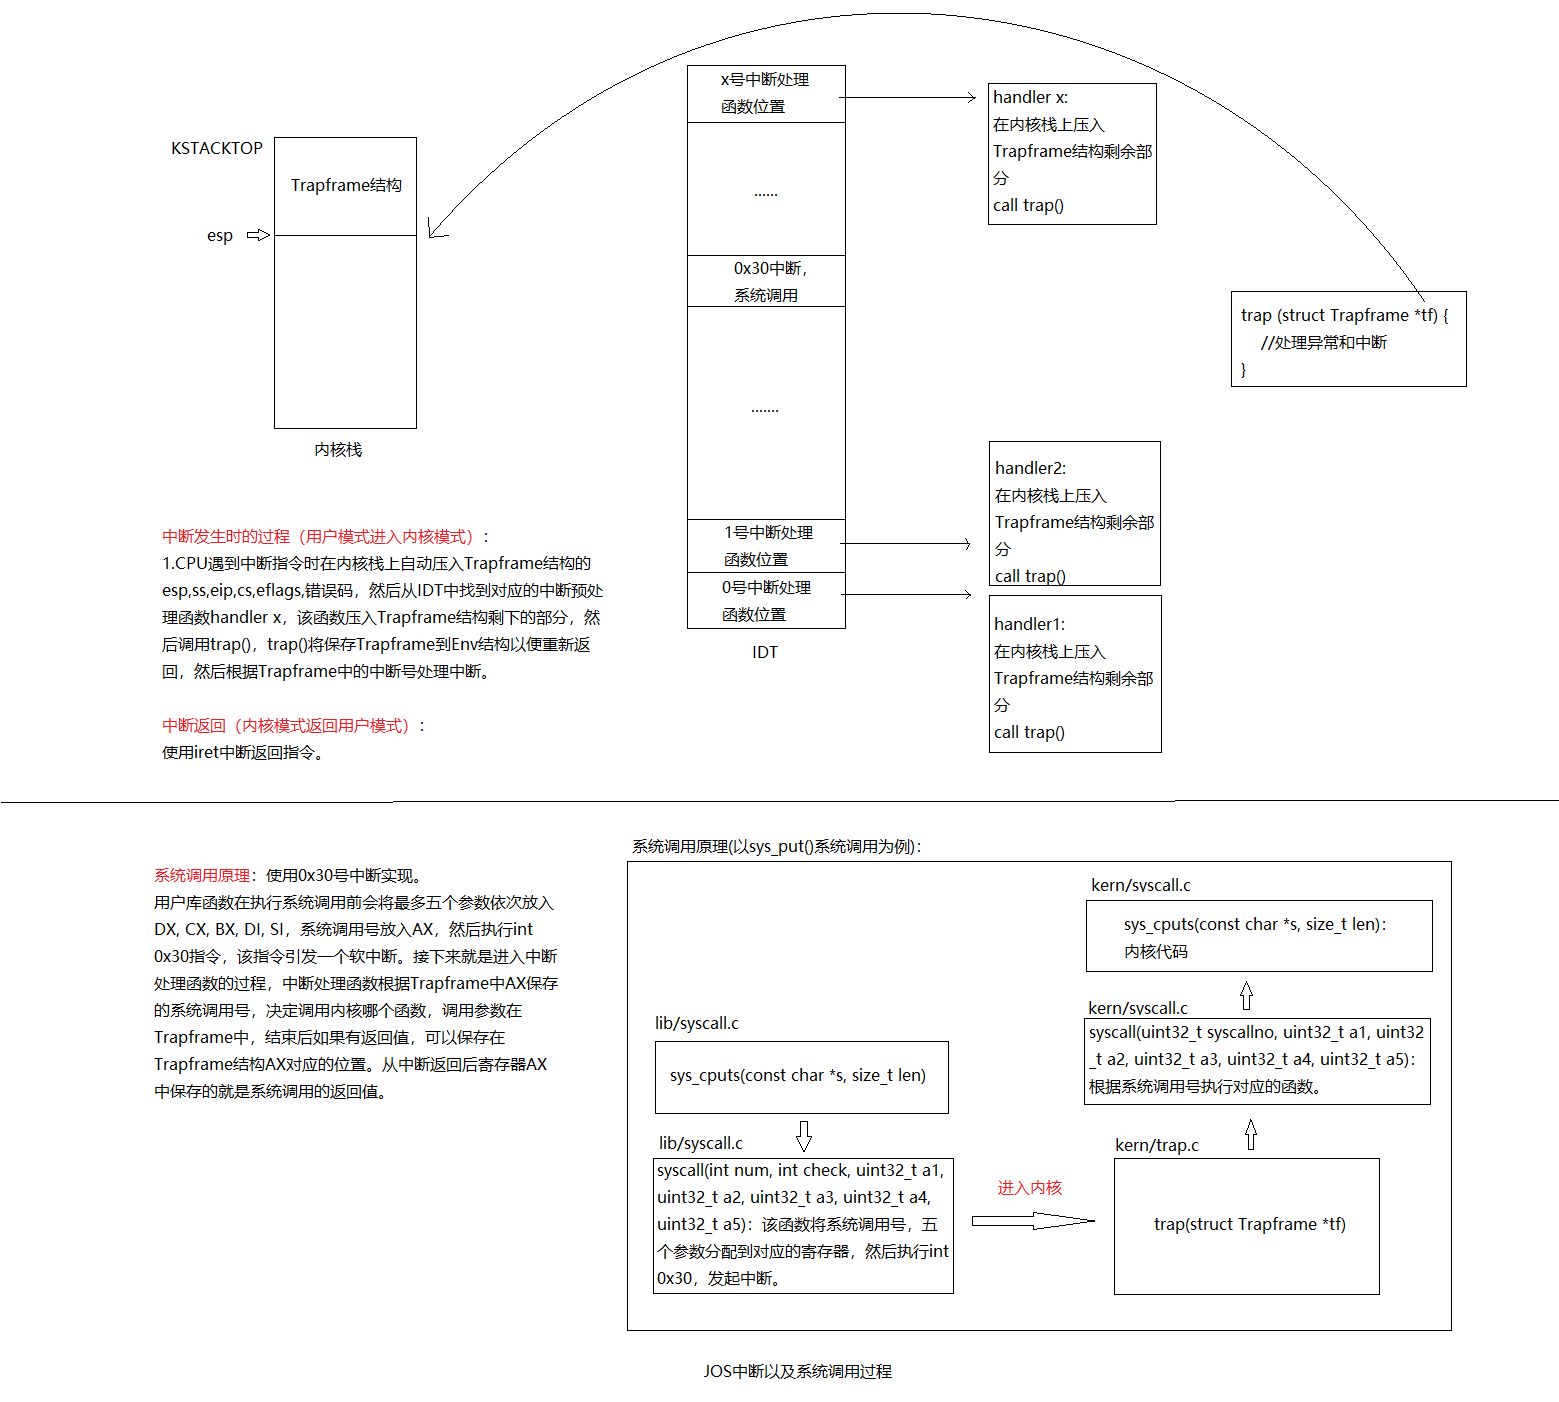
- 利用中断机制,使JOS支持系统调用。要能说出遇到int 0x30这条系统调用指令时发生的详细步骤。见上图。
具体代码在:https://github.com/gatsbyd/mit_6.828_jos
如有错误,欢迎指正(_):
15313676365