CAS:http://huangyunbin.iteye.com/blog/1942369
Future:http://blog.csdn.net/liulipuo/article/details/39029643
知识储备CAS
CAS基于冲突检测的无锁并发策略,性能也较高。CAS操作有3个操作数,内存值M,预期值E,新值U,如果M==E,则将内存值修改为B,否则啥都不做。
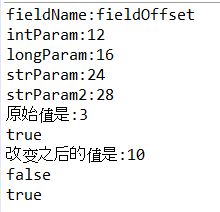
public class TestUnsafe {

  private static Unsafe unsafe;
  static{
    try {
      //通过反射获取rt.jar下的Unsafe类
      Field field = Unsafe.class.getDeclaredField("theUnsafe");
      field.setAccessible(true);
      unsafe = (Unsafe) field.get(null);
    } catch (Exception e) {
      System.out.println("Get Unsafe instance occur error"+ e);
    }
  }
  public static void main(String[] args) throws Exception
  {
      Class clazz = Target.class;
      Field[] fields = clazz.getDeclaredFields();
      System.out.println("fieldName:fieldOffset");
      for (Field f : fields) {
          // 获取属性偏移量,可以通过这个偏移量给属性设置
          System.out.println(f.getName() + ":" + unsafe.objectFieldOffset(f));
      }
      Target target = new Target();
      Field intFiled  =  clazz.getDeclaredField("intParam")  ;
      int a=(Integer)intFiled.get(target ) ;
      System.out.println("原始值是:"+a);
      //intParam的字段偏移是12 原始值是3 我们要改为10
      System.out.println(unsafe.compareAndSwapInt(target, 12, 3, 10));
      int b=(Integer)intFiled.get(target) ;
      System.out.println("改变之后的值是:"+b);

      //这个时候已经改为10了,所以会返回false
      System.out.println(unsafe.compareAndSwapInt(target, 12, 3, 10));  //false
      //判断target对象的偏移量24位置,即strParam,如果该变量值=null,则给strParam赋值5
      System.out.println(unsafe.compareAndSwapObject(target, 24, null, "5"));     //true
  }
}


class Target{
  int intParam=3;
  long longParam;
  String strParam;
  String strParam2;
}
测试结果:
FutureTask
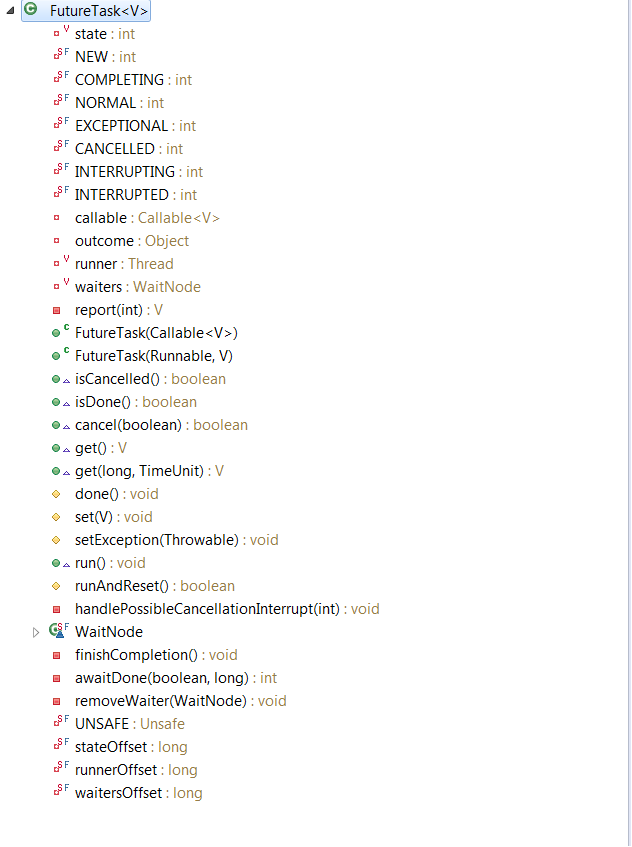
futureTask的异步计算功能就不介绍了,主要分析源码,下图是futureTask的结构:
NEW 新建 0
COMPLETING 执行中 1
NORMAL 正常 2
EXCEPTIONAL 异常 3
CANCELLED 取消 4
INTERRUPTING 中断中 5
INTERRUNPED 被中断 6
state的状态变化可以有四种方式
NEW->COMPLETING->NORMAL 正常完成的流程
NEW->COMPLETING->EXCEPTIONAL 出现异常的流程
NEW->CANCELED 被取消
NEW->INTERRUNPING->INTERRRUNPTED 被中断
创建FutureTask
 public FutureTask(Callable<V> callable) {
        if (callable == null)
            throw new NullPointerException();
        this.callable = callable;
        //state初始化NEW状态
        this.state = NEW;       // ensure visibility of callable
    }
run方法:
 1  public void run() {
 2 //如果当前state不是创建状态,且已经在运行。则直接return。
 3         if (state != NEW ||
 4             !UNSAFE.compareAndSwapObject(this, runnerOffset,
 5                                          null, Thread.currentThread()))
 6             return;
 7 //开始执行任务
 8         try {
 9             Callable<V> c = callable;
10   //创建状态,且callable不为空,开始执行调用call()
11             if (c != null && state == NEW) {
12                 V result;
13                 boolean ran;
14                 try {
15                     result = c.call();
16                     ran = true;
17                 } catch (Throwable ex) {
18                     result = null;
19                     ran = false;
20                     setException(ex);
21                 }
22 //成功调用任务,执行set()方法
23                 if (ran)
24                     set(result);
25             }
26         } finally {
27             // runner must be non-null until state is settled to
28             // prevent concurrent calls to run()
29 //无论是否成功,都要把runner设置为null
30             runner = null;
31             // state must be re-read after nulling runner to prevent
32             // leaked interrupts
33             int s = state;
34             if (s >= INTERRUPTING)
35                 handlePossibleCancellationInterrupt(s);
36         }
37     }
接下来看一下24行的set方法:
 1 protected void set(V v) {
 2 //CAS设置state  NEW  ->  COMPLETING
 3         if (UNSAFE.compareAndSwapInt(this, stateOffset, NEW, COMPLETING)) {
 4 //结果赋值outcome
 5             outcome = v;
 6 //CAS将state设置为NORMAL
 7             UNSAFE.putOrderedInt(this, stateOffset, NORMAL); // final state
 8 //唤醒所有的等待线程,同时设置callable=null,调用done(),具体实现后面详细介绍
 9             finishCompletion();
10         }
11     }
cancel()取消
 1     public boolean cancel(boolean mayInterruptIfRunning) {
 2 //如果state已经不是NEW 或者NEW不能设置成INTERRUPTING , 则直接返回false 。
 3         if (!(state == NEW &&
 4               UNSAFE.compareAndSwapInt(this, stateOffset, NEW,
 5                   mayInterruptIfRunning ? INTERRUPTING : CANCELLED)))
 6             return false;
 7         try {    // in case call to interrupt throws exception
 8 //如果是可中断 那么就 调用系统中断方法 然后把状态设置成INTERRUPTED
 9             if (mayInterruptIfRunning) {
10                 try {
11                     Thread t = runner;
12                     if (t != null)
13 //中断执行线程
14                         t.interrupt();
15                 } finally { // final state
16 //最后设置state为INTERRUPTED
17                     UNSAFE.putOrderedInt(this, stateOffset, INTERRUPTED);
18                 }
19             }
20         } finally {
21             finishCompletion();
22         }
23         return true;
24     }
再来看一下get操作:
 public V get(long timeout, TimeUnit unit)
        throws InterruptedException, ExecutionException, TimeoutException {
        if (unit == null)
            throw new NullPointerException();
        int s = state;
//如果还没完成,并且等待timeout也没有完成,则抛出超时异常
        if (s <= COMPLETING &&
            (s = awaitDone(true, unit.toNanos(timeout))) <= COMPLETING)
            throw new TimeoutException();
        return report(s);
    }
awaitDone()操作来如何实现超时,已经完成但未超时,则结束等待返回结果,看具体代码:
    private int awaitDone(boolean timed, long nanos)
        throws InterruptedException {
//超时时间点
        final long deadline = timed ? System.nanoTime() + nanos : 0L;
        WaitNode q = null;
        boolean queued = false;
//循环执行
        for (;;) {
//中断处理
            if (Thread.interrupted()) {
                removeWaiter(q);
                throw new InterruptedException();
            }

            int s = state;
//首先判断是否完成,如果完成,直接返回state结果
            if (s > COMPLETING) {
                if (q != null)
                    q.thread = null;
                return s;
            }
            else if (s == COMPLETING) // cannot time out yet
                Thread.yield();
//未完成执行,则将当前线程(主线程)设置成等待节点并放入到等待队列中
            else if (q == null)
                q = new WaitNode();
//将waiters设置成q的next节点,并替换,改操作只做一次,将main线程加入到队列中,只加一次
            else if (!queued)
                queued = UNSAFE.compareAndSwapObject(this, waitersOffset,
                                                     q.next = waiters, q);
//如果启动了超时等待
            else if (timed) {
//计算剩余超时时间
                nanos = deadline - System.nanoTime();
//超时,移除队列中的等待线程,返回state,上层判断state,并报出超时异常
                if (nanos <= 0L) {
                    removeWaiter(q);
                    return state;
                }
//还未超时,则等待nanos时间,然而如果task执行接受,并不会一直等待,在run()中的set()中,会执行finishCompleted(),将对待队列线性唤醒,调用LockSupport.unpark()方法来唤醒等待线程
                LockSupport.parkNanos(this, nanos);
            }
            else
//未启用超时功能,在未完成callable,则无限期等待
                LockSupport.park(this);
        }
    }
最后看一下finishCompletion()方法,调用callable,是如何唤醒main线程
private void finishCompletion() {
        // assert state > COMPLETING;
//遍历等待队列
        for (WaitNode q; (q = waiters) != null;) {
//将waiters的头结点中线程设置null,即移除某个等待线程
            if (UNSAFE.compareAndSwapObject(this, waitersOffset, q, null)) {
                for (;;) {
                    Thread t = q.thread;
//如果等待线程不为null  调用LockSupport.unpark(t)唤醒,然后操作下一个等待线程
                    if (t != null) {
                        q.thread = null;
                        LockSupport.unpark(t);
                    }
                    WaitNode next = q.next;
                    if (next == null)
                        break;
                    q.next = null; // unlink to help gc
                    q = next;
                }
                break;
            }
        }

        done();

        callable = null;        // to reduce footprint
    }
至此,FutureTask的源码解析已经完成,接下来看一下开源对于异步处理的解决方案。
举一反三:
ChannelFuture
ListenableFuture