前言
在讲解滑动时间窗之前,有个问题可以思考一下,如何统计当前时间服务的QPS呢?博主在前公司的时候,他们是这么设计的,在分布式环境下,列如当前时间 2021-9-13 23:12:10, 那么解析成key = 2021-9-13-23-12-10,并通过这个key查询redis,获取一个整型的统计值,并执行incr自增。当到下一个时间2021-9-13 23:12:11,则生成key=2021-9-13-23-12-11.从redis中获取一个新的计数器,并incr。
这有什么问题?
1) 随着时间的增长,redis中的key越来越多
2)23时12分10秒600毫秒 与 23时12分11秒600毫秒 这1秒期间,QPS的值将无法统计。
滑动时间窗算法
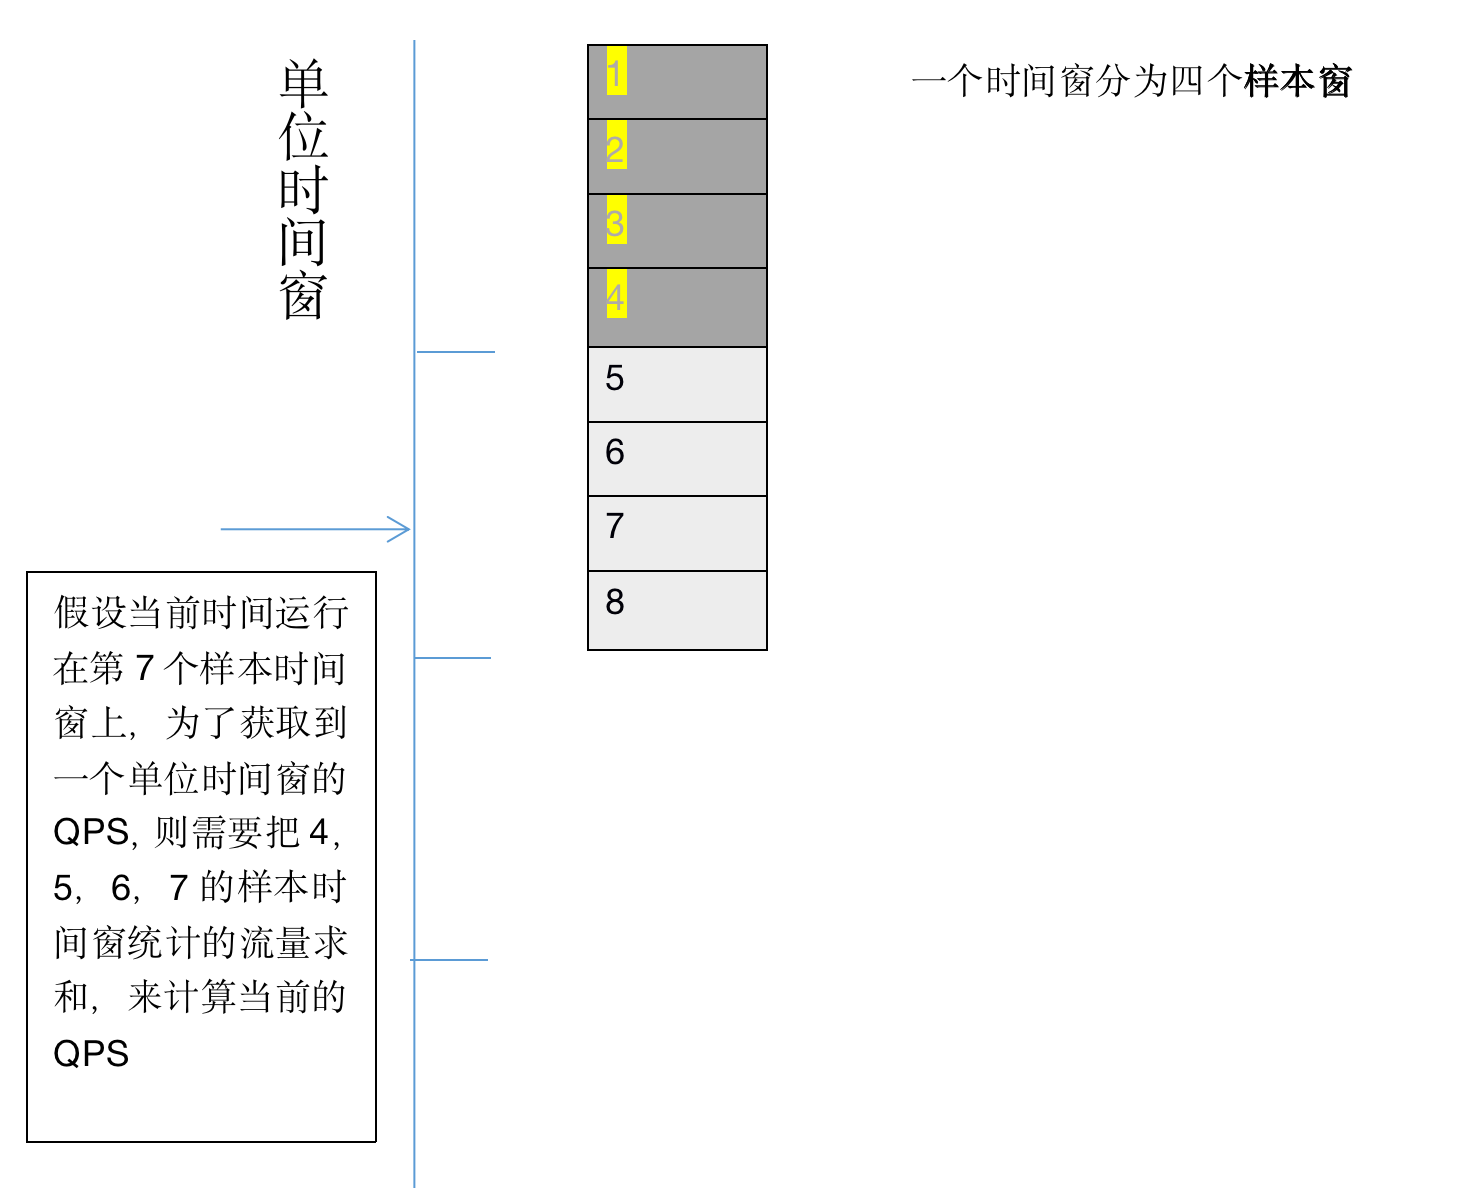
1 我们把当前的时间看做一个无限延长的有向轴,并且分隔成一个个固定单位,这个固定单位成为时间窗,可以是1s,也可以是1min。为了便于统计一分钟内或者1秒钟内的QPS,将单位时间窗划分为多个样本时间窗。
2 划分样本时间窗的目的是 为了避免重复统计,列如当时间运行到样本窗7 ,则需要统计样本窗4-7。 下次如果当前时间到了样本窗8,则需要统计5-8,而中间的5-7已经统计过了,只需要再加上样本窗8中的数据。
3 在sentinel中,缓存了一个单位时间窗的统计数据,并组织成一个环,实际上就是通过对样本窗口数取余来确定请求落在哪个样本窗上。
4 使用了滑动时间窗算法之后,获取的QPS永远统计的是当前时间之前的一个单位时间窗的统计结果,也解决了在前言中的问题2.
源码解析
整个Sentinel是按着责任链模式来组织架构的,在chain上的slot,StatisticSlot#entry里面,先根据之前的统计执行下面的slot,比如FlowSlot,根据流控结果来统计当前请求是否成功或者失败。
// Do some checking.
            // 先做其他的slot
            fireEntry(context, resourceWrapper, node, count, prioritized, args);

            // Request passed, add thread count and pass count.
            node.increaseThreadNum();
            // 对当前的资源DefaultNode添加统计
            node.addPassRequest(count);

            if (context.getCurEntry().getOriginNode() != null) {
                // Add count for origin node.
                context.getCurEntry().getOriginNode().increaseThreadNum();
                // 对所有相同资源和相同来源。不同的context上的同一个originNode做统计
                context.getCurEntry().getOriginNode().addPassRequest(count);
            }
统计的维度有这么几个,1 对于当前请求在指定资源上的DefaultNode的统计 2指定资源上上全局的clusterNode的统计。代码如下node.addPassRequest(count)
@Override
    public void addPassRequest(int count) {
        // 增加当前入口的defaultNode中的统计数据
        super.addPassRequest(count);
        // 增加当前资源的clusterNode中全局统计数据
        this.clusterNode.addPassRequest(count);
    }
3 对于相同资源的全局CluserNode在指定来源上的统计 ,比如 全局统计资源A在来源A上的QPS ,代码 context.getCurEntry().getOriginNode().addPassRequest(count);
@Override
    public void addPassRequest(int count) {
        // 为滑动计数器增加本次访问的计数器
        rollingCounterInSecond.addPass(count);
        rollingCounterInMinute.addPass(count);
    }
入口已经讲解完毕,接下来具体从阐述数据结构及算法核心逻辑。
在StatisticsNode里面有2个重要的计量器,一个是单位时间窗以秒为单位,一个单位时间窗是分为单位
/**
     * Holds statistics of the recent {@code INTERVAL} milliseconds. The {@code INTERVAL} is divided into time spans
     * by given {@code sampleCount}.
     * 定义一个使用数组保存数据的计量器
     */
    private transient volatile Metric rollingCounterInSecond = new ArrayMetric(SampleCountProperty.SAMPLE_COUNT /* 样本窗口数量 默认2 */,
        IntervalProperty.INTERVAL /* 时间窗长度  默认1s */);

    /**
     * Holds statistics of the recent 60 seconds. The windowLengthInMs is deliberately set to 1000 milliseconds,
     * meaning each bucket per second, in this way we can get accurate statistics of each second.
     */
    private transient Metric rollingCounterInMinute = new ArrayMetric(60, 60 * 1000, false);
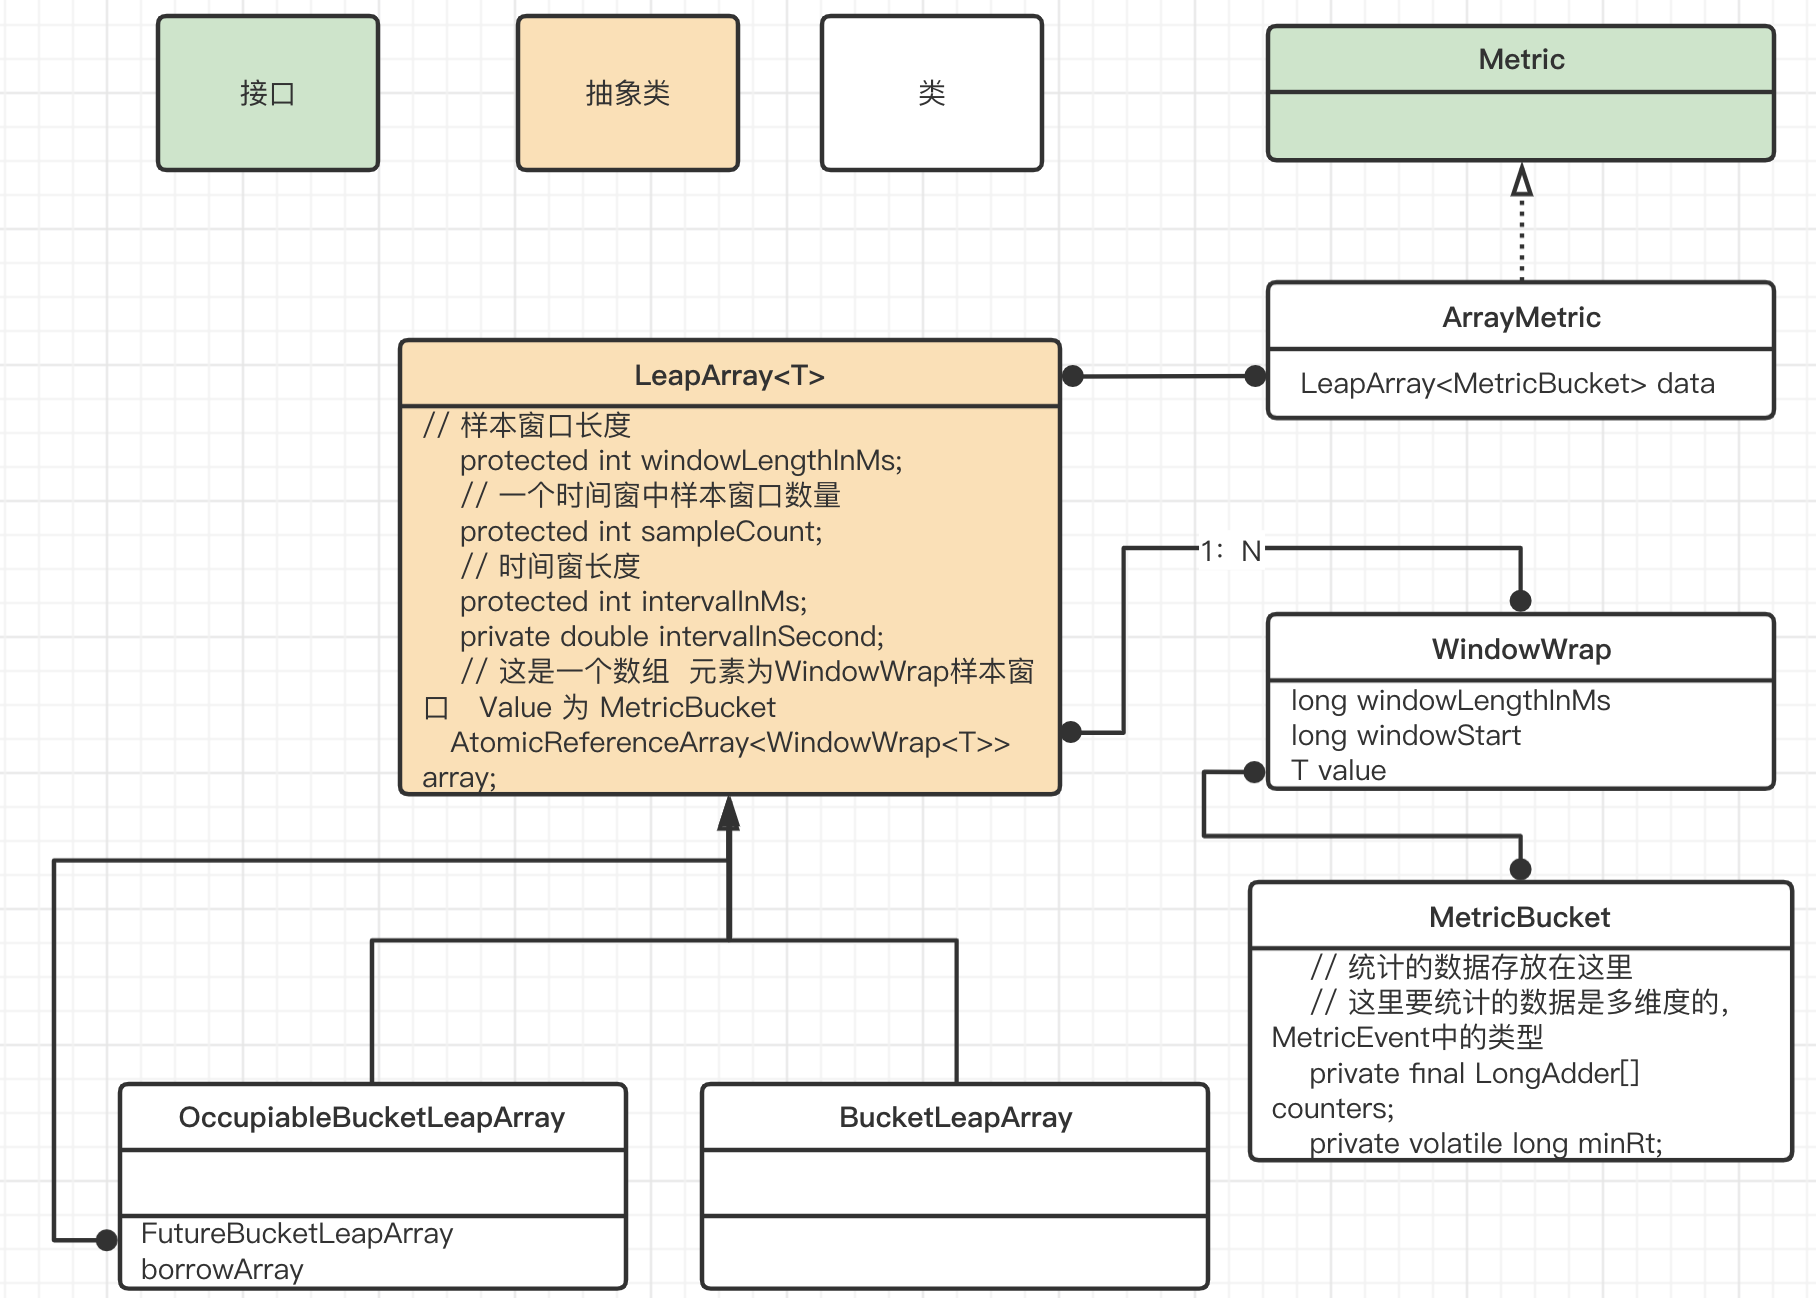
在讲解之前可以看一下数据结构是如何设计的,实际上一个计量器内部维护这一个数组,即单位时间窗,元素为一个样本窗口对象windowWrap,一个样本窗口维护这一个MetricBucket类型的值变量.
数据结构
addPass
    public void addPass(int count) {
        // 获取当前时间点所在的样本窗口
        WindowWrap<MetricBucket> wrap = data.currentWindow();
        // 在样本窗中增加count
        wrap.value().addPass(count);
    }
这里面最关键是如何根据当前时间来获取在单位时间窗内的样本窗,先计算出当前时间在单位时间窗内的样本窗位置.
    // 计算当前时间在哪个样本窗口
    private int calculateTimeIdx(/*@Valid*/ long timeMillis) {
        long timeId = timeMillis / windowLengthInMs;
        // Calculate current index so we can map the timestamp to the leap array.
        //  一个时间窗组成一个环,该环由多个样本窗口组成
        return (int)(timeId % array.length());
    }
然后根据idx来获取到样本窗对象,比较样本窗开始时间来确认是否过时
    public WindowWrap<T> currentWindow(long timeMillis) {
        if (timeMillis < 0) {
            return null;
        }

        // 计算当前时间所在的样本窗口ID,即在计算数组leapArray中的索引
        // 这个idx不会超过样本数量
        int idx = calculateTimeIdx(timeMillis);
        // Calculate current bucket start time.
        // 获取当前时间对应的样本窗口的起始时间戳
        long windowStart = calculateWindowStart(timeMillis);

        /*
         * Get bucket item at given time from the array.
         *
         * (1) Bucket is absent, then just create a new bucket and CAS update to circular array.
         * (2) Bucket is up-to-date, then just return the bucket.
         * (3) Bucket is deprecated, then reset current bucket and clean all deprecated buckets.
         */
        while (true) {
            // 获取到当前时间所在的样本窗口
            WindowWrap<T> old = array.get(idx);
            if (old == null) {
                /*
                 *     B0       B1      B2    NULL      B4
                 * ||_______|_______|_______|_______|_______||___
                 * 200     400     600     800     1000    1200  timestamp
                 *                             ^
                 *                          time=888
                 *            bucket is empty, so create new and update
                 *
                 * If the old bucket is absent, then we create a new bucket at {@code windowStart},
                 * then try to update circular array via a CAS operation. Only one thread can
                 * succeed to update, while other threads yield its time slice.
                 */
                WindowWrap<T> window = new WindowWrap<T>(windowLengthInMs, windowStart, newEmptyBucket(timeMillis));
                if (array.compareAndSet(idx, null, window)) {
                    // Successfully updated, return the created bucket.
                    return window;
                } else {
                    // Contention failed, the thread will yield its time slice to wait for bucket available.
                    Thread.yield();
                }
            } else if (windowStart == old.windowStart()) {
                /*
                 *     B0       B1      B2     B3      B4
                 * ||_______|_______|_______|_______|_______||___
                 * 200     400     600     800     1000    1200  timestamp
                 *                             ^
                 *                          time=888
                 *            startTime of Bucket 3: 800, so it's up-to-date
                 *
                 * If current {@code windowStart} is equal to the start timestamp of old bucket,
                 * that means the time is within the bucket, so directly return the bucket.
                 */
                return old;
            } else if (windowStart > old.windowStart()) {
                // 在idx上的样本时间窗可能已经老了,可能是上几圈的idx位置,本线程的windowStart 已经到了后面圈的样本时间窗了
                /*
                 *   (old)
                 *             B0       B1      B2    NULL      B4
                 * |_______||_______|_______|_______|_______|_______||___
                 * ...    1200     1400    1600    1800    2000    2200  timestamp
                 *                              ^
                 *                           time=1676
                 *          startTime of Bucket 2: 400, deprecated, should be reset
                 *
                 * If the start timestamp of old bucket is behind provided time, that means
                 * the bucket is deprecated. We have to reset the bucket to current {@code windowStart}.
                 * Note that the reset and clean-up operations are hard to be atomic,
                 * so we need a update lock to guarantee the correctness of bucket update.
                 *
                 * The update lock is conditional (tiny scope) and will take effect only when
                 * bucket is deprecated, so in most cases it won't lead to performance loss.
                 */
                if (updateLock.tryLock()) {
                    try {
                        // Successfully get the update lock, now we reset the bucket.
                        return resetWindowTo(old, windowStart);
                    } finally {
                        updateLock.unlock();
                    }
                } else {
                    // Contention failed, the thread will yield its time slice to wait for bucket available.
                    Thread.yield();
                }
            } else if (windowStart < old.windowStart()) {
                // 这种情况一般不会出现  除非人为改动
                // Should not go through here, as the provided time is already behind.
                return new WindowWrap<T>(windowLengthInMs, windowStart, newEmptyBucket(timeMillis));
            }
        }
    }
这时候已经完成了统计工作,那么在流量控制FlowSlot中是如何的实现QPS查询呢?
FlowSlot#entry -> FlowRuleChecker#checkFlow -> FlowRuleChecker#canPassCheck -> DefaultController#canPass -> DefaultController#avgUsedTokens -> node.passQps()
获取计量数中的通过数 除以 单位时间窗长度
@Override
    public double passQps() {
        return rollingCounterInSecond.pass() / rollingCounterInSecond.getWindowIntervalInSec();
    }
接下来看一下如何获取单位时间窗内的请求量
实际上就是把有效的样本时间窗内的各个统计量相加
@Override
    public long pass() {
        // 更新array中当前时间点所在的样本窗口实例中的数据
        data.currentWindow();
        long pass = 0;
        List<MetricBucket> list = data.values();

        // 将当前时间窗中的所有样本窗口统计的值求和
        for (MetricBucket window : list) {
            pass += window.pass();
        }
        return pass;
    }
在拿样本时间窗的时候,需要拿有效的样本,不能包含过时的
 public List<T> values(long timeMillis) {
        if (timeMillis < 0) {
            return new ArrayList<T>();
        }
        int size = array.length();
        List<T> result = new ArrayList<T>(size);

        for (int i = 0; i < size; i++) {
            WindowWrap<T> windowWrap = array.get(i);
            // 判断样本窗是否过时: 当前时间-windowsStart > intervalInms
            if (windowWrap == null || isWindowDeprecated(timeMillis, windowWrap)) {
                // 有可能这个时间窗口 没有请求,在一个时间窗的时候 发现这个样本窗已经过时
                continue;
            }
            result.add(windowWrap.value());
        }
        return result;
    }
LeapArray有2个实现类,分别是OccupiableBucketLeapArray (单位时间窗为1s)和 BucketLeapArray(单位时间窗为1min),那么这两个实现类有什么区别的。实际上对于OccupiableBucketLeapArray,如果是优先级较高,同时流控的时候超过了配置的阈值,那么可以等待一定的时间,使用未来的配额,保证通过流控。
DefaultController#canPass()
 @Override
    public boolean canPass(Node node, int acquireCount, boolean prioritized) {
        int curCount = avgUsedTokens(node);
        if (curCount + acquireCount > count) { // 被流控
            // 如果流控策略是基于QPS 并且优先级较高
            if (prioritized && grade == RuleConstant.FLOW_GRADE_QPS) {
                long currentTime;
                long waitInMs;
                currentTime = TimeUtil.currentTimeMillis();
                waitInMs = node.tryOccupyNext(currentTime, acquireCount, count);
                if (waitInMs < OccupyTimeoutProperty.getOccupyTimeout()) {
                    // 添加占用未来时间对应的样本窗的pass配额
                    node.addWaitingRequest(currentTime + waitInMs, acquireCount);
                    // 统计 OccupiedPass
                    node.addOccupiedPass(acquireCount);
                    sleep(waitInMs);

                    // PriorityWaitException indicates that the request will pass after waiting for {@link @waitInMs}.
                    throw new PriorityWaitException(waitInMs);
                }
            }
            return false;
        }
        return true;
    }
那么如何确定等待的时间呢?
在上面的代码中有个比较 waitInMs < OccupyTimeoutProperty.getOccupyTimeout(),这说明就是因为当前样本窗的pass数量太多造成的,这个时间只要sleep 剩余样本窗是的时间就可以了。
而等待时间超过500的情况下,说明之前的样本窗就已经超过阈值了,这个时候不允许通过流量控制,返回false。
public long tryOccupyNext(long currentTime, int acquireCount, double threshold) {
        double maxCount = threshold * IntervalProperty.INTERVAL / 1000;
        // 0
        long currentBorrow = rollingCounterInSecond.waiting();
        if (currentBorrow >= maxCount) {
            return OccupyTimeoutProperty.getOccupyTimeout();
        }

        // 500
        int windowLength = IntervalProperty.INTERVAL / SampleCountProperty.SAMPLE_COUNT;
        /**
         * 这个算法  是获取当前时间对应的样本窗的结束时间 往前推一个单位时间窗 来获取到一个能统计到当前时间对应的样本窗的最早时间
         */
        long earliestTime = currentTime - currentTime % windowLength + windowLength - IntervalProperty.INTERVAL;

        int idx = 0;
        /*
         * Note: here {@code currentPass} may be less than it really is NOW, because time difference
         * since call rollingCounterInSecond.pass(). So in high concurrency, the following code may
         * lead more tokens be borrowed.
         */
        // 当前时间单位窗口的统计数
        long currentPass = rollingCounterInSecond.pass();
        /**
         * 这块逻辑很好理解:
         * 从最早时间 到 当前时间为止
         * 初始等待时间为  当前时间对应的样本窗,剩余的时间长度
         * 如果去掉最早样本窗的pass数之后,发现仍然大于阈值 ,则等待时间数 + 样本时间窗长度
         */
        while (earliestTime < currentTime) {
            long waitInMs = idx * windowLength + windowLength - currentTime % windowLength;
            if (waitInMs >= OccupyTimeoutProperty.getOccupyTimeout()) {
                break;
            }
            long windowPass = rollingCounterInSecond.getWindowPass(earliestTime);
            if (currentPass + currentBorrow + acquireCount - windowPass <= maxCount) {
                return waitInMs;
            }
            earliestTime += windowLength;
            currentPass -= windowPass;
            idx++;
        }

        return OccupyTimeoutProperty.getOccupyTimeout();
    }