1.为什么要学习Spring的注解配置?
基于注解配置的方式也已经逐渐代替xml。所以我们必须要掌握使用注解的方式配置Spring。
关于实际的开发中到底使用xml还是注解,每家公司有着不同的使用习惯。所以这两种配置方式都需要掌握。
学习基于注解的IoC配置,首先得有一个认知,即注解配置和xml配置要实现的功能都是一样的,都是要降低程序间的耦合。只是配置的形式不一样。
2.入门示例
步骤:
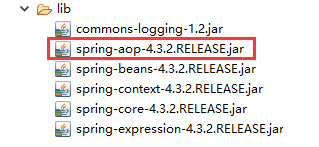
1.导入jar包,相对于之前的,在基于注解的配置中,我们还要多拷贝一个aop的jar包。
2.在classpath下创建一个配置文件applicationContext.xml,并导入约束,基于注解整合时,配置文件导入约束时需要多导入一个context名称空间下的约束
<?xml version="1.0" encoding="UTF-8"?>
<beans xmlns="http://www.springframework.org/schema/beans"
    xmlns:p="http://www.springframework.org/schema/p"
    xmlns:context="http://www.springframework.org/schema/context"
    xmlns:xsi="http://www.w3.org/2001/XMLSchema-instance"
    xsi:schemaLocation="http://www.springframework.org/schema/beans
    http://www.springframework.org/schema/beans/spring-beans.xsd
    http://www.springframework.org/schema/context
    http://www.springframework.org/schema/context/spring-context.xsd
">

</beans>
3.创建一个用于测试的类,并且加入使用@Component注解,声明该类允许注入到Spring容器
import org.springframework.stereotype.Component;
/*
 * @Component 组件注解,spring在启动的时候扫描对应的包下面的所有类型
 * 如果哪一个类上只要有 @Component 注解,说明这个就需要被Spring管理
 * Spring在容器就创建这个类的对象
 *
 * @Component 属性介绍
 *     @Component(value="id值")
 *  value :指定 bean 的 id值
 *    可以不写,默认bean的id就是当前类名的 首字母小写
 *    如果写,“value=”可以省略,直接"id值"
 *
 */
@Component("service")
public class Service {

    public void say() {
        System.out.println("你好!Spring");
    }
}
4.往配置文件加入扫描组件配置
<?xml version="1.0" encoding="UTF-8"?>
<beans xmlns="http://www.springframework.org/schema/beans"
    xmlns:p="http://www.springframework.org/schema/p"
    xmlns:context="http://www.springframework.org/schema/context"
    xmlns:xsi="http://www.w3.org/2001/XMLSchema-instance"
    xsi:schemaLocation="http://www.springframework.org/schema/beans
    http://www.springframework.org/schema/beans/spring-beans.xsd
    http://www.springframework.org/schema/context
    http://www.springframework.org/schema/context/spring-context.xsd
">
    <!-- 配置spring要进行扫描的组件注解的包(默认包含子包)的位置 -->
    <context:component-scan base-package="com.gjs.service"/>
</beans>
5.测试代码
import org.junit.Test;
import org.springframework.context.ApplicationContext;
import org.springframework.context.support.ClassPathXmlApplicationContext;

import com.gjs.service.Service;

public class TestSpring {
    @Test
    public void testName() throws Exception {
        ApplicationContext context = new ClassPathXmlApplicationContext("applicationContext.xml");
        Service service = context.getBean("service",Service.class);
        service.say();

    }
}
3.常用注解说明
3.1 IOC相关注解
用于被扫描创建对象的注解,统称为组件注解。组件包括:@Component,@Controller,@Service,@Repository。它们的作用是标识类为注解的组件类,启动Spring框架的程序时,声明将这些组件类注入到Spring容器里面。功能类似原来配置文件的<bean>标签。
其他它们的功能是一样的并没有本质上的区别,哪为什么会有4个呢?
Spring第一版注解的实现(spring 2.5),就是使用一个@Component。从3.0以后,作者认为根据分层的需要,把它拆成了四个。为了可以让开发人员,可见即可得,一看到注解,立即知道类的性质。所以分成了四个。
规范:
@Controller:用于声明表示层的组件注解
@Service:用于声明服务层的组件注解
@Repository:用于声明持久层的组件注解
@Component:用于声明三层以外的组件注解
除了@Controller在SpringMVC里面有强制的要求,SpringMVC的表示层必须使用@Controller组件注解。其他情况不按规范使用也不会有问题,但既然是规范就要遵守。
@Scope:指定作用范围,等同于Xml配置<bean>标签中的scope
@Component("service")
@Scope("prototype")
public class Service {

    public void say() {
        System.out.println("你好!Spring");
    }
}
@PostConstruct:初始化方法注解,等同于Xml配置<bean>标签中的init-method
@PostConstruct
public void init() {
    System.out.println("初始化方法执行了");
}
@PreDestroy:销毁方法注解,等同于Xml配置<bean>标签中的destroy-method
@PreDestroy
public void destroy() {
     System.out.println("销毁方法执行了");
}
3.2 依赖注入的注解
Spring提供了两套用注解依赖注入的解决方案
1.@Autowired +@Qualifier():是Spring定义的标签
2.@Resouce:是J2EE的规范
@Autowired +@Qualifier()
@Autowired +@Qualifier()有三种注入的方式:
1.在字段上面注入
2.在方法上面注入
3.在构造方法上面注入
示例:
整体结构:
CustomeService接口:
package com.gjs.service;

public interface CustomeService {
    public void say();
}
CustomServiceImpl1:
package com.gjs.service.impl;

import org.springframework.stereotype.Service;

import com.gjs.service.CustomeService;
@Service("service1")
public class CustomServiceImpl1 implements CustomeService {

    @Override
    public void say() {
        System.out.println("CustomerServiceImpl1.say()");
    }
}
CustomServiceImpl2:
package com.gjs.service.impl;

import org.springframework.stereotype.Service;

import com.gjs.service.CustomeService;

@Service("service2")
public class CustomServiceImpl2 implements CustomeService {

    @Override
    public void say() {
        System.out.println("CustomerServiceImpl2.say()");
    }
}
CustomController:
package com.gjs.client;

import org.springframework.beans.factory.annotation.Autowired;
import org.springframework.beans.factory.annotation.Qualifier;
import org.springframework.stereotype.Controller;

import com.gjs.service.CustomeService;


@Controller("client")
public class CustomController {
    /*
     * 方式一(推荐) : 在字段(成员变量)上注入
     * @Autowired :
     *     默认会从Spring容器找对应类型的对象注入进来
     *  使用@Autowired 必须保证Spring容器中最少一个类型对应bean ,如果没有就会抛异常
     *   org.springframework.beans.factory.NoSuchBeanDefinitionException
     *     可以使用 注解的 required属性(除特殊情况,一般不使用)
     *  required = true/false 是否是必须有对应的对象,true 是必须有(默认),false 不是必须有
     *
     *  如果spring容器有多个相同类型的对象,默认无法注入也会抛异常
     *  org.springframework.beans.factory.NoUniqueBeanDefinitionException 不是唯一的bean异常
     *  这时就需要配合使用 @Qualifier() 注解了
     *  @Qualifier(value="对应bean的id值")可以在多个相同类型的对象中筛选指定唯一id的对象,“value=”可以省略
     */
    //@Autowired(required=false)
    //@Qualifier("service1")
    private CustomeService customeService;

    /*
     * 方式二 :使用setter方法(属性)注入
     * 将@Autowired直接贴在set方法上面即可,程序运行,会执行set方法
     * 将Spring容器对应的类型的参数赋值给 set方法的参数,类型不存在或存在多个,处理方式与方式一一样
     */
    //@Autowired()
    //@Qualifier("service1")
    public void setCustomeService(CustomeService customeService) {
        this.customeService = customeService;
    }

    /*
     * 方式三 : 构造器注入
     * 使用注解的IOC创建bean的情况下
     * 默认bean中有什么样的构造器,spring就调用那个构造器去创建对应的bean对象
     * 并且会自动注入 构造器中对应类型参数的对象,无须@Autowired()
     *
     * 如果构造函数的参数类型对应的bean有多个就在 在参数前面 使用 @Qualifier()注解,指定 对应的bean的id
     */

    public CustomController(@Qualifier("service1")CustomeService customeService) {
        this.customeService = customeService;
    }

    public void say() {
        customeService.say();
    }

}
applicationContext.xml:
<?xml version="1.0" encoding="UTF-8"?>
<beans xmlns="http://www.springframework.org/schema/beans"
    xmlns:p="http://www.springframework.org/schema/p"
    xmlns:context="http://www.springframework.org/schema/context"
    xmlns:xsi="http://www.w3.org/2001/XMLSchema-instance"
    xsi:schemaLocation="http://www.springframework.org/schema/beans
    http://www.springframework.org/schema/beans/spring-beans.xsd
    http://www.springframework.org/schema/context
    http://www.springframework.org/schema/context/spring-context.xsd
">
    <!-- 配置spring要进行扫描的组件注解的包(默认包含子包)的位置 -->
    <context:component-scan base-package="com.gjs"/>

</beans>
测试类TestSpring:
package com.gjs.test;

import org.junit.Test;
import org.springframework.context.ApplicationContext;
import org.springframework.context.support.ClassPathXmlApplicationContext;

import com.gjs.client.CustomController;

public class TestSpring {
    @Test
    public void testName() throws Exception {
        //1.读取配置文件,创建Spring容器
        ApplicationContext context = new ClassPathXmlApplicationContext("applicationContext.xml");
        //获取调用方 CustomClient对象
        CustomController client = context.getBean("client", CustomController.class);
        //调用CustomClient对象的say()方法
        client.say();
    }
}
@Resouce
@Resource 功能等同 @Autowired + @Qualifier
@Resource只能注入字段和setter方法,不能注入构造方法
CustomController类,其他参考上面的
package com.gjs.client;

import javax.annotation.Resource;

import org.springframework.beans.factory.annotation.Autowired;
import org.springframework.beans.factory.annotation.Qualifier;
import org.springframework.stereotype.Controller;

import com.gjs.service.CustomeService;


@Controller("client")
public class CustomController {
    /*
     * 方式一: 字段注入
     *  也是默认会从Spring容器找对应类型的对象注入进来
     *  有多个相同类型时,可以使用@Resource(name="对应bean的id")指定注入哪个对象
     *  @Resource 必须保证需要注入的类型在Spring容器中最少有一个对象,没有直接抛异常
     */
    //@Resource(name="service1")
    private CustomeService customeService;

    /*
     * 方式二: set方法(属性)注入
     */
    @Resource(name="service1")
    public void setCustomeService(CustomeService customeService) {
        this.customeService = customeService;
    }


    public void say() {
        customeService.say();
    }

}
@Value注解
@Value注解:注入基本数据类型以及它们的包装类和String类型数据的,支持${}注入Properties文件的键值对,等同 <proprty name=”...” value=”${Key}”>。
@Repository
public class UserDaoImpl implements UserDao {

    /**
     * @Value(value="")
     * 可以从Spring容器读取 .properties 配置文件内容
     * value :配置文件的对应的key -->使用 ${key} 获取
     * 程序运行中自动将 properties 对应key的获取出来设置给字段
     *
     */

    //等价 <property name="driverClassName" value="${jdbc.driverClassName}">
    @Value("${jdbc.driverClassName}")
    private String driverClassName;

    @Value("${jdbc.url}")
    private String url;

    @Value("${jdbc.username}")
    private String username;

    @Value("${jdbc.password}")
    private String password;

    //@Value("${jdbc.maxActive}")
    @Value("10") //开发者也手动赋值
    private String maxActive;


    @Override
    public void insert(User user) {
        System.out.println(driverClassName);
        System.out.println(url);
        System.out.println(username);
        System.out.println(password);
        System.out.println(maxActive);

    }

}
4.纯注解配置
虽然使用注解的方式,但我们还是离不开xml文件,因为我们还有配置组件扫描位置,如果这也能用注解配置,那么我们就可以脱离xml文件了。
替换XML配置文件的注解:
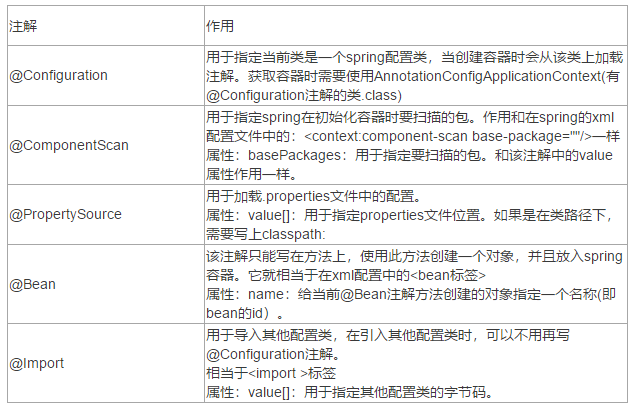
package com.gjs.config;

import javax.sql.DataSource;

import org.springframework.beans.factory.annotation.Value;
import org.springframework.context.annotation.Bean;
import org.springframework.context.annotation.ComponentScan;
import org.springframework.context.annotation.Configuration;
import org.springframework.context.annotation.PropertySource;

import com.alibaba.druid.pool.DruidDataSource;

/*
 * @Configuration
 * 说明把当前类当做成Spring框架的配置文件
 * @ComponentScan
 *  配置注解包扫描的位置
 * @PropertySource("classpath:db.properties")
 *  读取.peroperties 后缀的配置文件
 */

@Configuration
@ComponentScan("com.gjs")
@PropertySource("classpath:db.properties")
public class SpringConfig {


    /**
     * @Value(value="")
     * 可以从Spring容器读取 .properties 配置文件内容
     * value :配置文件的对应的key -->使用 ${key} 获取
     * 程序运行中自动将 properties 对应key的获取出来设置给字段
     *
     */

    //等价 <property name="driverClassName" value="${jdbc.driverClassName}">
    @Value("${jdbc.driverClassName}")
    private String driverClassName;

    @Value("${jdbc.url}")
    private String url;

    @Value("${jdbc.username}")
    private String username;

    @Value("${jdbc.password}")
    private String password;

    @Value("${jdbc.maxActive}")
    private Integer maxActive;


    //<bean id="dataSource" class="com.alibaba.druid.pool.DruidDataSource"
      //init-method="init" destroy-method="close">
    @Bean(name="dataSource",initMethod="init",destroyMethod="close")
    public DataSource getDataSource() {
        DruidDataSource dataSource = new DruidDataSource();
        dataSource.setDriverClassName(driverClassName);
        dataSource.setUrl(url);
        dataSource.setUsername(username);
        dataSource.setPassword(password);
        dataSource.setMaxActive(maxActive);
        return dataSource;
    }

}
5. Spring的测试
5.1.传统的单元测试
存在的问题:
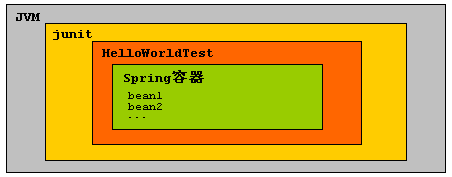
1,每个测试都要重新启动Spring容器,启动容器的开销大,测试效率低下。
2,不应该是测试代码管理Spring容器,应该是Spring容器在管理测试代码。
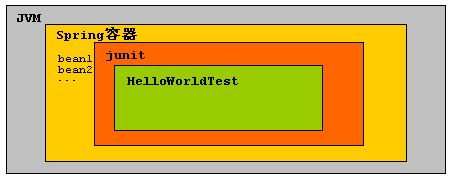
5.2 正确的Spring的测试
5.3 如何使用Spring测试
Spring测试必须保证Eclipse的单元测试的最低版本是 4.12版本,如果使用的Eclipse版本很低,那么单元测试版本可能低于4.12,那么需要开发者手动导入单元测试的jar包
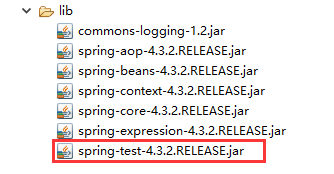
要使用Spring测试就要先导入test的jar包
package com.gjs.test;

import org.junit.Test;
import org.junit.runner.RunWith;
import org.springframework.context.ApplicationContext;
import org.springframework.context.support.ClassPathXmlApplicationContext;
import org.springframework.test.context.ContextConfiguration;
import org.springframework.test.context.junit4.SpringJUnit4ClassRunner;

import com.gjs.client.CustomController;

//表示先启动Spring容器,把junit运行在Spring容器中
@RunWith(SpringJUnit4ClassRunner.class)
//表示从哪里加载资源文件,默认从src(源目录)下面加载
@ContextConfiguration("classpath:applicationContext.xml")
public class TestSpring {
    @Test
    public void testName() throws Exception {
        //1.读取配置文件,创建Spring容器
        ApplicationContext context = new ClassPathXmlApplicationContext("applicationContext.xml");
        //获取调用方 CustomClient对象
        CustomController client = context.getBean("client", CustomController.class);
        //调用CustomClient对象的say()方法
        client.say();
    }
}