首先最开始应该清楚一个知识,最外面的那个[ [ [ ]]]括号代表第一维,对应维度数字0,第二个对应1,多维时最后一个对应数字-1;因为后面有用到
1 矩阵变换
tf.shape(Tensor)
返回张量的形状。但是注意,tf.shape函数本身也是返回一个张量。而在tf中,张量是需要用sess.run(Tensor)来得到具体的值的。
x=[[1,2,3],[4,5,6]]
shape=tf.shape(x)
with tf.Session() as sess:
    print (shape)
    print (sess.run(shape))

#输出
Tensor("Shape:0", shape=(2,), dtype=int32)
[2 3]
tf.expand_dims(Tensor,dim)
为张量增加一个维度
为张量+1维。官网的例子:’t’ is a tensor of shape [2]
shape(expand_dims(t, 0)) ==> [1, 2] #当值为0时表示,把原来的一个形状为[2]的向量表示成1*2的
shape(expand_dims(t, 1)) ==> [2, 1] #当值为1时表示,把原来的一个形状为[2]的向量表示成2*1的
shape(expand_dims(t, -1)) ==> [2, 1]#当值为-1时表示最后一个维度,把原来的一个形状为[2]的向量表示成2*1的
sess = tf.InteractiveSession()
labels = [1,2,3]
x = tf.expand_dims(labels, 0)#变成1*3
print(sess.run(x))
x = tf.expand_dims(labels, 1)#变成3*1
print(sess.run(x))
#>>>[[1 2 3]]
#>>>[[1]
#        [2]
#        [3]]
# 't2' is a tensor of shape [2, 3, 5]
shape(expand_dims(t2, 0)) ==> [1, 2, 3, 5]#在第一个位置增加一个维度
shape(expand_dims(t2, 2)) ==> [2, 3, 1, 5]#在第三个位置增加一个维度
shape(expand_dims(t2, 3)) ==> [2, 3, 5, 1]#在第四个位置增加一个维度
tf.squeeze() Function函数作用:从张量的shape中删除维度大小为1
tf.squeeze(input, axis=None, name=None, squeeze_dims=None)
squeeze_dims不指定就删除维度大小为1 的
  t' is a tensor of shape [1, 2, 1, 3, 1, 1]
  tf.shape(tf.squeeze(t))  # [2, 3]


  t' is a tensor of shape [1, 2, 1, 3, 1, 1]#指定要删的第几个位置
  tf.shape(tf.squeeze(t, [2, 4]))  # [1, 2, 3, 1]
tf.pack()==tf.stack()
将一个R维张量列表沿着axis轴组合成一个R+1维的张量。
  # 'x' is [1, 4]
  # 'y' is [2, 5]
  # 'z' is [3, 6]
  tf.stack([x, y, z]) => [[1, 4], [2, 5], [3, 6]]  # Pack along first dim.
  tf.stack([x, y, z], axis=1) => [[1, 2, 3], [4, 5, 6]]
  tf.stack([6,10])=>[6,10]=>在一些应用中可以作为6*10的shape
tf.concat
tf.concat(values, axis, name='concat')
Concatenates tensors along one dimension.
将张量沿着指定维数拼接起来。个人感觉跟前面的pack用法类似
axis:必须是一个数,表明在哪一维上连接
如果axis是0,那么在某一个shape的第一个维度上连,对应到实际,就是叠放到列上
t1 = [[1, 2, 3], [4, 5, 6]] #shape(t1)=[2,3]  2所在的表示第一维,3所在的表示第二维
t2 = [[7, 8, 9], [10, 11, 12]]#shape(t2)=[2,3]
tf.concat([t1, t2],0) == > [[1, 2, 3], [4, 5, 6], [7, 8, 9], [10, 11, 12]] ##shape=[4,3]
如果axis是1,那么在某一个shape的第二个维度上连
t1 = [[1, 2, 3], [4, 5, 6]]#shape(t1)=[2,3]
t2 = [[7, 8, 9], [10, 11, 12]]#shape(t2)=[2,3]
tf.concat([t1, t2],1) ==> [[1, 2, 3, 7, 8, 9], [4, 5, 6, 10, 11, 12]]##shape=[2,6]
如果axis是-1,那么在某一个shape的最后维度上连
t1 = [[[1, 2], [2, 3]], [[4, 4], [5, 3]]]
t2 = [[[7, 4], [8, 4]], [[2, 10], [15, 11]]]
#shape是[2,2,2]
w=tf.concat([t1, t2], -1)#最后一维,最里面的那一维,最后一个2表示的那个
e=tf.concat([t1, t2], 1)#
q=tf.concat([t1, t2], 0)#第一维,就是最外面的那一维,第一个2
with tf.Session() as sess:
print(sess.run(tf.shape(t1)))
print("result:w=",'
',sess.run(w))
print("result:e=",'
',sess.run(e))
print("result:q=",'
',sess.run(q))
####################输出结果################
[2 2 2]
result:w=
 [[[ 1  2  7  4]
  [ 2  3  8  4]]

 [[ 4  4  2 10]
  [ 5  3 15 11]]]
result:e=
 [[[ 1  2]
  [ 2  3]
  [ 7  4]
  [ 8  4]]

 [[ 4  4]
  [ 5  3]
  [ 2 10]
  [15 11]]]
result:q=
 [[[ 1  2]
  [ 2  3]]

 [[ 4  4]
  [ 5  3]]

 [[ 7  4]
  [ 8  4]]

 [[ 2 10]
  [15 11]]]
values:就是两个或者一组待连接的tensor了
这里要注意的是:如果是两个向量,它们是无法调用
tf.concat(1, [t1, t2])
因为向量对应的shape只有一个维度,当然不能在第二维上连了,虽然实际中两个向量可以在行上连,但是放在程序里是会报错的
所以要用到前面讲过的tf.expand_dims来扩维:
t1=tf.constant([1,2,3])
t2=tf.constant([4,5,6])
#concated = tf.concat( [t1,t2],1)这样会报错
#concated = tf.concat( [t1,t2],0)正确
t1=tf.expand_dims(tf.constant([1,2,3]),1)
t2=tf.expand_dims(tf.constant([4,5,6]),1)
concated = tf.concat([t1,t2],1)#这样就是正确的
tf.random_shuffle
tf.random_shuffle(value,seed=None,name=None)
沿着value的第一维进行随机重新排列
sess = tf.InteractiveSession()
a=[[1,2],[3,4],[5,6]]
x = tf.random_shuffle(a)
print(sess.run(x))
#===>[[3 4],[5 6],[1 2]]
tf.argmax | tf.argmin
tf.argmax(input=tensor,dimention=axis)
找到给定的张量tensor中在指定轴axis上的最大值/最小值的位置。
a=tf.get_variable(name='a',
                  shape=[3,4],
                  dtype=tf.float32,
                  initializer=tf.random_uniform_initializer(minval=-1,maxval=1))
b=tf.argmax(input=a,dimension=0)#列
c=tf.argmax(input=a,dimension=1)#行
sess = tf.InteractiveSession()
sess.run(tf.initialize_all_variables())
print(sess.run(a))
#[[ 0.04261756 -0.34297419 -0.87816691 -0.15430689]
# [ 0.18663144  0.86972666 -0.06103253  0.38307118]
# [ 0.84588599 -0.45432305 -0.39736366  0.38526249]]
print(sess.run(b))
#[2 1 1 2]
print(sess.run(c))
#[0 1 0]
tf.equal
tf.equal(x, y, name=None):
判断两个tensor是否每个元素都相等。返回一个格式为bool的tensor,True or False
tf.cast
cast(x, dtype, name=None)
将x的数据格式转化成dtype.例如,原来x的数据格式是bool,那么将其转化成float以后,就能够将其转化成0和1的序列。反之也可以
a = tf.Variable([1,0,0,1,1])
b = tf.cast(a,dtype=tf.bool)
c  = tf.cast(True,dtype=tf.float32)
sess = tf.InteractiveSession()
sess.run(tf.initialize_all_variables())
print(sess.run(b))
print(sess.run(c))
#[ True False False  True  True]
#1.0
tf.reshape
reshape(tensor, shape, name=None)
顾名思义,就是将tensor按照新的shape重新排列。一般来说,shape有三种用法:
如果 shape=[-1], 表示要将tensor展开成一个list
如果 shape=[a,b,c,…] 其中每个a,b,c,..均>0,那么就是常规用法
如果 shape=[a,-1,c,…] 此时b=-1,a,c,..依然>0。这表示tf会根据tensor的原尺寸,自动计算b的值。
官方给的例子已经很详细了,我就不写示例代码了
# tensor 't' is [1, 2, 3, 4, 5, 6, 7, 8, 9]
# tensor 't' has shape [9]
reshape(t, [3, 3]) ==> [[1, 2, 3],
                        [4, 5, 6],
                        [7, 8, 9]]

# tensor 't' is [[[1, 1], [2, 2]],
#                [[3, 3], [4, 4]]]
# tensor 't' has shape [2, 2, 2]
reshape(t, [2, 4]) ==> [[1, 1, 2, 2],
                        [3, 3, 4, 4]]

# tensor 't' is [[[1, 1, 1],
#                 [2, 2, 2]],
#                [[3, 3, 3],
#                 [4, 4, 4]],
#                [[5, 5, 5],
#                 [6, 6, 6]]]
# tensor 't' has shape [3, 2, 3]
# pass '[-1]' to flatten 't',将tensor转化成一个list
reshape(t, [-1]) ==> [1, 1, 1, 2, 2, 2, 3, 3, 3, 4, 4, 4, 5, 5, 5, 6, 6, 6]

# -1 can also be used to infer the shape###指代未知的数字
# -1 is inferred to be 9:
reshape(t, [2, -1]) ==> [[1, 1, 1, 2, 2, 2, 3, 3, 3],
                         [4, 4, 4, 5, 5, 5, 6, 6, 6]]

# -1 is inferred to be 2:
reshape(t, [-1, 9]) ==> [[1, 1, 1, 2, 2, 2, 3, 3, 3],
                         [4, 4, 4, 5, 5, 5, 6, 6, 6]]

# -1 is inferred to be 3:
reshape(t, [ 2, -1, 3]) ==> [[[1, 1, 1],
                              [2, 2, 2],
                              [3, 3, 3]],
                             [[4, 4, 4],
                              [5, 5, 5],
                              [6, 6, 6]]]
2. 神经网络相关操作
embedding_lookup(params, ids, partition_strategy=”mod”, name=None,
validate_indices=True):
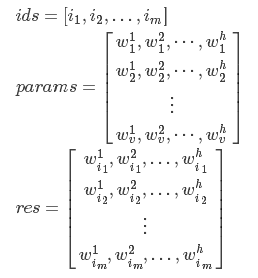
简单的来讲,就是将一个数字序列ids转化成embedding序列表示。
假设params.shape=[v,h], ids.shape=[m], 那么该函数会返回一个shape=[m,h]的张量。用数学来表示,就是

那么这个有什么用呢?如果你了解word2vec的话,就知道我们可以根据文档来对每个单词生成向量。单词向量可以进一步用来测量单词的相似度等等。那么假设我们现在已经获得了每个单词的向量,都存在param中。那么根据单词id序列ids,就可以通过embedding_lookup来获得embedding表示的序列。
tf.trainable_variables
返回所有可训练的变量。
在创造变量(tf.Variable, tf.get_variable 等操作)时,都会有一个trainable的选项,表示该变量是否可训练。这个函数会返回图中所有trainable=True的变量。
tf.get_variable(…), tf.Variable(…)的默认选项是True, 而 tf.constant(…)只能是False
import tensorflow as tf
from pprint import pprint

a = tf.get_variable('a',shape=[5,2])    # 默认 trainable=True
b = tf.get_variable('b',shape=[2,5],trainable=False)
c = tf.constant([1,2,3],dtype=tf.int32,shape=[8],name='c') # 因为是常量,所以trainable=False
d = tf.Variable(tf.random_uniform(shape=[3,3]),name='d')
tvar = tf.trainable_variables()
tvar_name = [x.name for x in tvar]
print(tvar)
# [<tensorflow.python.ops.variables.Variable object at 0x7f9c8db8ca20>, <tensorflow.python.ops.variables.Variable object at 0x7f9c8db8c9b0>]
print(tvar_name)
# ['a:0', 'd:0']

sess = tf.InteractiveSession()
sess.run(tf.initialize_all_variables())
pprint(sess.run(tvar))
#[array([[ 0.27307487, -0.66074866],
#       [ 0.56380701,  0.62759042],
#       [ 0.50012994,  0.42331111],
#       [ 0.29258847, -0.09185416],
#       [-0.35913971,  0.3228929 ]], dtype=float32),
# array([[ 0.85308731,  0.73948073,  0.63190091],
#       [ 0.5821209 ,  0.74533939,  0.69830012],
#       [ 0.61058474,  0.76497936,  0.10329771]], dtype=float32)]
tf.gradients
用来计算导数。该函数的定义如下所示
def gradients(ys,
              xs,
              grad_ys=None,
              name="gradients",
              colocate_gradients_with_ops=False,
              gate_gradients=False,
              aggregation_method=None):
虽然可选参数很多,但是最常使用的还是ys和xs。根据说明得知,ys和xs都可以是一个tensor或者tensor列表。而计算完成以后,该函数会返回一个长为len(xs)的tensor列表,列表中的每个tensor是ys中每个值对xs[i]求导之和。如果用数学公式表示的话,那么 g = tf.gradients(y,x)可以表示成

tf.clip_by_global_norm
修正梯度值,用于控制梯度爆炸的问题。梯度爆炸和梯度弥散的原因一样,都是因为链式法则求导的关系,导致梯度的指数级衰减。为了避免梯度爆炸,需要对梯度进行修剪。
先来看这个函数的定义:
def clip_by_global_norm(t_list, clip_norm, use_norm=None, name=None):
输入参数中:t_list为待修剪的张量, clip_norm 表示修剪比例(clipping ratio).
函数返回2个参数: list_clipped,修剪后的张量,以及global_norm,一个中间计算量。当然如果你之前已经计算出了global_norm值,你可以在use_norm选项直接指定global_norm的值。
那么具体如何计算呢?根据源码中的说明,可以得到
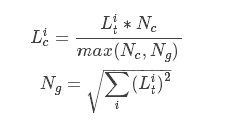
list_clipped[i]=t_list[i] * clip_norm / max(global_norm, clip_norm),其中
global_norm = sqrt(sum([l2norm(t)**2 for t in t_list]))
如果你更熟悉数学公式,则可以写作

其中,
Lic和Lig代表t_list[i]和list_clipped[i],
Nc和Ng代表clip_norm 和 global_norm的值。
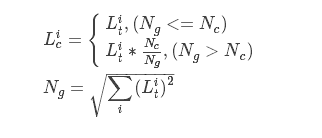
其实也可以看到其实Ng就是t_list的L2模。上式也可以进一步写作

也就是说,当t_list的L2模大于指定的NcNc时,就会对t_list做等比例缩放
tf.nn.dropout
dropout(x, keep_prob, noise_shape=None, seed=None, name=None)
按概率来将x中的一些元素值置零,并将其他的值放大。用于进行dropout操作,一定程度上可以防止过拟合
x是一个张量,而keep_prob是一个(0,1]之间的值。x中的各个元素清零的概率互相独立,为1-keep_prob,而没有清零的元素,则会统一乘以1/keep_prob, 目的是为了保持x的整体期望值不变。
sess = tf.InteractiveSession()
a = tf.get_variable('a',shape=[2,5])
b = a
a_drop = tf.nn.dropout(a,0.8)
sess.run(tf.initialize_all_variables())
print(sess.run(b))
#[[ 0.28667903 -0.66874665 -1.14635754  0.88610041 -0.55590457]
# [-0.29704338 -0.01958954  0.80359757  0.75945008  0.74934876]]
print(sess.run(a_drop))
#[[ 0.35834879 -0.83593333 -1.43294692  1.10762548 -0.        ]
# [-0.37130421 -0.          0.          0.94931257  0.93668592]]
tensorflow的共享变量,tf.Variable(),tf.get_variable(),tf.Variable_scope(),tf.name_scope()联系与区别
参考:http://www.cnblogs.com/Charles-Wan/p/6200446.html
在训练深度网络时,为了减少需要训练参数的个数(比如具有simase结构的LSTM模型)、或是多机多卡并行化训练大数据大模型(比如数据并行化)等情况时
,往往需要共享变量。另外一方面是当一个深度学习模型变得非常复杂的时候,往往存在大量的变量和操作,如何避免这些变量名和操作名的唯一不重复,同时维护一个条理清晰的graph非常重要。因此,tensorflow中用tf.Variable(),tf.get_variable(),tf.Variable_scope(),tf.name_scope()几个函数来实现:
1、tf.Variable(<variable_name>),tf.get_variable(<variable_name>)的作用与区别:
tf.Variable(<variable_name>)会自动检测命名冲突并自行处理,但tf.get_variable(<variable_name>)则遇到重名的变量创建且变量名没有设置为共享变量时,则会报错。
tf.Variable(<variable_name>)和tf.get_variable(<variable_name>)都是用于在一个name_scope下面获取或创建一个变量的两种方式,区别在于:
tf.Variable(<variable_name>)用于创建一个新变量,在同一个name_scope下面,可以创建相同名字的变量,底层实现会自动引入别名机制,两次调用产生了其实是两个不同的变量。
tf.get_variable(<variable_name>)用于获取一个变量,并且不受name_scope的约束。当这个变量已经存在时,则自动获取;如果不存在,则自动创建一个变量。
2、tf.name_scope(<scope_name>)与tf.variable_scope(<scope_name>):
tf.name_scope(<scope_name>):主要用于管理一个图里面的各种op,返回的是一个以scope_name命名的context manager。一个graph会维护一个name_space的
堆,每一个namespace下面可以定义各种op或者子namespace,实现一种层次化有条理的管理,避免各个op之间命名冲突。
tf.variable_scope(<scope_name>):一般与tf.name_scope()配合使用,用于管理一个graph中变量的名字,避免变量之间的命名冲突,tf.variable_scope(<scope_name>)允许在一个variable_scope下面共享变量。
需要注意的是:创建一个新的variable_scope时不需要把reuse属性设置未False,只需要在使用的时候设置为True就可以了。
with tf.variable_scope("image_filters1") as scope1:
result1 = my_image_filter(image1)
with tf.variable_scope(scope1, reuse = True)
result2 = my_image_filter(image2)
变量共享主要涉及到两个函数: tf.get_variable(<name>, <shape>, <initializer>) 和 tf.variable_scope(<scope_name>)。
先来看第一个函数: tf.get_variable。
tf.get_variable 和tf.Variable不同的一点是,前者拥有一个变量检查机制,会检测已经存在的变量是否设置为共享变量,如果已经存在的变量没有设置为共享变量,TensorFlow 运行到第二个拥有相同名字的变量的时候,就会报错。
例如如下代码:
def my_image_filter(input_images):
    conv1_weights = tf.Variable(tf.random_normal([5, 5, 32, 32]),
        name="conv1_weights")
    conv1_biases = tf.Variable(tf.zeros([32]), name="conv1_biases")
    conv1 = tf.nn.conv2d(input_images, conv1_weights,
        strides=[1, 1, 1, 1], padding='SAME')
    return  tf.nn.relu(conv1 + conv1_biases)
有两个变量(Variables)conv1_weighs, conv1_biases和一个操作(Op)conv1,如果你直接调用两次,不会出什么问题,但是会生成两套变量;
# First call creates one set of 2 variables.
result1 = my_image_filter(image1)
# Another set of 2 variables is created in the second call.
result2 = my_image_filter(image2)
如果把 tf.Variable 改成 tf.get_variable,直接调用两次,就会出问题了:
result1 = my_image_filter(image1)
result2 = my_image_filter(image2)
# Raises ValueError(... conv1/weights already exists ...)
为了解决这个问题,TensorFlow 又提出了 tf.variable_scope 函数:它的主要作用是,在一个作用域 scope 内共享一些变量,可以有如下几种用法:
1)
with tf.variable_scope("image_filters") as scope:
    result1 = my_image_filter(image1)
    scope.reuse_variables() # or
    #tf.get_variable_scope().reuse_variables()
    result2 = my_image_filter(image2)
2)
with tf.variable_scope("image_filters1") as scope1:
    result1 = my_image_filter(image1)
with tf.variable_scope(scope1, reuse = True)
    result2 = my_image_filter(image2)
通常情况下,tf.variable_scope 和 tf.name_scope 配合,能画出非常漂亮的流程图,但是他们两个之间又有着细微的差别,那就是 name_scope 只能管住操作 Ops 的名字,而管不住变量 Variables 的名字,看下例:
with tf.variable_scope("foo"):
    with tf.name_scope("bar"):
        v = tf.get_variable("v", [1])
        x = 1.0 + v
assert v.name == "foo/v:0"
assert x.op.name == "foo/bar/add"
tf.get_variable函数的使用
tf.get_variable(name, shape, initializer): name就是变量的名称,shape是变量的维度,initializer是变量初始化的方式,初始化的方式有以下几种:
tf.constant_initializer:常量初始化函数
tf.random_normal_initializer:正态分布
tf.truncated_normal_initializer:截取的正态分布
tf.random_uniform_initializer:均匀分布
tf.zeros_initializer:全部是0
tf.ones_initializer:全是1
tf.uniform_unit_scaling_initializer:满足均匀分布,但不影响输出数量级的随机值
import tensorflow as tf;
import numpy as np;
import matplotlib.pyplot as plt;

a1 = tf.get_variable(name='a1', shape=[2,3], initializer=tf.random_normal_initializer(mean=0, stddev=1))
a2 = tf.get_variable(name='a2', shape=[1], initializer=tf.constant_initializer(1))
a3 = tf.get_variable(name='a3', shape=[2,3], initializer=tf.ones_initializer())

with tf.Session() as sess:
    sess.run(tf.initialize_all_variables())
    print sess.run(a1)
    print sess.run(a2)
    print sess.run(a3)
输出:
[[ 0.42299312 -0.25459203 -0.88605702]
 [ 0.22410156  1.34326422 -0.39722782]]
[ 1.]
[[ 1.  1.  1.]
 [ 1.  1.  1.]]
#注意:不同的变量之间不能有相同的名字,除非你定义了variable_scope,这样才可以有相同的名字。
3.普通操作
tf.linspace | tf.range
tf.linspace(start,stop,num,name=None)
tf.range(start,limit=None,delta=1,name=’range’)
这两个放到一起说,是因为他们都用于产生等差数列,不过具体用法不太一样。
tf.linspace在[start,stop]范围内产生num个数的等差数列。不过注意,start和stop要用浮点数表示,不然会报错
tf.range在[start,limit)范围内以步进值delta产生等差数列。注意是不包括limit在内的。
sess = tf.InteractiveSession()
x = tf.linspace(start=1.0,stop=5.0,num=5,name=None)  # 注意1.0和5.0
y = tf.range(start=1,limit=5,delta=1)
print(sess.run(x))
print(sess.run(y))
#===>[ 1.  2.  3.  4.  5.]
#===>[1 2 3 4]
tf.assign
assign(ref, value, validate_shape=None, use_locking=None, name=None)
tf.assign是用来更新模型中变量的值的。ref是待赋值的变量,value是要更新的值。即效果等同于 ref = value
简单的实例代码见下
sess = tf.InteractiveSession()

a = tf.Variable(0.0)
b = tf.placeholder(dtype=tf.float32,shape=[])
op = tf.assign(a,b)

sess.run(tf.initialize_all_variables())
print(sess.run(a))
# 0.0
sess.run(op,feed_dict={b:5.})
print(sess.run(a))
# 5.0
4.规范化
tf.variable_scope
简单的来讲,就是为变量添加命名域
 with tf.variable_scope("foo"):
      with tf.variable_scope("bar"):
          v = tf.get_variable("v", [1])
          assert v.name == "foo/bar/v:0"
tf.get_variable_scope
返回当前变量的命名域,返回一个tensorflow.python.ops.variable_scope.VariableScope变量。
- 在
tf.Session里面进行运算。 - 通过
tf.constant()创建常量 tensor。 - 用
tf.placeholder()和feed_dict得到输入。 - 应用
tf.add(),tf.subtract(),tf.multiply(), andtf.divide()函数进行数学运算. - 学习如何用
tf.cast()进行类型转换。
5.矩阵操作
5.1矩阵生成
这部分主要将如何生成矩阵,包括全0矩阵,全1矩阵,随机数矩阵,常数矩阵等
sess=tf.InteractiveSession()
#x=tf.ones([2,3],tf.int32)
x=tf.zeros([2,3],tf.int32)
print (sess.run(x))
新建一个与给定的tensor类型大小一致的tensor,使其所有元素为0和1
sess=tf.InteractiveSession()
tensor=[[1,2,3],[4,5,6]]
#x=tf.ones_like(tensor)
x=tf.zeros_like(tensor)
print (sess.run(x))
创建一个形状大小为shape的tensor,初始值为value
sess=tf.InteractiveSession()
x=tf.fill([2,3],2)
print (sess.run(x))
创建一个常量tensor,按照给出value来赋值,可以用shape来指定其形状。value可以是一个数,也可以是一个list。
如果是一个数,那么这个常量中所有值的按该数来赋值。
如果是list,那么len(value)一定要小于等于shape展开后的长度。赋值时,先将value中的值逐个存入。不够的部分,则全部存入value的最后一个值。
sess=tf.InteractiveSession()
#x=tf.constant(2,shape=[2,3])
x=tf.constant([2,3],shape=[2,3])
print (sess.run(x))
random_normal:正态分布随机数,均值是mean,标准差是stddev
truncated_normal:截断正态分布随机数,均值是mean,标准差是stddev,只保留[mean-2*stddev,mean+2*stddev]范围内的随机数
random_uniform:均匀分布随机数,范围为[minval,maxval]
sess=tf.InteractiveSession()
x=tf.random_normal(shape=[1,5],mean=0.0,stddev=1.0,dtype=tf.float32)
print (sess.run(x))