前提
- 树莓派系统安装好 apache web 服务器,如未安装,可在树莓派内执行
sudo apt-get install apache2进行安装apache
也可以通过命令获取GPIO信息:
gpio --version #查看gpio版本
gpio readall # 查看树莓派所有管脚的基本信息
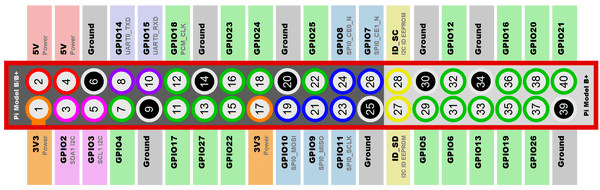
树莓派针脚说明图如下图:

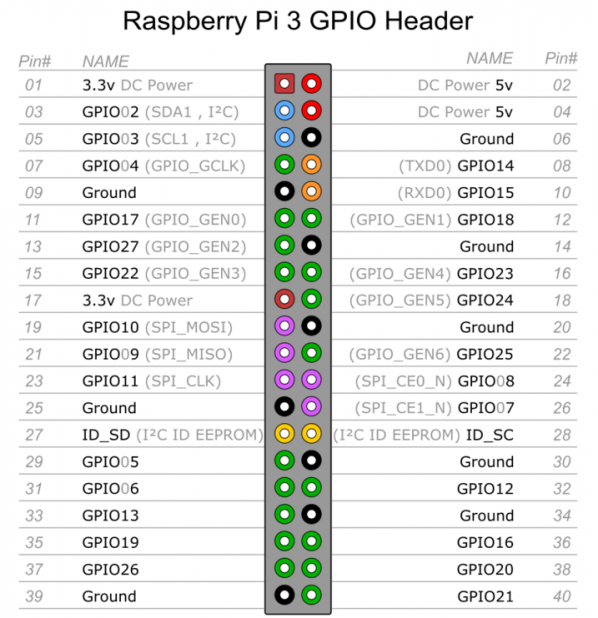
注: 在GPIO接线或接模块的时候,建议关闭树莓派之后进行操作,避免造成元电子损坏。
参考基于树莓派3B,DHT11/DHT22,LCD1602的一个实时温度湿度检测系统的详细说明,LCD1602和DHT11和树莓派3B连线成功。后来参考博文,使用了ntp和修改时区,才把日期时间与北京时间一致。
在未操作之前,输入date,返回的是"Fri 17 Mar 16:03:16 UTC 2017",我看电脑时间,好像已经是03-18 00:03了,时间不对。
按照教你如何修改树莓派的时区和网络对时的方法按照好了ntpdate.
安装 ntpdate
sudo apt-get install ntpdate
选择时区:
tzselect
最后时区为"Asia/Shanghai"。最后执行sudo ntpdate cn.pool.ntp.org,提示:

没有更新成功。
最后尝试了树莓派系统时间同步中的sudo dpkg-reconfigure tzdata的命令来修改本地时区,依次选择的是"Asia","Chongqing" 回车确认之后,就更新好了时间,输出的date与本地电脑的时区一样。
只接DHT11,不接 LCD
DHT11 接线
DHT11有3个脚,VCC,DATA,GND
| 符号 | 含义 | 树莓派 Pin | 树莓派 含义 |
|---|---|---|---|
| VCC | 供电电源(+3.3V) | 1 | 3.3V电源 |
| DATA | 数据输出脚 | 32 | GPIO 12 |
| GND | 地 | 9 | 地 |
按照使用Github仓库 rpi-TempRuntime 上的说明:
安装依赖:
sudo apt-get update
sudo apt-get install python-dev python-rpi.gpio
sudo apt-get install build-essential python-dev python-smbus python-pip
git clone https://github.com/adafruit/Adafruit_Python_DHT.git
cd Adafruit_Python_DHT
sudo python setup.py install
sudo pip install RPi.GPIO
git clone https://github.com/adafruit/Adafruit_Python_CharLCD
cd Adafruit_Python_CharLCD
sudo python setup.py install
安装
将开源库下载克隆到树莓派Apache 默认的/var/www/html 目录下,命令如下:
#from Raspberry pi ssh
sudo apt-get install -y git # 如果没有安装git,需要执行这一句安装git
cd /var/www/html # 进入Apache默认的document_root
git clone https://github.com/yfgeek/rpi-TempRuntime.git # 使用git clone使用的github仓库
sed -i "s|26|12|" /var/www/html/rpi-TempRuntime/DHT11-WITHOUT-LCD.py #将监听数据口 GPIO 26 改为GPIO 12
运行
cd /var/www/html/rpi-TempRuntime
python DHT11-WITHOUT-LCD.py
创建快速启动脚本
#from Raspberry pi ssh
vim start.sh
创建一个启动的 shell 脚本,文件名为 start.sh,脚本内容如下:
#!/bin/bash
cd /var/www/html/rpi-TempRuntime
python -u DHT11-WITHOUT-LCD.py
4位数码管显示模块(带时钟点)
数码管接线说明:
| 符号 | 含义 | 树莓派 Pin | 树莓派含义 |
|---|---|---|---|
| CLK | 时钟信号脚 | 16 | GPIO 23 |
| DIO | 数据输入输出脚 | 18 | GPIO 24 |
| VCC | 供电电源(+5V) | 4 | 5V 电源 |
| GND | 地 | 14 | 地 |
获取 TM1637 脚本
#from Raspberry pi ssh
pi@raspberrypi:~/workspace $ wget https://raspberrytips.nl/files/tm1637.py
原始的代码可以在 Github 这里 找到
显示数码管的python47digitclock.py 源文件,我存放的文件夹路径是: /home/pi/workspace
47digitclock.py 文件,将源码的时间计算为直接获取当前时间(24小时制),使用字符串截取的方式获取每个LED显示的字符,源码是:
#!/usr/bin/env python
# -*- coding: utf-8 -*-

# https://raspberrytips.nl/tm1637-4-digit-led-display-raspberry-pi/

import sys
import time
import datetime
import RPi.GPIO as GPIO
import tm1637

#CLK -> GPIO23 (Pin 16)
#DI0 -> GPIO24 (Pin 18)

Display = tm1637.TM1637(23,24,tm1637.BRIGHT_TYPICAL)

Display.Clear()
Display.SetBrightnes(1)

while(True):
   todaytime = time.strftime('%H:%M:%S',time.localtime(time.time()))
   todaystr  = todaytime.split(":");
   second = int(todaystr[2])

   currenttime = [int(todaystr[0][0]), int(todaystr[0][1]), int(todaystr[1][0]), int(todaystr[1][1]) ]

   Display.Show(currenttime)
   Display.ShowDoublepoint(second % 2)

   time.sleep(1)
演示代码可以直接下载:
#from Raspberry pi ssh
pi@raspberrypi:~/workspace $ wget https://raspberrytips.nl/files/47digitclock.py
确保存放47digitclock.py 文件所在的文件夹内有tm1637.py 脚本文件,即可运行命令来启动数码管:
python 47digitclock.py
创建名为startclock.sh的一个shell文件,用于快速执行显示时间的python文件,startclock.sh文件的内容如下:
#!/bin/bash
cd /home/pi/workspace
python -u 47digitclock.py
每次重新开机启动时,启动这两个文件
nohup ./start.sh &
nohup ./startclock.sh &
运行之后的出现的我问题
问题1 : 显示时钟一段时间之后的时候,如果出现 LED的数字乱跳、忽然变亮又变暗、LED全不量的情况,可以登入树莓派中,运行
ps -ef | grep 47
在输出结果中,看一下是否有两个或者两个以上的 47digitclock.py 进程在运行,如果是有两个或者两个以上的47digitclock.py进程的话,请用 kill -9 进程编号将全部的47digitclock.py进程都停止,然后再运行nohup ./startclock.sh &
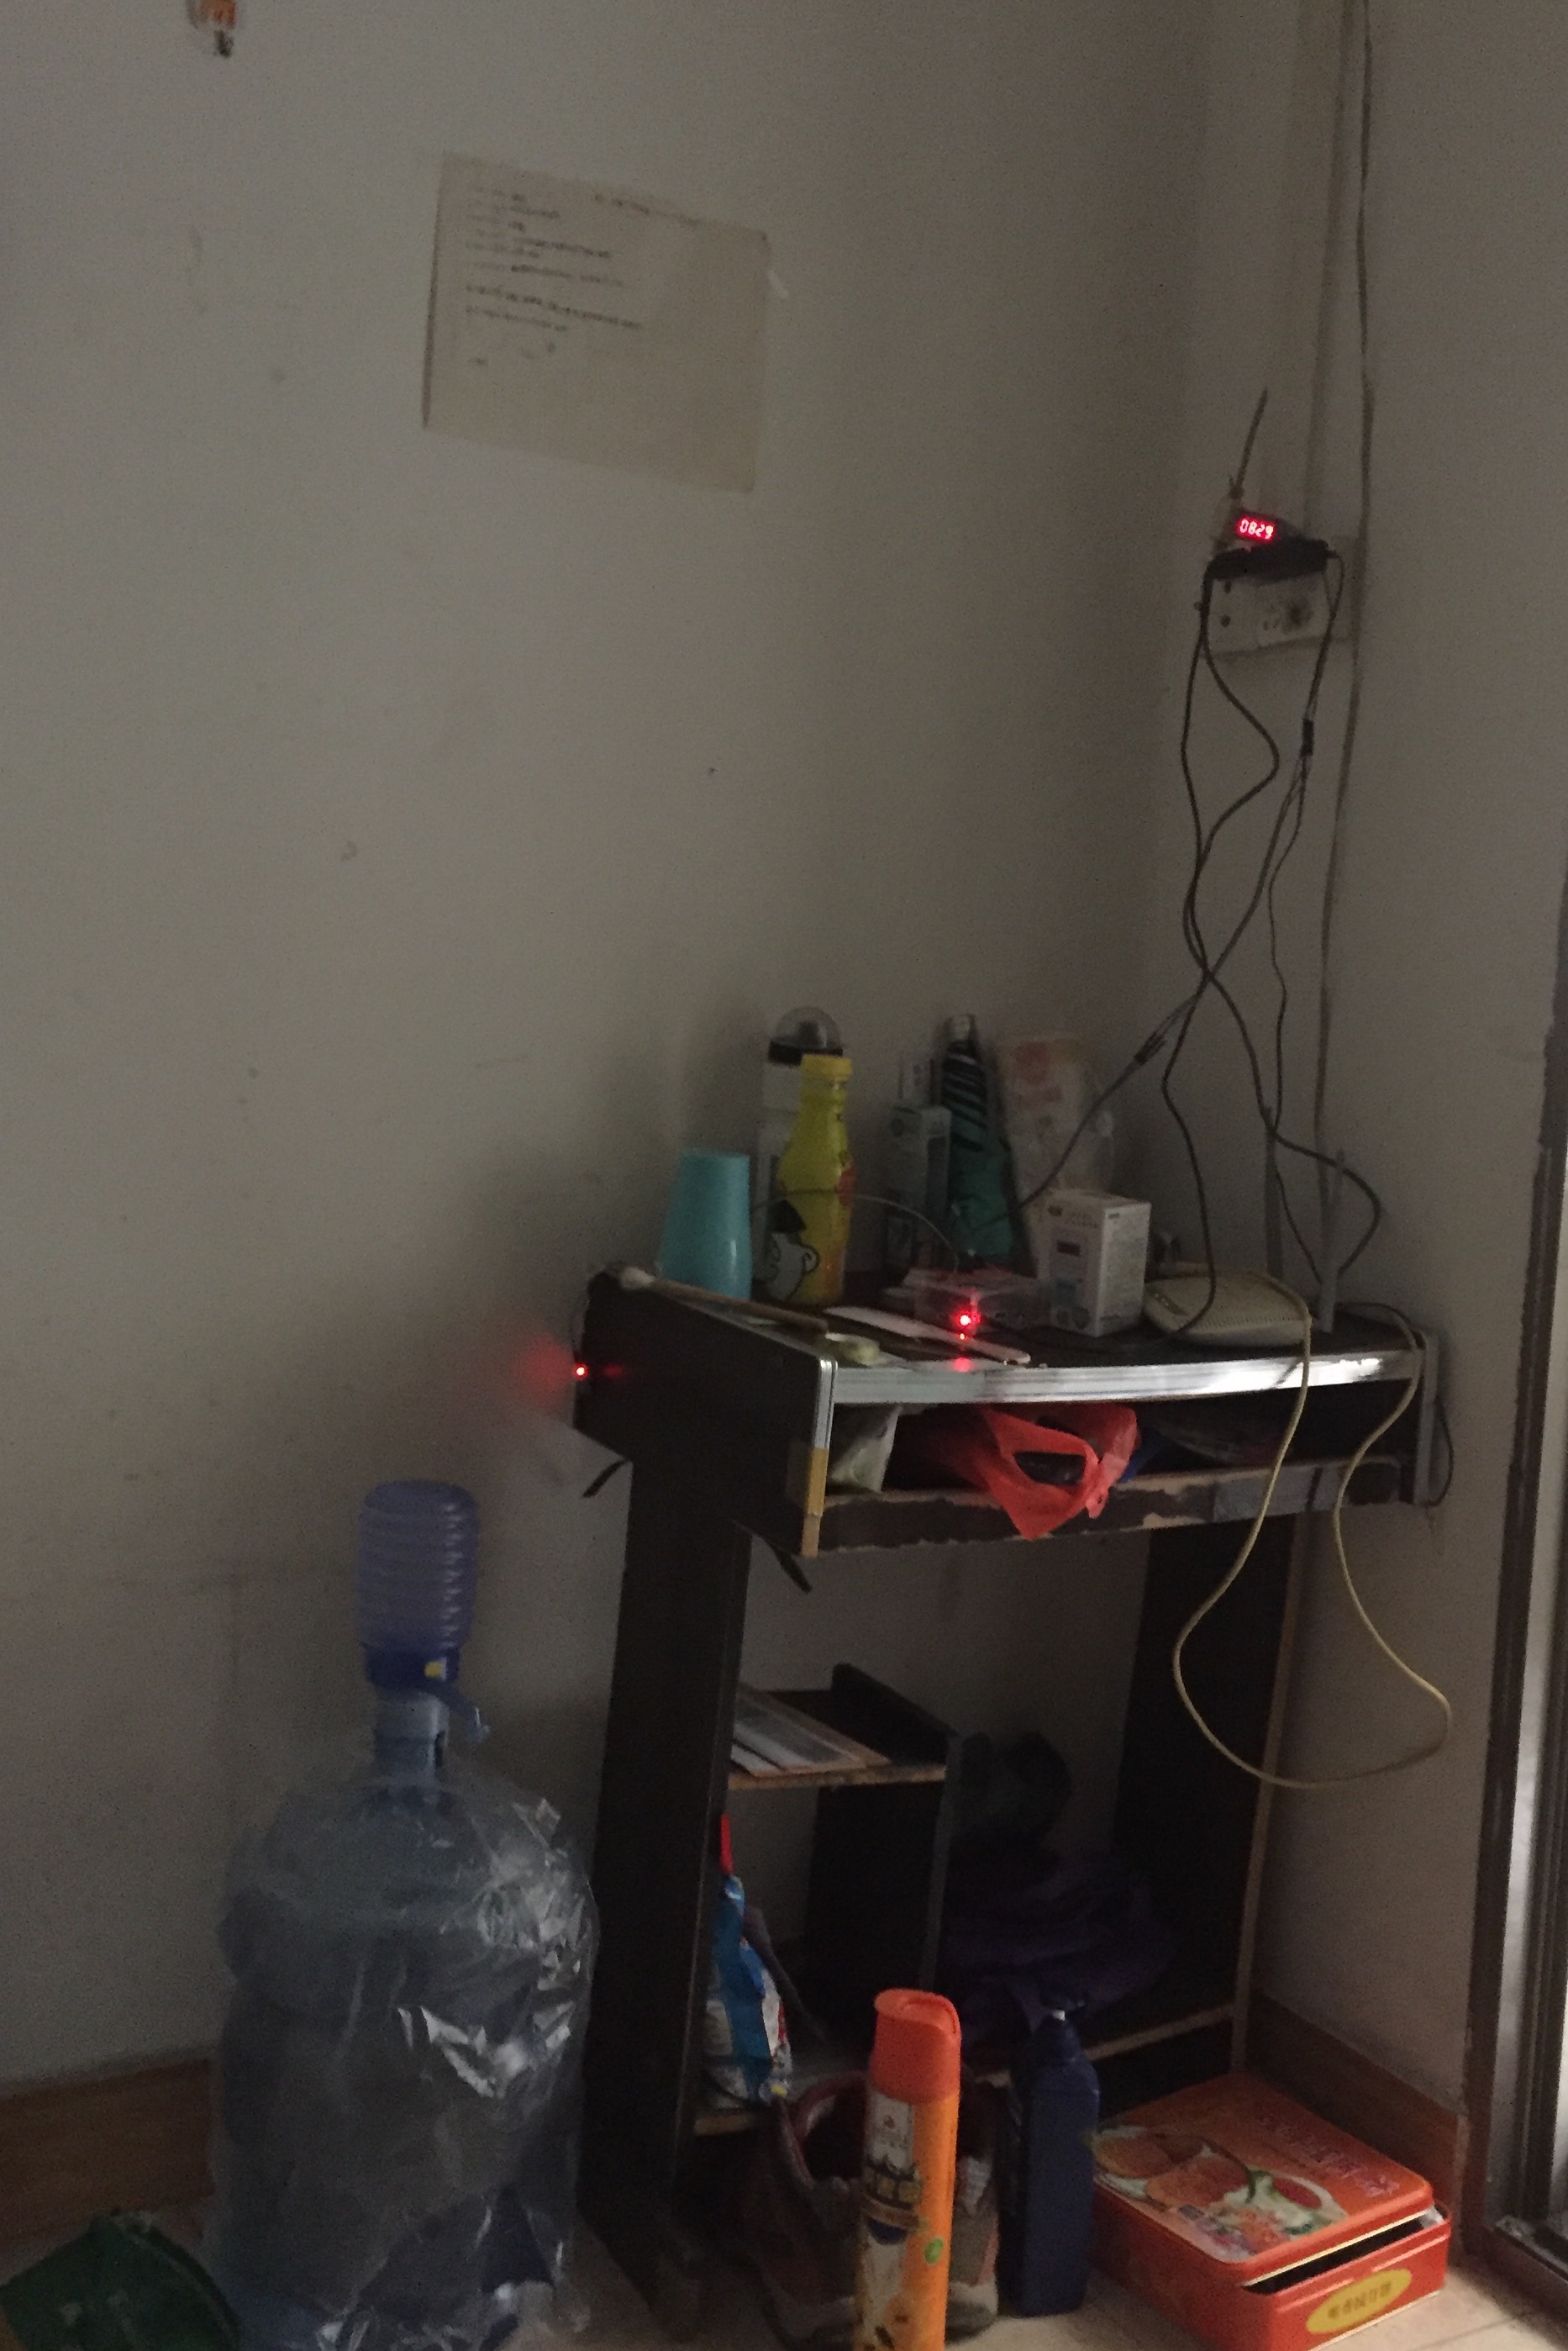
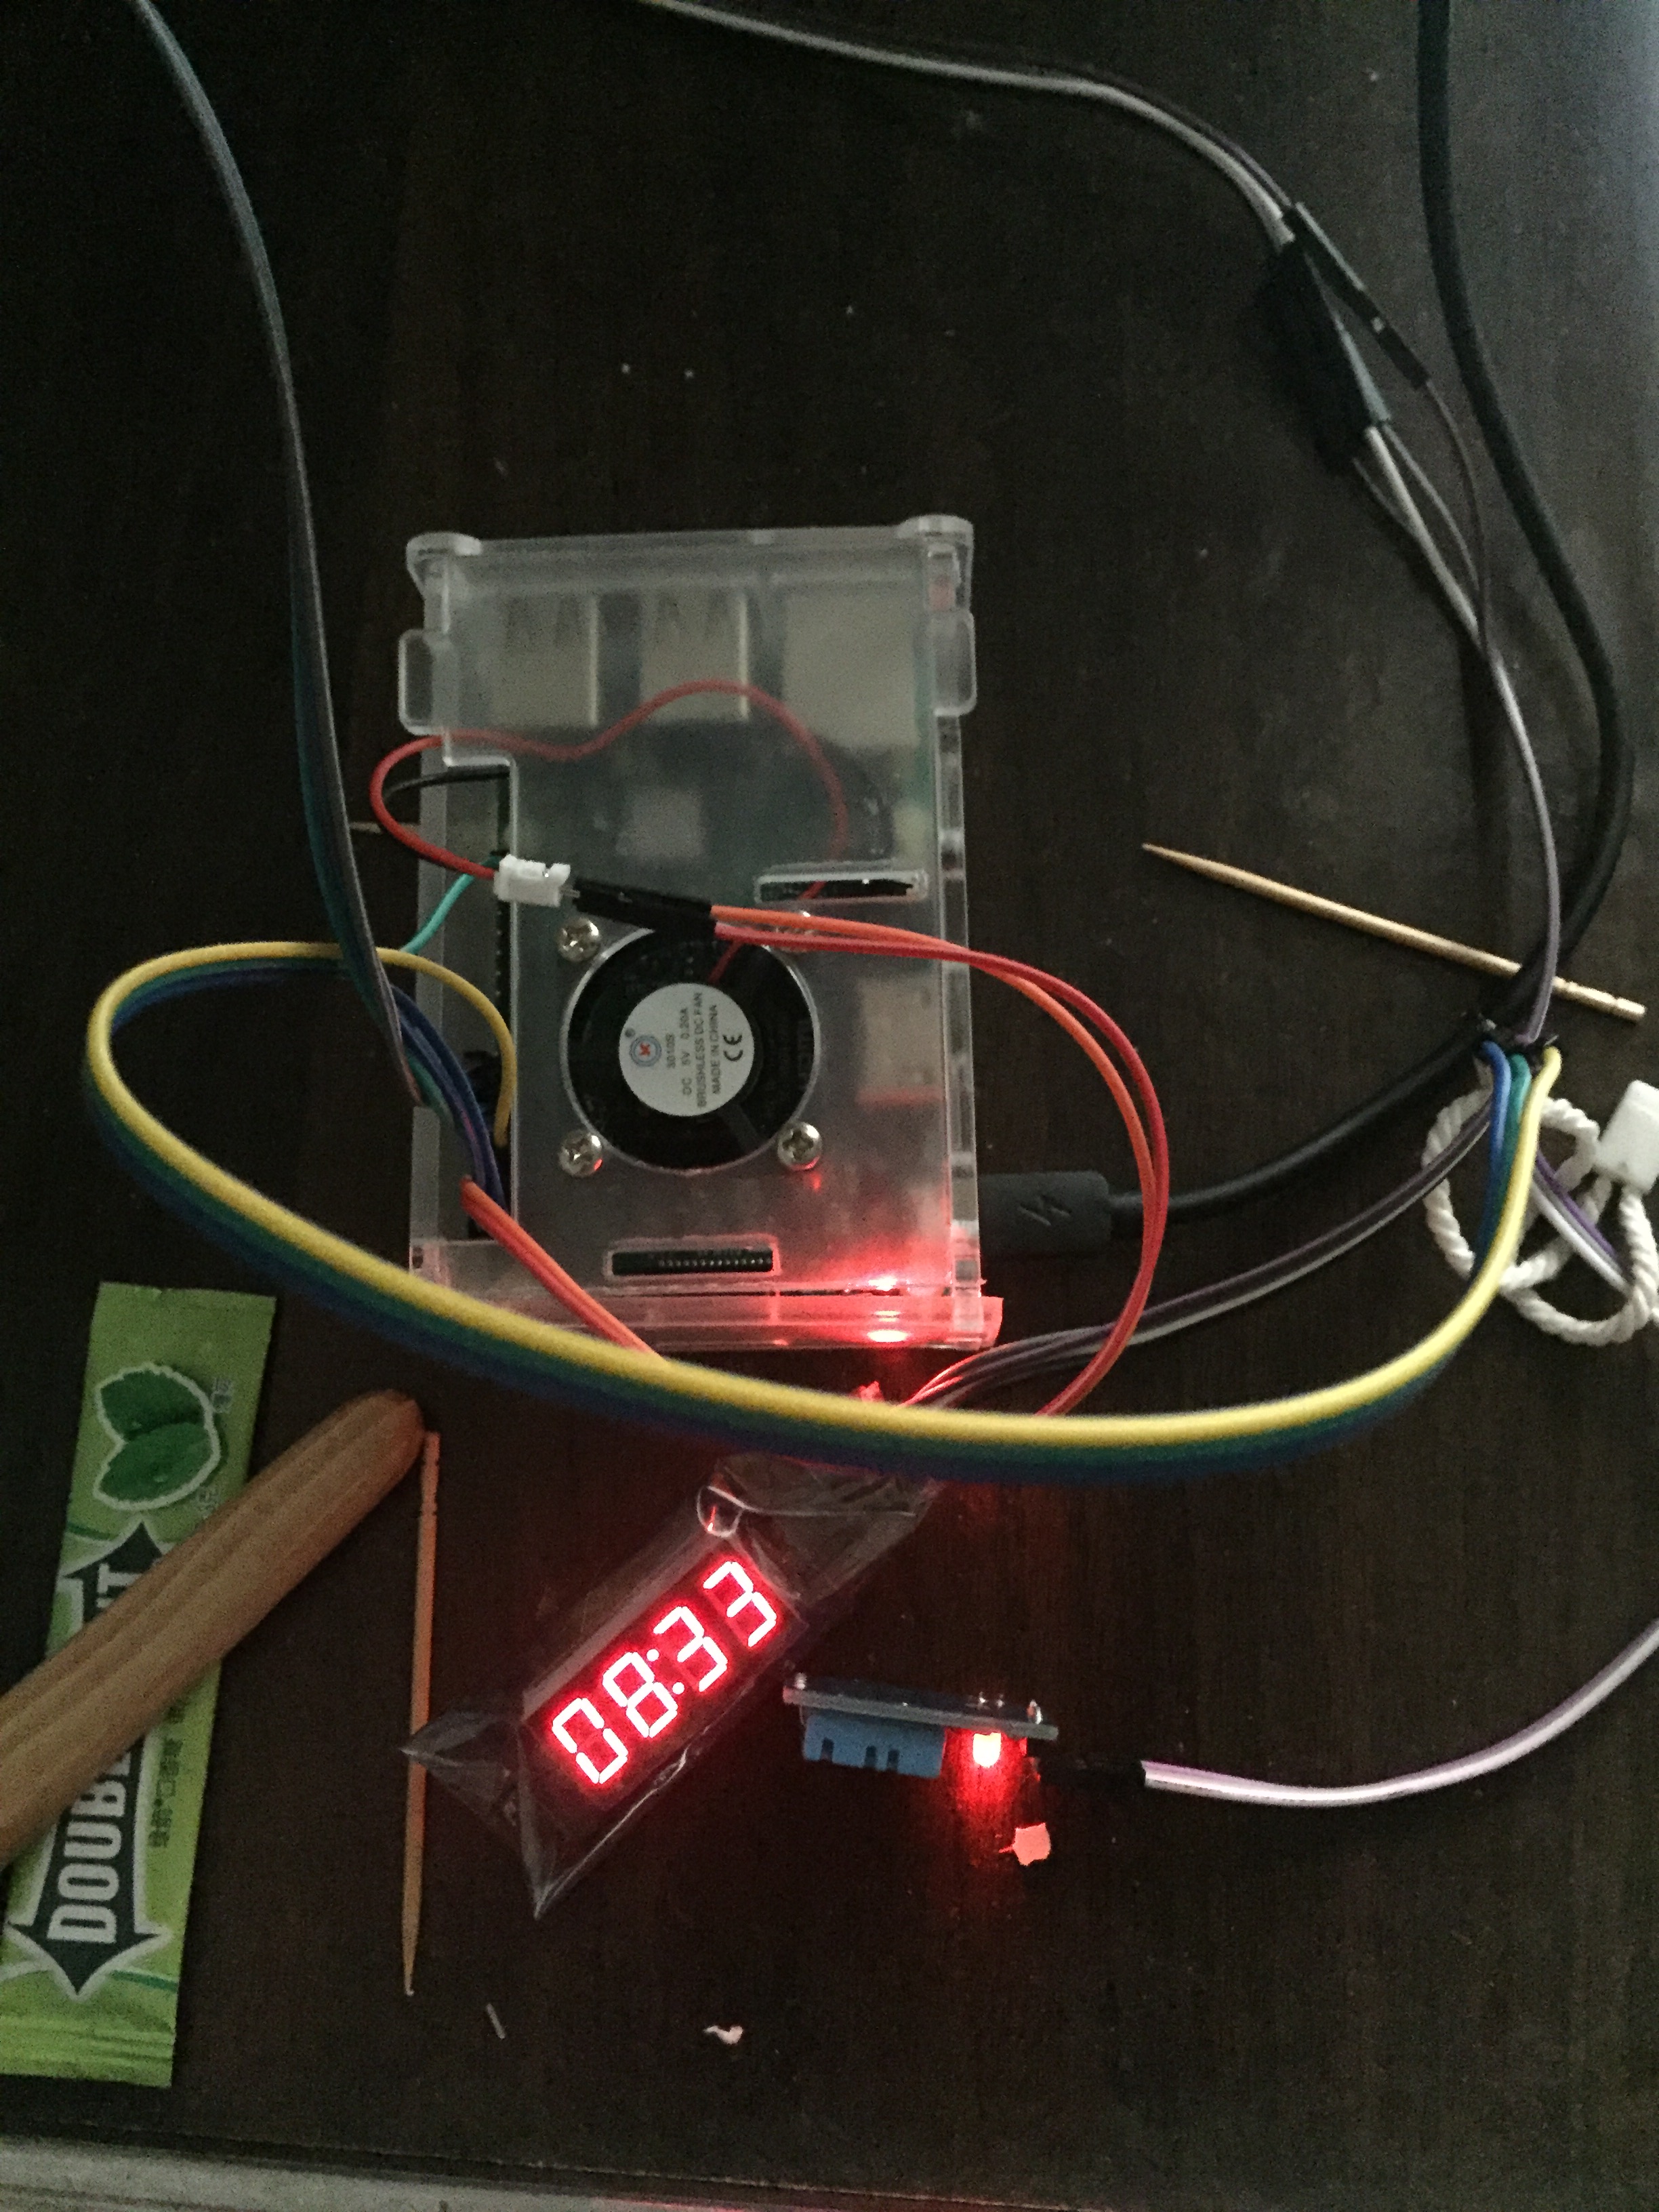
最终效果是:
--- 2017-05月19日 更新----
如果经历过两次晚上深夜停电,每次都要起床之后,登入ssh 手动两个命令,故参考文献14,自己将开机启动的sh改为以服务的形式开机启动
- 时钟模块随开机启动服务
sudo vim /etc/init.d/startmy47digitclock
在 /etc/init.d/startmy47digitclock 文件中的写入以下内容
#!/bin/bash
# /etc/init.d/startmy47digitclock

### BEGIN INIT INFO
# Provides: 47digitclock
# Required-Start: $remote_fs $syslog
# Required-Stop: $remote_fs $syslog
# Default-Start: 2 3 4 5
# Default-Stop: 0 1 6
# Short-Description: pi startclock initscript
# Description: This service is used to manage a 47digitclock
### END INIT INFO

case "$1" in
     start)
          echo "Starting lcd"
          python -u /home/pi/workspace/47digitclock.py &
        ;;
     stop)
        echo "Stopping lcd"
        #killall 47digitclock.py
        kill $(ps aux | grep -m 1 'python -u /home/pi/workspace/47digitclock.py' | awk '{ print $2 }')
        ;;
     *)
         echo "Usage: service lcd start|stop"
         exit 1
        ;;
esac
exit 0
设置47digitclock.py python脚本开机启动
给文件添加执行权限
sudo chmod +x /etc/init.d/startmy47digitclock
这样47digitclock的启动脚本改用service 命令就可以
sudo service startmy47digitclock start#启动
sudo service startmy47digitclock stop#停止
最后设置开机启动
sudo update-rc.d startmy47digitclock defaults
取消开机启动(从update-rc.d中移除這个开机启动)
sudo update-rc.d startmy47digitclock remove
- DHT11 没有LCD的 启动服务
sudo vim /etc/init.d/startmydht11
在/etc/init.d/startmydht11中添加以下内容:
#!/bin/bash
# /etc/init.d/startmydht11

### BEGIN INIT INFO
# Provides: mydht11
# Required-Start: $remote_fs $syslog
# Required-Stop: $remote_fs $syslog
# Default-Start: 2 3 4 5
# Default-Stop: 0 1 6
# Short-Description: pi start DHT11 initscript
# Description: This service is used to manage a humiture
### END INIT INFO

case "$1" in
     start)
          echo "Starting DHT11 humiture"
          cd /var/www/html/rpi-TempRuntime && python -u DHT11-WITHOUT-LCD.py &
        ;;
     stop)
        echo "Stopping  DHT11 humiture"
        #killall DHT11-WITHOUT-LCD.py
        kill $(ps aux | grep -m 1 'python -u DHT11-WITHOUT-LCD.py' | awk '{ print $2 }')
        ;;
     *)
         echo "Usage: service lcd start|stop"
         exit 1
        ;;
esac
exit 0
设置DHT11-WITHOUT-LCD.py python脚本开机启动
给文件添加执行权限
sudo chmod +x /etc/init.d/startmydht11
这样DHT11-WITHOUT-LCD.py(start.sh)的启动脚本改用service 命令就可以
sudo service startmydht11 start#启动
sudo service startmydht11 stop#停止
最后设置开机启动
sudo update-rc.d startmydht11 defaults
注:启动脚本中的Provides不能重复,不然在设置开机启动时会提示
insserv: script startmydht11: service embbnux already provided!
insserv: exiting now!
update-rc.d: error: insserv rejected the script header
Nokia 5110显示屏
接口为串行SPI接口
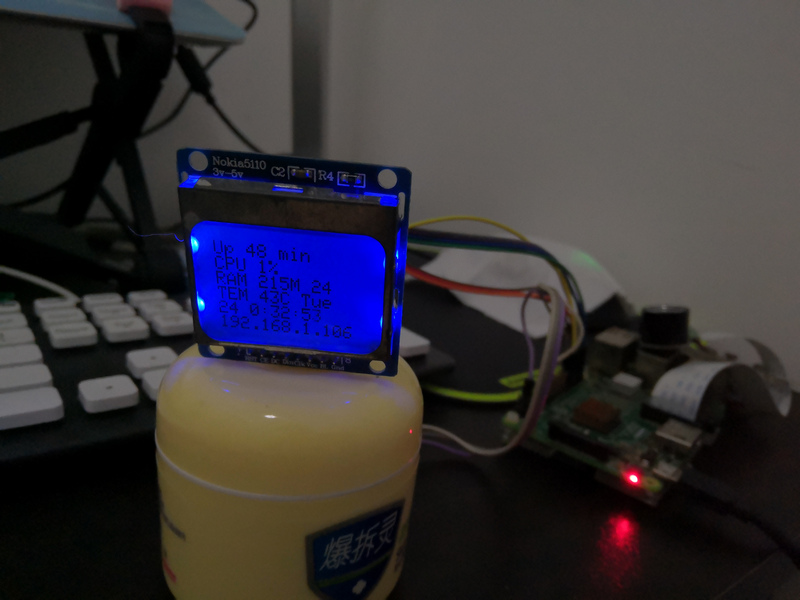
本想加一个todo list显示在一个显示器上面,上班之前看看有什么忘记带了的,可是自己先前买了的Nokia 5110显示屏,找了网上的资料和教程,不能显示中文,只好放弃,可能要买另外一个显示屏了。目前用这个Nokia 5110 显示屏来显示和教程一样的资料,启动时间(Up),Cpu占用率,内存使用率,当前树莓派的温度,时间,Ip地址。
Nokia5110显示屏与树莓派连接,以下gpio编号使用wiringPi编号。
| 符号 | 含义 | 树莓派 Pin | 树莓派 含义 | 树莓派 wiringPi |
|---|---|---|---|---|
| RST | 复位 | 29 | GPIO.5 | 21 |
| CE | 片选 | 31 | GPIO.6 | 22 |
| DC | 数据/指令选择 | 33 | GPIO.13 | 23 |
| Din | 串行数据线 | 35 | GPIO.19 | 24 |
| CLK | 串行时钟线 | 37 | GPIO.26 | 25 |
| Vcc | 电源输入(3.3v和5v均可) | 38 | GPIO.16 | 28 |
| BL | 背光控制端 | 40 | GPIO.20 | 29 |
| Gnd | 地线 | 34 | 地线 |
#from Raspberry pi ssh
wget http://blog.lxx1.com/wp-content/uploads/2016/07/nokia510.zip
chmod +x nokia510.zip
cd nokia510
pi@raspberrypi:~/workspace/nokia510 $ ls -lah
total 72K
drwxr-xr-x 2 pi pi 4.0K Dec 22 23:48 .
drwxrwxrwx 3 pi pi 4.0K Dec 23 22:31 ..
-rwxr-xr-x 1 pi pi  21K Dec 22 23:46 cpushow
-rw-r--r-- 1 pi pi  25K Jan 17  2015 PCD8544.c #Nokia5110显示屏的驱动文件
-rw-r--r-- 1 pi pi 3.2K Jan 17  2015 PCD8544.h #驱动文件的头文件
-rw-r--r-- 1 pi pi 6.0K Jul 13  2016 pcd8544_rpi.c #显示程序
## 编译运行,生成 cpushow 文件
pi@raspberrypi:~/workspace/nokia510 $ cc -o cpushow pcd8544_rpi.c PCD8544.c -L /usr/local/lib -l wiringPi
参考文章的pcd8544_rpi.c 文件内容是:
/*
=================================================================================
 Name        : pcd8544_rpi.c
 Version     : 0.1

 Copyright (C) 2012 by Andre Wussow, 2012, desk@binerry.de

 Description :
     A simple PCD8544 LCD (Nokia3310/5110) for Raspberry Pi for displaying some system informations.
         Makes use of WiringPI-library of Gordon Henderson (https://projects.drogon.net/raspberry-pi/wiringpi/)

         Recommended connection (http://www.raspberrypi.org/archives/384):
         LCD pins      Raspberry Pi
         LCD1 - GND    P06  - GND
         LCD2 - VCC    P01 - 3.3V
         LCD3 - CLK    P11 - GPIO0
         LCD4 - Din    P12 - GPIO1
         LCD5 - D/C    P13 - GPIO2
         LCD6 - CS     P15 - GPIO3
         LCD7 - RST    P16 - GPIO4
         LCD8 - LED    P01 - 3.3V

================================================================================
This library is free software; you can redistribute it and/or
modify it under the terms of the GNU Lesser General Public
License as published by the Free Software Foundation; either
version 2.1 of the License, or (at your option) any later version.

This library is distributed in the hope that it will be useful,
but WITHOUT ANY WARRANTY; without even the implied warranty of
MERCHANTABILITY or FITNESS FOR A PARTICULAR PURPOSE.  See the GNU
Lesser General Public License for more details.
================================================================================
 */
#include <wiringPi.h>
#include <stdint.h>
#include <stdio.h>
#include <stdlib.h>
#include <string.h>
#include <time.h>
#include <sys/sysinfo.h>
#include "PCD8544.h"

//devin modify
#include <sys/types.h>
#include <sys/stat.h>
#include <fcntl.h>
#include <sys/ioctl.h>
#include <sys/socket.h>
#include <arpa/inet.h>
#include <netinet/in.h>
#include <net/if.h>

#define TEMP_PATH "/sys/class/thermal/thermal_zone0/temp"
#define MAX_SIZE 32
#define NETWORK_FILE "/etc/network/interfaces"

// 引脚连接
int _din = 24;
int _sclk = 25;
int _dc = 23;
int _rst = 21;
int _cs = 22;

int _vcc = 28;
int _bl = 29;

// 对比度调节,根据屏幕亮度选择
//may be need modify to fit your screen!  normal: 30- 90 ,default is:45 !!!maybe modify this value!
int contrast = 30;

time_t timep;
struct tm *p;
char *wday[] = {"Sun","Mon","Tue","Wed","Thu","Fri","Sat"};

char get_temp(void);
char* getip(char* ip_buf);
char* get_temp2(void);
int min,hour,sec,mday;
char week;
struct tm *localtime(const time_t *timep);
int main(void)
{

 // 打印程序运行信息
  printf("Raspberry Pi Nokia5110 sysinfo display
");
  printf("========================================
");

  // 检查wiringPi是否启动
  if (wiringPiSetup() == -1)
  {
        printf("wiringPi-Error
");
    exit(1);
  }

  // 初始化Nokia并且清楚显示
  LCDInit(_sclk, _din, _dc, _cs, _rst, _vcc, _bl, contrast);
  LCDclear();

  // 显示树莓派Logo
  LCDshowLogo();

  delay(2000);

  for (;;)
  {
          // 清楚屏幕显示
          LCDclear();

          //获得当前时间
          char timeInfo[16];
          time(&timep);
          p=localtime(&timep);
          mday=p->tm_mday;
          min=p->tm_min;
          week=p->tm_wday;
          hour=p->tm_hour;
          sec=p->tm_sec;
          sprintf(timeInfo, "%d %d:%d:%d",mday,hour,min,sec);

          // 获得 system usage / info
          struct sysinfo sys_info;
          if(sysinfo(&sys_info) != 0)
          {
                printf("sysinfo-Error
");
          }

          // 启动时间
          char uptimeInfo[15];
          unsigned long uptime = sys_info.uptime / 60;
          sprintf(uptimeInfo, "Up %ld min", uptime);

          // CPU占用
          char cpuInfo[10];
          unsigned long avgCpuLoad = sys_info.loads[0] / 1000;
          sprintf(cpuInfo, "CPU %ld%%
", avgCpuLoad);

          // 内存使用量及占用
          char ramInfo[10];
          unsigned long totalRam = sys_info.totalram / 1024 / 1024;
          unsigned long freeRam = sys_info.freeram /1024 /1024;
          unsigned long usedRam = totalRam - freeRam;
          unsigned long ram_load = (usedRam * 100) / totalRam;
          sprintf(ramInfo, "RAM %.3dM %.2d", usedRam,ram_load);

          // 树莓派温度
          char tempInfo[10];
          sprintf(tempInfo, "TEM %.2dC %s", get_temp(),wday[week]);

          //IP 信息
          char ipInfo[16];
          getip(ipInfo);

          //开始显示
          LCDdrawstring(0, 0, uptimeInfo);
          LCDdrawstring(0, 8, cpuInfo);
          LCDdrawstring(0, 16, ramInfo);
          LCDdrawstring(0, 24, tempInfo);
          LCDdrawstring(0, 32, timeInfo);
          LCDdrawstring(0, 40, ipInfo);
          LCDdisplay();

          delay(1000);
  }
  return 0;
}

//decin modify

char get_temp(void)
{
    int fd;
    double temp = 0;
    char buf[MAX_SIZE];

    // 打开/sys/class/thermal/thermal_zone0/temp
    fd = open(TEMP_PATH, O_RDONLY);
    if (fd < 0) {
        fprintf(stderr, "failed to open thermal_zone0/temp
");
                // 关闭文件
                close(fd);
        return -1;
    }

    // 读取内容
    if (read(fd, buf, MAX_SIZE) < 0) {
        fprintf(stderr, "failed to read temp
");
                // 关闭文件
                close(fd);
        return -1;
    }

    // 转换为浮点数打印
    temp = atoi(buf) / 1000.0;
        // 关闭文件
        close(fd);
        return temp;
}

// 获取eth0端口的IP地址,可根据需要设置为wlan0
char* getip(char* ip_buf)
{
    struct ifreq temp;
    struct sockaddr_in *myaddr;
    int fd = 0;
    int ret = -1;
    strcpy(temp.ifr_name, "eth0");
    if((fd=socket(AF_INET, SOCK_STREAM, 0))<0)
    {
        return NULL;
    }
    ret = ioctl(fd, SIOCGIFADDR, &temp);
    close(fd);
    if(ret < 0) return NULL; myaddr = (struct sockaddr_in *)&(temp.ifr_addr); strcpy(ip_buf, inet_ntoa(myaddr->sin_addr));
        //printf("IP: %s", ip_buf);
    return ip_buf;
}
运行命令,让 Nokia 5110显示屏显示资料:
sudo ./cpushow
如需后台运行:
sudo ./cpushow &
查找启动的这个进程
ps aux | grep 'cpushow'
根据查找结果,kill -9 查询结果的Pid 就停止了。
接了Nokia 5110和DHT11效果

参考文献
- 基于树莓派3B,DHT11/DHT22,LCD1602的一个实时温度湿度检测系统
- 树莓派系统时间同步
- 教你如何修改树莓派的时区和网络对时
- 【手把手教你树莓派3 (五)】DHT11传感器
- 树莓派国内可用镜像源 最后选择的是中国科学技术大学开源软件镜像,清华大学的好像是https的链接,提示了
E: The method driver /usr/lib/apt/methods/https could not be found. N: Is the package apt-transport-https installed? - 我使用过的Linux命令之nano - 比vi简单易用的文本编辑器 学习到了nano的基本使用,Ctrl + O保存文件,Ctrl + x退出nano。之前一直怕用nano,现在暂时会用nano编辑器了。
- PYTHON的程序在LINUX后台运行
- linux后台运行python程序 将运行的python命令,改为bash文件
- Linux中让进程在后台运行的方法 按照這里的方法,将自己写的start.sh,后台运行
- 4 digits-7 segmenten LED display met TM1637 controller aansturen 4位数码管带时钟点积木显示当前的时间,下载了里面的树莓派针脚图片
- 树莓派系统时间同步 用来参考树莓派自动同步网络时间
- Python用特殊符号切割字符串并生成list(简单)
- python datetime模块用strftime 格式化时间
- 树莓派用服务方式设置开机启动
- Ubuntu启动项设置——之update-rc.d 命令使用
- 树莓派 之 使用Nokia5110显示屏显示系统信息 Nokia 5110显示资料主要参考源
- 树莓派3B--WiringPi控制GPIO - csdn 学习到
gpio命令的用法