一、ajax 原理 和 使用
ajax,即在不重新加载整个网页的情况下,对网页的某部分进行更新。
下面演示ajax 的实现原理
配置:
cd ajax
参考:http://www.expressjs.com.cn/starter/generator.html
express --view=ejs myapp
cd myapp
npm install
1、完整的ajax流程:
(1)、 创建XMLHttpRequest对象
var xhr = new XMLHttpRequest();
(2)、准备发送
xhr.open('get', './01check.js?username='+uname+'&password='+pw,true);

(3)、执行发送动作
xhr.send(null);

(4)、监听response 回调函数
onreadystatechange 事件:每当 readyState 改变时,就会触发 onreadystatechange 事件。
2、代码逻辑
index.js 路由
......
router.get('/api/one',(req,res,next)=>{
  res.json({
      status:200,
      result:'this is one.....'
  })
});


/* GET home page. */
router.get('/one', function(req, res, next) {
  res.render('index1', { title: 'Express' });
})
...........
index.ejs:
<body>
<button id="send">发送1个请求</button>
<script>
  var btn = document.getElementById('send');
  btn.addEventListener('click',function () {
     // 使用原生的ajax 技术,发送一个网络请求
      // 1.创建XMLHttpRequest对象
      var xhr;
      if(window.XMLHttpRequest){
          xhr = new XMLHttpRequest();
      }else {
          xhr = new ActiveXObject('Microsoft.XMLHTTP');
      }

      // 2.准备发送
      /*
       参数1: 请求方式 (get/post)
       参数2: 请求url
       参数3: 是否异步
    */
      xhr.open('get','http://localhost:3000/api/one',true);

      // 3. 发送
    xhr.send();

      // 4. 监听服务器的响应
      // 一旦服务器响应回来之后, 就会执行这个函数
      xhr.onreadystatechange = function () {
          console.log(xhr.readyState);
          if(xhr.readyState === 4){  // 代表服务器已经给了响应, 不代表响应成功
              if(xhr.status === 200){
                  console.log(xhr.response);
              }
          }
      }

  });
</script>
</body>

// 结果:
/*
2
3
4
{"status":200,"result":"this is one....."}
*/
index.js 路由:
router.get('/api/two',(req,res,next)=>{
    console.log(req.query);
    res.json({
        status:200,
        result:'this is two.....'
    })
});


router.get('/two', function(req, res, next) {
    res.render('index2', { title: 'Express' });
});
index2.ejs
<body>
<input id="account" type="text" name="account">
<input id="pwd" type="text" name="pwd">
<button id="send">发送一个请求</button>
<script>
    window.onload=function () {

        var btn = document.getElementById('send');
        btn.onclick = function () {
            // 使用原生的ajax 技术,发送一个网络请求
            // 1.创建XMLHttpRequest对象
            var xhr;
            if(window.XMLHttpRequest){
                xhr = new XMLHttpRequest();
            }else {
                xhr = new ActiveXObject('Microsoft.XMLHTTP');
            }

            // 从页面获取需要传递的数据
            var userName = document.getElementById('account').value;
            var pwd = document.getElementById('pwd').value;

            // 2.准备发送
            /*
             参数1: 请求方式 (get/post)
             参数2: 请求url
             参数3: 是否异步
          */
            // 后面跟一个随机数值,保证每次发送ajax请求,都是真的发然后从响应中获取最新数据,而不是从缓存中取得
            xhr.open('get', 'http://localhost:3000/api/two?account=' + account + '&pwd=' + pwd + '&random=' + getRandomStr(), true);

            // 3. 发送
            xhr.send();

            // 4. 监听服务器的响应
            // 一旦服务器响应回来之后, 就会执行这个函数
            xhr.onreadystatechange = function () {
                // 5. 处理响应的数据 (对方说话)
                console.log(xhr.readyState);
                if(xhr.readyState === 4){  // 代表服务器已经给了响应, 不代表响应成功
                    if(xhr.status === 200){
                        console.log(xhr.response);
                    }
                }
            }
        }
    }


    function getRandomStr() {
        return Math.random() + (new Date().getTime())
    }
</script>

</body>
前端打印:
2
3
4
{"status":200,"result":"this is two....."}
服务端打印:
{ account: '[object HTMLInputElement]',
  pwd: '123456',
  random: '1547356096169.2708' }
GET /api/two?account=[object%20HTMLInputElement]&pwd=123456&random=1547356096169.2708 200 8.824 ms - 42
封装ajax:
AjaxTool.js:
(function (window) {
    function AjaxTool() {}

    AjaxTool.ajaxRequest = function (url, paramObj, timeout, successCallBack, errorCallBack) {
        // 1.创建XMLHttpRequest对象
        var xhr;
        if(window.XMLHttpRequest){
            xhr = new XMLHttpRequest();
        }else {
            xhr = new ActiveXObject('Microsoft.XMLHTTP');
        }


        // 2.准备发送
        /*
         参数1: 请求方式 (get/post)
         参数2: 请求url
         参数3: 是否异步
      */
        // 后面跟一个随机数值,保证每次发送ajax请求,都是真的发然后从响应中获取最新数据,而不是从缓存中取得
        var params_str = getStrWithObj(paramObj);
        var uri_str = url + '?' + params_str;
        // 转码
        var codeURI = encodeURI(uri_str)
        xhr.open('get', codeURI, true);


        // 3. 发送
        xhr.send();

        // 4. 监听服务器的响应
        xhr.onreadystatechange = function () {
            // 5. 处理响应的数据
            console.log(xhr.readyState);
            if(xhr.readyState === 4){  // 代表服务器已经给了响应, 不代表响应成功
                if(xhr.status === 200){
                    successCallBack(xhr);
                }else {
                    errorCallBack();

                }
            }
        }

        // 5. 控制请求的时间
        var timer;
        if(timeout > 0){
            timer = setTimeout(function () {
                // 取消ajax  请求
                xhr.abort();
            },timeout);
        }

    }
    /*
    * 把对象转换成字符串
    * */
    function getStrWithObj(paramsObj) {
        var arr = [];
        for(var k in paramsObj){
            var str = k + '=' + paramsObj[k];
            arr.push(str);
        }
        arr.push('random='+ getRandomStr());
        return arr.join('&');
    }

    /*
    返回一个随机数
    * */
    function getRandomStr() {
        return Math.random() + (new Date().getTime())
    }

    window.AjaxTool = AjaxTool;
})(window);
index3.ejs:
<body>
<input id="account" type="text" name="account">
<input id="pwd" type="text" name="pwd">
<button id="send">发送一个请求</button>
<script>
    window.onload=function () {

        var btn = document.getElementById('send');
        btn.onclick = function () {
            // 使用原生的ajax 技术,发送一个网络请求
            // 1.创建XMLHttpRequest对象
            var xhr;
            if(window.XMLHttpRequest){
                xhr = new XMLHttpRequest();
            }else {
                xhr = new ActiveXObject('Microsoft.XMLHTTP');
            }

            // 从页面获取需要传递的数据
            var userName = document.getElementById('account').value;
            var pwd = document.getElementById('pwd').value;

            // 2.准备发送
            /*
             参数1: 请求方式 (get/post)
             参数2: 请求url
             参数3: 是否异步
          */
            // 后面跟一个随机数值,保证每次发送ajax请求,都是真的发然后从响应中获取最新数据,而不是从缓存中取得
            xhr.open('get', 'http://localhost:3000/api/two?account=' + account + '&pwd=' + pwd + '&random=' + getRandomStr(), true);

            // 3. 发送
            xhr.send();

            // 4. 监听服务器的响应
            // 一旦服务器响应回来之后, 就会执行这个函数
            xhr.onreadystatechange = function () {
                // 5. 处理响应的数据 (对方说话)
                console.log(xhr.readyState);
                if(xhr.readyState === 4){  // 代表服务器已经给了响应, 不代表响应成功
                    if(xhr.status === 200){
                        console.log(xhr.response);
                    }
                }
            }
        }
    }

    function getRandomStr() {
        return Math.random() + (new Date().getTime())
    }
</script>

</body>
3、简单版原生 post方式
<body>
<input id="account" type="text" name="account">
<input id="pwd" type="text" name="pwd">
<button id="send">发送一个请求</button>
<script>
    window.onload=function () {
        var btn = document.getElementById('send');
        btn.onclick = function () {
            // 1. 获取数据
            var account = document.getElementById('account').value;
            var pwd = document.getElementById('pwd').value;


            // 第一步
            var xhr = new XMLHttpRequest();
            // 第二步
            xhr.open('post','http://localhost:3000/api/four',true)
            // 第三步
            xhr.setRequestHeader('Content-Type','application/x-www-form-urlencoded');
            xhr.send('account='+account + '&pwd=' + pwd);

            // 第四步
            xhr.onreadystatechange = function () {
                console.log(xhr.readyState);
                console.log(xhr.status);
                if(xhr.readyState === 4 && xhr.status === 200){
                    console.log(xhr.responseText);
                }else {
                    console.log('请求失败');
                }
            }

        }
    }

</script>

</body>
4、ajax 完整封装
(function(window){
    function AjaxTool(){}
    AjaxTool.ajaxRequest = function(params,successCallBack,errorCallBack){
        // 0. 获取参数
        var requestType = params['requestType'] || 'get';
        var url = params['url'];
        var paramsObj = params['paramsObj'];
        var timeout = params['timeout'];
        console.log(params);
        // 1.创建XMLHttpRequest对象 (找到一个电话)
        var xhr;
        if(window.XMLHttpRequest){
            xhr =new XMLHttpRequest();
        }else{
            xhr = new ActiveXObject('Microsoft.XMLHTTP');
        }

        // 2.判断请求方式
        if(requestType.toLowerCase() === 'get'){
            var codeURI = encodeURI(url + '?' + getStrWithObject(paramsObj));
            xhr.open('get',codeURI,true);
            xhr.send();
        }else if(requestType.toLowerCase() === 'post'){
            // 请求体
            var codeParam = encodeURI(getStrWithObject(paramsObj));
            xhr.open('post',url,true);
            xhr.setRequestHeader('Content-Type','application/x-www-form-urlencoded');
            console.log(codeParam);
            xhr.send(codeParam);

        }

        // 3. 监听服务器响应
        xhr.onreadystatechange = function(){
            // 3.1 处理响应数据
            if(xhr.readyState === 4){
                // 4 代表服务器给响应了,并不代表响应成功
                if(xhr.status === 200){
                    successCallBack(xhr);
                    // 清除定时器
                    clearTimeout(timer);
                }else{
                    errorCallBack();
                }
            }
        }


        // 4. 控制响应时间
        var timer;
        if(timeout > 0){
            timer = setTimeout(function(){
                // 取消ajax请求
                xhr.abort();
            },timeout);
        }


    }


    /*
    返回一个随机数
    */
    function getRandomStr(){
        return	Math.random() + (new Date().getTime());
    }


    /*
    把对象转成字符串
    */
    function getStrWithObject(paramsObj){
        var arr = [];
        for(var key in paramsObj){
            var str = key + '=' + paramsObj[key];
            arr.push(str)
        }
        arr.push('random=' + getRandomStr())
        return arr.join('&');
    }
    window.AjaxTool = AjaxTool;
})(window)
index5.ejs:
<body>
<input id="account" type="text" name="account">
<input id="pwd" type="text" name="pwd">
<button id="send">发送一个请求</button>
<script src="../js/AjaxTool.js"></script>
<script>
    window.onload=function () {
        var btn = document.getElementById('send');
        btn.onclick = function () {
            // 1. 获取数据
            var account = document.getElementById('account').value;
            var pwd = document.getElementById('pwd').value;

            // 2. 处理数据
            var paramsObj = {
                'account':account,
                'pwd':pwd
            }

            var params = {
                'requestType':'post',
                'url':'http://localhost:3000/api/five',
                'paramsObj':paramsObj,
                'timeout':2000
            }

            AjaxTool.ajaxRequest(params,function (xhr) {
                console.log('成功' + xhr.responseText);
            },function () {
                console.log('失败');
            });

        }
    }

</script>

</body>
index.js 服务端路由文件:
router.get('/five',(req,res,next)=>{
    res.render('index5')
});

router.post('/api/five',(req,res,next)=>{
    console.log(req.body);
    res.json({
        status:200,
        result:'this is five...method:post..'
    })
});
输入admin 123456 ,然后提交
前端打印:成功{"status":200,"result":"this is five...method:post.."}
服务端打印:{ account: 'admin', pwd: '123123', random: '1547522571613.208' }
5、用 jquery 进行 ajax 请求
三方封装的是最完善的,我们用三方封装好的即可,但是对ajax原生的执行的大致逻辑知道一些比较好。
index6.ejs:
<body>
<form action="http://localhost:3000/api/six" method="post">
    <input id="account" type="text" name="account">
    <input id="pwd" type="text" name="pwd">
    <input id="send" type="submit" value="请求">
</form>
<script src="/js/jquery.js"></script>
<script>
    $('form').on('submit', function () {
        console.log($(this).serialize());  //account=admin&pwd=123456
        $.ajax({
            url: $(this).attr('action'),
            type: $(this).attr('method'),
            data: $(this).serialize(),
            success: function (data) {
                console.log(data);  //{status: 200, result: "this is six...."}
            }
        });

        // 阻止默认事件
        return false;
    });
</script>
服务端:
router.post('/api/six',(req,res,next)=>{
    console.log(req.body);
    res.json({
        status:200,
        result:'this is six....'
    })
});
二、跨域
1、什么是跨域
同源策略:
- 同源策略是浏览器的一种安全策略,所谓同源指的是请求URL地址中的协议、域名和端口都相同,只要其中之一不相同就是跨域
- 同源策略主要为了保证浏览器的安全性
- 在同源策略下,浏览器不允许Ajax跨域获取服务器数据
- 比如:
- http://api.baidu.com/deatil.html 域名不同
- https://api.baidu.com/deatil.html 协议不同
- http://api.baidu.com:8080/deatil.html 端口不同
2、解决方案:
jsonp
document.domain+iframe :只有主域名相同的情况下方可使用此方法
location.hash + iframe
window.name + iframe
window.postMessage
flash等第三方插件
3、跨域演示
用 express-generator 快速创建一个应用的骨架server,然后在服务端index.js 路由中
router.get('/', function(req, res, next) {
  // res.render('index', { title: 'Express' });
    console.log(`收到客户端的请求: ${req.url}`);
    res.end('end');
});
在本地新创建一个页面,不要通过和 server 端口一致
<body>
<button id="send">点我</button>
<script src="js/AjaxTool.js"></script>
<script>
    window.onload = function () {
        var btn = document.getElementById('send');
        btn.onclick = function () {
            var paramObj = {
                'name':'zhangsan',
                'pwd':'123'
            };
            var params = {
             'requestType' : 'get',
             'url' : 'http://localhost:3000/',
             'paramObj' : paramObj,
             timeout : 2000
            };

            // 发起请求
            AjaxTool.ajaxRequest(params,function (xhr) {
                console.log('success...'+ xhr.responseText);
            },function () {
                console.log('failed.....');
            })
        }
    }
</script>

</body>
结果:
服务端还是收到请求了,打印:
收到客户端的请求: /?name=zhangsan&pwd=123&random=1547690599507.3115
GET /?name=zhangsan&pwd=123&random=1547690599507.3115 - - ms - -
客户端打印如下图:

4、jsonp 解决跨域问题
-
jsonp跨域必须前后端联合支持
-
jsonp只支持get不支持post
(1) 演示1
路由:
router.get('/',function (req,res,next) {
    console.log(`收到客户端的请求: ${req.url}`);
    var data = JSON.stringify({
        status_code:200,
        result:{
          name:'张三',
          age:19,
          friend:['李四','王五','赵六']
        }
    });
    res.end('getData('+data+')');
});
前端页面:
<body>
<script>
    function getData(data) {
        console.log(data);
    }
</script>
<script src="http://localhost:3000/"></script>
</body>
通过 script 引入,来跨域请求,这个是可行的,同样的方式,还有 css标签的引入

(2) 封装
路由:
router.get('/',function (req,res,next) {
    console.log(`收到客户端的请求: ${req.url}`);
    var data = JSON.stringify({
        status_code:200,
        result:{
          name:'张三',
          age:19,
          friend:['李四','王五','赵六']
        }
    });
    console.log(`${req.query.callback}(${data})`);
    res.end(`${req.query.callback}(${data})`);
});
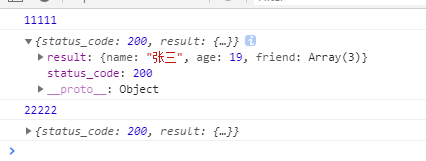
前端:
<body>
<script>

jsonp({
    url: 'http://localhost:3000/',
    data: '',
    success: function (data) {
        console.log(11111);
        console.log(data);
    }
});
jsonp({
    url: 'http://localhost:3000/',
    data: '',
    success: function (data) {
        console.log(22222);

        console.log(data);
    }
});

/*
* 1、让函数名称不一致
* 2、调用完成后删除
* */
function jsonp(option) {
    // 1. 将用户通过对象的命名空间传递进来的函数 挂载到全局
    var callbackName = 'hello_' + Math.random().toString().substr(2);
    window[callbackName] = function (data) {
        option.success(data);
        // 删除 script 标签 ,多次调用后 script 太多了,在这里删除掉
        document.body.removeChild(script);
    };

    // 1. 处理url的拼接
    option.url = option.url + '?callback=' + callbackName;
    // 2. 创建script标签
    var script = document.createElement('script');
    script.src = option.url;
    document.body.appendChild(script);


    /*说明: 拼接完url后,url 会带上函数的名称,服务端根据url 取得函数名称,然后返回的时候
        res.end(`${req.query.callback}(${data})`);
    * */
}

</script>
</body>
前端代码注释:
加断点可以查看执行流程,首先 jsonp({})执行,接着到下面的 function jsonp({}),在下面的 function jsonp() 里面, window[callbackName] = function (data) {} ,在这里只是声明了函数,并且是全局的,但是并没有调用,里面的东西是在后来服务端 响应后调用的,并接着调用 了 里面的 option.success(data) 的函数,因为这个时候,服务端返回的时候把参数data 也传回来了 res.end(${req.query.callback}(${data})); 。所以接着执行了上面的 jsonp({}) 里面的 success:function(){data} 的函数。
执行结果:
三、nrm
什么是nrm:
- https://github.com/Pana/nrm
- nrm can help you easy and fast switch between different npm registries....
install:
$ npm install -g nrm
查看有哪些源:
$ nrm ls

* npm -----  https://registry.npmjs.org/
  cnpm ----  http://r.cnpmjs.org/
  taobao --  https://registry.npm.taobao.org/
  nj ------  https://registry.nodejitsu.com/
  rednpm -- http://registry.mirror.cqupt.edu.cn
  skimdb -- https://skimdb.npmjs.com/registry
选择镜像源:
$ nrm use cnpm  //switch registry to cnpm

    Registry has been set to: http://r.cnpmjs.org/
注意:每次安装包的时候,依然是使用 npm 命令来安装。