本文转自:http://blog.csdn.net/tanjunjie621/article/details/6689639
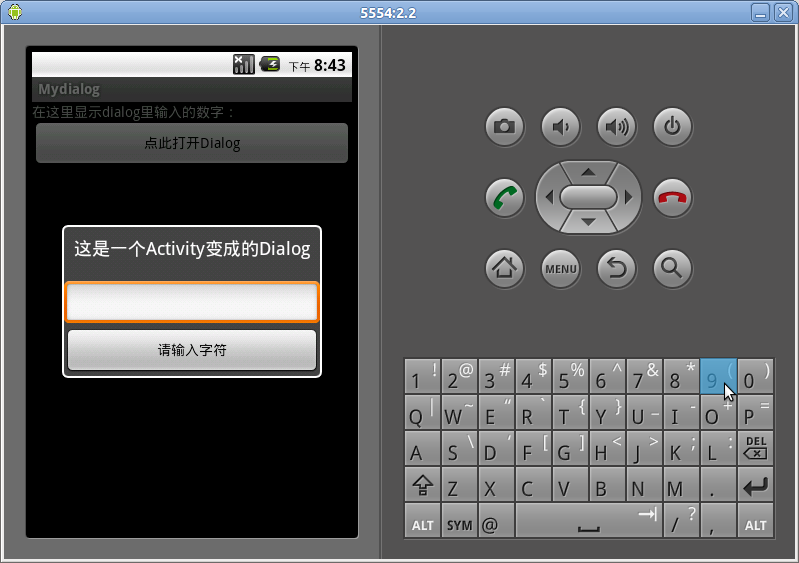
在我们使用Dialog时,如果需要用到很多自己设计的控件,虽然可以让弹出框显示出我们需要的界面,但却无法找到地方完成控制代码的编写,如何解决这个问题呢,我们可以将Activity伪装成Dialog弹出框,这样即显示了界面,在Activity里写控制代码也是大家的拿手好戏了,现在我就来抛砖引玉说说简单的实现吧。
首先,问题的关键在MainActivity里的一句 android:theme="@android:style/Theme.Dialog",这就是Activity的Dialog风格。
我们先创建一个main.xml,内容如下
- <?xml version="1.0" encoding="utf-8"?>
- <LinearLayout xmlns:android="http://schemas.android.com/apk/res/android"
- android:orientation="vertical"
- android:layout_width="fill_parent"
- android:layout_height="fill_parent"
- >
- <TextView
- android:id="@+id/showString"
- android:layout_width="fill_parent"
- android:layout_height="wrap_content"
- android:text="在这里显示dialog里输入的数字:"
- />
- <Button
- android:id="@+id/openButton"
- android:text="点此打开Dialog"
- android:layout_width="fill_parent"
- android:layout_height="wrap_content"
- />
- </LinearLayout>
再创建一个textdialog.xml,内容如下
- <?xml version="1.0" encoding="utf-8"?>
- <LinearLayout
- xmlns:android="http://schemas.android.com/apk/res/android"
- android:orientation="vertical"
- android:layout_width="match_parent"
- android:layout_height="match_parent">
- <EditText
- android:id="@+id/et"
- android:layout_width="fill_parent"
- android:layout_height="wrap_content"
- />
- <Button
- android:id="@+id/returnButton"
- android:text="请输入字符"
- android:layout_width="fill_parent"
- android:layout_height="wrap_content"
- />
- </LinearLayout>
- </pre>现在在MainActivity里写下如下代码,都是很基本的代码,相信大家都能看懂<p></p><p><span style="font-size:16px"><span style="font-size:16px"></span></span></p><pre name="code" class="java">public class MainActivity extends Activity {
- private Button openButton;
- private TextView showString;
- public void onCreate(Bundle savedInstanceState) {
- super.onCreate(savedInstanceState);
- setContentView(R.layout.main);
- openButton = (Button)findViewById(R.id.openButton);
- showString = (TextView)findViewById(R.id.showString);
- openButton.setOnClickListener(new OnClickListener() {
- public void onClick(View v) {
- //这里用到了返回试Activity的基本用法,因为和主题无关,就不多解释了
- Intent i = new Intent(MainActivity.this, testDialog.class);
- startActivityForResult(i, 0);
- }
- });
- }
- //利用返回试Activity接收输入的数据并显示,证明我们的Dialog式的Activity确实可以完成数据的处理
- protected void onActivityResult(int requestCode, int resultCode, Intent data) {
- super.onActivityResult(requestCode, resultCode, data);
- //取出字符串
- Bundle bundle = data.getExtras();
- String str = bundle.getString("str");
- showString.setText(str);
- }
- }
下面是testDialog的编程,你可以看出这个Dialog和正常的Activity就没什么区别,但它最后确实可以像Dialog一样弹出
- ublic class testDialog extends Activity{
- private Button returnButton;
- private EditText inputEditor;
- protected void onCreate(Bundle savedInstanceState) {
- super.onCreate(savedInstanceState);
- setContentView(R.layout.textdialog);
- returnButton = (Button)findViewById(R.id.returnButton);
- inputEditor = (EditText)findViewById(R.id.et);
- //和前面一样,只是用到了返回式Activity的基本方法,虽然这里已经是个Dialog了,但却和普通Activity无异
- returnButton.setOnClickListener(new OnClickListener() {
- public void onClick(View v) {
- String input = inputEditor.getText().toString();
- Intent i = new Intent(testDialog.this, MainActivity.class);
- Bundle b = new Bundle();
- b.putString("str", input);
- i.putExtras(b);
- testDialog.this.setResult(RESULT_OK, i);
- testDialog.this.finish();
- }
- });
- }
- }
最后的亮点,设置Activity的Dialog风格,在MainActivity里注册下第二个Activity吧,别完了风格设置哦
- <activity android:name=".testDialog"
- android:label="这是一个Activity变成的Dialog"
- android:theme="@android:style/Theme.Dialog"
- ></activity>
好了,你可以运行一下了,如果正常,你将看到和我一样的结果
