一、接口自动化测试框架基于pytest+yaml数据驱动
1、@pytest.mark.parametrize(args_name,args_value) -->实现数据驱动的一个装置器
什么意思呢?把这段代码放到用例上面,然后通过args_name来获取yaml的参数,传递给具体的用例
- args_name:参数名
- args_value:参数值(list,tuple,字典列表,字典元祖),有多少个值用例就会执行多少次
- 例如:[a,b,c] (a,b,c)执行3次,[{a:1},{b:1}]执行2次,({a:1},{b:1})执行2次
2、yaml有两种数据类型
键值对:key:value 如:'name':'赵丽颖' ,读取之后是字典如:{'name':'赵丽颖'}。
列表:通过-表示一组值。如:-name1:赵丽颖,-name2:倪妮 读取之后是字典列表:[{'name':'赵丽颖'},{'name':'倪妮'},{}'name':'高圆圆']
3、操作yaml文件需要安装
pip3 install pyyaml
#案例:实现单接口的自动化测试(多参数)
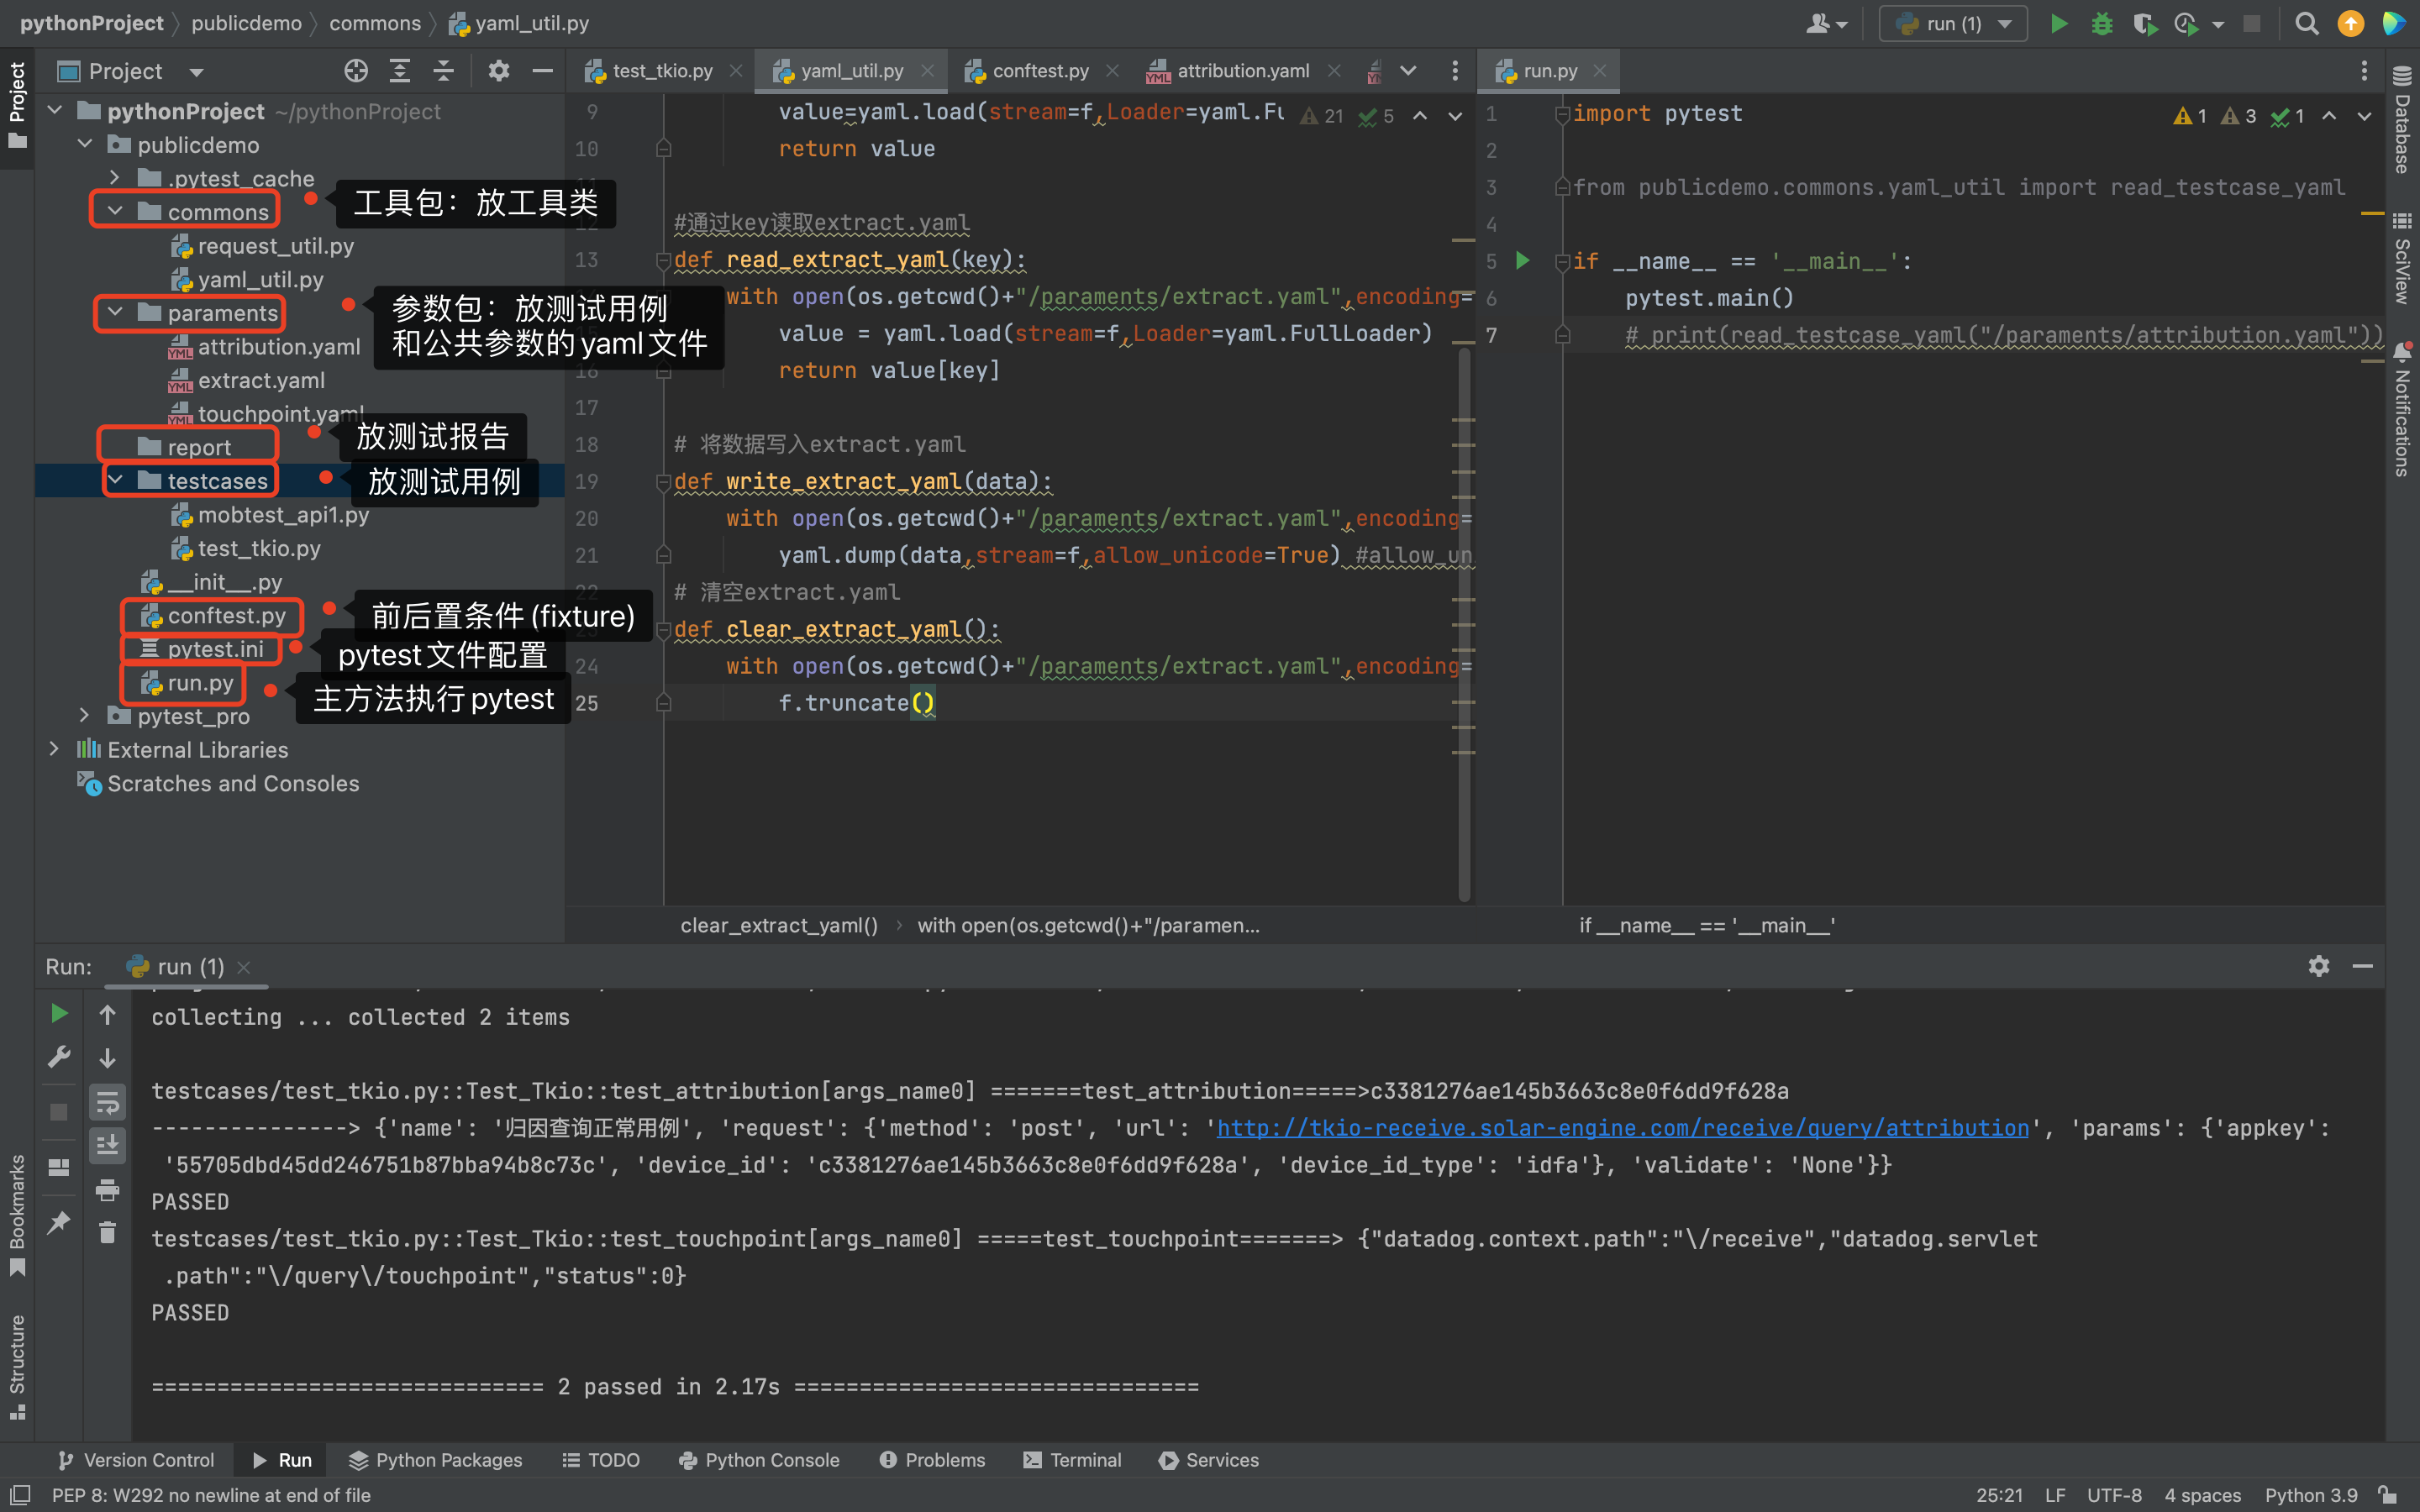
思路:testcases文件夹放具体的接口,yaml放测试用例参数,写一个工具类yaml_util读取yaml的文件,pytest.ini写运行方式。
1、get_paraments.yaml文件 -->可以放到一个专门存放yaml文件类目下(比如:paraments)
- name: 归因查询正常用例
  request:
    method: post
    url: http://tkio-receive.solar-engine.com/receive/query/attribution
    params:
      appkey: 55705dbd45dd246751b87bba94b8c73c
      device_id: c3381276ae145b3663c8e0f6dd9f628a
      device_id_type: idfa
    validate: None
- name: appkey为空
  request:
    method: post
    url: http://tkio-receive.solar-engine.com/receive/query/attribution
    params:
      appkey: ""
      device_id: c3381276ae145b3663c8e0f6dd9f628a
      device_id_type: idfa
    validate: None
- name: device_id为空
  request:
    method: post
    url: http://tkio-receive.solar-engine.com/receive/query/attribution
    params:
      appkey: 55705dbd45dd246751b87bba94b8c73c
      device_id: ""
      device_id_type: idfa
    validate: None
validate可以做断言
注意:这里面是三条测试用例,-name作为一条,字段和值之间有严格的空格限制(比如:method: post method:和post之间有空格,要不会报错)
2、yaml_util.py文件 -->读取yaml文件的工具类,可以放到commons类目下
import os
import yaml

def read_testcase_yaml(yaml_path):
    # os.getcwd()获取项目根路径+yaml_path到yaml文件的路径
    with open(os.getcwd()+yaml_path,encoding="utf-8",mode="r") as f:
        # yaml加载到文件的值  -->stream是文件流,Loader是加载的方式,yaml.FullLoader所有数据
        value=yaml.load(stream=f,Loader=yaml.FullLoader)
        return value
-->在真正传参给接口之前,测试一下yaml.util.py能不能获取到yaml文件,并且看下获取后的数据格式
run.py类测试一下
import pytest

from publicdemo.commons.yaml_util import read_testcase_yaml

if __name__ == '__main__':
    #pytest.main()
    print(read_testcase_yaml("/paraments/get_cookie.yaml"))
/paraments/get_paraments.yaml是yaml文件所在的路径 -->因为os.getcwd()是获取项目根目录,所以直接写yaml文件所在的路径即可

执行结果:
{'name': '归因查询正常用例',
  'request':
    {'method': 'post',
     'url': 'http://tkio-receive.solar-engine.com/receive/query/attribution',
     'params':
      {'appkey': '55705dbd45dd246751b87bba94b8c73c', 'device_id': 'c3381276ae145b3663c8e0f6dd9f628a', 'device_id_type': 'idfa'},
       'validate': 'None'}}
从读取之后返回的结果可以看出,确实返回的是字段列表
3、testcases文件夹-->test_api.py
import time
import pytest
import requests
import json

from publicdemo.commons.request_util import RequestUtil
from publicdemo.commons.yaml_util import read_testcase_yaml


class Test_Tkio:

    headers = {
        "Content-Type":"application/json;charset=UTF-8"
    }

    # 归因查询
    @pytest.mark.run(order=1)
    @pytest.mark.smoke
    @pytest.mark.parametrize("args_name",read_testcase_yaml("/paraments/get_cookie.yaml"))
    def test_attribution(self,args_name):#注意:装饰器的名字(args_name)一定要传到用例的参数里面去
        methods = args_name["request"]["method"]
        path = args_name["request"]["url"]
        datas = args_name["request"]["params"]
        res = RequestUtil().all_sendSession(method=methods,url=path,data=json.dumps(datas),headers=Test_Tkio.headers)
        result = res.text
        print("=======test_attribution=====>"+result)
        print("--------------->",args_name)
        time.sleep(1)
@pytest.mark.parametrize("args_name",read_testcase_yaml("/paraments/get_cookie.yaml"))
 --> 读取yaml文件返回的字典列表复制给args_name
methods = args_name["request"]["method"]   --》接口所需要的字段,可以直接用返回的字段args_name去截取相应的值
yaml文件内有几条用例,这样在test_api接口执行后就会执行几条,这样就实现了自动化
=======》一个模块下有10个接口,那么就需要10个yaml文件,一个接口一个yaml,一个yaml里面有N个用例
二、关联接口的封装
#通过key读取extract.yaml
def read_extract_yaml(key):
    with open(os.getcwd()+"/paraments/extract.yaml",encoding="utf-8",mode="r") as f:
        value = yaml.load(stream=f,Loader=yaml.FullLoader)
        return value[key]

# 将数据写入extract.yaml
def write_extract_yaml(data):
    with open(os.getcwd()+"/paraments/extract.yaml",encoding="utf-8",mode="a") as f:  #mode="a"是追加,"w"是覆盖写入
        yaml.dump(data,stream=f,allow_unicode=True) #allow_unicode=True 允许unicod编码
# 清空extract.yaml
def clear_extract_yaml():
    with open(os.getcwd()+"/paraments/extract.yaml",encoding="utf-8",mode="w") as f:
        f.truncate()
2、test_tkio.py 测试类(包含两个接口:归因查询、点击查询)(点击查询传入的参数device_id,需要从归因查询接口返回的结果中获取)
import time
import pytest
import requests
import json

from publicdemo.commons.yaml_util import read_testcase_yaml, write_extract_yaml, read_extract_yaml
from pytest_pro.day02.common.request_util import RequestUtil


class Test_Tkio:

    urls ="http://tkio-receive.solar-engine.com"
    headers = {
        "Content-Type":"application/json;charset=UTF-8"
    }

    # 归因查询
    @pytest.mark.run(order=1)
    @pytest.mark.smoke
    @pytest.mark.parametrize("args_name", read_testcase_yaml("/paraments/attribution.yaml"))
    def test_attribution(self, args_name):  # 注意:装饰器的名字(args_name)一定要传到用例的参数里面去
        methods = args_name["request"]["method"]
        path = args_name["request"]["url"]
        datas = args_name["request"]["params"]
        res = RequestUtil().all_sendSession(method=methods, url=path, data=json.dumps(datas), headers=Test_Tkio.headers)
        result = res.text
        dic_response = json.loads(result)
        # 取返回的device_id值
        device_id=dic_response['data']['install_raw_log']['device_info']['device_id']
        # 组装成一个字典,已k:v的方式存储到extract.yaml文件中
        extract_value={"device_id":device_id}
        # 调用write_extract_yaml方法写入extract.yaml
        write_extract_yaml(extract_value)
        print("=======test_attribution=====>"+device_id)
        print("--------------->", args_name)
        time.sleep(1)

        # 点击查询
    @pytest.mark.usermanage
    @pytest.mark.parametrize("args_name",read_testcase_yaml("/paraments/touchpoint.yaml"))
    def test_touchpoint(self,args_name):
        methods = args_name["request"]["method"]
        path = args_name["request"]["url"]
        # datas = args_name["request"]["params"]
        datas = {
            "appkey":args_name["request"]["params"]["appkey"],
            # 调用read_extract_yaml方法读取归因查询写入extract.yaml文件中的device_id
            "device_id":read_extract_yaml("device_id"),
            "device_id_type": "idfa",
            "touchpoint_type": "click",
            "attribution_type": "ua"
        }
        res = RequestUtil().all_sendSession(method=methods,url=path, data=json.dumps(datas), headers=Test_Tkio.headers)

        print("=====test_touchpoint=======>", res.text)
        time.sleep(1)
这样在每次执行归因接口(test_attribution方法)的时候,extract.yaml就会写入device_id,而执行点击查询接口时(test_touchpoint方法)就会从extract.yaml中通过device_id的key取值使用
但是会有一个问题,在多次执行接口的时候,会一直往extract.yaml里面写同样的数据,那如何解决?
- 可以用yaml_util.py的清空方法clear_extract_yaml(),那么在什么时候使用呢?
- 可以在写入之前清空,这里我们可以用到pytest前后置条件中的fixture,作用域为package/session:会话级别(就意味着在整个执行过程中,只会执行一次)
- 所以在contest.py文件内可以写一个fixture来调用yaml_util.py中的清空方法,并保证是会话级别-自动执行
import pytest
from publicdemo.commons.yaml_util import clear_extract_yaml

# 会话级别意味着整个执行过程中只执行一次,autouse=True是自动执行
@pytest.fixture(scope="session",autouse=True)
def clear_yaml():
    clear_extract_yaml()
这样我们在执行run.py(此文件内放pytest的main执行方法)时,就可以实现把extract.yaml文件中的内容先清空,然后在写入,然后在读取,即使是多次执行也会是先清空,然后在写入,然后在读取这样的操作
自此接口自动化一个初步的框架已经成型
三、生成美观的Allure报告
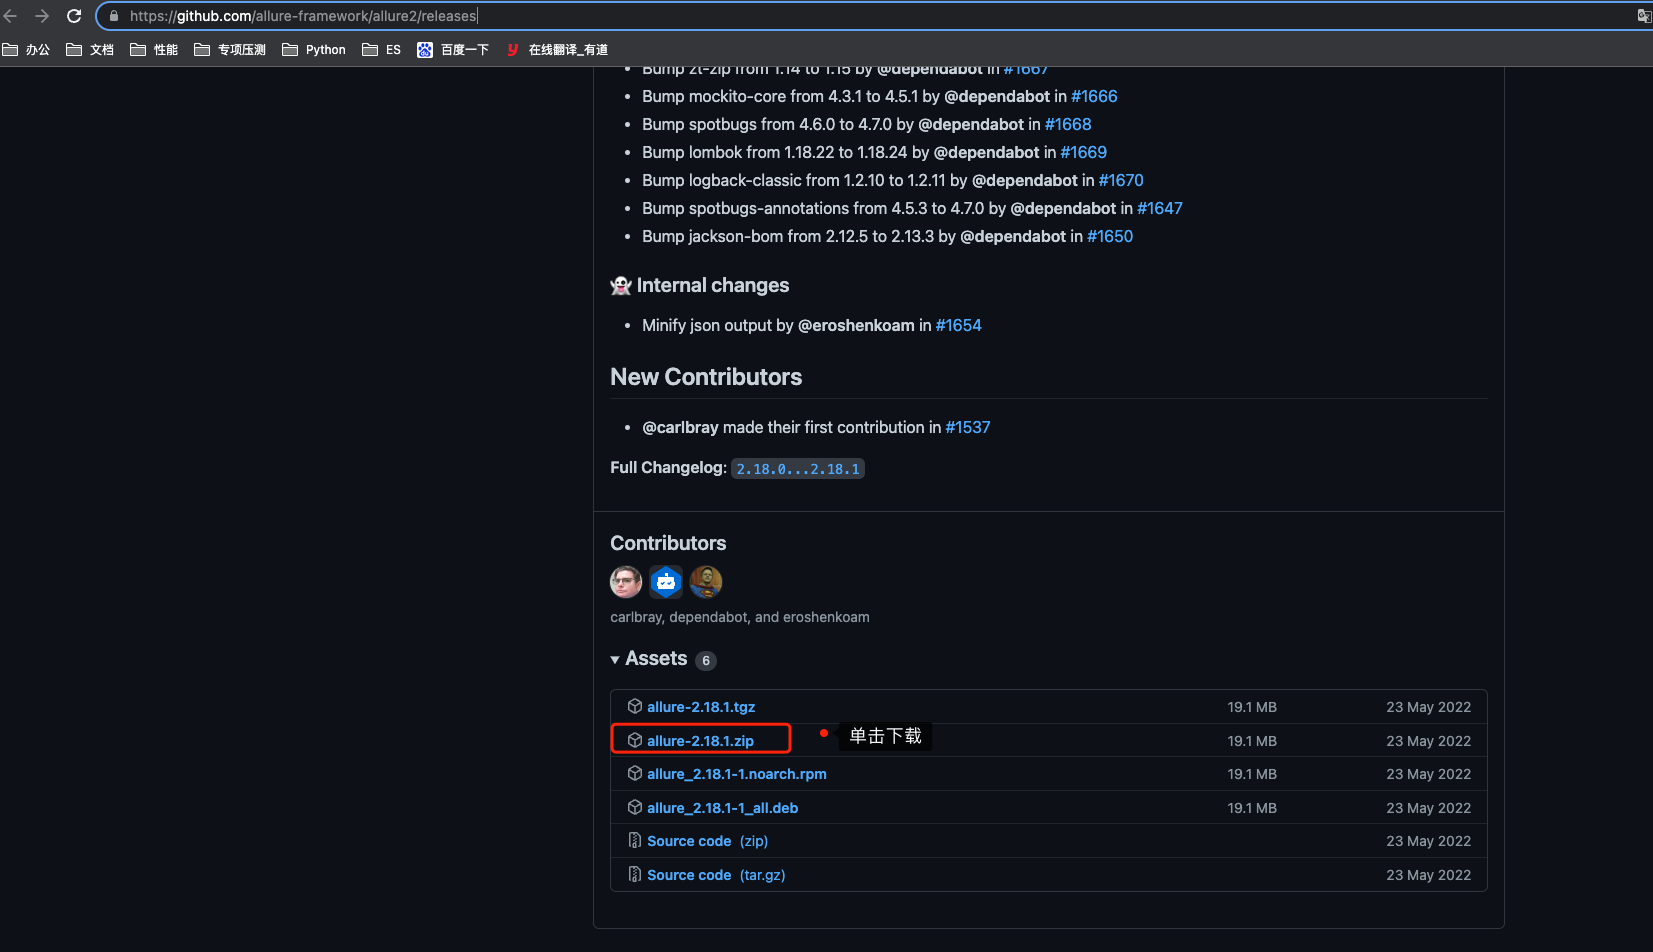
1、官网下载allure:https://github.com/allure-framework/allure2/releases 并解压
2、解压之后配置环境变量
win配置:把目录:E:\allure-2.13.7\bin; 配置的path路径。
mac配置:
|- 终端输入:open -t ~/.bash_profile
|- 输入下面的内容:
export PATH=/usr/bin:/bin:/usr/sbin:/sbin:/usr/local/bin
export ALLURE="/Users/mobvista/lidong/allure-2.18.1/bin:${PATH}"
export PATH=$PATH:$ALLURE
|- 使配置的环境变量生效:source ~/.bash_profile
|- 验证allure是否配置成功:allure --version 显示版本号说明安装成功
3、生成allure报告
3.1 生成临时报告:在根目录下创建一个temps文件夹,然后在pytest.ini文件中addopts后面输入:--alluredir=./temps --clean-alluredir
addopts = -vs --alluredir=./temps --clean-alluredir -m "smoke or usermanage"
temps文件下生成的是json后缀的临时报告
3.2 生成html测试报告:
在run.py文件中添加

if __name__ == '__main__':
    pytest.main()
    # print(read_testcase_yaml("/paraments/attribution.yaml"))
    time.sleep(3)
    os.system("allure generate ./temps -o ./report --clean")
注意:mac本如果执行报 “sh: allure: command not found”错误,具体的解决方法:https://blog.csdn.net/z1107445981/article/details/118468592