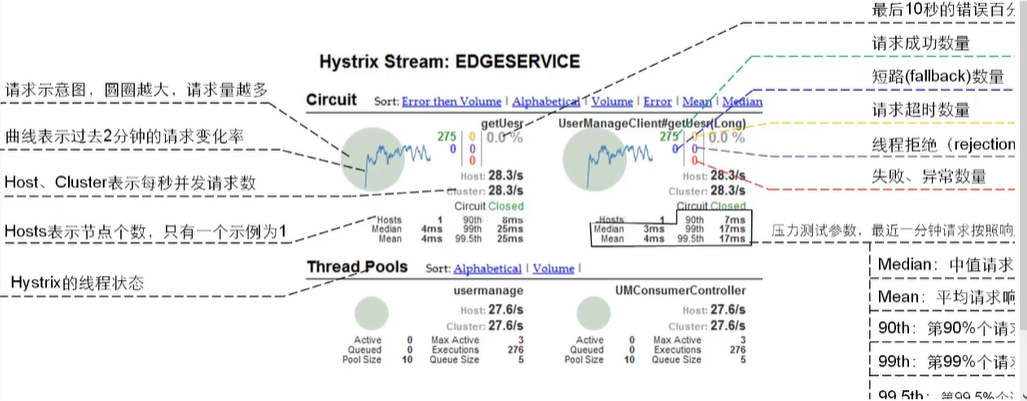
1.Hystrix(熔断器)概述
Hystirx是一个供分布式系统使用,提供延迟和容错功能,保证复杂的分布系统在面临不可避免的失败时,仍能有其弹性,在分布式环境中,许多服务依赖项中会出现一些不可避免地失败,比如说网络问题。Hystrix是一个库,通过添加延迟容差和容错逻辑来帮助您控制这些分布式服务之间的交互。Hystrix通过隔离服务之间的访问点,停止其间的级联故障以及提供回退选项,从而提高系统的整体弹性。本文讲述的是Feign配合Hystrix在服务不可达时进行简单容错降级处理。
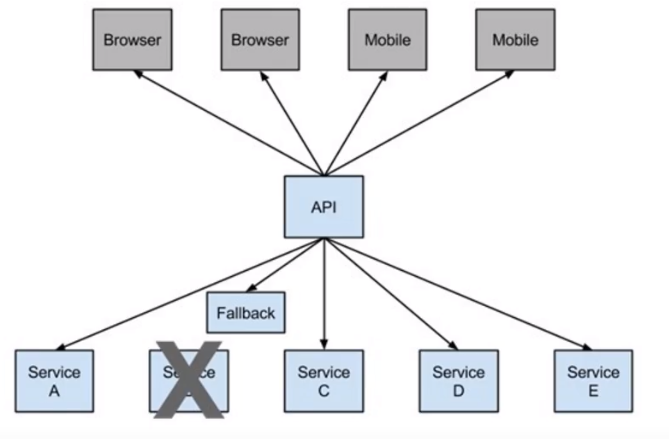
1.1 服务降级
服务器忙,请稍后再试,不让客户端等待返回一个友好提示,例如 当程序运行异常时
1.2 服务熔断
类似保险丝,当达到最大访问服务后,直接访问拒绝,拉闸限电,然后调用服务降级方法返回友好提示
1.3 服务限流
秒杀高并发等操作,严禁一窝蜂的过来拥挤,大家排队,一秒钟n个,有序进行.
2.Hystrix基本使用
2.1安装依赖
<dependencies>
    <!--新增hystrix-->
    <dependency>
        <groupId>org.springframework.cloud</groupId>
        <artifactId>spring-cloud-starter-netflix-hystrix</artifactId>
    </dependency>

    <dependency>
        <groupId>org.springframework.cloud</groupId>
        <artifactId>spring-cloud-starter-netflix-eureka-client</artifactId>
    </dependency>

    <dependency>
        <groupId>com.gh.springcloud</groupId>
        <artifactId>cloud-api-commons</artifactId>
        <version>${project.version}</version>
    </dependency>


    <dependency>
        <groupId>org.springframework.boot</groupId>
        <artifactId>spring-boot-starter-web</artifactId>
    </dependency>

    <dependency>
        <groupId>org.springframework.boot</groupId>
        <artifactId>spring-boot-starter-actuator</artifactId>
    </dependency>

    <dependency>
        <groupId>org.projectlombok</groupId>
        <artifactId>lombok</artifactId>
        <optional>true</optional>
    </dependency>
    <dependency>
        <groupId>org.springframework.boot</groupId>
        <artifactId>spring-boot-starter-test</artifactId>
        <scope>test</scope>
    </dependency>
</dependencies>
2.2 编写yml
server:
  port: 8001

spring:
  application:
    name: cloud-provider-hystrix-payment

eureka:
  client:
    register-with-eureka: true
    fetch-registry: true
    service-url:
      #defaultZone: http://eureka7001.com:7001/eureka,http://eureka7002.com:7002/eureka
      defaultZone: http://eureka7001.com:7001/eureka
2.3 主启动类
@EnableCircuitBreaker 注解代表开启回路
@SpringBootApplication
@EnableEurekaClient
@EnableCircuitBreaker    //回路
public class PaymentHystrixMain8001 {
    public static void main(String[] args) {
        SpringApplication.run(PaymentHystrixMain8001.class,args);
    }
}
2.4 service实现类
这里设置等待时间为三秒,当超过三秒时,则会执行fallback里面的方法
    @HystrixCommand(fallbackMethod = "paymentInfo_timeoutHandler",commandProperties = {
            @HystrixProperty(name = "execution.isolation.thread.timeoutInMilliseconds",value = "3000")
    })
    public String paymentInfo_timeout(Integer id) {
        int time = 6;
        try {
            TimeUnit.SECONDS.sleep(time);
        } catch (InterruptedException e) {
            e.printStackTrace();
        }
        return "线程池:" + Thread.currentThread().getName() + "  paymentInfo_timeout,id=  " + id + "	耗时" + time + "秒钟~";
    }

    public String paymentInfo_timeoutHandler(Integer id){
        return "线程池:" + Thread.currentThread().getName() + "  paymentInfo_timeout,id=  " + id + "	ko(╥﹏╥)o~";
    }
2.5 测试
启动项目,访问 http://localhost:8080/consumer/payment/hystrix/timeout/32
打印线程池:HystrixTimer-1 paymentInfo_timeout,id= 32 ko(╥﹏╥)o~ 代表执行的是fallback里面的方法,hystrix生效.
3.消费端使用Hystrix
3.1 修改yml
开启feign.hystrix
feign:
  hystrix:
    enabled: true
3.2 修改启动类
启动类添加@EnableHystrix

3.3 controller
    @GetMapping("consumer/payment/hystrix/timeout/{id}")
    @HystrixCommand(fallbackMethod = "paymentInfo_timeoutHandler",commandProperties = {
            @HystrixProperty(name = "execution.isolation.thread.timeoutInMilliseconds",value = "1500")
    })
    public String paymentInfo_timeout(@PathVariable("id") Integer id) {
        int age=10/0;
        return paymentHystrixService.paymentInfo_timeout(id);
    }

    public String paymentInfo_timeoutHandler(Integer id){
        return "线程池:" + Thread.currentThread().getName() + "  paymentInfo_timeout,id=  " + id + "	ko(╥﹏╥)o啊啊啊~";
    }
3.4 通用fallback
在类上添加注解
@DefaultProperties(defaultFallback = "payment_global_fallbackMethod")
然后编写里面的方法
    public String payment_global_fallbackMethod(){
        return "全局异常处理,请稍后再试";
    }
调用方法

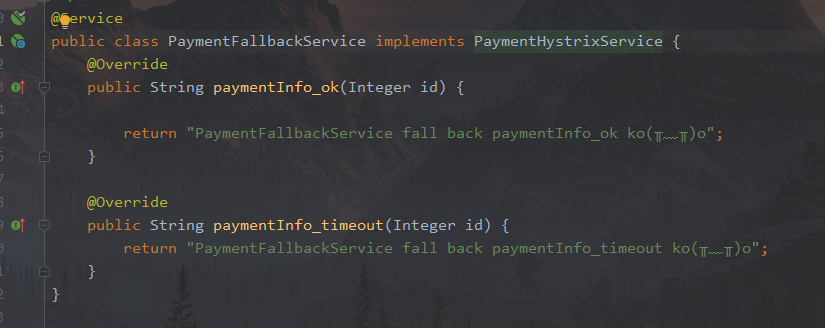
3.5 通配服务降级fallback

编写fallback类实现PaymentHystrixService接口
4.hystrix图形化Dashboard监控
4.1 安装依赖
    <dependencies>
        <!--新增hystrix dashboard-->
        <dependency>
            <groupId>org.springframework.cloud</groupId>
            <artifactId>spring-cloud-starter-netflix-hystrix-dashboard</artifactId>
        </dependency>
        <dependency>
            <groupId>org.springframework.boot</groupId>
            <artifactId>spring-boot-starter-actuator</artifactId>
        </dependency>

        <dependency>
            <groupId>org.projectlombok</groupId>
            <artifactId>lombok</artifactId>
            <optional>true</optional>
        </dependency>
        <dependency>
            <groupId>org.springframework.boot</groupId>
            <artifactId>spring-boot-starter-test</artifactId>
            <scope>test</scope>
        </dependency>
    </dependencies>
4.2 修改端口
在yml里面进行端口修改
server:
  port: 9001
4.3 主启动类
@SpringBootApplication
@EnableHystrixDashboard
public class HystrixDashboardMain9001 {
    public static void main(String[] args) {
        SpringApplication.run(HystrixDashboardMain9001.class,args);
    }
}
4.4 启动项目
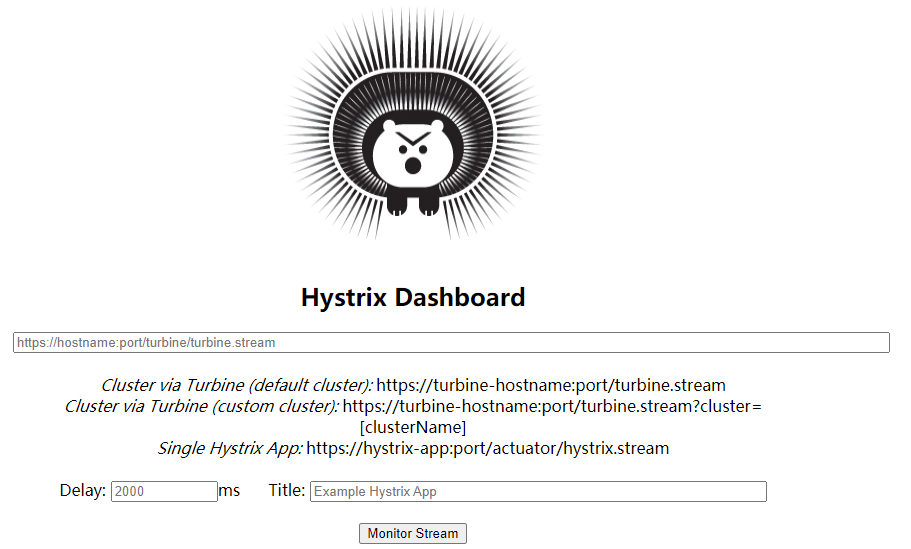
启动项目看到访问 http://localhost:9001/hystrix 以下界面则代表图形化界面安装成功
4.5 监控服务
需要在8001启动类添加如下配置和注解 @EnableCircuitBreaker
    /**
     * 注意:新版本Hystrix需要在主启动类中指定监控路径
     * 此配置是为了服务监控而配置,与服务容错本身无关,spring cloud升级后的坑
     * ServletRegistrationBean因为springboot的默认路径不是"/hystrix.stream",
     * 只要在自己的项目里配置上下面的servlet就可以了
     *
     * @return ServletRegistrationBean
     */
    @Bean
    public ServletRegistrationBean getServlet() {
        HystrixMetricsStreamServlet streamServlet = new HystrixMetricsStreamServlet();
        ServletRegistrationBean registrationBean = new ServletRegistrationBean(streamServlet);

        // 一启动就加载
        registrationBean.setLoadOnStartup(1);
        // 添加url
        registrationBean.addUrlMappings("/hystrix.stream");
        // 设置名称
        registrationBean.setName("HystrixMetricsStreamServlet");
        return registrationBean;
    }
填好信息后启动监控
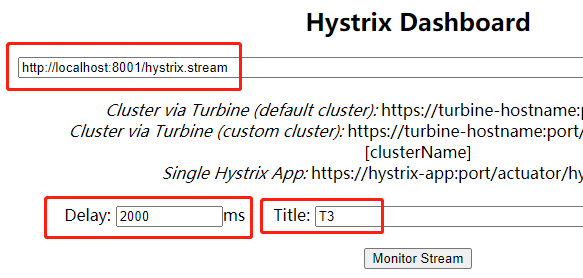
在8001 先访问正确的地址,在访问异常的地址 ,可以进行时实监控
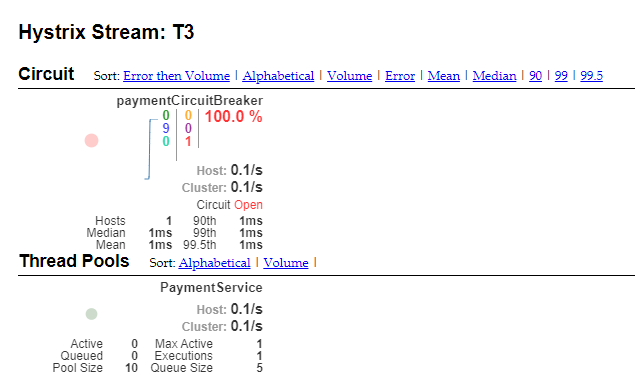
整图说明
