背景
之前已经写了很多TensorFlow的基本知识,现在利用TensorFlow实现一些简单的功能,对原来的知识进行串联,并初步入门,该部分共包括三篇,分别实现的是回归模型,浅层神经网络,KNN。
TensorFlow构建回归模型
本代码的构建步骤
- 建立公式的计算图
- 损失函数与优化器
- 加载数据
- 启动会话,训练与测试
建立计算图
在TensorFlow中构建模型,我们首先需要实现的一个计算图,然后再在Session中运行图,并加载数据,那么首先计算图。
公式到计算图的转化
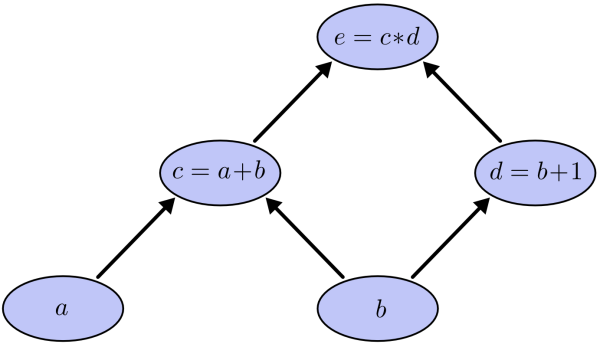
首先假如,我们有公式 e = (a+b) * (b +1)那么我们就可以将其拆解成五个节点
1. a节点,输入节点
2. b节点,输入节点
3. a+b 节点,计算节点,命名为c
4. b+1 节点,计算节点,命名为d
5. e = c * d 计算节点,输出节点,节点e
如图表示就是
回归模型
同理logits :y = wx+b可以转化为
1.x 输入节点
2.w 权重
3.b 偏执
4. y0 = xw 计算节点
5. y = y0 + b 计算节点,输出节点
如图,这就是我们要实现的计算图,但是在实际的使用过程中却还有两点不同,
1. 第一我们实现模型实际上已经向量化好了的,这是机器学习的基础,这里不再重复,你可以去网易云课堂学习吴恩达教授的深度学习课程,里面有不错的介绍。
2. 在TensorFlow中实现该计算图时,是直接一行代码实现的,并没有再构建y0,实际无影响。详细情况请看代码:
# 定义变量
x = tf.placeholder(tf.float32, [None, 784])
W = tf.Variable(tf.zeros([784, 10]))
b = tf.Variable(tf.zeros([10]))
# 公式
y = tf.matmul(x, W) + b
注意:后面我们使用的时交叉熵回归分类器
损失函数与优化算法
损失函数,我们这里使用的是平均值(平均的是交叉熵分类器的损失)
学习率,设定的为0.5
优化算法,使用的随机梯度下降
# Define loss and optimizer
y_ = tf.placeholder(tf.float32, [None, 10])

cross_entropy = tf.reduce_mean(
  tf.nn.softmax_cross_entropy_with_logits(labels=y_, logits=y))
train_step = tf.train.GradientDescentOptimizer(0.5).minimize(cross_entropy)
因为TensorFlow已经实现了自动求导,所以我们就不需要想之前用其他Python类库写机器学习代码那样在自己编写反向求导了(老铁,这波稳如狗)
数据的加载
我们这次使用的时mnist的手写数字数据,你也可以使用其他数据来测试这个回归模型,但是注意修改之前的Tensor 的shape
mnist = input_data.read_data_sets("/home/fonttian/CODE/TensoFlow/Data/MNIST_data", one_hot=True)
# 训练数据
batch_xs, batch_ys = mnist.train.next_batch(100)
最后初始化定义session,初始化所有节点,开始训练和测试吧
sess = tf.InteractiveSession()
tf.global_variables_initializer().run()
sess.run(train_step, feed_dict={x: batch_xs, y_: batch_ys})

# Test trained model
    correct_prediction = tf.equal(tf.argmax(y, 1), tf.argmax(y_, 1))
    accuracy = tf.reduce_mean(tf.cast(correct_prediction, tf.float32))
    if (i+1) % 100 == 0:
        print(i+1,":",sess.run(accuracy, feed_dict={x: mnist.test.images,y_: mnist.test.labels}))
全部代码
import tensorflow as tf
import os

from tensorflow.examples.tutorials.mnist import input_data

os.environ['TF_CPP_MIN_LOG_LEVEL'] = '2'

# Import data
mnist = input_data.read_data_sets("/home/fonttian/CODE/TensoFlow/Data/MNIST_data", one_hot=True)

# Create the model
x = tf.placeholder(tf.float32, [None, 784])
W = tf.Variable(tf.zeros([784, 10]))
b = tf.Variable(tf.zeros([10]))
y = tf.matmul(x, W) + b

# Define loss and optimizer
y_ = tf.placeholder(tf.float32, [None, 10])

cross_entropy = tf.reduce_mean(
  tf.nn.softmax_cross_entropy_with_logits(labels=y_, logits=y))
train_step = tf.train.GradientDescentOptimizer(0.5).minimize(cross_entropy)

sess = tf.InteractiveSession()
tf.global_variables_initializer().run()
# Train
for i in range(10000):
    batch_xs, batch_ys = mnist.train.next_batch(100)
    sess.run(train_step, feed_dict={x: batch_xs, y_: batch_ys})

    # Test trained model
    correct_prediction = tf.equal(tf.argmax(y, 1), tf.argmax(y_, 1))
    accuracy = tf.reduce_mean(tf.cast(correct_prediction, tf.float32))
    if (i+1) % 100 == 0:
        print(i+1,":",sess.run(accuracy, feed_dict={x: mnist.test.images,y_: mnist.test.labels}))
