yum安装lnmp环境是最方便,最快捷的一种方法。源码编译安装需要花费大量的人类时间,当然源码编译可以个性化配置一些其它功能。目前来说,yum安装基本满足我们搭建web服务器的需求。
本文是我根据近期学习的内容加上我自己的理解,整理出来的从yum搭建lnmp环境到网站配置的超详细的教程。如有错误的地方请指出,不胜感激!
lnmp环境分为4部分,linux、nginx、mysql和php。
软件安装
linux系统
采用vm虚拟机最小化安装centos7.6,目前最新的centos系统。
nginx安装
配置nginx源
rpm -ivh http://nginx.org/packages/centos/7/noarch/RPMS/nginx-release-centos-7-0.el7.ngx.noarch.rpm
安装nginx-1.16版本
yum install -y nginx
确认是否安装:

yum install nginx,会默认创建nginx:nginx,组和账户。
文件默认位置:
二进制文件在/usr/sbin/nginx
配置文件夹在/etc/nginx/
log文件夹在/var/log/nginx
yum安装会自动创建/usr/lib/systemd/system/nginx.service,可以用systemctl 启动停止。
mysql安装
配置mysql源
rpm -ivh http://dev.mysql.com/get/mysql57-community-release-el7-10.noarch.rpm
安装mysql5.7
yum -y install mysql-community-server
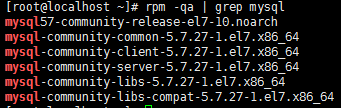
确认是否安装:
php安装
配置php源
rpm -Uvh https://dl.fedoraproject.org/pub/epel/epel-release-latest-7.noarch.rpm
rpm -Uvh https://mirror.webtatic.com/yum/el7/webtatic-release.rpm
安装php7.0
yum install -y php70w-common php70w-fpm php70w-opcache php70w-gd php70w-mysqlnd php70w-mbstring php70w-pecl-redis php70w-pecl-memcached php70w-devel
上面该命令即可安装拓展:
php-api, php-bz2, php-calendar, php-ctype, php-curl, php-date, php-exif, php-fileinfo, php-filter, php-ftp, php-gettext, php-gmp, php-hash, php-iconv, php-json, php-libxml, php-openssl, php-pcre, php-pecl-Fileinfo, php-pecl-phar, php-pecl-zip, php-reflection, php-session, php-shmop, php-simplexml, php-sockets, php-spl, php-tokenizer, php-zend-abi, php-zip, php-zlib
如果要加装其它php拓展(如xml),直接”yum install php70w-xml”即可,非常简单
确认是否安装:

查看安装的php拓展


 1 [root@localhost ~]# php -m
 2 [PHP Modules]
 3 bz2
 4 calendar
 5 Core
 6 ctype
 7 curl
 8 date
 9 dom
10 exif
11 fileinfo
12 filter
13 ftp
14 gd
15 gettext
16 gmp
17 hash
18 iconv
19 igbinary
20 json
21 libxml
22 mbstring
23 memcached
24 mysqli
25 mysqlnd
26 openssl
27 pcntl
28 pcre
29 PDO
30 pdo_mysql
31 pdo_sqlite
32 Phar
33 posix
34 readline
35 redis
36 Reflection
37 session
38 shmop
39 SimpleXML
40 sockets
41 SPL
42 sqlite3
43 standard
44 sysvmsg
45 sysvsem
46 sysvshm
47 tokenizer
48 wddx
49 xml
50 xmlreader
51 xmlwriter
52 xsl
53 Zend OPcache
54 zip
55 zlib
56
57 [Zend Modules]
58 Zend OPcache
至此,nginx、mysql、php安装完成。下一步,配置。
软件配置及wordpress安装
假设我们要搭建一个博客网站,wordpress。
nginx配置
首先看一下nginx配置文件夹
[root@localhost ~]# tree /etc/nginx
/etc/nginx
├── conf.d
│   └── default.conf
├── fastcgi_params
├── koi-utf
├── koi-win
├── mime.types
├── modules -> ../../usr/lib64/nginx/modules
├── nginx.conf
├── scgi_params
├── uwsgi_params
└── win-utf
再看一下nginx配置文件nginx.conf,其包含了conf.d文件夹内所有后缀是conf的配置文件。其实conf.d文件夹中以conf结尾的文件即为网站的配置文件。
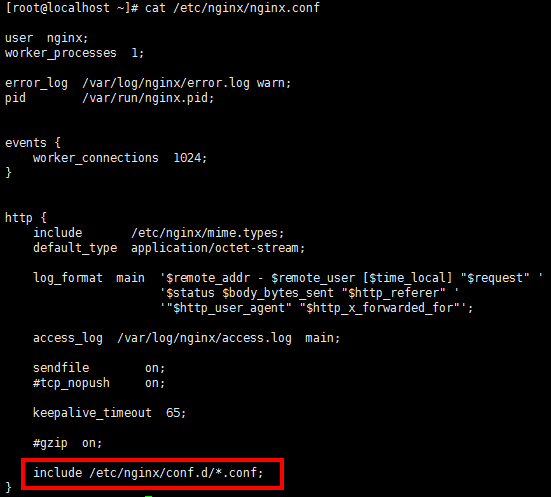
查看conf.d/default.conf默认配置文件。
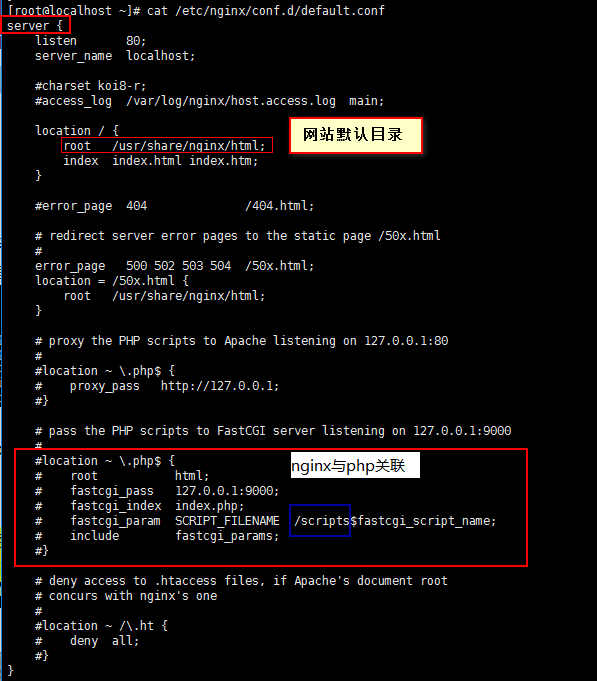
每一个网站目录都需要一个”server“来引导。server_name为要访问的网址(即域名,后面建立wordpress配置会详细讲解),root即为网站的默认目录,index为索引。
下面我们来重建一个客户端浏览器与web服务器交互的过程,来理解这些配置的作用。
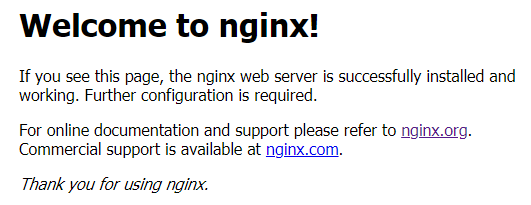
浏览器里面输入“localhost”(即server_name,可以用ip地址代替),浏览器会默认访问其80端口,恰好web服务器nginx监听的就是80端口(配置中的listen 80),这时候nginx会找到网站的默认目录root,即/usr/share/nginx/html,然后寻找该目录下的index索引文件,即index.html、index.htm,我们来看一下/usr/share/nginx/html文件夹和index.html文件的内容:

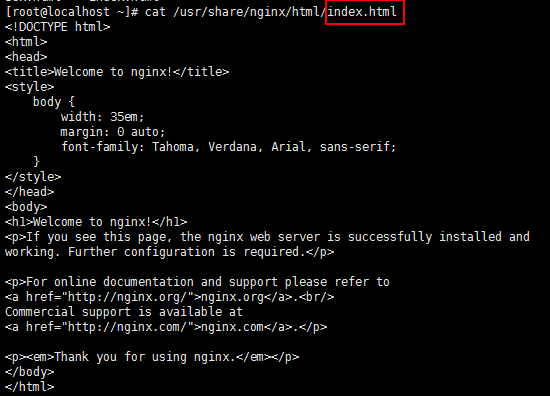
index.html是一个html语言编写的文件,可以在网页上显示出来,启动nginx, systemctl start nginx ,访问localhost(或者ip),即可显示出来index.html文件中的内容
ok,整个过程再捋一下:
客户端浏览器访问web服务器80端口,nginx监听到80端口有访问,根据访问的地址(域名)找到网站的默认目录(上文是/usr/share/nginx/html),然后访问index定义的索引文件index.html,最后nginx将index.html文件的内容返回给浏览器,显示出来。
以上就是一个简单的web服务器工作的过程,如果不嫌麻烦,完全可以编写一个个的html文件来当做个人博客,访问按文件名访问即可。
php配置
但单纯地访问静态的html网页实现的功能太少了,所以,当当当当,php出场了!用php语言来编写网页。nginx收到用户请求后,访问网站所在目录,看到其索引文件是php结尾的,index.php,然后将其转交给php处理,php处理后返回给nginx,nginx再返回给用户。
从wordpress官网上下载源码,然后解压,查看其文件:
[root@localhost ~]# wget https://cn.wordpress.org/latest-zh_CN.tar.gz
[root@localhost ~]# tar xf latest-zh_CN.tar.gz
[root@localhost ~]# ls wordpress/
index.php        wp-admin              wp-content         wp-load.php      wp-signup.php
license.txt      wp-blog-header.php    wp-cron.php        wp-login.php     wp-trackback.php
readme.html      wp-comments-post.php  wp-includes        wp-mail.php      xmlrpc.php
wp-activate.php  wp-config-sample.php  wp-links-opml.php  wp-settings.php
即该网站源码的索引是index.php。
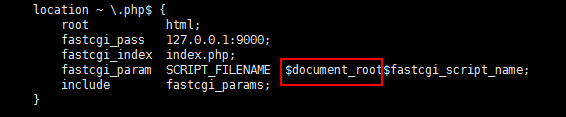
第一节安装过程我们单独安装了nginx与php,它们根本就不认识,怎么交互?所以需要将nginx与php程序关联起来,即改动default.conf文件中的有关fastcgi的项,把注释去掉,然后把 /script 改成 $document_root ,即
网站源码,即上文的wordpress文件夹,放在任何位置都可以,但必须配置好权限,让nginx所在的用户组有读写权限。为了方便,我们将其放在/usr/share/html/目录下,并且更改其用户为nginx
[root@localhost ~]# mv wordpress/ /usr/share/nginx/html/
[root@localhost ~]# cd /usr/share/nginx/html
[root@localhost html]# chown -R nginx:nginx wordpress/
[root@localhost html]# ll
total 12
-rw-r--r--. 1 root  root   494 Aug 13  2019 50x.html
-rw-r--r--. 1 root  root   612 Aug 13  2019 index.html
drwxr-xr-x. 5 nginx nginx 4096 Jul 29 10:00 wordpress
接下来配置网站的nginx配置文件。假设我们注册的网站域名为domain.com,进入/etc/nginx/conf.d/文件夹,新建domain.com.conf文件(名称随意,但后缀必须为conf,为了方便区分使用“域名”+“.conf"),修改内容如下(可以直接复制default.conf,然后修改):
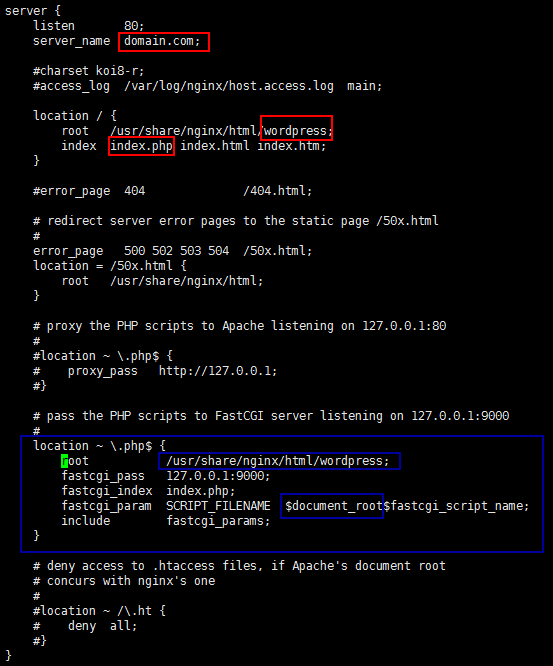
注意几个要修改的地方,server_name改为你注册的域名(域名要解析到服务器的ip,一台vps服务器上可以有多个网站,不同网站就是用server_name来区分的),root即网站根目录,定位到上文我们复制到的地址,index里添加index.php(wordpress目录里只有index.php,没有index.html),还有下方的nginx与fastcgi关联。
至此,网站的配置文件完成。下一步,配置mysql。
mysql配置
为什么需要数据库?因为数据太多,查找、修改等都是麻烦事,所以我们需要一个管理数据的软件,即数据库。mysql是一个关系型数据库管理系统。
我们今天的主角wordpress同样也是需要数据库的,接下来我们用mysql创建一个数据库。创建完,我们肯定需要访问,访问的话需要用户权限,我们还需要创建一个用户(尽量不要用mysql的root用户去访问,root的权限太大了)。
首先启动mysql,
systemctl start mysqld
使用yum安装完mysql之后,第一次会生成一个随机密码,在/var/log/mysqld.log中,可以用该密码登入
[root@localhost ~]# grep password /var/log/mysqld.log
2019-08-02T19:27:52.679467Z 1 [Note] A temporary password is generated for root@localhost: Fu0fT!4b,4,b
然后登录mysql,输入上方的密码(密码不会显示出来),回车
[root@localhost ~]# mysql -u root -p
Enter password:
Welcome to the MySQL monitor.  Commands end with ; or g.
Your MySQL connection id is 2
Server version: 5.7.27

Copyright (c) 2000, 2019, Oracle and/or its affiliates. All rights reserved.

Oracle is a registered trademark of Oracle Corporation and/or its
affiliates. Other names may be trademarks of their respective
owners.

Type 'help;' or 'h' for help. Type 'c' to clear the current input statement.

mysql>
修改root密码:
mysql> set password for root@localhost = password('Mysql./root123');
Query OK, 0 rows affected, 1 warning (0.00 sec)
创建用户wordpress_user:
mysql> CREATE USER 'wordpress_user'@'host' IDENTIFIED BY 'Mysql./user123';
Query OK, 0 rows affected (0.00 sec)
创建数据库wordpress,并且将其所有权赋给用户wordpress_user:
mysql> create database wordpress;
Query OK, 1 row affected (0.00 sec)

mysql> grant all privileges on wordpress.* to "wordpress_user"@"localhost" identified by "Mysql./user123";
Query OK, 0 rows affected, 1 warning (0.00 sec)

mysql> flush privileges;
Query OK, 0 rows affected (0.00 sec)
重新启动nginx、mysql、php-fpm
systemctl restart nginx
systemctl restart mysqld
systemctl restart php-fpm
为避免出现其它问题,先关闭防火墙和selinux,后续再进行配置:
systemctl stop firewalld
setenforce 0
在浏览器中输入 domain.com (这是域名domain.com要换成你自己的域名,和上方conf配置中一致),即出现wordpress初始化界面:
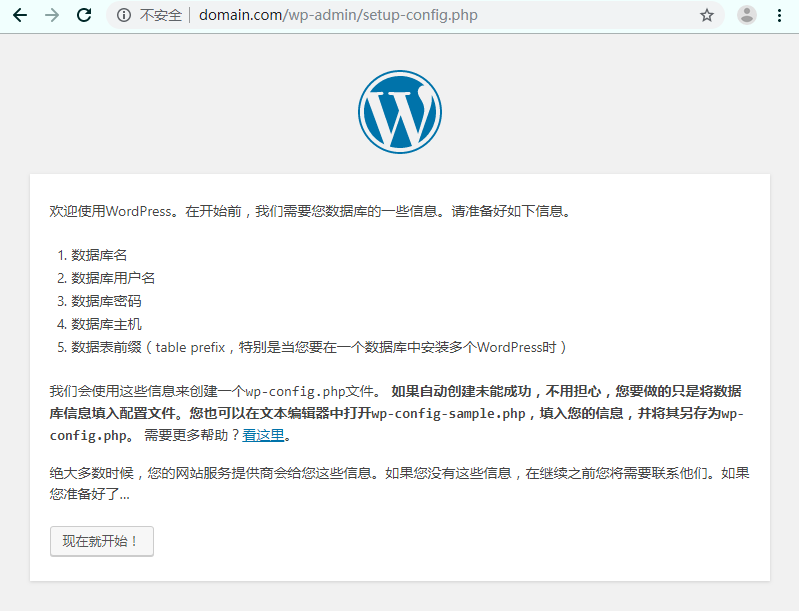
点击“现在就开始!”,填入上面mysql创建的用户名和数据库:
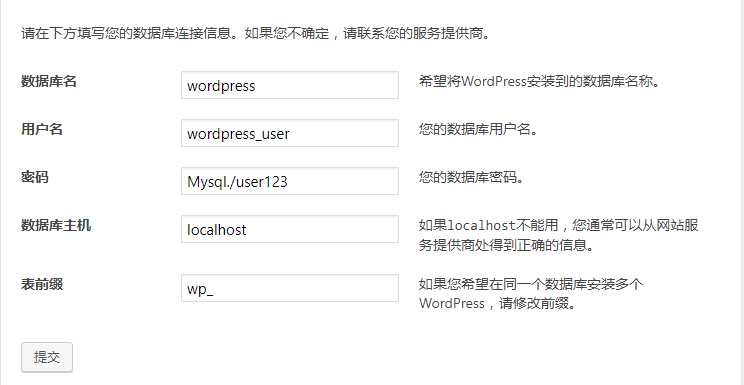
点击“提交”,
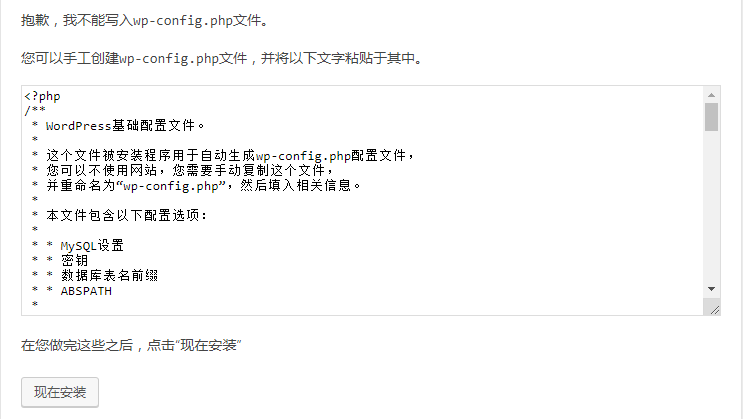
报错是因为,之前我们设置网站文件夹wordpress的用户组为 nginx:nginx ,而yum安装php的默认用户组为 apache:apache ,查看php-fpm配置文件 vim /etc/php-fpm.d/ww.conf ,可以看到:

将apache改为nginx,保存退出,重新启动php-fpm, systemctl restart php-fpm ,即可正常进入下一步,
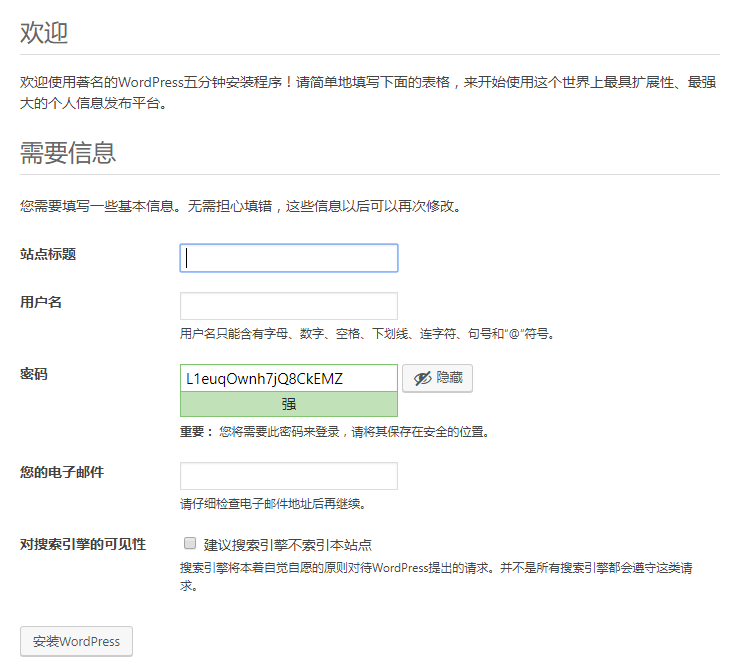
输入“站点标题”、“用户名”、“密码”、“电子邮件”,即可安装。安装完成,即可登录后台管理界面:
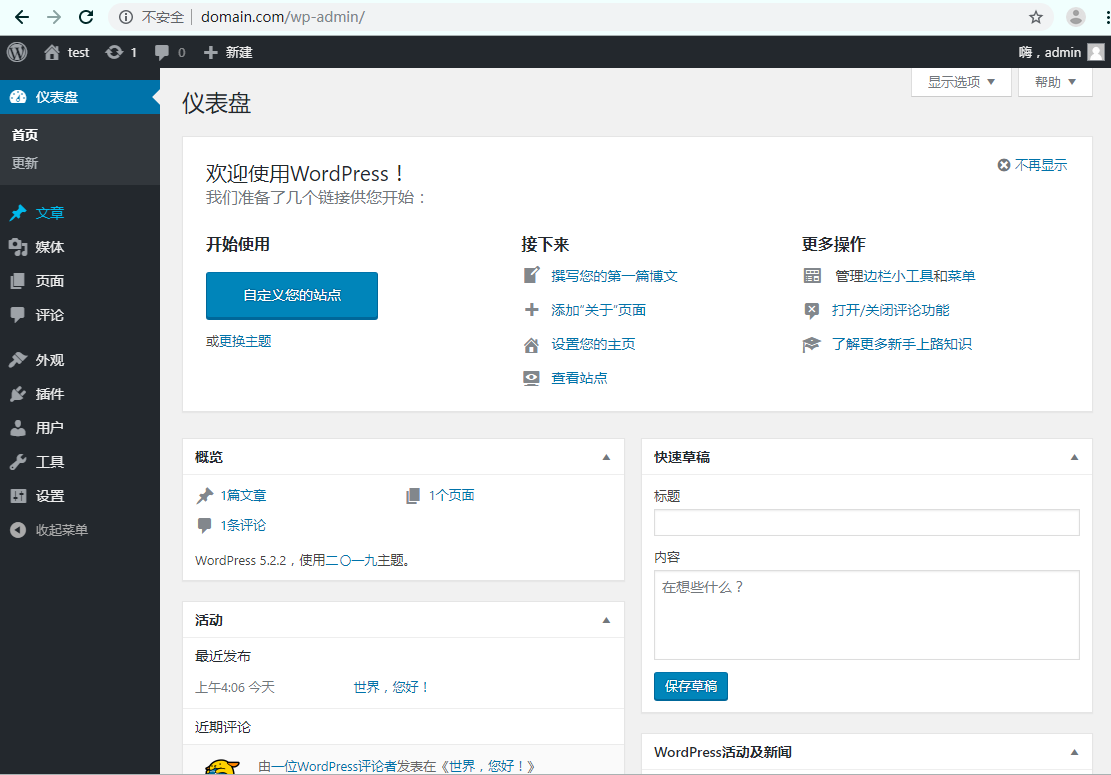
至此,mysql配置完成,wordpress博客网站配置完成!
总结:
使用yum安装nginx、mysql、php,方便快捷,实测在1c/1g虚拟机上安装只需5分钟!
单独安装完nginx、php软件后,需要配置nginx关联php。
配置wordpress网站,网站源码(即根目录)可以放置在任何位置,只要在nginx的conf配置文件里定位到就可以。nginx的主要配置文件是 nginx.conf ,它会包含(include)conf.d文件夹下面所有后缀是”.conf"的配置文件,本质上是包含描述网站具体配置的server { } 代码。
目前所有web服务器lnmp,lamp等,其安装方式,源码编译安装、yum安装、一键脚本安装、面板安装等,具体实现原理即上面讲述的两点:
1、配置nginx(或lamp)关联php;
2、配置网站的conf配置文件。