前言:
最近在项目中使用springboot时发现,采用在pom中定义不同的profile,并且maven打包时
采用-P参数并不能替换我application.properties文件中指定占位符的问题。
配置文件布局:

在application.properties中定义整个项目中不同环境下共通的配置属性,并采用springboot针对配置文件的特性 - spring.profiles.active=dev或者test
来自动加载合并application-dev/test.properties中特有的配置的功能,开发,测试,生产环境配置文件命名方面需要遵守springboot的约束即可。
Maven pom 配置:


备注:实际上使用springboot,上述的<resources>标签,以及<outputDirectory>都是不需要的,其都已经定义过了。在这里写出来只是为了讲述maven打包的原理。
执行打包命令:
进入项目pom文件所在目录,执行
mvn clean package -P test
命令解释:
1:执行后会根据pom中定义的profiles标签寻找对应的profile id为test的,将其properties下的子标签获取到,拿到key = boot.profile,value = test。放入map中
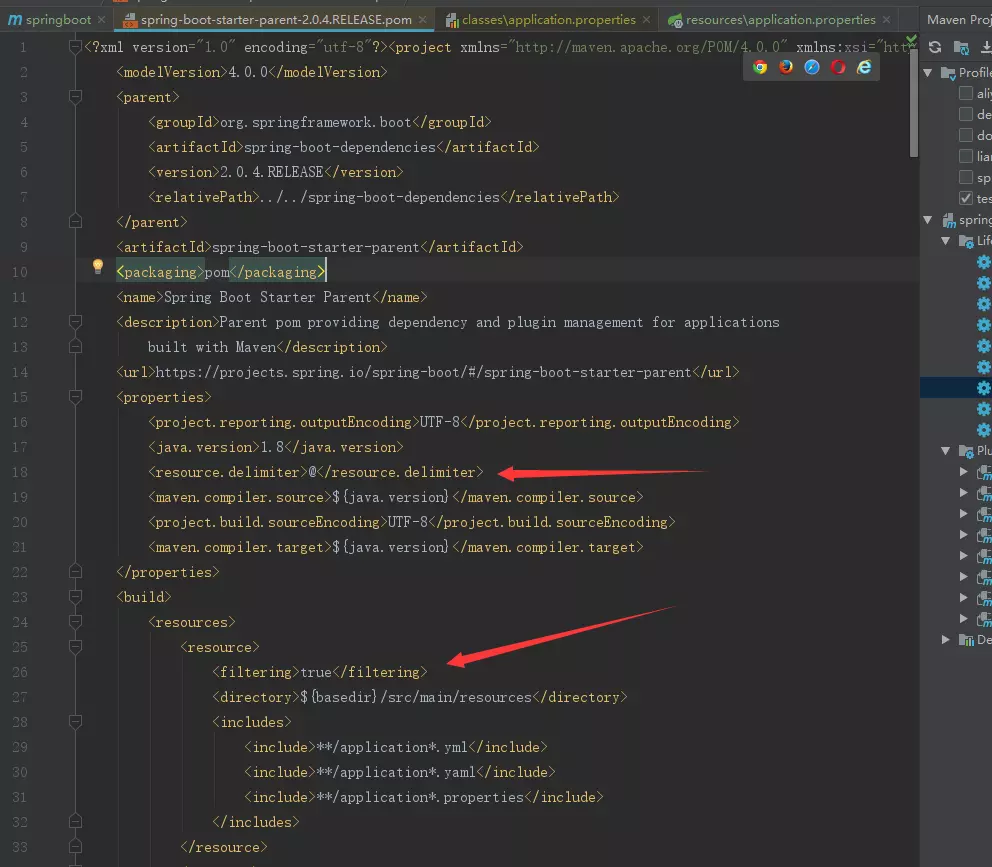
2:根据 build中定义的resources标签,开始打包对应的资源文件,由于指定了filtering为true,故会将上一步中得到的map中的key拿去替换resource中指定的资源文件中的占位符${key},为value值。
遇到的问题:
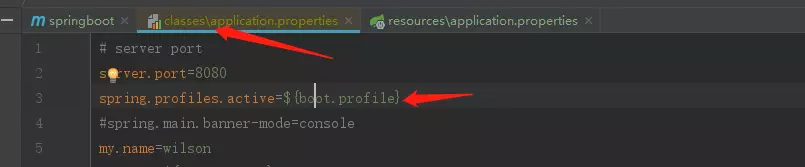
执行后查看classes文件下的资源文件,发现并没有替换掉
原因:
发现最终是因为springboot导致的,查看其pom继承,

进入后发现,springboot默认指定资源文件中的占位符为@@,并不是maven默认的 ${}

解决方案:
1:将application.properties中的占位符由${key} -> @key@
2:覆盖springboot的默认规则
 1     <build>
 2         <finalName>${project.artifactId}</finalName>
 3         <resources>
 4             <resource>
 5                 <filtering>true</filtering>
 6                 <directory>${basedir}/src/main/resources</directory>
 7                 <includes>
 8                     <include>**/application*.yml</include>
 9                     <include>**/application*.yaml</include>
10                     <include>**/*.properties</include>
11                 </includes>
12             </resource>
13             <resource>
14                 <directory>${basedir}/src/main/resources</directory>
15                 <excludes>
16                     <exclude>**/application*.yml</exclude>
17                     <exclude>**/application*.yaml</exclude>
18                     <exclude>**/*.properties</exclude>
19                 </excludes>
20             </resource>
21         </resources>
22         <plugins>
23             <plugin>
24                 <groupId>org.springframework.boot</groupId>
25                 <artifactId>spring-boot-maven-plugin</artifactId>
26             </plugin>
27             <plugin>
28                 <artifactId>maven-resources-plugin</artifactId>
29                 <configuration>
30                     <encoding>utf-8</encoding>
31                     <useDefaultDelimiters>true</useDefaultDelimiters>
32                 </configuration>
33             </plugin>
34         </plugins>
35     </build>
3:测试了再自己的pom中不增加resource配置,只是增加

也是可以的哦
建议:
既然已经使用了springboot,就不要再用回之前的写法了,平白增加配置。
附:pom的profile导入.properties
方法1:
 1   <profiles>
 2     <!--开发环境-->
 3     <profile>
 4       <id>dev</id>
 5       <activation>
 6         <activeByDefault>true</activeByDefault>
 7       </activation>
 8       <properties>
 9         <spring.profiles.active>dev</spring.profiles.active>
10       </properties>
11       <build>
12         <filters>
13           <filter>${basedir}/src/main/resources/application-dev.properties</filter>
14         </filters>
15       </build>
16     </profile>
17     <!--预发环境-->
18     <profile>
19       <id>pre</id>
20       <activation>
21         <activeByDefault>true</activeByDefault>
22       </activation>
23       <properties>
24         <spring.profiles.active>pre</spring.profiles.active>
25       </properties>
26       <build>
27         <filters>
28           <filter>${basedir}/src/main/resources/application-pre.properties</filter>
29         </filters>
30       </build>
31     </profile>
32   </profiles>
方法2:
 1   <profiles>
 2     <!--开发环境-->
 3     <profile>
 4       <id>dev</id>
 5       <activation>
 6         <activeByDefault>true</activeByDefault>
 7       </activation>
 8       <properties>
 9         <spring.profiles.active>dev</spring.profiles.active>
10       </properties>
11     </profile>
12     <!--预发环境-->
13     <profile>
14       <id>pre</id>
15       <activation>
16         <activeByDefault>true</activeByDefault>
17       </activation>
18       <properties>
19         <spring.profiles.active>pre</spring.profiles.active>
20       </properties>
21     </profile>
22   </profiles>
23
24   <build>
25     <filters>
26          <filter>
27 ${basedir}/src/main/resources/application-${spring.profiles.active}.properties
28          </filter>
29     </filters>
30   </build>