Flume案例和Flume监控系统的使用:
安装
- 将apache-flume-1.7.0-bin.tar.gz上传到linux的/opt/software目录下
-
解压apache-flume-1.7.0-bin.tar.gz到/opt/module/目录下
[hadoop@datanode1 software]$ tar -zxf apache-flume-1.7.0-bin.tar.gz -C /opt/module/
3. 修改apache-flume-1.7.0-bin的名称为flume
[hadoop@datanode1 module]$ mv apache-flume-1.7.0-bin flume
将flume/conf下的flume-env.sh.template文件修改为flume-env.sh,并配置flume-env.sh文件
[hadoop@datanode1 module]$ mv flume-env.sh.template flume-env.sh
[hadoop@datanode1 module]$ vi flume-env.sh
export JAVA_HOME=/opt/module/jdk1.8.0_162
案例实操
监控端口数据
案例需求:首先,Flume监控本机44444端口,然后通过telnet工具向本机44444端口发送消息,最后Flume将监听的数据实时显示在控制台。
判断端口是否被占用
sudo netstat -tunlp | grep 44444
功能描述:netstat命令是一个监控TCP/IP网络的非常有用的工具,它可以显示路由表、实际的网络连接以及每一个网络接口设备的状态信息。
基本语法:netstat [选项]
选项参数:
-t或—tcp:显示TCP传输协议的连线状况;
-u或—udp:显示UDP传输协议的连线状况;
-n或—numeric:直接使用ip地址,而不通过域名服务器;
-l或—listening:显示监控中的服务器的Socket;
-p或—programs:显示正在使用Socket的程序识别码和程序名称;
配置
hadoop@datanode1 job]$ vim flume-telnet-logger.conf
# Name the components on this agent
a1.sources = r1		#r1:表示a1的输入源
a1.sinks = k1		#k1表示a1的输出目的地
a1.channels = c1     #C1表示a1的缓冲区

# Describe/configure the source
a1.sources.r1.type = netcat           #表示a1的输入源类型为netcat类型
a1.sources.r1.bind = localhost		 #标识a1的监听的主机
a1.sources.r1.port = 44444			 #标识a1监听的端口号

# Describe the sink
a1.sinks.k1.type = logger			#标识a1的输出目的地是logger类型

# Use a channel which buffers events in memory
a1.channels.c1.type = memory				#表示a1的channel类型是memory内存型
a1.channels.c1.capacity = 1000				#表示a1的channel总容量1000
a1.channels.c1.transactionCapacity = 100     #表示a1的channel传输总容量100

# Bind the source and sink to the channel
a1.sources.r1.channels = c1              #表示将r1和c1连接起来
a1.sinks.k1.channel = c1			    #表示将k1和c1连接起来
启动
[hadoop@datanode1 flume]$  bin/flume-ng agent --conf conf/ --name a1 --conf-file job/flume-telnet-logger.conf -Dflume.root.logger=INFO,console

参数说明:
	--conf conf/  :表示配置文件存储在conf/目录
	--name a1	:表示给agent起名为a1
	--conf-file job/flume-telnet.conf :flume本次启动读取的配置文件是在job文件夹下的flume-telnet.conf文件。
	-Dflume.root.logger==INFO,console :-D表示flume运行时动态修改flume.root.logger参数属性值,并将控制台日志打印级别设置为INFO级别。
日志级别包括:log、info、warn、error。
telnet localhost 44444

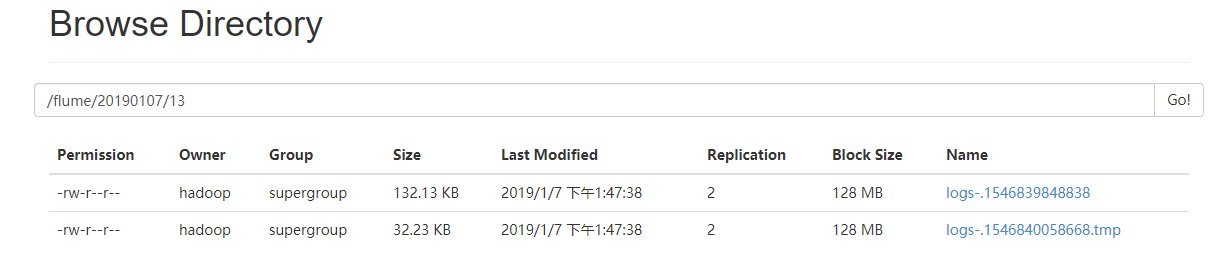
实时读取本地文件到HDFS案例
测试脚本
[hadoop@datanode1 data]$ vim test.sh
#!bin/bash
i=1
while [ true ]
let i+=1
d=$( date +%Y-%m-%d %H:%M:%S )
do
 echo "data:$d $i"
done
flume-file-hdfs.conf
[hadoop@datanode1 job]$ vim flume-file-hdfs.conf
# Name the components on this agent
a2.sources = r2
a2.sinks = k2
a2.channels = c2

# Describe/configure the source
a2.sources.r2.type = exec
a2.sources.r2.command = tail -F  /opt/module/flume/job/data/data1.log
a2.sources.r2.shell = /bin/bash -c

# Describe the sink
a2.sinks.k2.type = hdfs
a2.sinks.k2.hdfs.path = hdfs://datanode1:9000/flume/%Y%m%d/%H
#上传文件的前缀
a2.sinks.k2.hdfs.filePrefix = logs-
#是否按照时间滚动文件夹
a2.sinks.k2.hdfs.round = true
#多少时间单位创建一个新的文件夹
a2.sinks.k2.hdfs.roundValue = 1
#重新定义时间单位
a2.sinks.k2.hdfs.roundUnit = hour
#是否使用本地时间戳
a2.sinks.k2.hdfs.useLocalTimeStamp = true
#积攒多少个Event才flush到HDFS一次
a2.sinks.k2.hdfs.batchSize = 1000
#设置文件类型,可支持压缩
a2.sinks.k2.hdfs.fileType = DataStream
#多久生成一个新的文件
a2.sinks.k2.hdfs.rollInterval = 600
#设置每个文件的滚动大小
a2.sinks.k2.hdfs.rollSize = 134217700
#文件的滚动与Event数量无关
a2.sinks.k2.hdfs.rollCount = 0
#最小冗余数
a2.sinks.k2.hdfs.minBlockReplicas = 1

# Use a channel which buffers events in memory
a2.channels.c2.type = memory
a2.channels.c2.capacity = 1000
a2.channels.c2.transactionCapacity = 100

# Bind the source and sink to the channel
a2.sources.r2.channels = c2
a2.sinks.k2.channel = c2
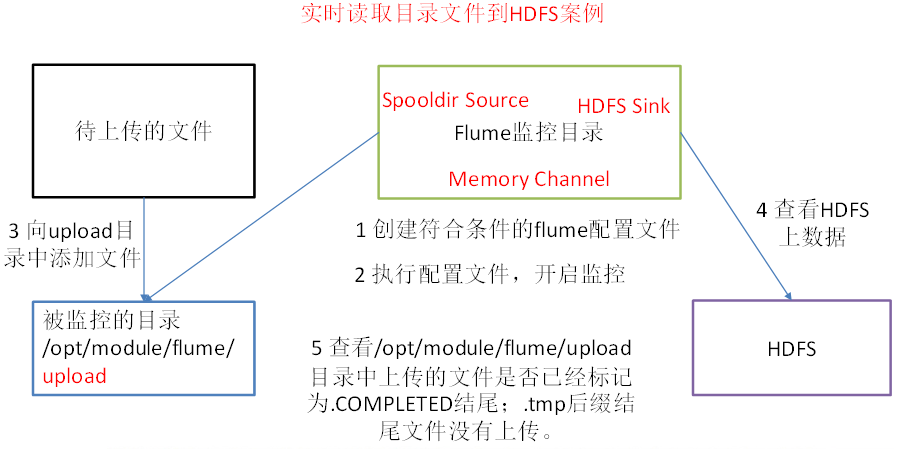
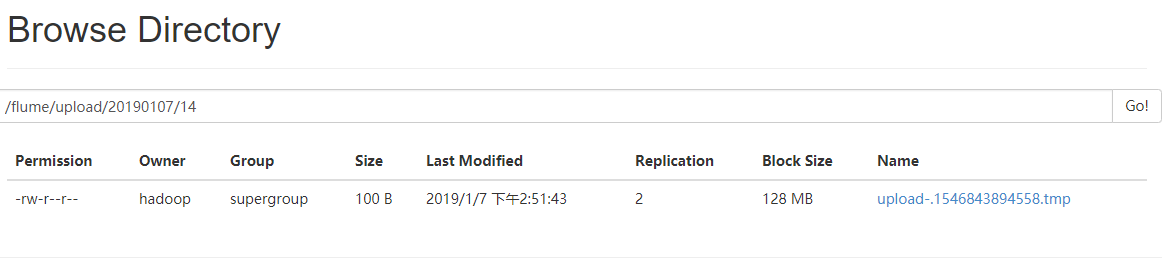
实时读取目录文件到HDFS案例
需求分析
配置
[hadoop@datanode1 job]$ vim flume-dir-hdfs.conf
[hadoop@datanode1 job]$ vim flume-dir-hdfs.conf
a3.sources = r3
a3.sinks = k3
a3.channels = c3

# Describe/configure the source
a3.sources.r3.type = spooldir
a3.sources.r3.spoolDir = /opt/module/flume/upload
a3.sources.r3.fileSuffix = .COMPLETED
a3.sources.r3.fileHeader = true
#忽略所有以.tmp结尾的文件,不上传
a3.sources.r3.ignorePattern = ([^ ]*.tmp)

# Describe the sink
a3.sinks.k3.type = hdfs
a3.sinks.k3.hdfs.path = hdfs://datanode1:9000/flume/upload/%Y%m%d/%H
#上传文件的前缀
a3.sinks.k3.hdfs.filePrefix = upload-
#是否按照时间滚动文件夹
a3.sinks.k3.hdfs.round = true
#多少时间单位创建一个新的文件夹
a3.sinks.k3.hdfs.roundValue = 1
#重新定义时间单位
a3.sinks.k3.hdfs.roundUnit = hour
#是否使用本地时间戳
a3.sinks.k3.hdfs.useLocalTimeStamp = true
#积攒多少个Event才flush到HDFS一次
a3.sinks.k3.hdfs.batchSize = 100
#设置文件类型,可支持压缩
a3.sinks.k3.hdfs.fileType = DataStream
#多久生成一个新的文件
a3.sinks.k3.hdfs.rollInterval = 600
#设置每个文件的滚动大小大概是128M
a3.sinks.k3.hdfs.rollSize = 134217700
#文件的滚动与Event数量无关
a3.sinks.k3.hdfs.rollCount = 0
#最小冗余数
a3.sinks.k3.hdfs.minBlockReplicas = 1

# Use a channel which buffers events in memory
a3.channels.c3.type = memory
a3.channels.c3.capacity = 1000
a3.channels.c3.transactionCapacity = 100

# Bind the source and sink to the channel
a3.sources.r3.channels = c3
a3.sinks.k3.channel = c3
测试脚本
#!bin/bash
i=1
cd /opt/module/flume/upload
while [ true ]
let i+=1
d=$( date +%Y-%m-%d %H:%M:%S )
do
 touch "文档$i.txt"
 touch "$d-$i.log"
 touch "$i.tmp"
 sleep 1
done
启动
[hadoop@datanode1 flume]$ bin/flume-ng agent --conf conf/ --name a3 --conf-file job/flume-dir-hdfs.conf
注意
- 在使用Spooling Directory Source时
- 不要在监控目录中创建并持续修改文件
- 上传完成的文件会以.COMPLETED结尾
- 被监控文件夹每600毫秒扫描一次文件变动
查看
查看本地文件

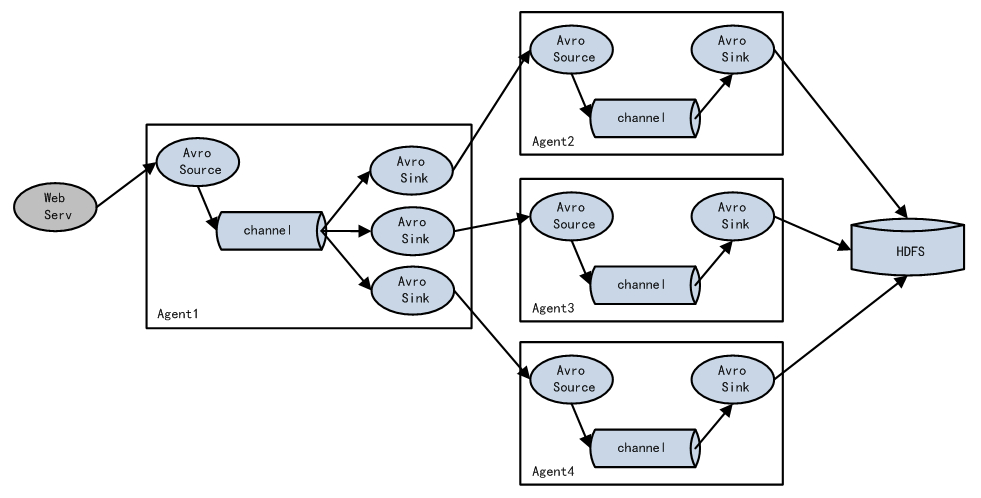
单数据源多出口案例(一)

分析
案例需求:使用flume-1监控文件变动,flume-1将变动内容传递给flume-2,flume-2负责存储到HDFS。同时flume-1将变动内容传递给flume-3,flume-3负责输出到local filesystem。
需求分析:

步骤
-
在/opt/module/flume/job目录下创建group1文件夹
[hadoop@datanode1 job]$ cd group1/
在datanode3节点上/opt/module/datas/目录下创建flume3文件夹
[hadoop@datanode3 datas]$ mkdir flume3/
配置1个接收日志文件的source和两个channel、两个sink,分别输送给flume-flume-hdfs和flume-flume-dir。
datanode1配置文件
[hadoop@datanode1 group1]$ vim flume-file-flume.conf
# Name the components on this agent
a1.sources = r1
a1.sinks = k1 k2
a1.channels = c1 c2
# 将数据流复制给多个channel
a1.sources.r1.selector.type = replicating

# Describe/configure the source
a1.sources.r1.type = exec
a1.sources.r1.command = tail -F /opt/module/datas/logs.log
a1.sources.r1.shell = /bin/bash -c

# Describe the sink
a1.sinks.k1.type = avro
a1.sinks.k1.hostname = datanode2
a1.sinks.k1.port = 4141

a1.sinks.k2.type = avro
a1.sinks.k2.hostname = datanode3
a1.sinks.k2.port = 4142

# Describe the channel
a1.channels.c1.type = memory
a1.channels.c1.capacity = 1000
a1.channels.c1.transactionCapacity = 100

a1.channels.c2.type = memory
a1.channels.c2.capacity = 1000
a1.channels.c2.transactionCapacity = 100

# Bind the source and sink to the channel
a1.sources.r1.channels = c1 c2
a1.sinks.k1.channel = c1
a1.sinks.k2.channel = c2
datanode2配置文件
[hadoop@datanode2 group1]$ vim flume-flume-hdfs.conf
# Name the components on this agent
a2.sources = r1
a2.sinks = k1
a2.channels = c1

# Describe/configure the source
a2.sources.r1.type = avro
a2.sources.r1.bind = datanode2
a2.sources.r1.port = 4141

# Describe the sink
a2.sinks.k1.type = hdfs
a2.sinks.k1.hdfs.path = hdfs://datanode1:9000/flume2/%Y%m%d/%H
#上传文件的前缀
a2.sinks.k1.hdfs.filePrefix = flume2-
#是否按照时间滚动文件夹
a2.sinks.k1.hdfs.round = true
#多少时间单位创建一个新的文件夹
a2.sinks.k1.hdfs.roundValue = 1
#重新定义时间单位
a2.sinks.k1.hdfs.roundUnit = hour
#是否使用本地时间戳
a2.sinks.k1.hdfs.useLocalTimeStamp = true
#积攒多少个Event才flush到HDFS一次
a2.sinks.k1.hdfs.batchSize = 100
#设置文件类型,可支持压缩
a2.sinks.k1.hdfs.fileType = DataStream
#多久生成一个新的文件
a2.sinks.k1.hdfs.rollInterval = 600
#设置每个文件的滚动大小大概是128M
a2.sinks.k1.hdfs.rollSize = 134217700
#文件的滚动与Event数量无关
a2.sinks.k1.hdfs.rollCount = 0
#最小冗余数
a2.sinks.k1.hdfs.minBlockReplicas = 1

# Describe the channel
a2.channels.c1.type = memory
a2.channels.c1.capacity = 1000
a2.channels.c1.transactionCapacity = 100
datanode3配置文件
[hadoop@datanode3 group1]$ vim flume-flume-dir.conf
me the components on this agent
a3.sources = r1
a3.sinks = k1
a3.channels = c2

# Describe/configure the source
a3.sources.r1.type = avro
a3.sources.r1.bind = datanode3
a3.sources.r1.port = 4142

# Describe the sink
a3.sinks.k1.type = file_roll
a3.sinks.k1.sink.directory = /opt/module/datas/flume3

# Describe the channel
a3.channels.c2.type = memory
a3.channels.c2.capacity = 1000
a3.channels.c2.transactionCapacity = 100

# Bind the source and sink to the channel
a3.sources.r1.channels = c2
a3.sinks.k1.channel = c2启动
启动
datanode1
[hadoop@datanode1 flume]$ bin/flume-ng agent --conf conf/ --name a1 --conf-file job/group1/flume-file-flume.conf
datanode2
[hadoop@datanode2 flume]$ bin/flume-ng agent --conf conf/ --name a2 --conf-file job/group1/flume-flume-hdfs.conf
datanode3
[hadoop@datanode3 flume]$ bin/flume-ng agent --conf conf/ --name a3 --conf-file job/group1/flume-flume-dir.conf
单数据源多出口案例(二)
需求
案例需求:使用flume-1监控文件变动,flume-1将变动内容传递给flume-2,flume-2负责存储到HDFS。同时flume-1将变动内容传递给flume-3,flume-3也负责存储到HDFS
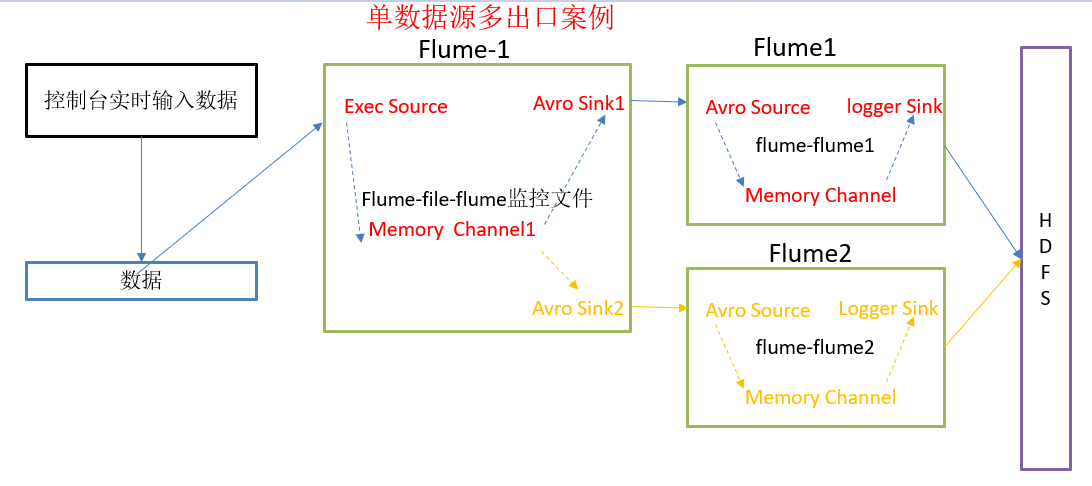
实现
datanode1
[hadoop@datanode1 flume]$ vim job/group1/flume-netcat-flume.conf
# Name the components on this agent
a1.sources = r1
a1.channels = c1
a1.sinkgroups = g1
a1.sinks = k1 k2

# Describe/configure the source
a1.sources.r1.type = netcat
a1.sources.r1.bind = datanode1
a1.sources.r1.port = 44444

a1.sinkgroups.g1.processor.type = load_balance
a1.sinkgroups.g1.processor.backoff = true
a1.sinkgroups.g1.processor.selector = round_robin
a1.sinkgroups.g1.processor.selector.maxTimeOut=10000

# Describe the sink
a1.sinks.k1.type = avro
a1.sinks.k1.hostname = datanode2
a1.sinks.k1.port = 4141

a1.sinks.k2.type = avro
a1.sinks.k2.hostname = datanode3
a1.sinks.k2.port = 4142

# Describe the channel
a1.channels.c1.type = memory
a1.channels.c1.capacity = 1000
a1.channels.c1.transactionCapacity = 100

# Bind the source and sink to the channel
a1.sources.r1.channels = c1
a1.sinkgroups.g1.sinks = k1 k2
a1.sinks.k1.channel = c1
a1.sinks.k2.channel = c1
datanode2
# Name the components on this agent
a2.sources = r1
a2.sinks = k1
a2.channels = c1

# Describe/configure the source
a2.sources.r1.type = avro
a2.sources.r1.bind = datanode2
a2.sources.r1.port = 4141

# Describe the sink
a2.sinks.k1.type = logger

# Describe the channel
a2.channels.c1.type = memory
a2.channels.c1.capacity = 1000
a2.channels.c1.transactionCapacity = 100

# Bind the source and sink to the channel
a2.sources.r1.channels = c1
a2.sinks.k1.channel = c1
datanode3
[hadoop@datanode3 flume]$ vim job/group1/flume-flume2.conf
# Name the components on this agent
a3.sources = r1
a3.sinks = k1
a3.channels = c2

# Describe/configure the source
a3.sources.r1.type = avro
a3.sources.r1.bind = datanode3
a3.sources.r1.port = 4142

# Describe the sink
a3.sinks.k1.type = logger

# Describe the channel
a3.channels.c2.type = memory
a3.channels.c2.capacity = 1000
a3.channels.c2.transactionCapacity = 100

# Bind the source and sink to the channel
a3.sources.r1.channels = c2
a3.sinks.k1.channel = c2
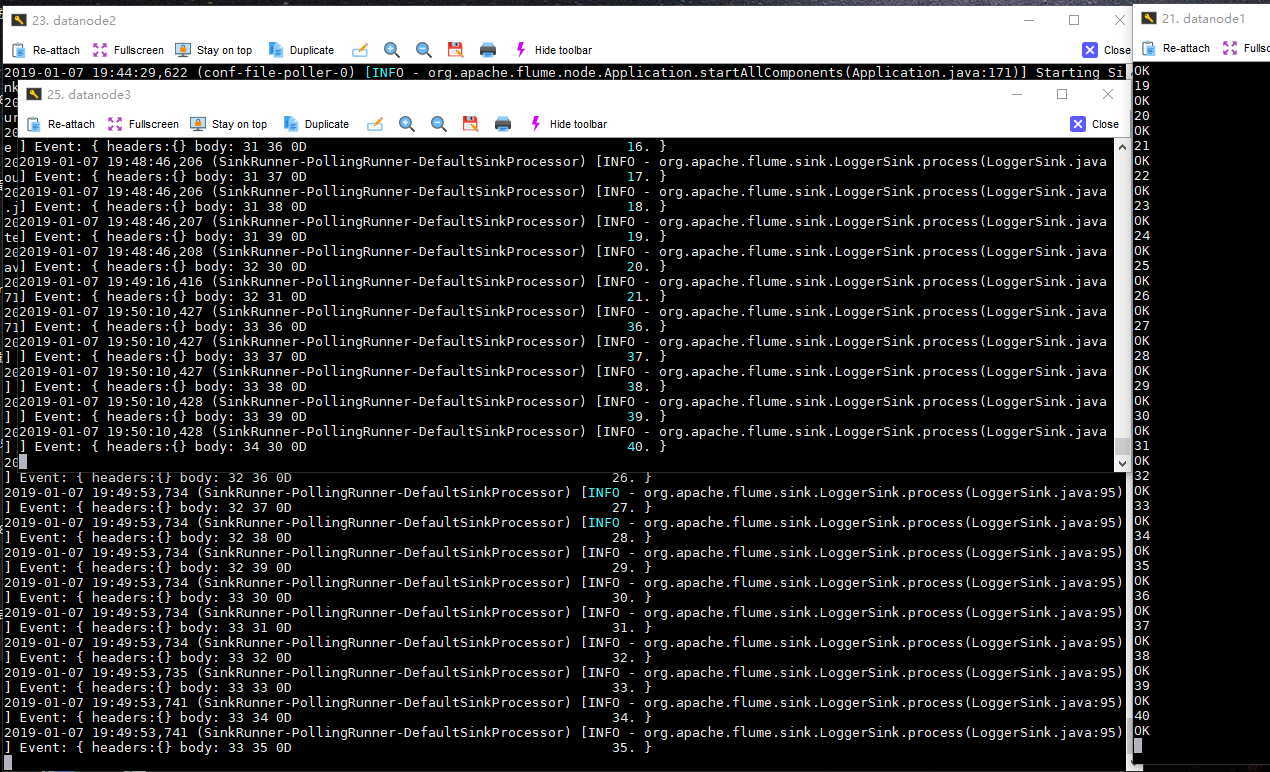
启动
datanode1
[hadoop@datanode1 flume]$ bin/flume-ng agent --conf conf/ --name a1 --conf-file job/group1/flume-netcat-flume.conf
datanode2
[hadoop@datanode2 flume]$ bin/flume-ng agent --conf conf/ --name a2 --conf-file job/group1/flume-flume1.conf -Dflume.root.logger=INFO,console
datanod3
[hadoop@datanode3 flume]$ bin/flume-ng agent --conf conf/ --name a3 --conf-file job/group1/flume-flume2.conf -Dflume.root.logger=INFO,console
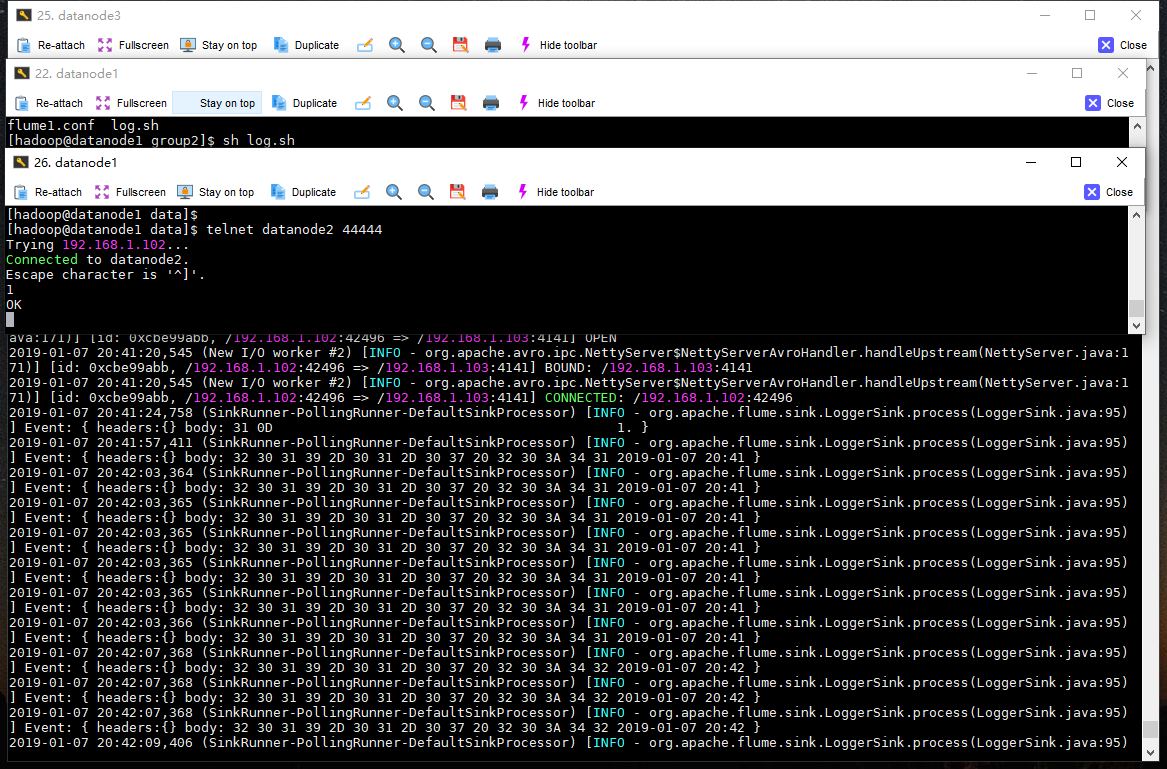
多数据源汇总案例

datanode1上的flume-1监控一个软件的log日志,
datanode2上的flume-2监控某一个端口的数据流,
flume-1与flume-2将数据发送给datanode3上的flume-3,flume-3将最终数据打印到控制台
步骤
- 分发flume
[hadoop@datanode2 job]$ mkdir group2
[hadoop@datanode2 job]$ xsync /opt/module/flume/
datanode1配置source用于监控hive.log文件,配置sink输出数据到下一级flume。
# Name the components on this agent
a1.sources = r1
a1.sinks = k1
a1.channels = c1

# Describe/configure the source
a1.sources.r1.type = exec
a1.sources.r1.command = tail -F /opt/module/datas/logs.log
a1.sources.r1.shell = /bin/bash -c

# Describe the sink
a1.sinks.k1.type = avro
a1.sinks.k1.hostname = datanode1
a1.sinks.k1.port = 4141

# Describe the channel
a1.channels.c1.type = memory
a1.channels.c1.capacity = 1000
a1.channels.c1.transactionCapacity = 100

# Bind the source and sink to the channel
a1.sources.r1.channels = c1
a1.sinks.k1.channel = c1
启动
[hadoop@datanode3 flume]$ bin/flume-ng agent --conf conf/ --name a3 --conf-file job/group2/flume3.conf -Dflume.root.logger=INFO,console
[hadoop@datanode2 flume]$  bin/flume-ng agent --conf conf/ --name a2 --conf-file job/group2/flume2.conf
[hadoop@datanode1 flume]$ bin/flume-ng agent --conf conf/ --name a1 --conf-file job/group2/flume1.conf
自定义MYSQLSource
SQLSourceHelper
import org.apache.flume.Context;
import org.apache.flume.conf.ConfigurationException;
import org.slf4j.Logger;
import org.slf4j.LoggerFactory;

import java.io.IOException;
import java.sql.*;
import java.text.ParseException;
import java.util.ArrayList;
import java.util.List;
import java.util.Properties;

public class SQLSourceHelper {

    private static final Logger LOG = LoggerFactory.getLogger(SQLSourceHelper.class);

    private int runQueryDelay, //两次查询的时间间隔
            startFrom,            //开始id
            currentIndex,	     //当前id
            recordSixe = 0,      //每次查询返回结果的条数
            maxRow;                //每次查询的最大条数


    private String table,       //要操作的表
            columnsToSelect,     //用户传入的查询的列
            customQuery,          //用户传入的查询语句
            query,                 //构建的查询语句
            defaultCharsetResultSet;//编码集

    //上下文,用来获取配置文件
    private Context context;

    //为定义的变量赋值(默认值),可在flume任务的配置文件中修改
    private static final int DEFAULT_QUERY_DELAY = 10000;
    private static final int DEFAULT_START_VALUE = 0;
    private static final int DEFAULT_MAX_ROWS = 2000;
    private static final String DEFAULT_COLUMNS_SELECT = "*";
    private static final String DEFAULT_CHARSET_RESULTSET = "UTF-8";

    private static Connection conn = null;
    private static PreparedStatement ps = null;
    private static String connectionURL, connectionUserName, connectionPassword;

    //加载静态资源
    static {
        Properties p = new Properties();
        try {
            p.load(SQLSourceHelper.class.getClassLoader().getResourceAsStream("jdbc.properties"));
            connectionURL = p.getProperty("dbUrl");
            connectionUserName = p.getProperty("dbUser");
            connectionPassword = p.getProperty("dbPassword");
            Class.forName(p.getProperty("dbDriver"));
        } catch (IOException | ClassNotFoundException e) {
            LOG.error(e.toString());
        }
    }

    //获取JDBC连接
    private static Connection InitConnection(String url, String user, String pw) {
        try {
            Connection conn = DriverManager.getConnection(url, user, pw);
            if (conn == null)
                throw new SQLException();
            return conn;
        } catch (SQLException e) {
            e.printStackTrace();
        }
        return null;
    }

    //构造方法
    SQLSourceHelper(Context context) throws ParseException {
        //初始化上下文
        this.context = context;

        //有默认值参数:获取flume任务配置文件中的参数,读不到的采用默认值
        this.columnsToSelect = context.getString("columns.to.select", DEFAULT_COLUMNS_SELECT);
        this.runQueryDelay = context.getInteger("run.query.delay", DEFAULT_QUERY_DELAY);
        this.startFrom = context.getInteger("start.from", DEFAULT_START_VALUE);
        this.defaultCharsetResultSet = context.getString("default.charset.resultset", DEFAULT_CHARSET_RESULTSET);

        //无默认值参数:获取flume任务配置文件中的参数
        this.table = context.getString("table");
        this.customQuery = context.getString("custom.query");
        connectionURL = context.getString("connection.url");
        connectionUserName = context.getString("connection.user");
        connectionPassword = context.getString("connection.password");
        conn = InitConnection(connectionURL, connectionUserName, connectionPassword);

        //校验相应的配置信息,如果没有默认值的参数也没赋值,抛出异常
        checkMandatoryProperties();
        //获取当前的id
        currentIndex = getStatusDBIndex(startFrom);
        //构建查询语句
        query = buildQuery();
    }

    //校验相应的配置信息(表,查询语句以及数据库连接的参数)
    private void checkMandatoryProperties() {
        if (table == null) {
            throw new ConfigurationException("property table not set");
        }
        if (connectionURL == null) {
            throw new ConfigurationException("connection.url property not set");
        }
        if (connectionUserName == null) {
            throw new ConfigurationException("connection.user property not set");
        }
        if (connectionPassword == null) {
            throw new ConfigurationException("connection.password property not set");
        }
    }

    //构建sql语句
    private String buildQuery() {
        String sql = "";
        //获取当前id
        currentIndex = getStatusDBIndex(startFrom);
        LOG.info(currentIndex + "");
        if (customQuery == null) {
            sql = "SELECT " + columnsToSelect + " FROM " + table;
        } else {
            sql = customQuery;
        }
        StringBuilder execSql = new StringBuilder(sql);
        //以id作为offset
        if (!sql.contains("where")) {
            execSql.append(" where ");
            execSql.append("id").append(">").append(currentIndex);
            return execSql.toString();
        } else {
            int length = execSql.toString().length();
            return execSql.toString().substring(0, length - String.valueOf(currentIndex).length()) + currentIndex;
        }
    }

    //执行查询
    List<List<Object>> executeQuery() {
        try {
            //每次执行查询时都要重新生成sql,因为id不同
            customQuery = buildQuery();
            //存放结果的集合
            List<List<Object>> results = new ArrayList<>();
            if (ps == null) {
                //
                ps = conn.prepareStatement(customQuery);
            }
            ResultSet result = ps.executeQuery(customQuery);
            while (result.next()) {
                //存放一条数据的集合(多个列)
                List<Object> row = new ArrayList<>();
                //将返回结果放入集合
                for (int i = 1; i <= result.getMetaData().getColumnCount(); i++) {
                    row.add(result.getObject(i));
                }
                results.add(row);
            }
            LOG.info("execSql:" + customQuery + "
resultSize:" + results.size());
            return results;
        } catch (SQLException e) {
            LOG.error(e.toString());
            // 重新连接
            conn = InitConnection(connectionURL, connectionUserName, connectionPassword);
        }
        return null;
    }

    //将结果集转化为字符串,每一条数据是一个list集合,将每一个小的list集合转化为字符串
    List<String> getAllRows(List<List<Object>> queryResult) {
        List<String> allRows = new ArrayList<>();
        if (queryResult == null || queryResult.isEmpty())
            return allRows;
        StringBuilder row = new StringBuilder();
        for (List<Object> rawRow : queryResult) {
            Object value = null;
            for (Object aRawRow : rawRow) {
                value = aRawRow;
                if (value == null) {
                    row.append(",");
                } else {
                    row.append(aRawRow.toString()).append(",");
                }
            }
            allRows.add(row.toString());
            row = new StringBuilder();
        }
        return allRows;
    }

    //更新offset元数据状态,每次返回结果集后调用。必须记录每次查询的offset值,为程序中断续跑数据时使用,以id为offset
    void updateOffset2DB(int size) {
        //以source_tab做为KEY,如果不存在则插入,存在则更新(每个源表对应一条记录)
        String sql = "insert into flume_meta(source_tab,currentIndex) VALUES('"
                + this.table
                + "','" + (recordSixe += size)
                + "') on DUPLICATE key update source_tab=values(source_tab),currentIndex=values(currentIndex)";
        LOG.info("updateStatus Sql:" + sql);
        execSql(sql);
    }

    //执行sql语句
    private void execSql(String sql) {
        try {
            ps = conn.prepareStatement(sql);
            LOG.info("exec::" + sql);
            ps.execute();
        } catch (SQLException e) {
            e.printStackTrace();
        }
    }

    //获取当前id的offset
    private Integer getStatusDBIndex(int startFrom) {
        //从flume_meta表中查询出当前的id是多少
        String dbIndex = queryOne("select currentIndex from flume_meta where source_tab='" + table + "'");
        if (dbIndex != null) {
            return Integer.parseInt(dbIndex);
        }
        //如果没有数据,则说明是第一次查询或者数据表中还没有存入数据,返回最初传入的值
        return startFrom;
    }

    //查询一条数据的执行语句(当前id)
    private String queryOne(String sql) {
        ResultSet result = null;
        try {
            ps = conn.prepareStatement(sql);
            result = ps.executeQuery();
            while (result.next()) {
                return result.getString(1);
            }
        } catch (SQLException e) {
            e.printStackTrace();
        }
        return null;
    }

    //关闭相关资源
    void close() {
        try {
            ps.close();
            conn.close();
        } catch (SQLException e) {
            e.printStackTrace();
        }
    }

    int getCurrentIndex() {
        return currentIndex;
    }

    void setCurrentIndex(int newValue) {
        currentIndex = newValue;
    }

    int getRunQueryDelay() {
        return runQueryDelay;
    }

    String getQuery() {
        return query;
    }

    String getConnectionURL() {
        return connectionURL;
    }

    private boolean isCustomQuerySet() {
        return (customQuery != null);
    }

    Context getContext() {
        return context;
    }

    public String getConnectionUserName() {
        return connectionUserName;
    }

    public String getConnectionPassword() {
        return connectionPassword;
    }
}
SQLSource
| 属性 | 说明(括号中为默认值) |
|---|---|
| runQueryDelay | 查询时间间隔(10000) |
| batchSize | 缓存大小(100) |
| startFrom | 查询语句开始id(0) |
| currentIndex | 查询语句当前id,每次查询之前需要查元数据表 |
| recordSixe | 查询返回条数 |
| table | 监控的表名 |
| columnsToSelect | 查询字段(*) |
| customQuery | 用户传入的查询语句 |
| query | 查询语句 |
| defaultCharsetResultSet | 编码格式(UTF-8) |
import org.apache.flume.Context;
import org.apache.flume.Event;
import org.apache.flume.EventDeliveryException;
import org.apache.flume.PollableSource;
import org.apache.flume.conf.Configurable;
import org.apache.flume.event.SimpleEvent;
import org.apache.flume.source.AbstractSource;
import org.slf4j.Logger;
import org.slf4j.LoggerFactory;

import java.text.ParseException;
import java.util.ArrayList;
import java.util.HashMap;
import java.util.List;

public class SQLSource extends AbstractSource implements Configurable, PollableSource {

    //打印日志
    private static final Logger LOG = LoggerFactory.getLogger(SQLSource.class);
    //定义sqlHelper
    private SQLSourceHelper sqlSourceHelper;


    @Override
    public long getBackOffSleepIncrement() {
        return 0;
    }

    @Override
    public long getMaxBackOffSleepInterval() {
        return 0;
    }

    @Override
    public void configure(Context context) {
        try {
            //初始化
            sqlSourceHelper = new SQLSourceHelper(context);
        } catch (ParseException e) {
            e.printStackTrace();
        }
    }

    @Override
    public Status process() throws EventDeliveryException {
        try {
            //查询数据表
            List<List<Object>> result = sqlSourceHelper.executeQuery();
            //存放event的集合
            List<Event> events = new ArrayList<>();
            //存放event头集合
            HashMap<String, String> header = new HashMap<>();
            //如果有返回数据,则将数据封装为event
            if (!result.isEmpty()) {
                List<String> allRows = sqlSourceHelper.getAllRows(result);
                Event event = null;
                for (String row : allRows) {
                    event = new SimpleEvent();
                    event.setBody(row.getBytes());
                    event.setHeaders(header);
                    events.add(event);
                }
                //将event写入channel
                this.getChannelProcessor().processEventBatch(events);
                //更新数据表中的offset信息
                sqlSourceHelper.updateOffset2DB(result.size());
            }
            //等待时长
            Thread.sleep(sqlSourceHelper.getRunQueryDelay());
            return Status.READY;
        } catch (InterruptedException e) {
            LOG.error("Error procesing row", e);
            return Status.BACKOFF;
        }
    }

    @Override
    public synchronized void stop() {
        LOG.info("Stopping sql source {} ...", getName());
        try {
            //关闭资源
            sqlSourceHelper.close();
        } finally {
            super.stop();
        }
    }
}
| SQLSourceHelper(Context context) | 构造方法,初始化属性及获取JDBC连接 |
|---|---|
| InitConnection(String url, String user, String pw) | 获取JDBC连接 |
| checkMandatoryProperties() | 校验相关属性是否设置(实际开发中可增加内容) |
| buildQuery() | 根据实际情况构建sql语句,返回值String |
| executeQuery() | 执行sql语句的查询操作,返回值List> |
| getAllRows(List> queryResult) | 将查询结果转换为String,方便后续操作 |
| updateOffset2DB(int size) | 根据每次查询结果将offset写入元数据表 |
| execSql(String sql) | 具体执行sql语句方法 |
| getStatusDBIndex(int startFrom) | 获取元数据表中的offset |
| queryOne(String sql) | 获取元数据表中的offset实际sql语句执行方法 |
| close() | 关闭资源 |
测试准备
驱动包
[hadoop@datanode1 flume]$ cp
/opt/sorfware/mysql-libs/mysql-connector-java-5.1.27/mysql-connector-java-5.1.27-bin.jar
/opt/module/flume/lib/
打包项目并将jar放入flume的lib目录下
配置文件
[hadoop@datanode1 flume]$ vim job/mysql.conf
# Name the components on this agent
a1.sources = r1
a1.sinks = k1
a1.channels = c1

# Describe/configure the source
a1.sources.r1.type = com.hph.SQLSource
a1.sources.r1.connection.url = jdbc:mysql://192.168.1.101:3306/mysqlsource
a1.sources.r1.connection.user = root
a1.sources.r1.connection.password = 123456
a1.sources.r1.table = student
a1.sources.r1.columns.to.select = *
a1.sources.r1.incremental.column.name = id
a1.sources.r1.incremental.value = 0
a1.sources.r1.run.query.delay=5000

# Describe the sink
a1.sinks.k1.type = logger

# Describe the channel
a1.channels.c1.type = memory
a1.channels.c1.capacity = 1000
a1.channels.c1.transactionCapacity = 100

# Bind the source and sink to the channel
a1.sources.r1.channels = c1
a1.sinks.k1.channel = c1
Mysql表准备
CREATE TABLE `student` (
`id` int(11) NOT NULL AUTO_INCREMENT,
`name` varchar(255) NOT NULL,
PRIMARY KEY (`id`)
);
CREATE TABLE `flume_meta` (
`source_tab` varchar(255) NOT NULL,
`currentIndex` varchar(255) NOT NULL,
PRIMARY KEY (`source_tab`)
);
测试脚本
#!/bin/bash

HOSTNAME="192.168.1.101"    #数据库信息
PORT="3306"
USERNAME="root"
PASSWORD="123456"

DBNAME="mysqlsource"        #数据库名称
TABLENAME="student"         #数据库中表的名称

i=0
while [true]
let i+=1;
do
insert_sql="insert into ${TABLENAME}(id,name) values($i,'student$i')"
mysql -h${HOSTNAME}  -P${PORT}  -u${USERNAME} -p${PASSWORD} ${DBNAME} -e  "${insert_sql}"
sleep 5
done
测试并查看
[hadoop@datanode1 flume]$ bin/flume-ng agent --conf conf/ --name a1 --conf-file job/mysql.conf -Dflume.root.logger=INFO,console		#启动agent
[hadoop@datanode1 job]$ sh mysql.sh  #启动测试脚本

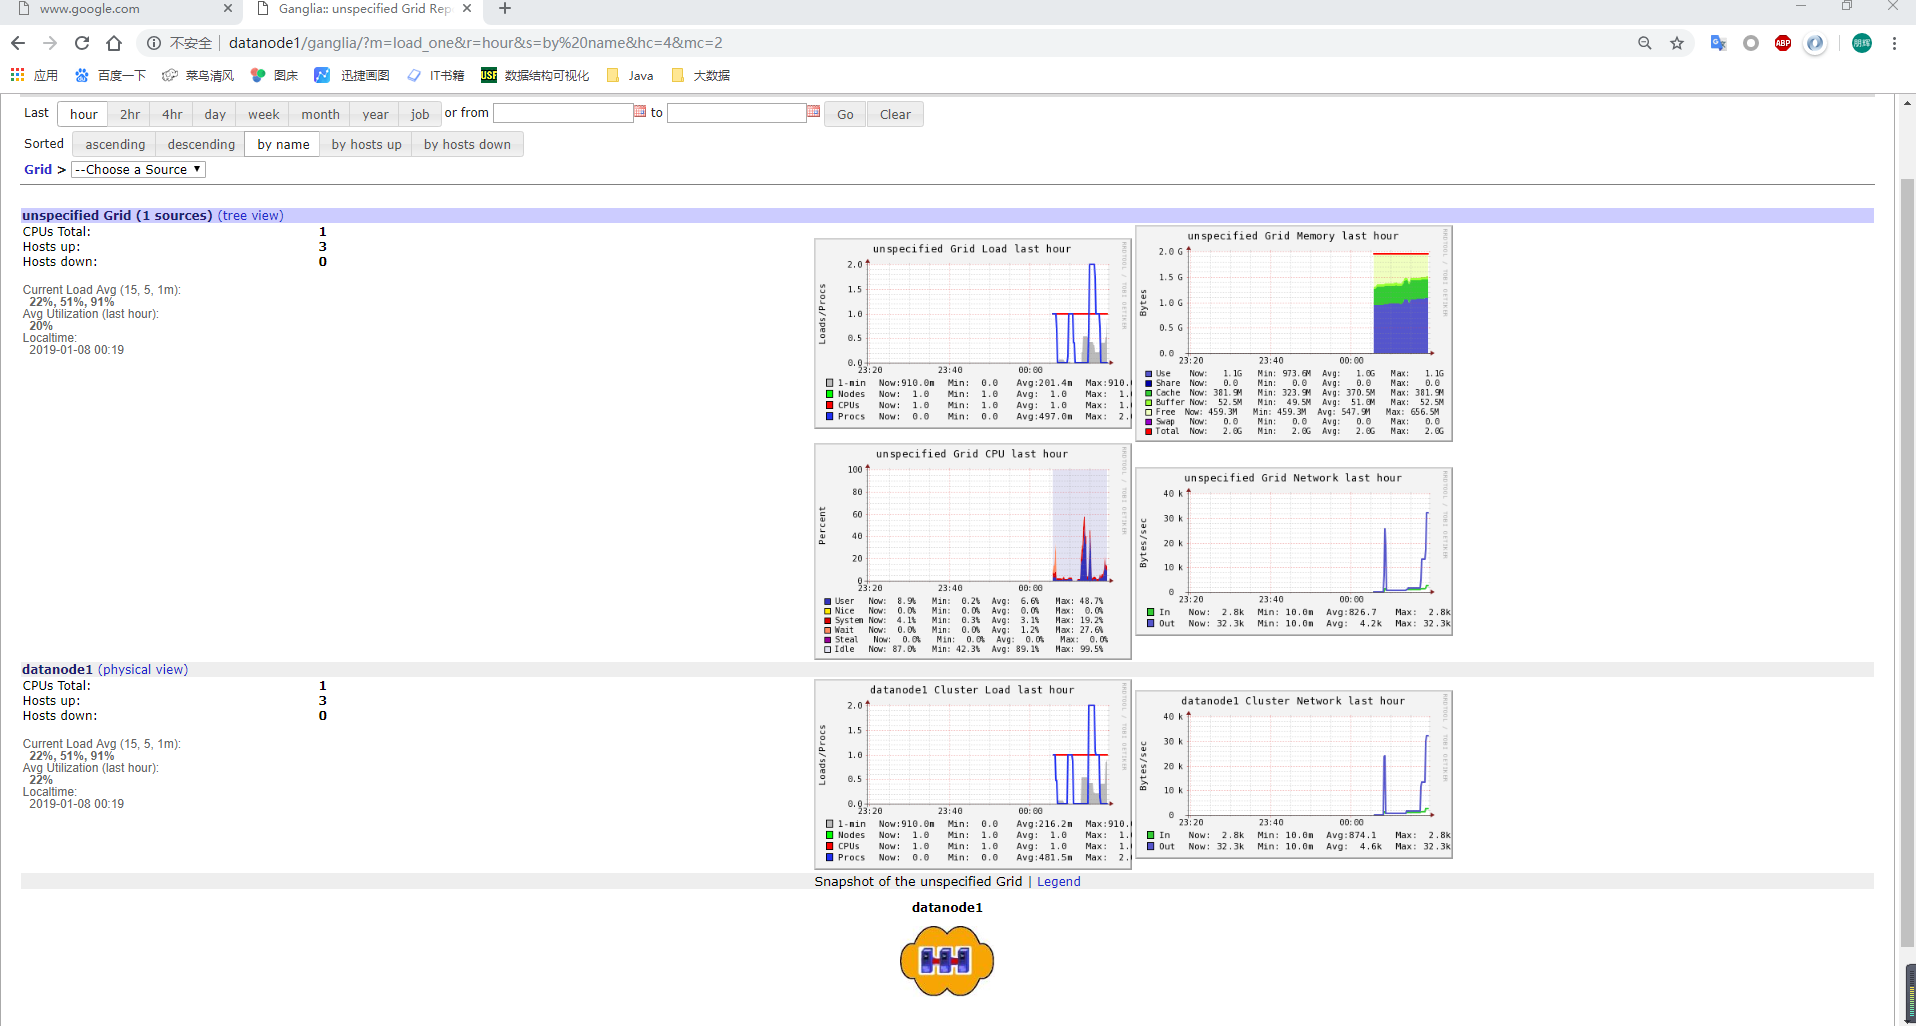
Flume监控Ganglia
步骤
1.安装httpd服务与php
[hadoop@datanode1 flume]$ sudo yum -y install httpd php
- 安装其他依赖
[hadoop@datanode1 flume]$ sudo yum -y install rrdtool perl-rrdtool rrdtool-devel
[hadoop@datanode1 flume]$ sudo yum -y install apr-devel
安装ganglia
[hadoop@datanode1 flume]$ sudo rpm -Uvh http://dl.fedoraproject.org/pub/epel/6/x86_64/epel-release-6-8.noarch.rpm
[hadoop@datanode1 flume]$ sudo yum -y install ganglia-gmetad
[hadoop@datanode1 flume]$ sudo yum -y install ganglia-web
[hadoop@datanode1 flume]$ sudo yum install -y ganglia-gmond
-
修改ganglia
[hadoop@datanode1 flume]$ sudo vim /etc/httpd/conf.d/ganglia.conf
# Ganglia monitoring system php web frontend
Alias /ganglia /usr/share/ganglia
<Location /ganglia>
  Order deny,allow
  Deny from all
  Allow from all
  # Allow from 127.0.0.1
  # Allow from ::1
  # Allow from .example.com
</Location>
修改配置文件gmetad.conf
data_source "datanode1" 192.168.1.101
修改配置文件gmond.conf
cluster {
  name = "datanode1"   #自己的主机名
  owner = "unspecified"
  latlong = "unspecified"
  url = "unspecified"
}
udp_send_channel {
  #bind_hostname = yes # Highly recommended, soon to be default.
                       # This option tells gmond to use a source address
                       # that resolves to the machine's hostname.  Without
                       # this, the metrics may appear to come from any
                       # interface and the DNS names associated with
                       # those IPs will be used to create the RRDs.
  #mcast_join = 239.2.11.71                        #注释掉
  host=192.168.1.101                 			   #自己的主机IP
  port = 8649								     #端口号
  ttl = 1
}
修改配置文件config
[hadoop@datanode1 flume]$ sudo vim /etc/selinux/config

# This file controls the state of SELinux on the system.
# SELINUX= can take one of these three values:
#     enforcing - SELinux security policy is enforced.
#     permissive - SELinux prints warnings instead of enforcing.
#     disabled - No SELinux policy is loaded.
SELINUX=disabled
# SELINUXTYPE= can take one of these two values:
#     targeted - Targeted processes are protected,
#     mls - Multi Level Security protection.
SELINUXTYPE=targeted
注意selinux本次生效关闭必须重启,如果此时不想重启,可以临时生效之:
[hadoop@datanode1 flume]$ sudo setenforce 0
启动ganglia
[hadoop@datanode1 flume]$ sudo service httpd start
Starting httpd:
[hadoop@datanode1 flume]$ sudo service gmetad start
[hadoop@datanode1 flume]$ sudo service gmond start
[hadoop@datanode1 flume]$
如果完成以上操作依然出现权限不足错误,请修改/var/lib/ganglia目录的权限
[hadoop@datanode1 flume]$ sudo chmod -R 777 /var/lib/ganglia
操作Flume测试监控
1.修改/opt/module/flume/conf目录下的flume-env.sh配置:
[hadoop@datanode1 conf]$ vim flume-env.sh
JAVA_OPTS="-Dflume.monitoring.type=ganglia
-Dflume.monitoring.hosts=192.168.1.101:8649
-Xms100m
-Xmx200m"
[hadoop@datanode1 conf]$ xsync flume-env.sh
启动flume任务
[hadoop@datanode3 flume]$ bin/flume-ng agent --conf conf/ --name a3 --conf-file job/group2/flume3.conf -Dflume.root.logger=INFO,console
[hadoop@datanode2 flume]$  bin/flume-ng agent --conf conf/ --name a2 --conf-file job/group2/flume2.conf
[hadoop@datanode1 flume]$ bin/flume-ng agent --conf conf/ --name a1 --conf-file job/group2/flume1.conf

| 字段(图表名称) | 字段含义 |
|---|---|
| EventPutAttemptCount | source尝试写入channel的事件总数量 |
| EventPutSuccessCount | 成功写入channel且提交的事件总数量 |
| EventTakeAttemptCount | sink尝试从channel拉取事件的总数量。这不意味着每次事件都被返回,因为sink拉取的时候channel可能没有任何数据。 |
| EventTakeSuccessCount | sink成功读取的事件的总数量 |
| StartTime | channel启动的时间(毫秒) |
| StopTime | channel停止的时间(毫秒) |
| ChannelSize | 目前channel中事件的总数量 |
| ChannelFillPercentage | channel占用百分比 |
| ChannelCapacity | channel的容量 |