JavaMail,提供给开发者处理电子邮件相关的编程接口。它是Sun发布的用来处理email的API。它可以方便地执行一些常用的邮件传输。但它并没有包含在JDK中,要使用JavaMail首先要下载javax.mail.jar下载地址:https://javaee.github.io/javamail/
自定义验证:
/**
 * 自定义验证
 * @author fly
 * @时间 2017-05-09
 *
 */
public class MyAuthenticator extends Authenticator{

    private String userName;
    private String password;

    public MyAuthenticator() {
    }


    public MyAuthenticator(String userName, String password) {
        this.userName = userName;
        this.password = password;
    }


    @Override
    protected PasswordAuthentication getPasswordAuthentication() {
        return new PasswordAuthentication(userName, password);
    }

}
封装发邮件信息:
/**
 * 封装发邮件信息
 * @author fly
 * @时间 2017-05-09
 */
public class MailSenderInfo {

    // 发送邮件的服务器的IP和端口
    private String mailServerHost;
    private String mailServerPort = "25";
    // 邮件发送者的地址
    private String fromAddress;
    // 邮件接收者的地址
    private String toAddress;
    // 登陆邮件发送服务器的用户名和密码
    private String userName;
    private String password;
    // 是否需要身份验证
    private boolean validate = false;
    // 邮件主题
    private String subject;
    // 邮件的文本内容
    private String content;
    // 邮件附件的文件名
    private String[] attachFileNames;


    /**
     * 获得邮件会话属性
     */
    public Properties getProperties(){
        Properties p = new Properties();
        p.put("mail.smtp.host", this.mailServerHost);
        p.put("mail.smtp.port", this.mailServerPort);
        p.put("mail.smtp.auth", validate ? "true" : "false");
        return p;
    }

    public String getMailServerHost() {
        return mailServerHost;
    }
    public void setMailServerHost(String mailServerHost) {
        this.mailServerHost = mailServerHost;
    }
    public String getMailServerPort() {
        return mailServerPort;
    }
    public void setMailServerPort(String mailServerPort) {
        this.mailServerPort = mailServerPort;
    }
    public String getFromAddress() {
        return fromAddress;
    }
    public void setFromAddress(String fromAddress) {
        this.fromAddress = fromAddress;
    }
    public String getToAddress() {
        return toAddress;
    }
    public void setToAddress(String toAddress) {
        this.toAddress = toAddress;
    }
    public String getUserName() {
        return userName;
    }
    public void setUserName(String userName) {
        this.userName = userName;
    }
    public String getPassword() {
        return password;
    }
    public void setPassword(String password) {
        this.password = password;
    }
    public boolean isValidate() {
        return validate;
    }
    public void setValidate(boolean validate) {
        this.validate = validate;
    }
    public String getSubject() {
        return subject;
    }
    public void setSubject(String subject) {
        this.subject = subject;
    }
    public String getContent() {
        return content;
    }
    public void setContent(String content) {
        this.content = content;
    }
    public String[] getAttachFileNames() {
        return attachFileNames;
    }
    public void setAttachFileNames(String[] attachFileNames) {
        this.attachFileNames = attachFileNames;
    }

}
封装发送邮件代码
/**
 * 封装发送邮件代码
 * @author fly
 * @时间 2017-05-09
 *
 */
public class Email {

    /**
     * 以文本格式发送邮件
     * @param mailInfo    待发送邮件信息
     * @throws Exception
     */
    public static void sendTextMail(MailSenderInfo mailInfo) throws Exception{
        // 判断是否需要身份认证
        MyAuthenticator authenticator = null;
        Properties pro = mailInfo.getProperties();

        if(mailInfo.isValidate()){
             // 如果需要身份认证,则创建一个密码验证器
            authenticator = new MyAuthenticator(mailInfo.getUserName(), mailInfo.getPassword());
        }
        // 根据邮件会话属性和密码验证器构造一个发送邮件的session
        Session sendMailSession = Session.getDefaultInstance(pro, authenticator);
        // 根据session创建一个邮件消息
        Message mailMessage = new MimeMessage(sendMailSession);
        // 创建邮件发送者地址
        Address from = new InternetAddress(mailInfo.getFromAddress());
        // 设置邮件消息的发送者
        mailMessage.setFrom(from);
        // 创建邮件的接收者地址,并设置到邮件消息中
        Address to = new InternetAddress(mailInfo.getToAddress());
        mailMessage.setRecipient(Message.RecipientType.TO, to);
        // 设置邮件消息的主题
        mailMessage.setSubject(mailInfo.getSubject());
        // 设置邮件消息发送的时间
        mailMessage.setSentDate(new Date());
        // 设置邮件消息的主要内容
        String mailContent = mailInfo.getContent();
        mailMessage.setText(mailContent);
        // 发送邮件
        Transport.send(mailMessage);
    }

    /**
     * 以HTML格式发送邮件
     * @param mailInfo   待发送邮件信息
     * @throws Exception
     */
    public static void sendHtmlMail(MailSenderInfo mailInfo) throws Exception{
        // 判断是否需要身份认证
                MyAuthenticator authenticator = null;
                Properties pro = mailInfo.getProperties();

                if(mailInfo.isValidate()){
                     // 如果需要身份认证,则创建一个密码验证器
                    authenticator = new MyAuthenticator(mailInfo.getUserName(), mailInfo.getPassword());
                }
                // 根据邮件会话属性和密码验证器构造一个发送邮件的session
                Session sendMailSession = Session.getDefaultInstance(pro, authenticator);
                // 根据session创建一个邮件消息
                Message mailMessage = new MimeMessage(sendMailSession);
                // 创建邮件发送者地址
                Address from = new InternetAddress(mailInfo.getFromAddress());
                // 设置邮件消息的发送者
                mailMessage.setFrom(from);
                // 创建邮件的接收者地址,并设置到邮件消息中
                Address to = new InternetAddress(mailInfo.getToAddress());
                // Message.RecipientType.TO属性表示接收者的类型为TO
                mailMessage.setRecipient(Message.RecipientType.TO, to);
                // 设置邮件消息的主题
                mailMessage.setSubject(mailInfo.getSubject());
                // 设置邮件消息发送的时间
                mailMessage.setSentDate(new Date());
                Multipart mainPart = new MimeMultipart();
                // 创建一个包含HTML内容的MimeBodyPart
                BodyPart html = new MimeBodyPart();
                html.setContent(mailInfo.getContent(), "text/html; charset=utf-8");
                mainPart.addBodyPart(html);
                // 将MiniMultipart对象设置为邮件内容
                mailMessage.setContent(mainPart);
                // 发送邮件
                Transport.send(mailMessage);
    }
测试程序:
public class JavaMailTest {

    public static void main(String[] args) {
        //设置邮件相关信息
        MailSenderInfo mailInfo = new MailSenderInfo();
        mailInfo.setMailServerHost("smtp.163.com");
        mailInfo.setMailServerPort("25");
        mailInfo.setValidate(true);
        mailInfo.setUserName("qfanliyan@163.com");
        mailInfo.setPassword("");    // 您的邮箱密码,若你的邮箱开启了客户端授权密码,则此处是您的客户端授权密码
        mailInfo.setFromAddress("qfanliyan@163.com");
        mailInfo.setToAddress("ifanliyan@qq.com");
        mailInfo.setSubject("这是一封测试邮件");
        mailInfo.setContent("你好!这是一封测试邮件");

        try {
            Email.sendTextMail(mailInfo);
            //Email.sendHtmlMail(mailInfo);
        } catch (Exception e) {
            e.printStackTrace();
        }
    }
}
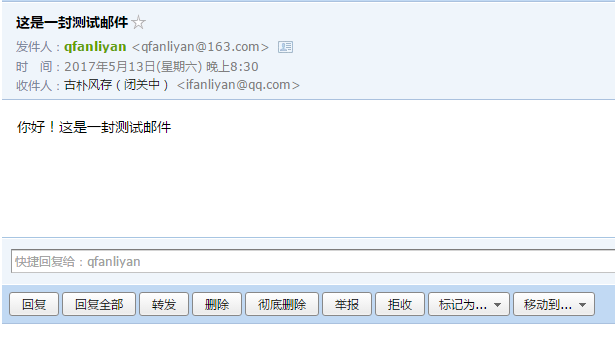
发送成功截图如下:
