博客转载自:https://blog.csdn.net/skillcollege/article/details/38855023
什么是ZBar?
ZBar是一个开源库,用于扫描、读取二维码和条形码。支持的二维码包括:EAN/UPC,QR等。
如果你是一个iPhone应用开发人员,做到二维码模块的时候,是不是会考虑ZBar开源项目来助你一臂之力呢?可是我这里说的是Android平台的开发,我为什么提到ZBar项目呢,难道我要用ZBar在Android平台扫描二维码吗?对的,没有错!这将会是一个极其不错的选择。为什么这么说呢,不是很多Android开发都是用Z*来解析二维码的么?好吧,Z*是我下一篇文章要写的,这里先抛砖引玉说一点点。我将Z*和ZBar做一个比较,说说它们的优缺点,便于大家的取舍。
- Z*项目的示例程序对于摄像头的控制写的非常全面,ZBar的没有
- ZBar基于C语言编写,解码效率高于Z*项目
- ZBar是日本人写的,对于中文解析会乱码这个肯定有人遇到过的,Z*不会乱码
- 扫描框的绘制,Z*的扫描框绘制是自定义View的,截取区域不好控制,ZBar的可以自定义,只要你会计算截取区
下载ZBar项目
编写ZBar示例程序
1. 着重介绍一下扫描截取界面的计算
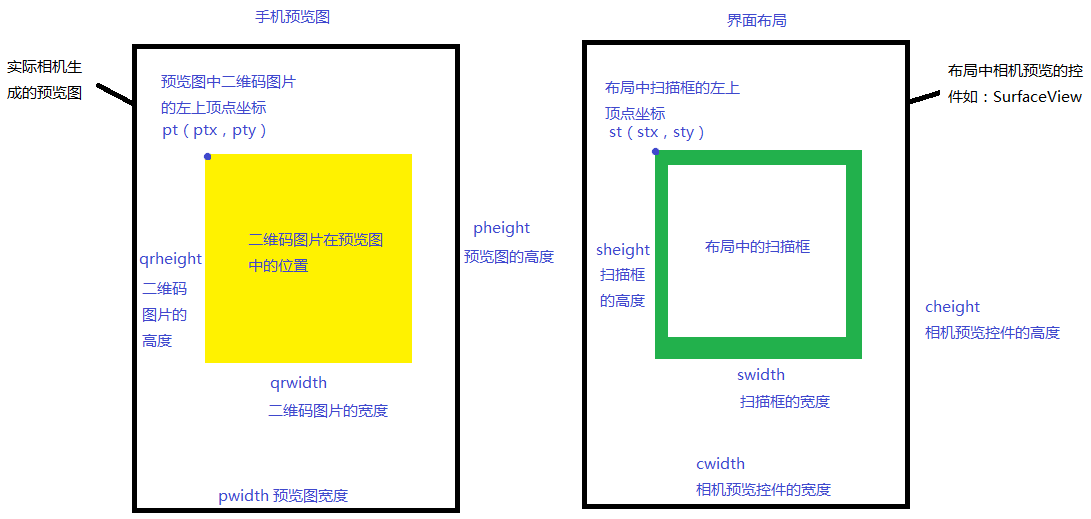
pt: 预览图中二维码图片的左上顶点坐标,也就是手机中相机预览中看到的待扫描二维码的位置
qrheight: 预览图中二维码图片的高度
qrwidth: 预览图中二维码图片的宽度
pheight:预览图的高度,也即camera的分辨率高度
pwidth: 预览图的宽度,也即camera的分辨率宽度

st: 布局文件中扫描框的左上顶点坐标
sheight: 布局文件中扫描框的高度
swidth: 布局文件中扫描框的宽度
cheight:布局文件中相机预览控件的高度
cwidth: 布局文件中相机预览控件的宽度
其中存在这样一个等比例公式
ptx / pwidth = stx / cwidth
pty / pheight = sty / cheight
qrwidth / pwidth = swidth / cwidth
qrheight / pheight = sheight / cheight
并外一种表达形式
ptx = stx * pwidth / cwidth ;
pty = sty * pheight / cheight ;
qrwidth = swidth * pwidth / cwidth ;
qrheight = sheight * pheight / cheight ;
以上ptx,pty,qrwidth,qrheight四个参数也就是ZBar中解码是需要crop时传入的四个参数,如此便知道了截取区域应该如何计算了。这样扫描的灵活性都大大增强了
2. ZBar中文乱码的解决
ZBar扫描含有中文的二维码图片时,结果是乱码的,所以需要修改c文件重新编译打包so文件才行
a. 需要修改的文件是zbar/qrcode/qrdextxt.c文件
/*This is the encoding the standard says is the default.*/
 latin1_cd=iconv_open("UTF-8","ISO8859-1");
修改为
/*This is the encoding the standard says is the default.*/
 latin1_cd=iconv_open("UTF-8","GBK");
b. 重新编译zbar生成so文件
这个真的需要一定的NDK开发经验了,我个人只是了解一点点NDK的知识,所以在网上找到了一个大神的博客一步一步做下来才算是编译完成了。

最后的编译项目架构
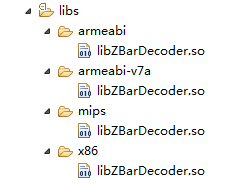
最终生成的so文件
本地方法调用
package com.dtr.zbar.build;

public class ZBarDecoder {

    static {
        System.loadLibrary("ZBarDecoder");
    }

    /**
     * 解码方法
     *
     * @param data
     *            图片数据
     * @param width
     *            原始宽度
     * @param height
     *            原始高度
     * @return
     */
    public native String decodeRaw(byte[] data, int width, int height);

    /**
     * 解码方法(需要裁剪图片)
     *
     * @param data
     *            图片数据
     * @param width
     *            原始宽度
     * @param height
     *            原始高度
     * @param x
     *            截取的x坐标
     * @param y
     *            截取的y坐标
     * @param cwidth
     *            截取的区域宽度
     * @param cheight
     *            截取的区域高度
     * @return
     */
    public native String decodeCrop(byte[] data, int width, int height, int x, int y, int cwidth, int cheight);
}
我的ZBar编译源程序代码: 源码下载
3. 编写Android示例程序
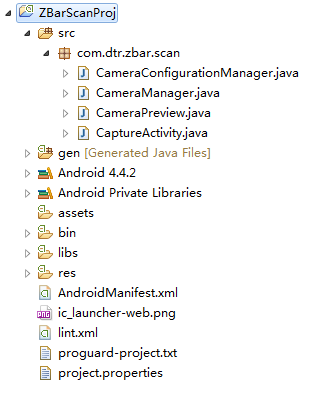
其中CameraConfigurationManager和CameraManager两个类是从ZXing项目中拷贝过来的,方便管理照相机,下一篇的ZXing项目中会更全面的使用ZXing中关于camera的管理类,本篇只是抛砖迎玉。
b.布局界面代码
<?xml version="1.0" encoding="utf-8"?>
<RelativeLayout xmlns:android="http://schemas.android.com/apk/res/android"
    android:layout_width="match_parent"
    android:layout_height="match_parent"
    android:orientation="vertical" >

    <RelativeLayout
        android:id="@+id/capture_container"
        android:layout_width="match_parent"
        android:layout_height="match_parent" >

        <FrameLayout
            android:id="@+id/capture_preview"
            android:layout_width="match_parent"
            android:layout_height="match_parent" />

        <ImageView
            android:id="@+id/capture_mask_top"
            android:layout_width="match_parent"
            android:layout_height="120dp"
            android:layout_alignParentTop="true"
            android:background="@drawable/shadow" />

        <RelativeLayout
            android:id="@+id/capture_crop_view"
            android:layout_width="200dp"
            android:layout_height="200dp"
            android:layout_centerHorizontal="true"
            android:layout_below="@id/capture_mask_top"
            android:background="@drawable/qr_code_bg" >

            <ImageView
                android:id="@+id/capture_scan_line"
                android:layout_width="match_parent"
                android:layout_height="wrap_content"
                android:layout_alignParentTop="true"
                android:layout_marginBottom="5dp"
                android:layout_marginTop="5dp"
                android:src="@drawable/scan_line" />
        </RelativeLayout>

        <ImageView
            android:id="@+id/capture_mask_bottom"
            android:layout_width="match_parent"
            android:layout_height="wrap_content"
            android:layout_alignParentBottom="true"
            android:layout_below="@id/capture_crop_view"
            android:background="@drawable/shadow" />

        <ImageView
            android:id="@+id/capture_mask_left"
            android:layout_width="wrap_content"
            android:layout_height="match_parent"
            android:layout_above="@id/capture_mask_bottom"
            android:layout_alignParentLeft="true"
            android:layout_below="@id/capture_mask_top"
            android:layout_toLeftOf="@id/capture_crop_view"
            android:background="@drawable/shadow" />

        <ImageView
            android:id="@+id/capture_mask_right"
            android:layout_width="wrap_content"
            android:layout_height="match_parent"
            android:layout_above="@id/capture_mask_bottom"
            android:layout_alignParentRight="true"
            android:layout_below="@id/capture_mask_top"
            android:layout_toRightOf="@id/capture_crop_view"
            android:background="@drawable/shadow" />
    </RelativeLayout>

    <Button
        android:id="@+id/capture_restart_scan"
        android:layout_width="match_parent"
        android:layout_height="40dp"
        android:layout_alignParentBottom="true"
        android:background="#66ffcc00"
        android:gravity="center"
        android:text="restart scan"
        android:textColor="@android:color/white"
        android:textSize="14sp" />

    <TextView
        android:id="@+id/capture_scan_result"
        android:layout_width="match_parent"
        android:layout_height="wrap_content"
        android:layout_above="@id/capture_restart_scan"
        android:layout_marginBottom="10dp"
        android:gravity="center"
        android:text="Scanning..."
        android:textColor="@android:color/white"
        android:textSize="14sp" />

</RelativeLayout>
c.扫描Activity关键代码
package com.dtr.zbar.scan;

import java.io.IOException;
import java.lang.reflect.Field;

import android.app.Activity;
import android.content.pm.ActivityInfo;
import android.graphics.Rect;
import android.hardware.Camera;
import android.hardware.Camera.AutoFocusCallback;
import android.hardware.Camera.PreviewCallback;
import android.hardware.Camera.Size;
import android.os.Bundle;
import android.os.Handler;
import android.text.TextUtils;
import android.view.View;
import android.view.View.OnClickListener;
import android.view.animation.Animation;
import android.view.animation.TranslateAnimation;
import android.widget.Button;
import android.widget.FrameLayout;
import android.widget.ImageView;
import android.widget.RelativeLayout;
import android.widget.TextView;

import com.dtr.zbar.build.ZBarDecoder;

public class CaptureActivity extends Activity {

    private Camera mCamera;
    private CameraPreview mPreview;
    private Handler autoFocusHandler;
    private CameraManager mCameraManager;

    private TextView scanResult;
    private FrameLayout scanPreview;
    private Button scanRestart;
    private RelativeLayout scanContainer;
    private RelativeLayout scanCropView;
    private ImageView scanLine;

    private Rect mCropRect = null;
    private boolean barcodeScanned = false;
    private boolean previewing = true;

    public void onCreate(Bundle savedInstanceState) {
        super.onCreate(savedInstanceState);
        setContentView(R.layout.activity_capture);
        setRequestedOrientation(ActivityInfo.SCREEN_ORIENTATION_PORTRAIT);
        findViewById();
        addEvents();
        initViews();
    }

    private void findViewById() {
        scanPreview = (FrameLayout) findViewById(R.id.capture_preview);
        scanResult = (TextView) findViewById(R.id.capture_scan_result);
        scanRestart = (Button) findViewById(R.id.capture_restart_scan);
        scanContainer = (RelativeLayout) findViewById(R.id.capture_container);
        scanCropView = (RelativeLayout) findViewById(R.id.capture_crop_view);
        scanLine = (ImageView) findViewById(R.id.capture_scan_line);
    }

    private void addEvents() {
        scanRestart.setOnClickListener(new OnClickListener() {
            public void onClick(View v) {
                if (barcodeScanned) {
                    barcodeScanned = false;
                    scanResult.setText("Scanning...");
                    mCamera.setPreviewCallback(previewCb);
                    mCamera.startPreview();
                    previewing = true;
                    mCamera.autoFocus(autoFocusCB);
                }
            }
        });
    }

    private void initViews() {
        autoFocusHandler = new Handler();
        mCameraManager = new CameraManager(this);
        try {
            mCameraManager.openDriver();
        } catch (IOException e) {
            e.printStackTrace();
        }

        mCamera = mCameraManager.getCamera();
        mPreview = new CameraPreview(this, mCamera, previewCb, autoFocusCB);
        scanPreview.addView(mPreview);

        TranslateAnimation animation = new TranslateAnimation(Animation.RELATIVE_TO_PARENT, 0.0f, Animation.RELATIVE_TO_PARENT, 0.0f, Animation.RELATIVE_TO_PARENT, 0.0f, Animation.RELATIVE_TO_PARENT,
                0.85f);
        animation.setDuration(3000);
        animation.setRepeatCount(-1);
        animation.setRepeatMode(Animation.REVERSE);
        scanLine.startAnimation(animation);
    }

    public void onPause() {
        super.onPause();
        releaseCamera();
    }

    private void releaseCamera() {
        if (mCamera != null) {
            previewing = false;
            mCamera.setPreviewCallback(null);
            mCamera.release();
            mCamera = null;
        }
    }

    private Runnable doAutoFocus = new Runnable() {
        public void run() {
            if (previewing)
                mCamera.autoFocus(autoFocusCB);
        }
    };

    PreviewCallback previewCb = new PreviewCallback() {
        public void onPreviewFrame(byte[] data, Camera camera) {
            Size size = camera.getParameters().getPreviewSize();

            // 这里需要将获取的data翻转一下,因为相机默认拿的的横屏的数据
            byte[] rotatedData = new byte[data.length];
            for (int y = 0; y < size.height; y++) {
                for (int x = 0; x < size.width; x++)
                    rotatedData[x * size.height + size.height - y - 1] = data[x + y * size.width];
            }

            // 宽高也要调整
            int tmp = size.width;
            size.width = size.height;
            size.height = tmp;

            initCrop();
            ZBarDecoder zBarDecoder = new ZBarDecoder();
            String result = zBarDecoder.decodeCrop(rotatedData, size.width, size.height, mCropRect.left, mCropRect.top, mCropRect.width(), mCropRect.height());

            if (!TextUtils.isEmpty(result)) {
                previewing = false;
                mCamera.setPreviewCallback(null);
                mCamera.stopPreview();

                scanResult.setText("barcode result " + result);
                barcodeScanned = true;
            }
        }
    };

    // Mimic continuous auto-focusing
    AutoFocusCallback autoFocusCB = new AutoFocusCallback() {
        public void onAutoFocus(boolean success, Camera camera) {
            autoFocusHandler.postDelayed(doAutoFocus, 1000);
        }
    };

    /**
     * 初始化截取的矩形区域
     */
    private void initCrop() {
        int cameraWidth = mCameraManager.getCameraResolution().y;
        int cameraHeight = mCameraManager.getCameraResolution().x;

        /** 获取布局中扫描框的位置信息 */
        int[] location = new int[2];
        scanCropView.getLocationInWindow(location);

        int cropLeft = location[0];
        int cropTop = location[1] - getStatusBarHeight();

        int cropWidth = scanCropView.getWidth();
        int cropHeight = scanCropView.getHeight();

        /** 获取布局容器的宽高 */
        int containerWidth = scanContainer.getWidth();
        int containerHeight = scanContainer.getHeight();

        /** 计算最终截取的矩形的左上角顶点x坐标 */
        int x = cropLeft * cameraWidth / containerWidth;
        /** 计算最终截取的矩形的左上角顶点y坐标 */
        int y = cropTop * cameraHeight / containerHeight;

        /** 计算最终截取的矩形的宽度 */
        int width = cropWidth * cameraWidth / containerWidth;
        /** 计算最终截取的矩形的高度 */
        int height = cropHeight * cameraHeight / containerHeight;

        /** 生成最终的截取的矩形 */
        mCropRect = new Rect(x, y, width + x, height + y);
    }

    private int getStatusBarHeight() {
        try {
            Class<?> c = Class.forName("com.android.internal.R$dimen");
            Object obj = c.newInstance();
            Field field = c.getField("status_bar_height");
            int x = Integer.parseInt(field.get(obj).toString());
            return getResources().getDimensionPixelSize(x);
        } catch (Exception e) {
            e.printStackTrace();
        }
        return 0;
    }
}
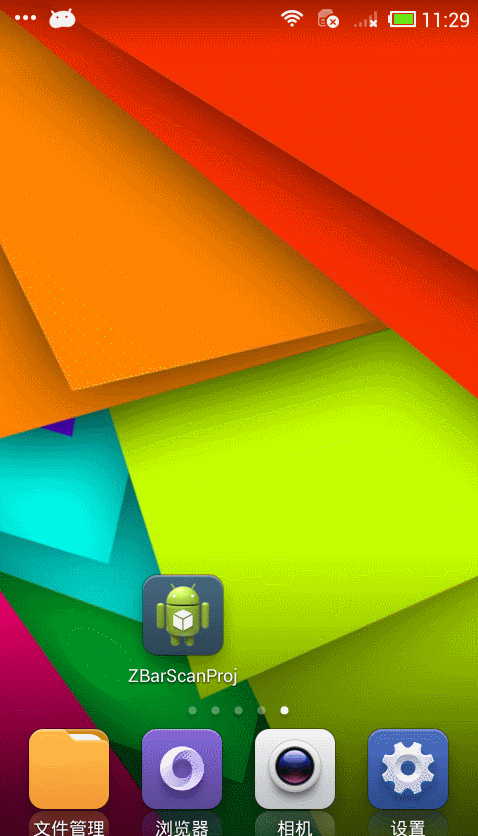
d.运行效果图