一.一个牛逼闪闪的知识点Promise
npm install bluebird
二.Promise实例
ball.html
<!doctype>
<!DOCTYPE html>
<html>
<head>
    <title>Promise animation</title>
    <style>
        .ball {
            width: 40px;
            height: 40px;
            border-radius: 20px;
        }
        .ball1 {
            background: red;
        }
        .ball2 {
            background: yellow;
        }
        .ball3 {
            background: green;
        }
    </style>
    <script src="./node_modules/bluebird/js/browser/bluebird.js"></script>
</head>
<body>
    <div class="ball ball1" style="margin-left: 0;"></div>
    <div class="ball ball2" style="margin-left: 0;"></div>
    <div class="ball ball3" style="margin-left: 0;"></div>

    <script type="text/javascript">
        var ball1 = document.querySelector('.ball1')
        var ball2 = document.querySelector('.ball2')
        var ball3 = document.querySelector('.ball3')

        function animate(ball, distance, cb) {
            setTimeout(function() {
                var marginLeft = parseInt(ball.style.marginLeft, 10)
                if(marginLeft === distance) {
                    cb && cb()
                }else {
                    if(marginLeft < distance) {
                        marginLeft++
                    }else {
                        marginLeft--
                    }
                    ball.style.marginLeft = marginLeft
                    animate(ball, distance, cb)
                }
            }, 13)
        }

        animate(ball1, 100, function() {
            animate(ball2, 200, function() {
                animate(ball3, 300, function(){
                    animate(ball3, 150, function(){
                        animate(ball2, 150, function(){
                            animate(ball1, 150, function(){
                                //
                            })
                        })
                    })
                })
            })
        })
    </script>
</body>
</html>
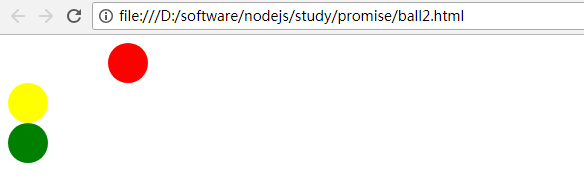
使用Promise改造后,ball2.html如下:
<!doctype>
<!DOCTYPE html>
<html>
<head>
    <title>Promise animation</title>
    <style>
        .ball {
            width: 40px;
            height: 40px;
            border-radius: 20px;
        }
        .ball1 {
            background: red;
        }
        .ball2 {
            background: yellow;
        }
        .ball3 {
            background: green;
        }
    </style>
</head>
<body>
    <div class="ball ball1" style="margin-left: 0;"></div>
    <div class="ball ball2" style="margin-left: 0;"></div>
    <div class="ball ball3" style="margin-left: 0;"></div>

    <script type="text/javascript">
        var ball1 = document.querySelector('.ball1')
        var ball2 = document.querySelector('.ball2')
        var ball3 = document.querySelector('.ball3')

        var Promise = window.Promise

        function promiseAnimate(ball, distance) {
            return new Promise(function(resolve, reject) {

                function _animate() {
                    setTimeout(function() {
                        var marginLeft = parseInt(ball.style.marginLeft, 10)
                        if(marginLeft === distance) {
                            resolve
                        }else {
                            if(marginLeft < distance) {
                                marginLeft++
                            }else {
                                marginLeft--
                            }
                            ball.style.marginLeft = marginLeft + 'px'
                            _animate()
                        }
                    }, 13)
                }

                _animate()
            })
        }

        promiseAnimate(ball1, 100)
            .then(function() {
                return promiseAnimate(ball2, 200)
            })
            .then(function() {
                return promiseAnimate(ball3, 300)
            })
            .then(function() {
                return promiseAnimate(ball3, 150)
            })
            .then(function() {
                return promiseAnimate(ball2, 150)
            })
            .then(function() {
                return promiseAnimate(ball1, 150)
            })
    </script>
</body>
</html>
运行效果:
三.牛逼闪闪的Promise只需三点
1.Promise是JS针对异步操作场景的解决方案
针对异步的场景,业界有很多解决方案,如回调、事件机制
Promise是一个对象,同时它也一种规范,针对异步操作约定了统一的接口,表示一个异步操作的最终结果以同步的方式来写代码,执行的操作是异步的,但是又保证程序的执行顺序是同步的。
原本是社区的一个规范的构想,被加入到ES6的语言标准里面,比如Chrom,Firefox浏览器已对它进行了实现。
2.Promise对象三种状态
未完成(pending)
已完成(fulfilled)
失败(rejected)
只能从未完成到已完成,或者从未完成到失败,不可逆的。
3.ES6的Promise语言标准、Promise/A+规范
Promise/A+规范算是之前的Promise/A规范的升级版,规定了行为标准,扩展了原来的规范,并且覆盖了一些约定俗成的行为,总之,它就是一个更为标准的Promise能力和使用的规范。
Promise/A与A+不同点
a.A+规范通过术语thenable来区分promise对象
b.A+定义onFulfilled/onRejected必须是作为函数来调用,而且调用过程必须是异步的
c.A+严格定义了then方式链式调用时onFulfilled/onRejected的调用顺序
4.如何使用Promise then方法
promiseObj.then(onFulfilled, onRejected)
onFulfilled = function(value) {
  return promiseObj2
}
onRejected = function(err) {}
Promise会保证then方法回调的顺序,依次调用,会等前面的promise方法执行完成后才会执行后面then中的方法。
Promise最大的特点是:回调函数可以写成规范的链式的写法,程序流程可以很清楚。它的一整套接口可以实现很强大的功能,比如为多个异步操作部署一个回调函数,为多个回调函数中抛出的错误统一指定处理的方法等等。
5.在什么场景下使用
只要是异步编程的地方,都可以使用Promise,但不能Promise而Promise,如业务场景是很简单的异步操作,维护很容易了,没必要引入一个Promise库来重构。
6.Promise库
Promise库市面上有不少,如下所示:
bluebird
Q
then.js
es6-promise
ypromise
async
nativeo-promise-only
四.重写爬虫,更优雅的异步编程
https协议是基于ssl/tls的http协议,所有数据都是在ssl/tls协议的封装之上传输的。
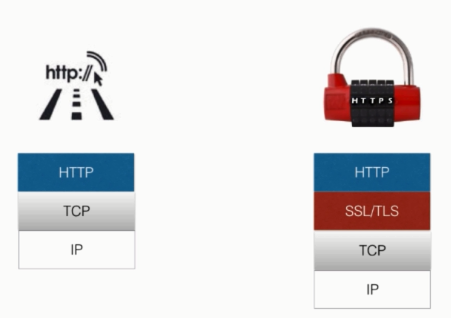
也就是说,https协议是在http协议的基础之上添加了ssl/tls握手及数据加密传输,因此,ssl/tls协议就是http和https最大区别。
在搭建https服务器的时候,需要有一个ssl证书。
https.js
var https = require('https')
var fs = require('fs')

var options = {
    key: fs.readFileSync('ssh_key.pem'),
    cert: fs.readFileSync('ssh_cert.pem')
}

https.createServer(options, function(req, res) {
    res.writeHead(200)
    res.end('Hello Imooc')
}).listen(8090)
重写爬虫,更优雅的异步编程,promise_crawler.js
var http = require('http')
var Promise = require('bluebird')
var cheerio = require('cheerio')
var baseUrl = 'http://www.imooc.com/learn/'
var url = 'http://www.imooc.com/learn/348'
var videoIds = [348, 259, 197, 134, 75]

function filterChapters(html) {
    var $ = cheerio.load(html)

    var chapters = $('.learnchapter')

    var title = $('#page_header .path span').text()
    var number = parseInt($($('.info_num i')[0]).text().trim(), 10)
    // var courseData = {
    //     title: title,
    //     number: number,
    //     videos: [{
    //         chapterTitle: '',
    //         videos: [
    //             title: '',
    //             id: ''
    //         ]
    //     }]
    // }

    var courseData = {
        title: title,
        number: number,
        videos: []
    }

    chapters.each(function(item) {
        var chapter = $(this)
        var charterTitle = chapter.find('strong').text()
        var videos = chapter.find('.video').children('li')
        var chapterData = {
            chapterTitle: chapterTitle,
            videos : []
        }

        videos.each(function(item) {
            var video = $(this).find('.studyvideo')
            var videoTitle = video.text()
            var id = video.attr('href').split('video/')[1]

            chapterData.videos.push({
                title: videoTitle,
                id: id
            })
        })

        courseData.videos.push(chapterData)
    })
    return courseData;
}

function printCourseInfo(coursesData) {
    coursesData.forEach(function(courseData) {
        console.log(courseData.number + '  人学过 ' + courseData.title + '
')
    })
    coursesData.forEach(function(courseData) {
        console.log('###' + courseData.title + '
')
        courseData.videos.forEach(function(item) {
            var chapterTitle = item.chapterTitle

            console.log(charterTitle + '
')

            item.videos.forEach(function(video) {
                console.log(' [' + video.id + ']' + video.title  + '
')
            })
        })
    })
}

function getPageAsync(url) {
    return new Promise(function(resolve, reject) {
        console.log('正在爬取' + url)

        http.get(url, function(res) {
            var html = ''
            res.on('data', function(data) {
                html += data
            })

            res.on('end', function() {
                resolve(html)
            })
        }).on('error', function(e) {
            reject(e)
            console.log('获取课程数据出错!')
        })
    })
}

var fetchCourseArray = []
videoIds.forEach(function(id) {
    fetchCourseArray.push(getPageAsync(baseUrl + id))
})

Promise
    .all(fetchCourseArray)
    .then(function(pages) {
        var coursesData = []

        pages.forEach(function(html) {
            var courses = filterChapters(html)
            coursesData.push(courses)
        })

        coursesData.sort(function(a, b) {
            return a.number < b.number
        })

        printCourseInfo(coursesData)
    })
运行结果:

五.Nodejs API
1.横扫Nodejs API-Buffer的实例
Buffer:用来处理二进制的数据。因为JS字符串是UTF-8的编码存储的,处理二进制的能力是很弱的,而网络层对于不同资源的请求、响应,甚至是文件都是二进制的方式来交互的,所以Node.js有这么一个接口,专门用于存放二进制数据的缓存区,并提供了一些方法来对缓存区数据进行进一步的处理。Buffer在Node.js中是要以全局访问的,不需要用require来加载。
> Buffer
{ [Function: Buffer]
poolSize: 8192,
from: [Function: from],
of: [Function: of],
alloc: [Function: alloc],
allocUnsafe: [Function: allocUnsafe],
allocUnsafeSlow: [Function: allocUnsafeSlow],
isBuffer: [Function: isBuffer],
compare: [Function: compare],
isEncoding: [Function: isEncoding],
concat: [Function: concat],
byteLength: [Function: byteLength],
[Symbol(kIsEncodingSymbol)]: [Function: isEncoding] }
> new Buffer('Hello Node.js')
<Buffer 48 65 6c 6c 6f 20 4e 6f 64 65 2e 6a 73>
> new Buffer('Hello Node.js', 'base64');
<Buffer 1d e9 65 a0 da 1d 7a 3b>
> var buf = new Buffer(8);
undefined
> buf.length
8
> var buf = new Buffer('12345678');console.log(buf);
<Buffer 31 32 33 34 35 36 37 38>
undefined
> var buf = new Buffer(7);buf.write('12345678');console.log(buf);
<Buffer 31 32 33 34 35 36 37>
undefined
> var buf = new Buffer([1,2,3,4]);console.log(buf);
<Buffer 01 02 03 04>
undefined
> console.log(buf[1])
2
undefined
> var buf = new Buffer([1,2.33,3.11,4]);console.log(buf);
<Buffer 01 02 03 04>
undefined
> console.log(buf[1])
2
undefined

a.buffer.write(string, offset=0, length, encoding='utf8')方法
> var buf = new Buffer('Hello 慕课网')
undefined
> buf.length
15
> buf.write('Hi 慕课网')
12
> buf.toString()
'Hi 慕课网网'
> buf.length
15
> buf.write(' ImoocImoocImooc', 2, 16)
13
> buf.toString()
'Hi ImoocImoocIm'
b.buffer.copy(target, tStart, sStart, sEnd=buffer.length)
> var buf = new Buffer('Hello Imooc')
undefined
> buf.length
11
> var buf2 = new Buffer(5)
undefined
> buf.copy(buf2)
5
> buf2.toString()
'Hello'
> buf.copy(buf2, 0, 6, 11)
5
> buf2.toString()
'Imooc'
c.buffer.js源码
var buffer = process.binding('buffer');
process.binding它是一个桥梁,javaScript代码就可以和C++代码进行交互,这条语句获取到C++里面实现的buffer模块

> var buf = new Buffer('imooc');
undefined
> var str = buf.toString('base64');
undefined
> str
'aW1vb2M='
> var buf = new Buffer('aW1vb2M=', 'base64')
undefined
> var str = buf.toString()
undefined
> str
'imooc'
> var buf = new Buffer('aW1vb2M=', 'base64')
undefined
> var str = buf.toString('hex')
undefined
> str
'696d6f6f63'
> var buf = new Buffer('696d6f6f63', 'hex')
undefined
> var str = buf.toString('utf8')
undefined
> str
'imooc'
>
2.buffer实例buffer_image.js
var fs = require('fs')

fs.readFile('logo.png', function(err, origin_buffer) {
    console.log(Buffer.isBuffer(origin_buffer))

    fs.writeFile('logo_buffer.png', origin_buffer, function(err) {
        if(err) {
            console.log(err)
        }
    })

    //var base64Image = new Buffer(origin_buffer).toString('base64')
    var base64Image = origin_buffer.toString('base64')

    console.log(base64Image)

    var decodedImage = new Buffer(base64Image, 'base64')

    console.log(Buffer.compare(origin_buffer, decodedImage))

    fs.writeFile('logo_decoded.png', decodedImage, function(err) {
        if(err) {
            console.log(err)
        }
    })
})

//把打印出来的base64Image,然后 data:image/png;base64,base64Image串,把data:image/png;base64,base64Image串拷贝到网页图片的url()的这个括号中,就可以查看到这张图片。
运行结果:
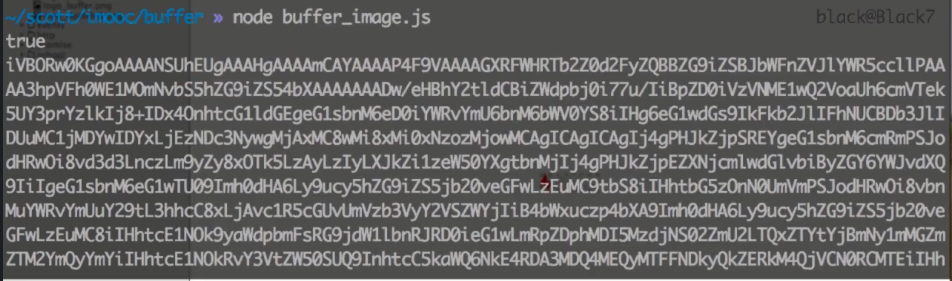
在当前目录下将会看到logo_buffer.png和logo_decoded.png两个文件。
当然,可以把输入的base64的串拷贝出来,然后在编辑器中编写如下所示:data:image/png;base64,输出的base64的串,可以把这整个串拷贝,如放到慕课网的背景url中,也能达到和慕课网本身图片一样的效果。

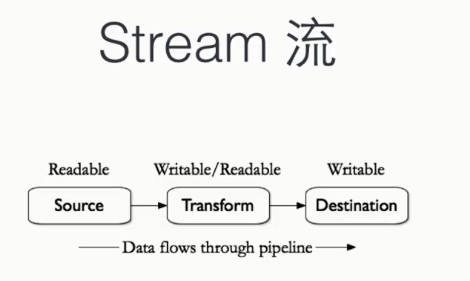
3.Stream流
stream_copy_logo.js
var fs = require('fs')
var source = fs.readFileSync('logo.png')

fs.writeFileSync('stream_copy_logo.png', source)
运行后,在当前目录下产生stream_copy_logo.png文件,且和logo.png一样。
stream_event.js
var fs = require('fs')

var readStream = fs.createReadStream('stream_copy_logo.js')

readStream.on('data', function(chunk) {
    console.log('data emits')
    console.log(Buffer.isBuffer(chunk))
    console.log(chunk.toString('utf8'))
}).on('readable', function() {
    console.log('data readable')
}).on('end', function() {
    console.log('data ends')
}).on('close', function() {
    console.log('data close')
}).on('error', function(e) {
    console.log('data read error' + e)
})
运行结果:

stream_event02.js,流的暂停和重启
var fs = require('fs')

var readStream = fs.createReadStream('stream_copy_logo.js')
var n = 0

readStream.on('data', function(chunk) {
    n++
    console.log('data emits')
    console.log(Buffer.isBuffer(chunk))
    //console.log(chunk.toString('utf8'))
    readStream.pause()
    console.log('data pause')
    setTimeout(function() {
        console.log('data pause end')
        readStream.resume()
    }, 3000)
}).on('readable', function() {
    console.log('data readable')
}).on('end', function() {
    console.log(n)
    console.log('data ends')
}).on('close', function() {
    console.log('data close')
}).on('error', function(e) {
    console.log('data read error' + e)
})
运行结果:

stream_copy_logo2.js,重构复制文件的代码
var fs = require('fs')

var readStream = fs.createReadStream('1.mp4')
var writeStream = fs.createWriteStream('1-stream.mp4')

readStream.on('data', function(chunk) {
    //数组还在缓存区
    if(writeStream.write(chunk) === false) {
        console.log('still cached')
        readStream.pause()
    }
})

readStream.on('end', function() {
    writeStream.end()
})

//对于writeStream来说,有一个drain事件,表明数据已经消费完了(写到目标了)
writeStream.on('drain', function() {
    console.log('data drains')
    //告诉readStream可以来读了
    readStream.resume()
})
运行结果:


Readable:可读流,负责读取外部的数据,并把数据缓存到内部的Buffer数组
Writable:可写流,负责消费数据,从可读流里获取到数据,然后对得到的数据块进行处理
Duplex:双工流,实现了Readable、Writable两个接口,如TcpSocket
Transform:转换流,也是双工的,可读可写,实现了Readable、Writable两个接口,但不保留数据
request_logo.js
var http = require('http')
var fs = require('fs')
var request = require('request')

http.createServer(function(req, res){
    // fs.readFile('logo.png', function(err, data) {
    //     if(err) {
    //         res.end('file not  exist!')
    //     }else {
    //         res.writeHeader(200, {'Context-Type': 'text/html'})
    //         res.end(data)
    //     }
    // })


    //pipe方法会自动帮我们监听data和end事件,图片文件中每一小段数据都会源源不断地发送给客户端,除此以外它还可以自动控制后端压力,这样在客户端连接缓慢时,node可以将尽可能少的缓存放到内存里面,通过对内存空间的调度就能自动控制流量,从而避免目标被快速读取的流而淹没
    //并且数据在pipe时,只有pipe链末端的目标流真正需要数据时,数据才会从源头被取出来。所以是被动消费。
    //fs.createReadStream('logo.png').pipe(res)

    request('https://www.imooc.com/static/img/index/logo.png').pipe(res)
}).listen(8090)
运行node request_logo.js后,在浏览器中输入http://localhost:8090,就能展示logo图片。
pipe_video.js
var fs = require('fs')

fs.createReadStream('1.mp4').pipe(fs.createWriteStream('1-pipe.mp4'))
运行后就会在当前目录下新产生1-pipe.mp4,和1.mp4一模一样。
stream_read_write.js
var Readable = require('stream').Readable
var Writable = require('stream').Writable

var readStream = new Readable()
var writStream = new Writable()

readStream.push('I ')
readStream.push('Love ')
readStream.push('Imooc
')
readStream.push(null)

writStream._write = function(chunk, encode, cb) {
    console.log(chunk.toString())
    cb()
}

readStream.pipe(writStream)
运行结果:

custom_stream.js
var stream = require('stream')
var util = require('util')

function ReadStream() {
    stream.Readable.call(this)
}

util.inherits(ReadStream, stream.Readable)

ReadStream.prototype._read = function() {
    this.push('I ')
    this.push('Love ')
    this.push('Imooc
')
    this.push(null)
}

function WritStream() {
    stream.Writable.call(this)
    this._cached = new Buffer('')
}

util.inherits(WritStream, stream.Writable)

WritStream.prototype._write = function(chunk, encode, cb) {
    console.log(chunk.toString())
    cb()
}

function TransformStream() {
    stream.Transform.call(this)
}

util.inherits(TransformStream, stream.Transform)

TransformStream.prototype._transform = function(chunk, encode, cb) {
    this.push(chunk)
    cb()
}

TransformStream.prototype._flush = function(cb) {
    this.push('Oh Yeah!')
    cb()
}

var rs = new ReadStream()
var ws = new WritStream()
var ts = new TransformStream()

rs.pipe(ts).pipe(ws)
运行结果:

学习视频《进击Node.js基础(二)》。