文章目录
Bean作用域简介
Bean是Spring的根本,Spring本身就是一个一个的bean组成的,bean托管在Spring容器中,那么这些bean的作用域范围是怎么样的呢?
在Spring中,有六个作用域。分别是singleton,prototype,request,session,application,websocket。
除了这六个比较通用的作用域外,Spring3.0开始,添加了thread作用域,pring4.2开始,添加了transaction作用域。
Singleton作用域
设计模式大家应该学过,设计模式里面有一个很经典的模式就是Singleton模式。Spring里面的Singleton作用域表明这个定义的bean在整个Spring容器中只有一个实例。任何对这个bean的请求都会返回这个唯一的实例。
下图显示了Singleton作用域的工作方式:
[外链图片转存失败(img-GLWDVVXB-1564064599475)(https://docs.spring.io/spring/docs/5.1.8.RELEASE/spring-framework-reference/images/singleton.png)]
Singleton作用域是Spring中bean的默认作用域,所以,Singleton的bean可以如下定义:
    <bean id="beanA" class="com.flydean.beans.BeanA" scope="singleton"/>

    <bean id="beanB" class="com.flydean.beans.BeanB" />
上面两个bean都是singleton作用域。
Prototype作用域
Prototype也是设计模式中一个很经典的模式。Prototype也被很多人也叫他多例模式,就是说可以创建出很多个类的实例。
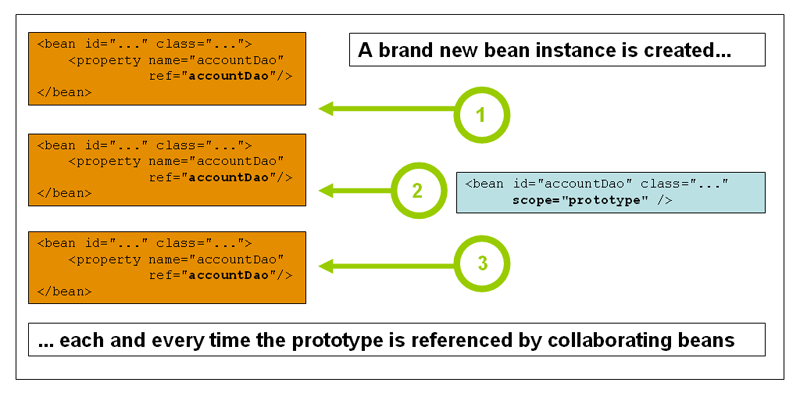
在Spring容器中,如果一个bean被定义为Prototype,那么,每次通过getBean()方法来获取这个bean都会返回一个新的bean实例。
下图说明了prototype作用域:
[外链图片转存失败(img-Oh56EhNw-1564064599479)(https://docs.spring.io/spring/docs/5.1.8.RELEASE/spring-framework-reference/images/prototype.png)]
一般来说,对于有状态的bean可以使用Prototype。
下面展示了如何定义一个prototype的bean:
<bean id="BeanC" class="com.flydean.beans.BeanB" scope="prototype"/>
因为prototype是多例的模式,所以Spring不负责该bean的整个生命周期,一旦bean被创建,交给client使用,Spring就不会再负责维护该bean实例。
如果在Prototype bean上面配置了生命周期回调方法,那么该方法是不会起作用的。客户端需要自己释放该bean中的资源。
要让Spring容器释放原型作用域bean所拥有的资源,可以使用自定义bean post-processor,用来处理bean的资源清理。
某种意义上Spring的Prototype相当于java中的new方法。
Singleton Beans 中依赖 Prototype-bean
既然singleon和prototype的作用域范围不一样,如果发生singleton Bean需要依赖于Prototype的时候,Prototype bean只会被实例化一次,然后注入到singleton bean中。
那么怎么解决这个问题呢?可以参照上一篇文章我们讲过的方法注入。
web 作用域
Request, Session, Application, 和WebSocket作用域仅在使用web的Spring ApplicationContext实现中,如果将这些作用域同Spring正常的IOC容器一起使用,则会报错:IllegalstateException。
配置web作用域的方式和普通的应用程序稍有不同。Web程序需要运行在相应的Web容器中,通常我们需要将程序入口配置在web.xml中。
如果你使用了Spring MVC的DispatcherServlet,那么不需要做额外的配置,因为DispatcherServlet已经包含了相关的状态。
-
servlet 2.5 web容器中,如果是DispatcherServlet之外的的请求,那么需要注册org.springframework.web.context.request.RequestContextListener。
-
servlet 3.0+web容器中,可以使用WebApplicationInitializer接口以编程的方式来添加。
下面是注册RequestContextListener的例子:
<web-app>
    ...
    <listener>
        <listener-class>
            org.springframework.web.context.request.RequestContextListener
        </listener-class>
    </listener>
    ...
</web-app>
如果Listener不能注册,那么可以注册RequestContextFilter,如下所示:
<web-app>
    ...
    <filter>
        <filter-name>requestContextFilter</filter-name>
        <filter-class>org.springframework.web.filter.RequestContextFilter</filter-class>
    </filter>
    <filter-mapping>
        <filter-name>requestContextFilter</filter-name>
        <url-pattern>/*</url-pattern>
    </filter-mapping>
    ...
</web-app>
通过配置DispatcherServlet, RequestContextListener, 和 RequestContextFilter ,我们就可以在相应的请求服务中调用相应范围的bean。
Request scope
下面是一个LoginAction的定义:
<bean id="loginActionA" class="com.flydean.actions.LoginAction" scope="request"/>
Spring容器通过为每个HTTP请求使用LoginAction定义来创建一个新的LoginAction bean实例。也就是说,LoginAction bean的作用域是在HTTP request级别。你可以根据需要更改所创建实例的内部状态,因为从相同的LoginAction bean定义创建的其他实例在状态中看不到这些更改。它们是针对单个请求的。当请求完成处理时,将丢弃该请求的作用域bean。
下面是使用注解@RequestScope的例子:
@RequestScope
@Component
public class LoginAction {
}
Session Scope
下面是Session的例子:
<bean id="userPerferenceA" class="com.flydean.service.UserPreferences" scope="session"/>
Spring容器通过在单个HTTP Session的生命周期中使用UserPreferences bean定义创建一个新的UserPreferences bean实例。换句话说,UserPreferences bean在HTTP Session级别有效。
与request scope的bean一样,您可以根据需要更改创建的实例的内部状态,因为其他也使用从相同的用户首选项bean定义创建的实例的HTTP session实例在状态中看不到这些更改,因为它们是特定于单个HTTP session的。当最终丢弃HTTP session时,也会丢弃作用于该特定HTTP session的bean。
下面是注解驱动的例子:
@SessionScope
@Component
public class UserPreferences {
}
Application Scope
参考下面的例子:
<bean id="appPerferences" class="com.flydean.service.AppPreferences" scope="application"/>
所谓的Application scope就是对于整个web容器来说,bean的作用域是ServletContext级别的,这个和singleton有点类似,但是区别在于,Application scope是ServletContext的单例,singleton是一个ApplicationContext的单例。在一个web容器中ApplicationContext可以有多个。
当然,也可以采用注解的方式来配置:
@ApplicationScope
@Component
public class AppPreferences {
}
作用域Bean的依赖
之前的文章我们讲到了,如果Singleton bean需要依赖Prototype bean那么可以采用方法注入。
但是如果将短作用域的bean注入到长作用域的bean时,该怎么处理呢?比如将request scope的bean 注入到 session scope的bean中,这个时候可以考虑使用AOP代理。
也就是说,你需要插入一个代理对象,该对象与被代理的对象公开相同的公共接口,但该对象可以从相关作用域(如HTTP请求)中获取到实际的目标对象,并将方法调用委托给实际对象。
AOP代理
在Spring中,你可以使用aop:scoped-proxy/ 来实现对目标bean的自动代理。
当然,singleton 和 prototype bean都可以使用aop:scoped-proxy/, 对于prototype bean, 每次代理都会生成一个新的对象。
参考下面的xml配置:
    <!-- an HTTP Session-scoped bean exposed as a proxy -->
    <bean id="userPreferences" class="com.flydean.service.UserPreferences" scope="session">
        <!-- instructs the container to proxy the surrounding bean -->
        <aop:scoped-proxy/>
    </bean>

    <!-- a singleton-scoped bean injected with a proxy to the above bean -->
    <bean id="userService" class="com.flydean.service.SimpleUserService">
        <!-- a reference to the proxied userPreferences bean -->
        <property name="userPreferences" ref="userPreferences"/>
    </bean>
上面的例子中,SimpleUserService 需要一个session scope 的UserPreferences 属性。但是双方作用域范围不同,这时候使用AOP对session scope对象进行代理,每次真正调用的时候,再有代理对象去session scope中查找真正的对象,然后将该对象返回。
一般来说Spring的aop:scoped-proxy/会使用CGLIB的代理。但是要注意,CGLIB只会代理非final类的公共方法。
如果将aop:scoped-proxy/的proxy-target-class属性的值指定false,则将使用基于JDK接口的代理。使用JDK接口代理,意味着该bean 必须实现特定的接口。并且所有被注入的bean的必须通过其接口之一引用bean。 如下所示:
    <!-- DefaultUserPreferences implements the UserPreferencesInterface interface -->
    <bean id="userPreferencesC" class="com.flydean.service.DefaultUserPreferences" scope="session">
        <aop:scoped-proxy proxy-target-class="false"/>
    </bean>

    <bean id="userManager" class="com.flydean.service.UserManager">
        <property name="userPreferences" ref="userPreferencesC"/>
    </bean>
其中DefaultUserPreferences是UserPreferencesInterface接口的实现,而UserManager的一个属性就是UserPreferencesInterface接口。
其他方法
当然AOP代理并不是唯一的方法,您还可以将注入点(即构造函数、setter参数或autowired字段)声明为ObjectFactory,允许每次需要时getObject()调用根据需要获取当前实例-而不保留该实例或将其单独存储。
或者使用它的JSR-330变种:Provider,和Provider一起使用,每次查询时都会调用get()方法。
自定义作用域
Spring提供了一个org.springframework.beans.factory.config.Scope接口来实现自定义作用域的功能。
第一节我们提到了Spring3.0开始,提供了thread的作用域,但是这个作用域需要自己来注册。 我们来看Spring自己的SimpleThreadScope是怎么定义和使用的。
首先 SimpleThreadScope 实现了 Scope接口, Scope接口提供了5个方法:
- Object get(String name, ObjectFactory<?> objectFactory); 从所在作用域返回对象。
- Object remove(String name); 从作用域删除对象
- void registerDestructionCallback(String name, Runnable callback); 注册销户回调方法
- Object resolveContextualObject(String key); 根据key获得上下文对象
- String getConversationId(); 获得当前scope的会话ID
自定义好了Scope类之后,需要将其注册到Spring容器中,可以通过大多数Spring ApplicationContext 的ConfigurableBeanFactory接口来注册:
void registerScope(String scopeName, Scope scope);
下面是编程方式的注册:
Scope threadScope = new SimpleThreadScope();
beanFactory.registerScope("thread", threadScope);
下面是配置方式的注册:
    <bean class="org.springframework.beans.factory.config.CustomScopeConfigurer">
        <property name="scopes">
            <map>
                <entry key="thread">
                    <bean class="org.springframework.context.support.SimpleThreadScope"/>
                </entry>
            </map>
        </property>
    </bean>
本章的例子可以参考bean-scope.
更多教程请参考flydean的博客