一、QAbstactSpinBox简介
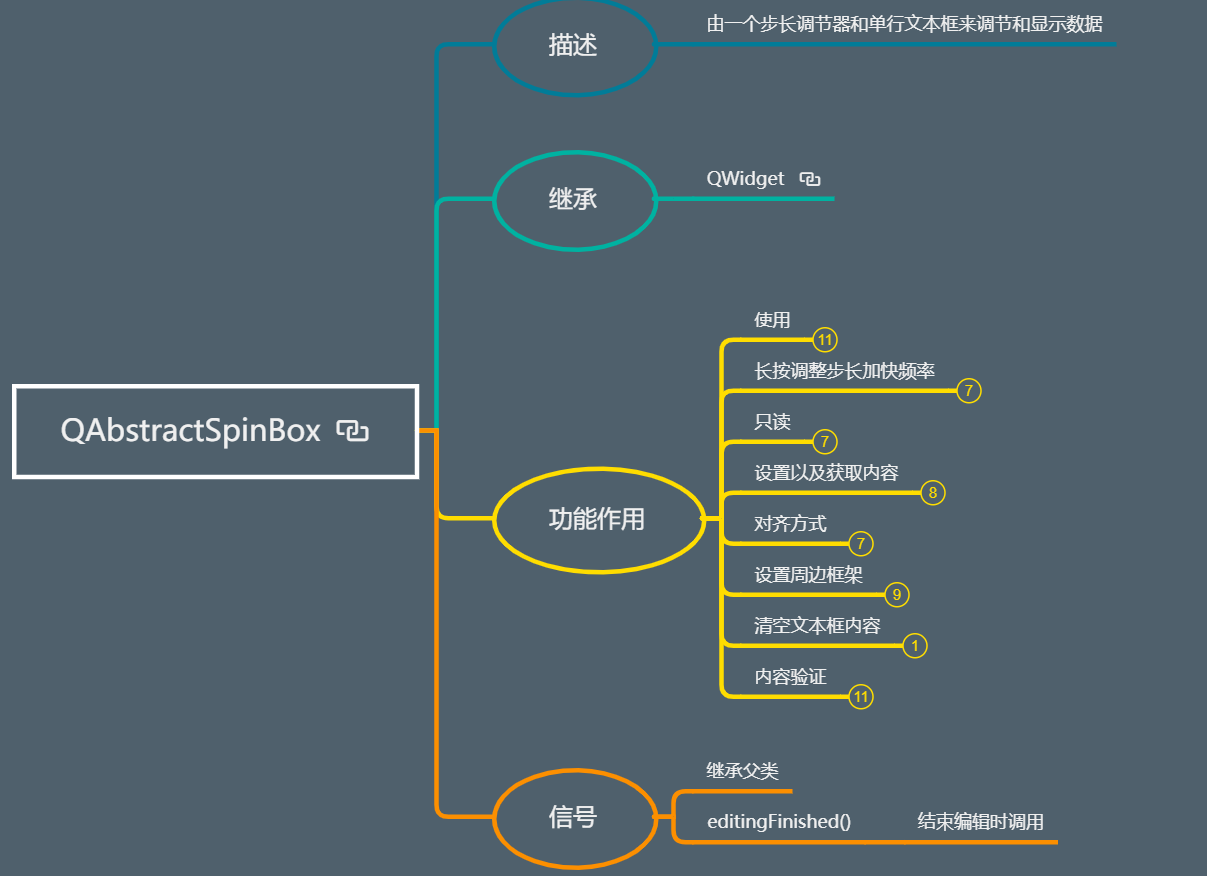
由一个步长调节器和单行文本框来调节和显示数据。
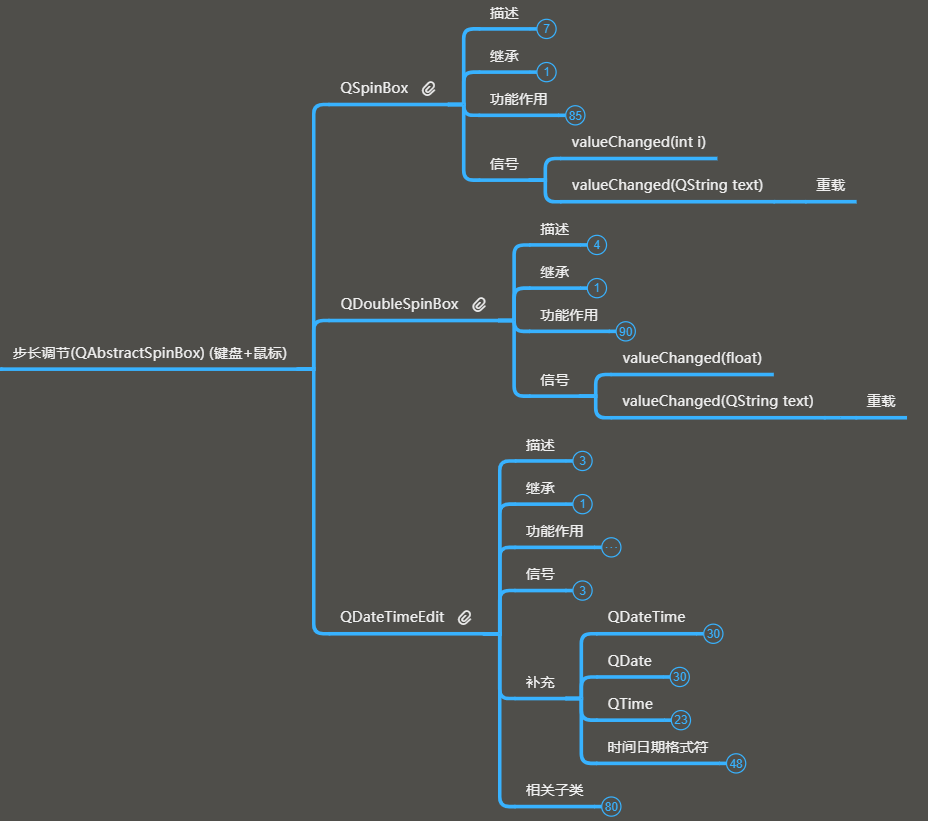
包含了QSpinBox、QDoubleSpinBox和QDateTimeEdit。
二、QAbstactSpinBox的功能作用及操作
1、使用
(1)框架

(2)操作及展示——步长调节器(0——9)

 1 from PyQt5.Qt import *
 2
 3
 4 class MyASB(QAbstractSpinBox):
 5     def __init__(self,parent=None,num=0,*args,**kwargs):
 6         super().__init__(parent,*args,**kwargs)
 7         self.lineEdit().setText(str(num))
 8
 9     def stepEnabled(self):
10         # 0--9
11         current_num = int(self.text())
12         if current_num== 0:
13             return QAbstractSpinBox.StepUpEnabled
14         elif current_num == 9:
15             return QAbstractSpinBox.StepDownEnabled
16         elif current_num < 0 or current_num > 9:
17             return QAbstractSpinBox.StepNone
18         else:
19             return QAbstractSpinBox.StepUpEnabled | QAbstractSpinBox.StepDownEnabled
20
21     def stepBy(self, p_int):
22         print(p_int)
23         current_num = int(self.text())+p_int*2
24         self.lineEdit().setText(str(current_num))
25
26
27
28 class Window(QWidget):
29     def __init__(self):
30         super().__init__()
31         self.setWindowTitle("QAbstractSpinBox")
32         self.resize(500, 500)
33         self.setup_ui()
34
35     def setup_ui(self):
36         asb = MyASB(self,6)
37         asb.resize(100,30)
38         asb.move(100,100)
39
40 if __name__ == '__main__':
41     import sys
42
43     app=QApplication(sys.argv)
44
45     window=Window()
46     window.show()
47     sys.exit(app.exec_())
2、长按调整步长加快频率
(1)框架

(2)操作及展示
1 asb.setAccelerated(True) # 加速
2 print(asb.isAccelerated()) # 获取是否加速
3、只读
(1)框架

(2)操作及展示
1 print(asb.isReadOnly()) # 获取是否只读状态
2 asb.setReadOnly(True) # 设置只读
4、设置以及获取内容
(1)框架
(2)操作及展示
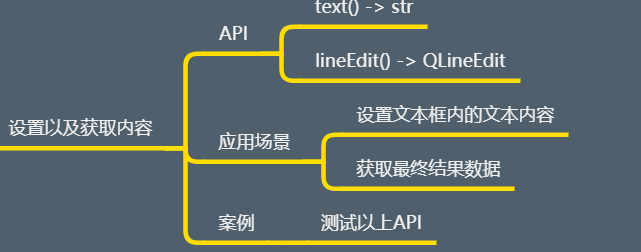
1 print(self.asb.text())  # 获取
2 # print(self.asb.lineEdit().text())
3 self.asb.lineEdit().setText("88")  # 改变值
5、对齐方式
(1)框架
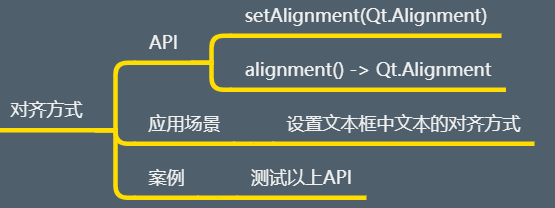
(2)操作及展示
1 # 对齐方式
2 # self.asb.setAlignment(Qt.AlignCenter) # 居中
3 self.asb.setAlignment(Qt.AlignRight)  # 右对齐
6、设置周边框架
(1)框架
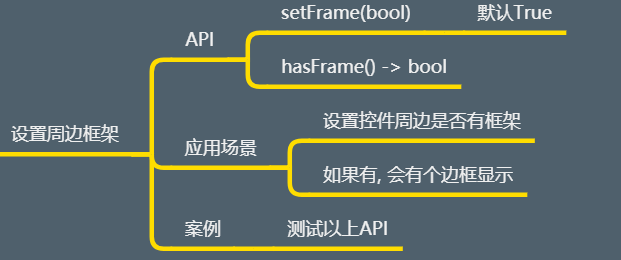
(2)操作及展示
1 # 设置周边框架
2 print(self.asb.hasFrame())  # 查看是否与框架
3 self.asb.setFrame(True)
7、清空文本框内容+设置上下箭头
1 # 清空文本框内容
2 self.asb.clear()
1 # 设置上下箭头的样式
2 # self.asb.setButtonSymbols(QAbstractSpinBox.NoButtons) # 设置为无样式图标
3 # self.asb.setButtonSymbols(QAbstractSpinBox.PlusMinus)
4 self.asb.setButtonSymbols(QAbstractSpinBox.PlusMinus)
8、内容验证
(1)框架

(2)操作及展示
 1 def validate(self, p_str, p_int):
 2     # 18--180
 3     num = int(p_str)
 4     if num < 18:
 5         return (QValidator.Intermediate,p_str,p_int)
 6     elif num <= 180:
 7         return (QValidator.Acceptable,p_str,p_int)
 8     else:
 9         return (QValidator.Invalid,p_str,p_int)
10
11 def fixup(self, p_str):
12     print(p_str)
13     return "18"
9、信号
(1)框架

(2)操作及展示
1 self.asb.editingFinished.connect(lambda: print("结束编辑"))
三、子类QSpinBox
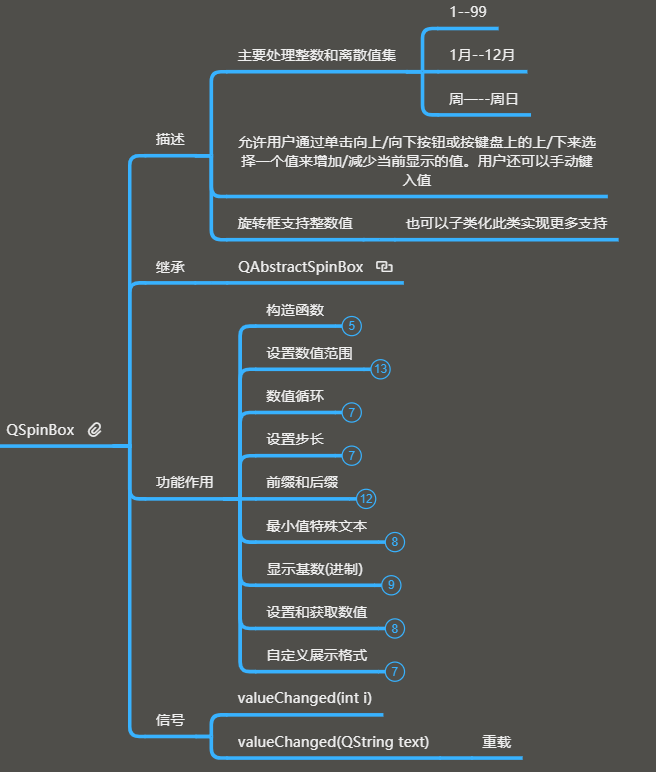
主要处理整数和离散数值集
1、设置数值范围
(1)框架
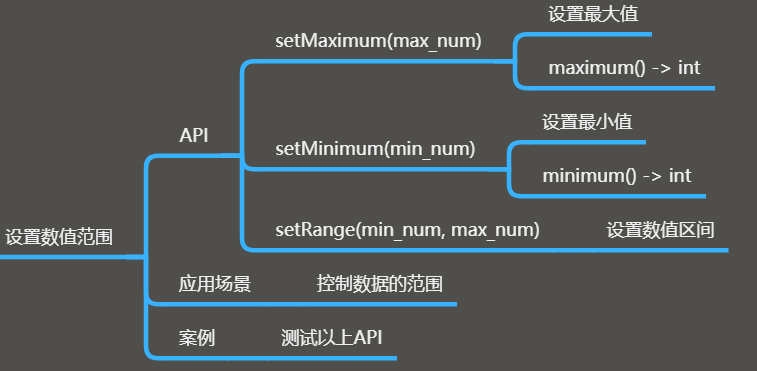
(2)操作及展示
1 def 最大值最小值(self):
2     # self.sb.setMaximum(180) # 最大180
3     # self.sb.setMinimum(99) # 最小99
4     self.sb.setRange(10,50) # 设置数值范围
2、数值循环
(1)框架

(2)操作及展示
1 btn.clicked.connect(lambda :self.数值循环())
2
3 def 数值循环(self):
4     print(self.sb.wrapping())
5     self.sb.setWrapping(True)
6     print(self.sb.wrapping())
3、设置步长
(1)框架
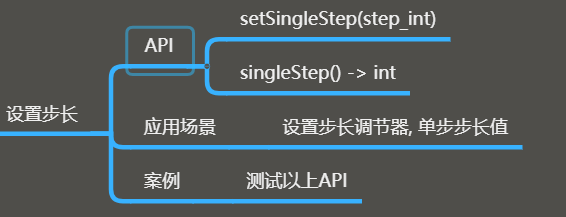
(2)操作及展示
1 btn.clicked.connect(lambda :self.步长的设置())
2
3 def 步长的设置(self):
4     self.sb.setSingleStep(3)
4、前缀和后缀
(1)框架
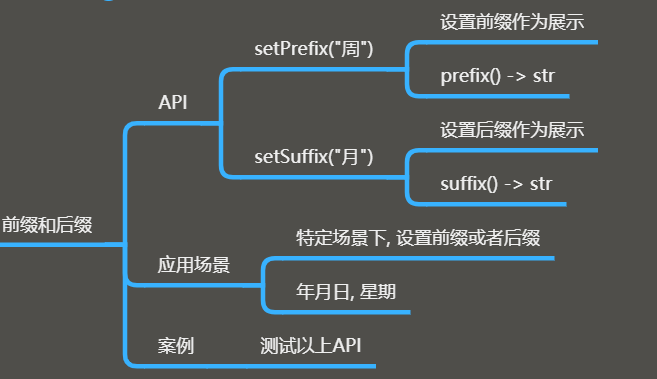
(2)操作及展示
1 btn.clicked.connect(lambda :self.前缀和后缀())
2
3 def 前缀和后缀(self):
4     # self.sb.setRange(1,12)
5     # self.sb.setSuffix("月") # 后缀
6     self.sb.setRange(1,6)
7     self.sb.setPrefix("周") # 前缀
5、最小值特殊文本
(1)框架

(2)操作及展示
1 self.sb.setRange(0, 6)
2 self.sb.setPrefix("周")  # 前缀
3 self.sb.setSpecialValueText("周日")
6、显示基数(进制)
(1)框架
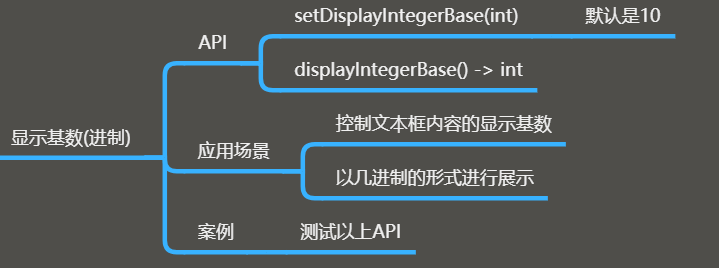
(2)操作及展示
1 def 显示的进制设置(self):
2     print(self.sb.displayIntegerBase()) # 查看进制
3     self.sb.setDisplayIntegerBase(2) # 显示的进制为二进制
4     print(self.sb.displayIntegerBase())  # 查看进制
7、设置和获取数值
(1)框架
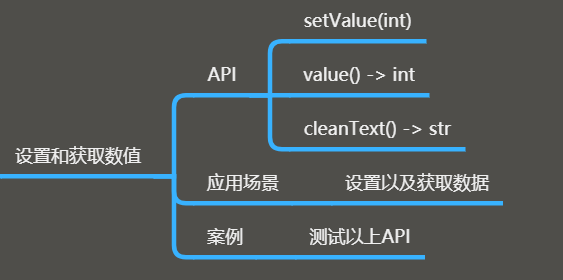
(2)操作及展示
1 def 设置和获取数值(self):
2     # self.sb.setRange(0,9)
3     # self.sb.setValue(66) # 设置数值不能超过上述限制
4     self.sb.setPrefix("哈喽") # 设置前缀
5     print(self.sb.value()) # 获取数值
8、自定义展示格式
(1)框架

(2)操作及展示
1 class SB(QSpinBox):
2     def textFromValue(self, p_int):
3         print(p_int)
4         return str(p_int)+"*"+str(p_int)

9、信号
(1)框架

(2)操作及展示
1 sb.valueChanged[str].connect(lambda val: print(type(val), val))
2 # 此处[str]表示向外发射信号时传递的参数是字符串类型
四、子类QDoubleSpinBox
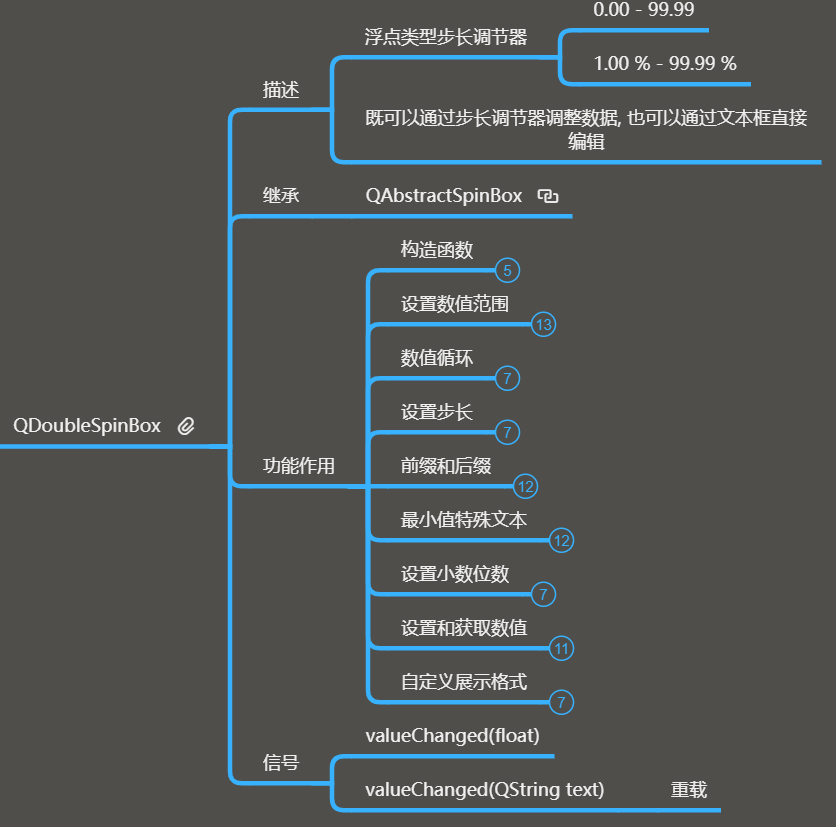
主要处理浮点类型的数据。
与之前相同的功能有:
设置数值范围、数值循环、设置步长、前缀和后缀、最小值特殊文本、设置和获取数值、自定义展示格式。
信号也是相同的。
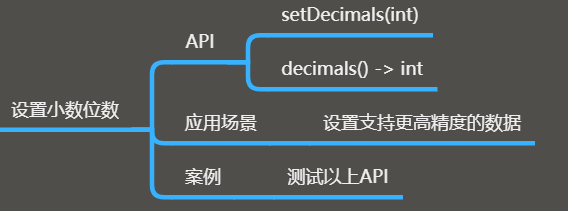
1、设置小数位数
(1)框架
(2)操作及展示
1 dsb.setDecimals(6) # 设置小数位数
2、设置和获取数值
(1)框架

(2)操作及展示
1 # test_btn.clicked.connect(lambda :dsb.setValue(66.643)) # 设置数据
2 # test_btn.clicked.connect(lambda :print(dsb.value(),type(dsb.value()))) # 获取数据
3 test_btn.clicked.connect(lambda: print(dsb.cleanText(), type(dsb.cleanText())))  # 清除文本(如,任何前后缀,括号等),转换成字符串
五、QDateTimeEdit
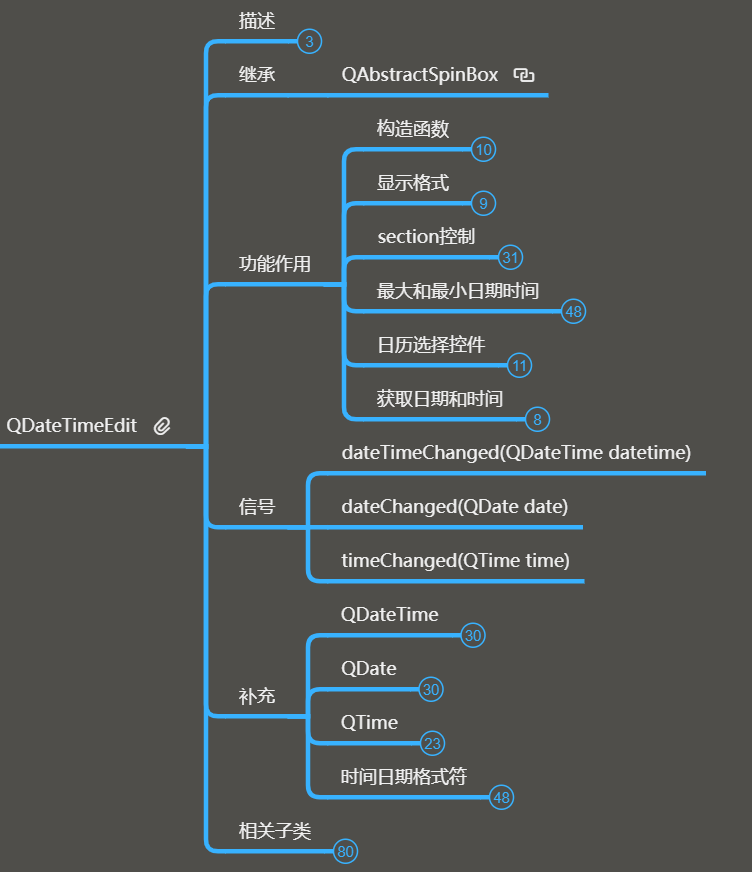
编辑日期和时间的单行文本框,既可以用箭头调节,也可以用键盘编辑输入;
可以单独调节某个部分。
1、构造函数
(1)框架
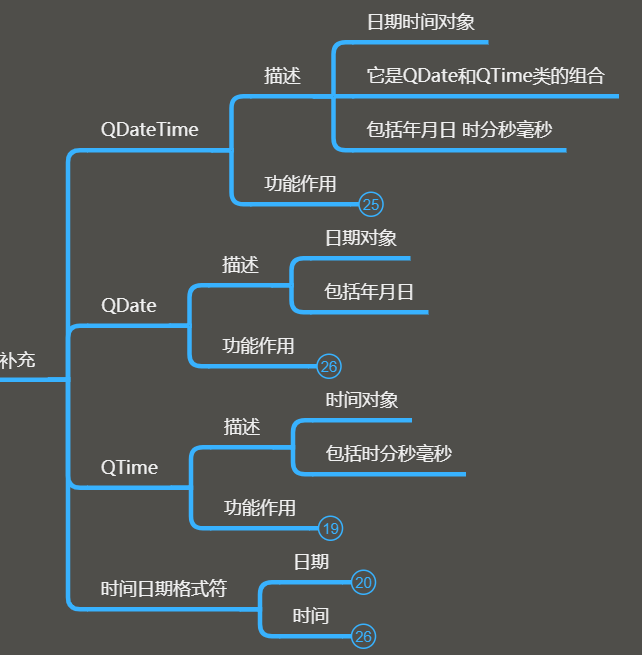
(2)操作及展示
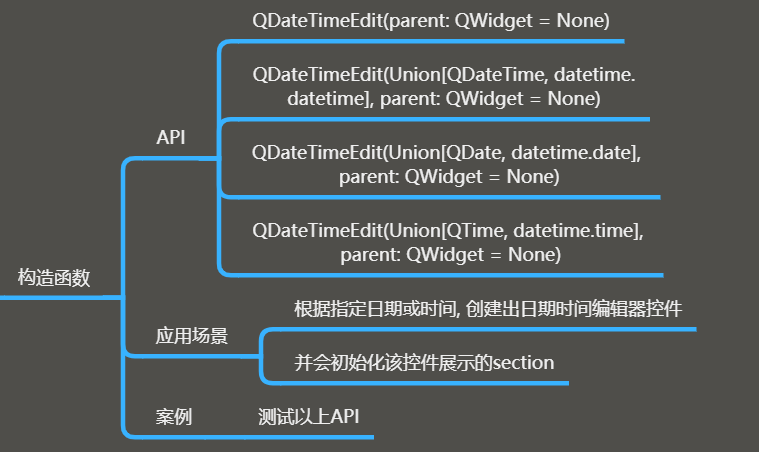
1 # dte = QDateTimeEdit(QDateTime.currentDateTime(),self) # 获取当前年月日时间
2 # dte = QDateTimeEdit(QDate.currentDate(),self) # 获取当前日期
3 dte = QDateTimeEdit(QTime.currentTime(), self)  # 获取当前时间
4 dte.move(100, 100)
补充:
① QDateTime
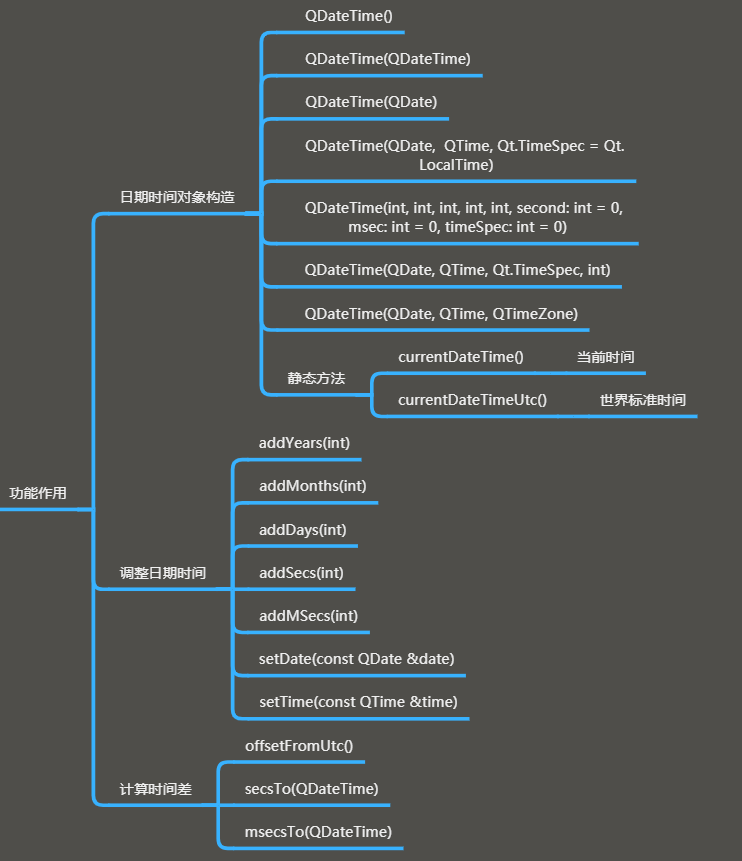
1 # 构造函数
2 # dt = QDateTime(2020,12,23,12,30)
3 dt = QDateTime.currentDateTime()  # 当前时间
4 # dt = dt.addYears(2) # 年份加2
5 print(dt.offsetFromUtc() // 3600)  # 计算时间差(小时)
6
7 print(dt)
8 QDateTimeEdit(dt, self)
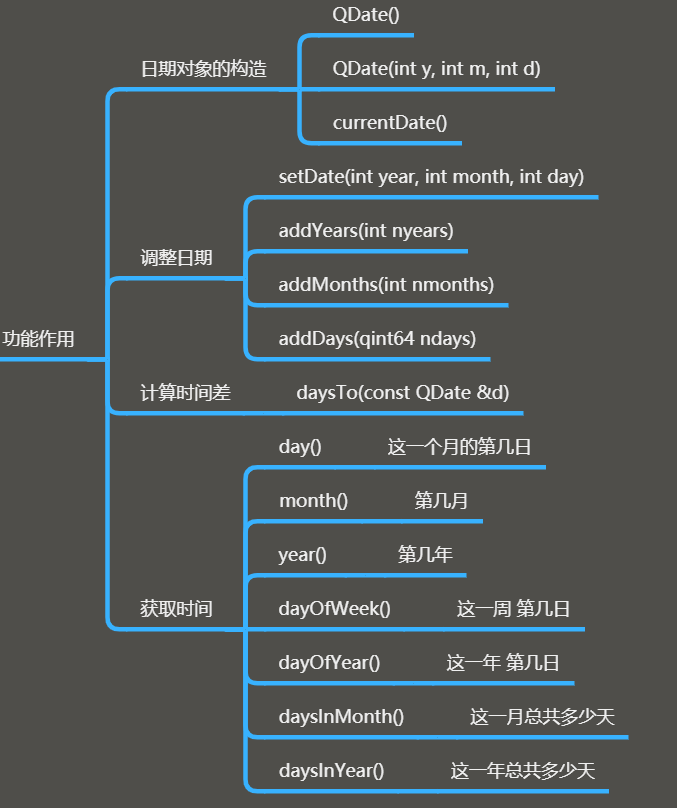
② QDate
③ QTime
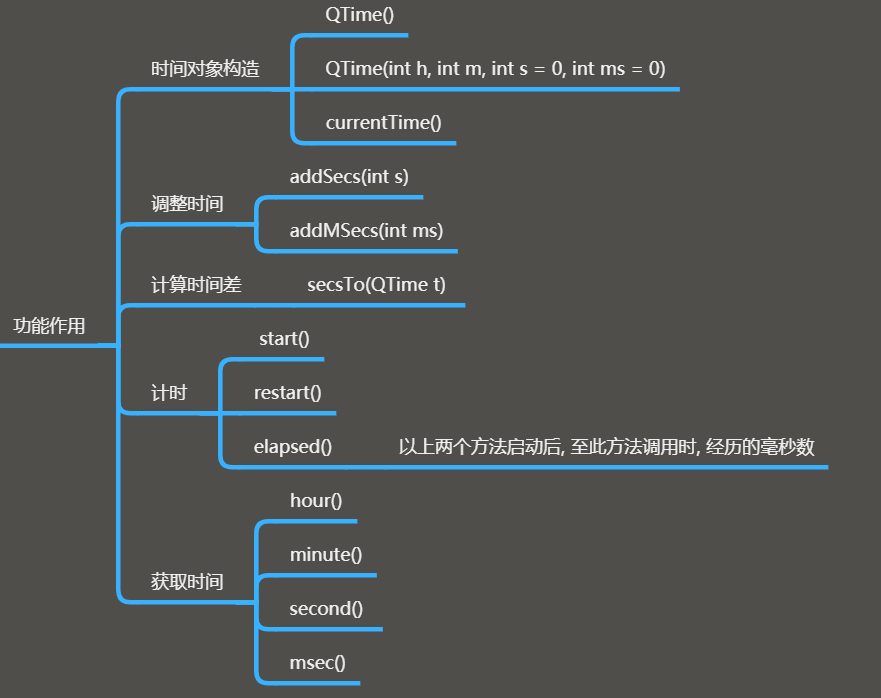
1 time = QTime.currentTime()
2 time.start()
3
4 btn = QPushButton(self)
5 btn.setText("测试")
6 btn.move(200, 200)
7 btn.clicked.connect(lambda: print(time.elapsed() // 1000))
2、显示格式
(1)框架

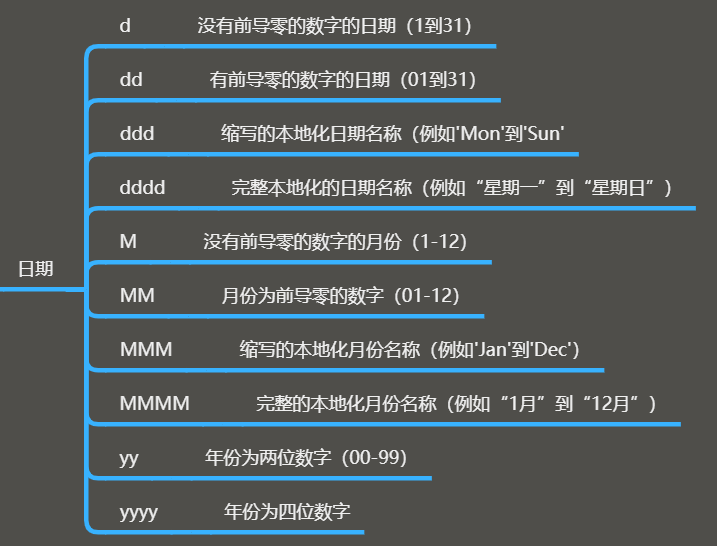
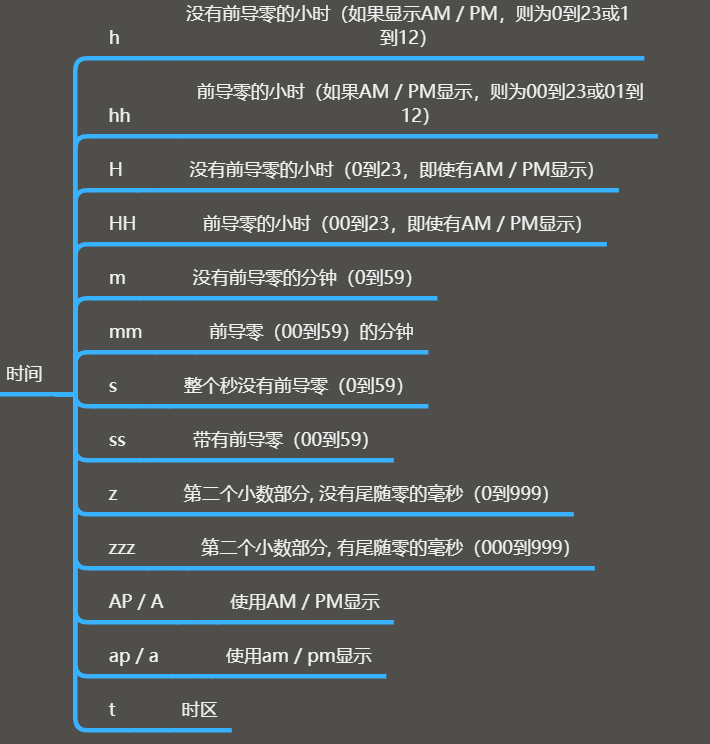
(2)操作及展示
1 dte.setDisplayFormat("yy-MM-dd hh:mm:ss:zzz")
2 print(dte.displayFormat())
3、section控制
(1)框架
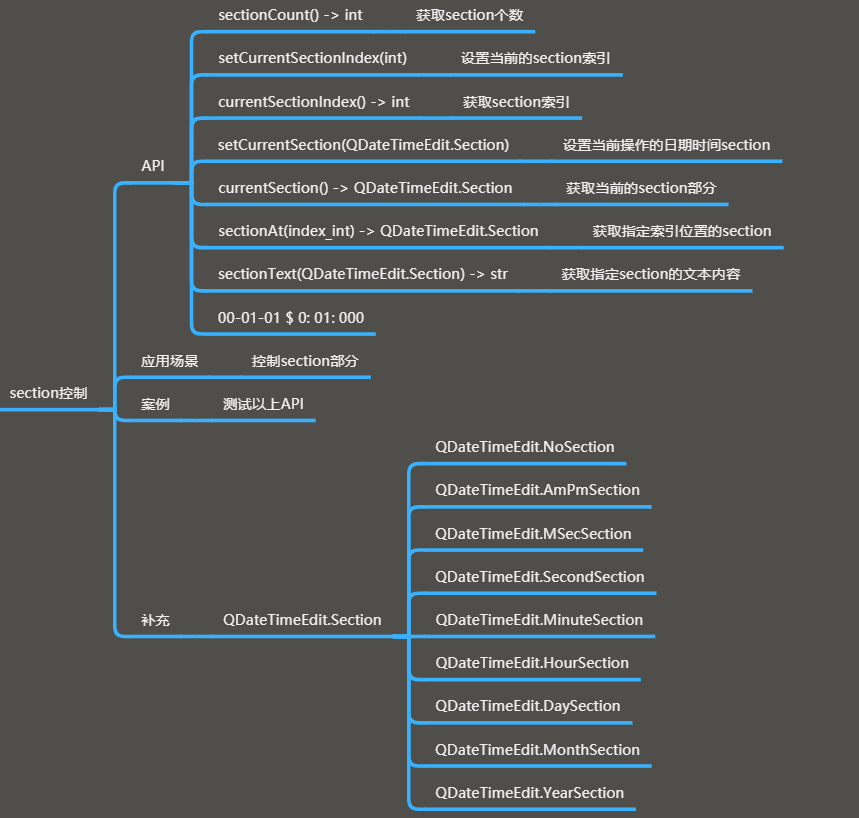
(2)操作及展示
 1 btn = QPushButton(self)
 2 btn.move(200, 200)
 3 btn.setText("测试")
 4
 5 # btn.clicked.connect(lambda :print(dte.currentSectionIndex())) # 获取索引
 6
 7 def test():
 8     print("xxx")
 9     dte.setFocus()  # 注意要先设置焦点
10     # dte.setCurrentSectionIndex(3) # 设置索引
11     dte.setCurrentSection(QDateTimeEdit.DaySection)  # 通过枚举来选择索引
12
13
14 btn.clicked.connect(test)
15
16 # section控制
17 print(dte.sectionCount())  # 查看section索引的个数
4、最大和最小日期时间
(1)框架
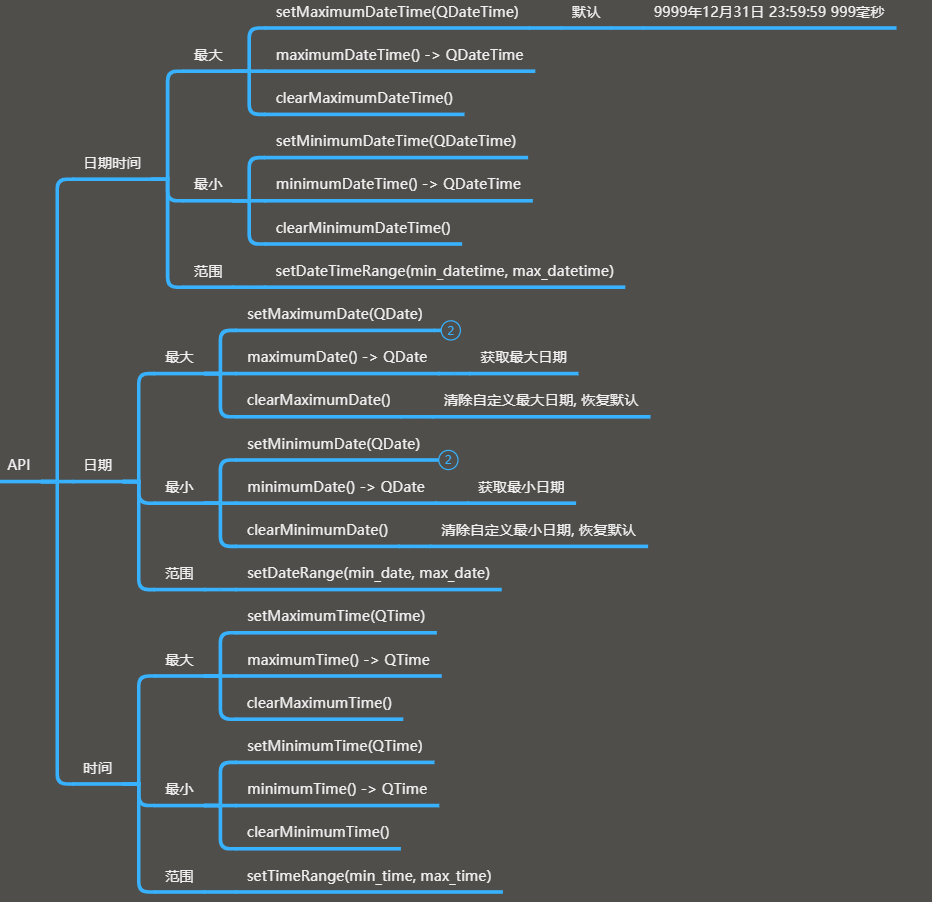
(2)操作及展示
1 # dte.setMaximumDateTime(QDateTime(2020,8,15,12,30)) # 设置最大日期时间
2 dte.setDateTimeRange(QDateTime.currentDateTime().addDays(-3),
3                      QDateTime.currentDateTime().addDays(3))  # 前三天到后三天
5、日历选择控件
(1)框架
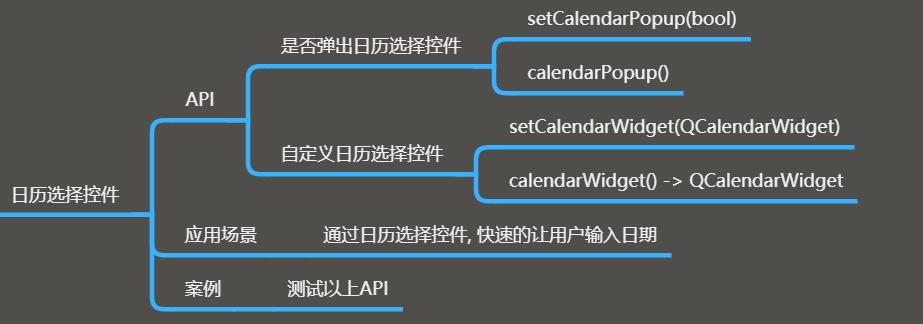
(2)操作及展示
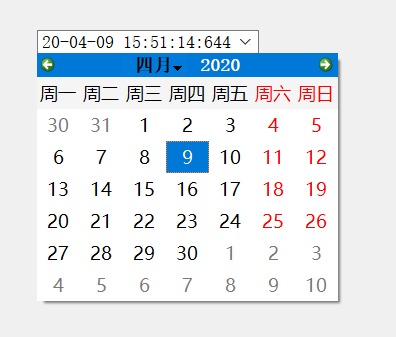
1 dte.setCalendarPopup(True)
2 # print(dte.time()) # 获取时间
3 print(dte.date())  # 获取日期
6、信号
(1)框架

(2)操作及展示
1 # 信号
2 dte.dateChanged.connect(lambda val: print(val))
3 dte.dateTimeChanged.connect(lambda val: print(val))

