日常的网页编程中,弹出对话框经常会以各种形式出现,例如:信息提示框、确认框、新增、修改信息等对话框均是其不同的表现形式。
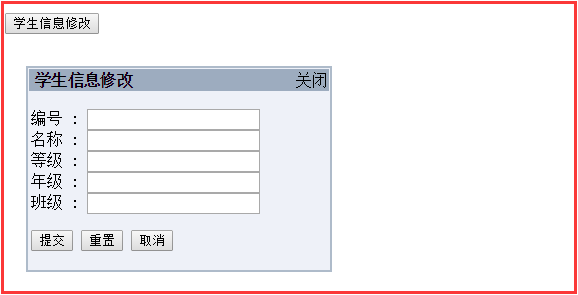
此文以弹出信息新增对话框进行简要演示,经请参阅!
以下为其对应的结构目录:
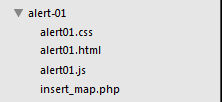
alert01.html 文件对应源码如下所示:
  1 <!DOCTYPE HTML PUBLIC "-//W3C//DTD HTML 4.01 Transitional//EN" "http://www.w3c.org/TR/1999/REC-html401-19991224/loose.dtd">
  2 <html xmlns="http://www.w3.org/1999/xhtml">
  3     <head>
  4         <title>JAVASCRIPT弹出框-01</title>
  5         <meta http-equiv="Content-Type" content="text/html; charset=utf-8">
  6
  7         <link rel="stylesheet" type="text/css" href="alert01.css">
  8         <script type="text/javascript" src= "alert01.js"></script>
  9     </head>
 10
 11     <body>
 12         <div id="popDiv">
 13
 14             <div id="popTitle"> <!-- 标题div -->
 15                 <span class="title_left">学生信息修改</span>
 16                 <span class="title_right">
 17                     <a href="#" onclick="hidePopup();">关闭</a>
 18                 </span>
 19             </div>
 20
 21             <div id="popForm"> <!-- 表单div -->
 22                 <form action="insert_map.php" method="post">
 23                     <p id="info">
 24                     编号 : <input type="text" name="id" /> </br>
 25                     名称 : <input type="text" name="name" /> </br>
 26                     等级 : <input type="text" name="level" /></br>
 27                     年级 : <input type="text" name="lon" /> </br>
 28                     班级 : <input type="text" name="lat" /> </br>
 29                     </p>
 30
 31                     <input type="submit" value="提交" />
 32                     <input type="reset" value="重置" onclick="clearinfo()"/>
 33                     <input type="reset" value="取消" onclick="hidePopup()" />
 34                 </form>
 35             </div>
 36         </div>
 37
 38         <p>
 39             <input name="" type="button" onclick="showPopup()" value="学生信息修改" />
 40         </p>
 41
 42         <script type="text/javascript">
 43             /*-------------------------鼠标左键拖动---------------------*/
 44             /*--------当不需要实现此功能时,可以将这一部分代码删除------------*/
 45             var objDiv = document.getElementById("popDiv");
 46
 47             // 判断浏览器类型
 48             var isIE = document.all ? true : false;
 49
 50             // 当鼠标左键按下后执行此函数
 51             document.onmousedown = function(evnt) {
 52                 var evnt = evnt ? evnt : event;
 53
 54                 if (evnt.button == (document.all ? 1 : 0)) {
 55                     // mouseD为鼠标左键状态标志,为true时表示左键被按下
 56                     mouseD = true;
 57                 }
 58             }
 59
 60             objDiv.onmousedown = function(evnt) {
 61                 objDrag = this;     // objDrag为拖动的对象
 62                 var evnt = evnt ? evnt : event;
 63
 64                 if (evnt.button == (document.all ? 1 : 0)) {
 65                     mx = evnt.clientX;
 66                     my = evnt.clientY;
 67                     objDiv.style.left = objDiv.offsetLeft + "px";
 68                     objDiv.style.top = objDiv.offsetTop + "px";
 69
 70                     if (isIE) {
 71                         objDiv.setCapture();
 72                         //objDiv.filters.alpha.opacity = 50;     // 当鼠标按下后透明度改变
 73                     } else {
 74                         window.captureEvents(Event.MOUSEMOVE);   // 捕获鼠标拖动事件
 75                         //objDiv.style.opacity = 0.5;            // 当鼠标按下后透明度改变
 76                     }
 77                 }
 78             }
 79
 80             document.onmouseup = function() {
 81                 mouseD = false;//左键松开
 82                 objDrag = "";
 83
 84                 if (isIE) {
 85                     objDiv.releaseCapture();
 86                     //objDiv.filters.alpha.opacity = 100;    //当鼠标左键松开后透明度改变
 87                 } else {
 88                     window.releaseEvents(objDiv.MOUSEMOVE);  //释放鼠标拖动事件
 89                     //objDiv.style.opacity = 1;              //当鼠标左键松开后透明度改变
 90                 }
 91             }
 92
 93             document.onmousemove = function(evnt) {
 94                 var evnt = evnt ? evnt : event;
 95
 96                 if (mouseD == true && objDrag) {
 97                     var mrx = evnt.clientX - mx;
 98                     var mry = evnt.clientY - my;
 99                     objDiv.style.left = parseInt(objDiv.style.left) + mrx + "px";
100                     objDiv.style.top = parseInt(objDiv.style.top) + mry + "px";
101                     mx = evnt.clientX;
102                     my = evnt.clientY;
103                 }
104             }
105         </script>
106     </body>
107 </html>
alert01.css 文件对应源码如下所示:
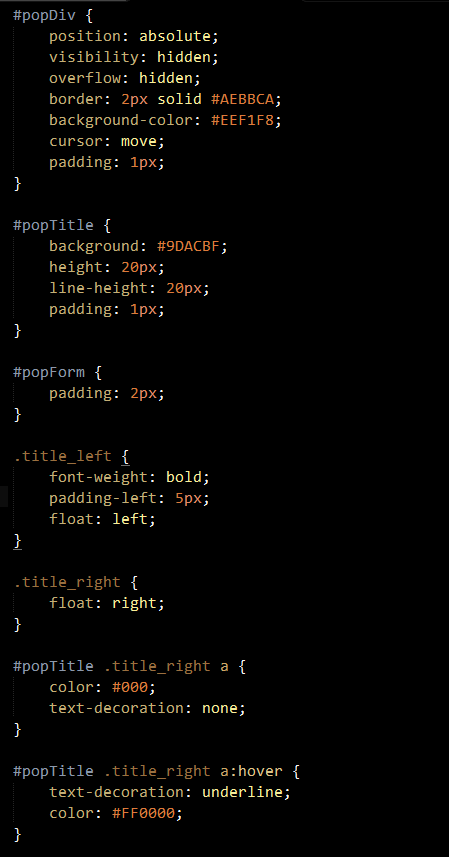
alert01.js 文件对应源码如下所示:
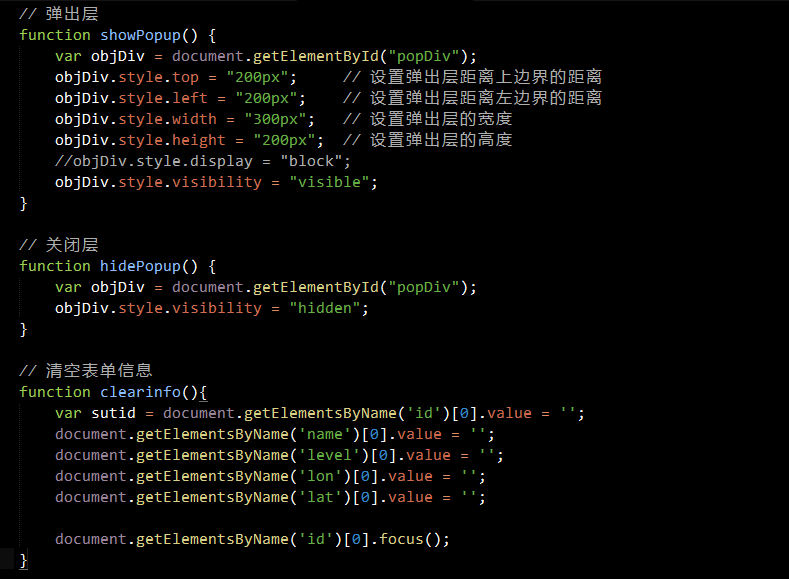
insert_map.php 文件对应源码如下所示:
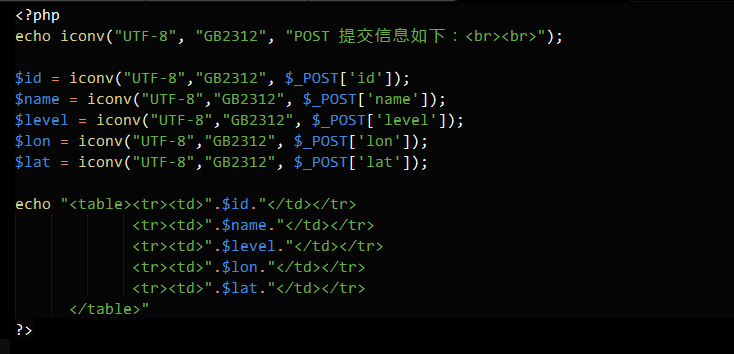
访问链接对应的网址(实际网址依据本地服务配置会有相应的变化)为:http://localhost//webapps/alert-01/alert01.html
页面显示如下图所示:
至此, HTML-002-弹出对话框 顺利完结,希望此文能够给初学 HTML 的您一份参考。
最后,非常感谢亲的驻足,希望此文能对亲有所帮助。热烈欢迎亲一起探讨,共同进步。非常感谢! ^_^