简单介绍
IGListKit是Instagram推出的新的UICollectionView框架,使用数据驱动,旨在创造一个更快更灵活的列表控件。
github地址:https://github.com/Instagram/IGListKit
这个全新的控件一出来,我就赶快投入实践了一把。
先谈一谈我对这个控件的结论:这个框架设计的非常好,完美符合高内聚、低耦合。IGListKit 是一个很典型的使用 Objective-C 开发的,但却是个偏向使用 Swift 语言开发者的一个 UI 组件库。
使用过程也面临了一些疑惑,先谈一下使用收获:
-
它的优势在于flexible,比起原来的UICollectionView,在使用上更加灵活,在数据驱动上做的更好。
-
这个框架在fast上体现的还不够,但不妨碍我们自己进行下一步优化。
先看看IGListKit的结构
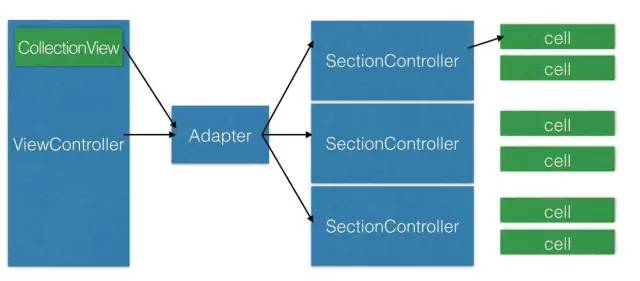
在原来的UICollectionViewController里的写法,我们一定都会实现UICollectionDataSource和UICollectionViewDelegate。
不过在IGListKit的实战过程中,你会发现似乎不用在ViewController中实现相关协议,取而代之的是SectionController来实现对应的方法:


class DemoSectionController: IGListSectionController, IGListSectionType{
    var object: DemoItem?
    func numberOfItems() -> Int {
        return 1
    }
    func sizeForItem(at index: Int) -> CGSize {
        return CGSize( collectionContext!.containerSize.width, height: 55)
    }
    func cellForItem(at index: Int) -> UICollectionViewCell {
        let cell = collectionContext!.dequeueReusableCell(of: LabelCell.self, for: self, at: index) as! LabelCell
        cell.label.text = object?.name
        return cell
    }
}
这里直接取了官方的Demo里的其中一个SectionController作为例子。其实UICollectionDataSource和UICollectionViewDelegate都交给了Adapter这个适配器中。我们来看一下IGAdapter.m文件中的源码:
当我们为适配器绑定collectionView时,调用如下方法
- (void)setCollectionView:(IGListCollectionView *)collectionView {
    if (_collectionView != collectionView || _collectionView.dataSource != self) {
        _collectionView = collectionView;
        _collectionView.dataSource = self;

        [self updateCollectionViewDelegate];
        [self updateAfterPublicSettingsChange];
    }
}
其中self是指适配器对象。
接着适配器作为实现数据源协议的对象,我们来看一下它是怎么联系SectionController群的。
- (UICollectionViewCell *)collectionView:(UICollectionView *)collectionView cellForItemAtIndexPath:(NSIndexPath *)indexPath {
    IGListSectionController *sectionController = [self.sectionMap sectionControllerForSection:indexPath.section];
    _isDequeuingCell = YES;
    UICollectionViewCell *cell = [sectionController cellForItemAtIndex:indexPath.item];
    _isDequeuingCell = NO;
    [self mapCell:cell toSectionController:sectionController];

    return cell;
}
可以看到adapter通过遍历自己的sectionController的map来达到UICollectionView的数据源在cellForItem如何选择对应的sectionController。
坦白说,这样做,给人一种全新的思路,而且以后就算自己实现其实也并不复杂,可以参考其设计。
WorkRange能做的事
什么是WorkRange?还是用Github的官方介绍说的更快,更清楚。
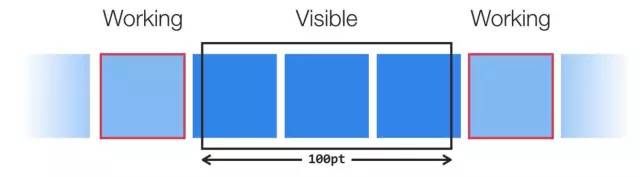
大体就是说,我们可以指定左右的Working区间,干一些准备工作。
官网写的不多,只说了我们可以干事,具体干啥事,在我的个人实践中,我对它使用的理解是这样的。
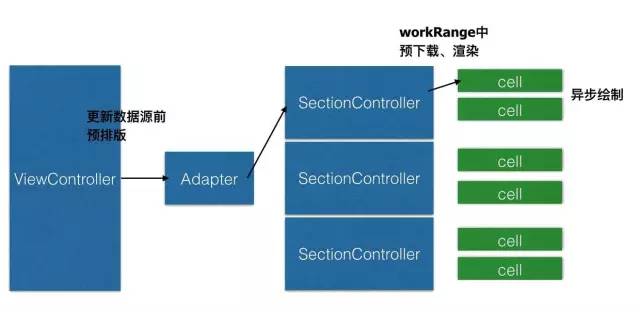
更新数据源及预排版在ViewController进行,为Item设置layout属性。这样在SectionController中可以无需计算直接使用排版数据。
func updateItem(withItems items:Array) {
/*
       假设我们在viewController中更新数据源,item为数据模型
        Items = [CommentItem(name: "Mike", comment: ""),
                     CommentItem(name: "Chen", comment: ""),
                     ....]
   */
        commentGroup = CommentGroup(Items: Items)

        let queue = DispatchQueue(label: "myBackgroundQueue")
        queue.async {
            for item in Items {
               let layout = CommentMainItemLayout(commentItem: item)
               item.layout = layout
            }
            self.commentModels.append(self.commentGroup!)

            DispatchQueue.main.async { [weak self] in
                self?.commentAdapter.performUpdates(animated: true, completion: nil)
            }
        }
    }
而将预下载或者预渲染工作放在workRange中。
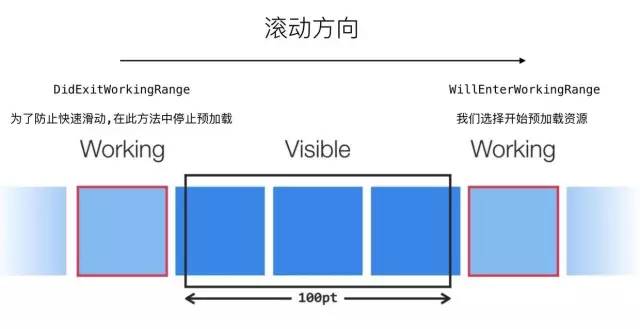
func listAdapter(_ listAdapter: IGListAdapter, sectionControllerWillEnterWorkingRange sectionController: IGListSectionController) {
      for  url: object.urls {
             ImageCache.setImage(withUrl:url)     //如果需要预渲染,可自行设定
      }
}

func listAdapter(_ listAdapter: IGListAdapter, sectionControllerDidExitWorkingRange sectionController: IGListSectionController) {
      ImageCache.cancel()
}
Display Delegate
我还没来得及用到Display Delegate,但我觉得它非常适合在显示文本的控件上使用异步绘制
我们先来看一看它的调用顺序
-
func cellForItem(at index: Int) -> UICollectionViewCell
-
func listAdapterwillDisplay
-
func listAdapterdidEndDisplaying
可以发现cellForItem在willDisplay前面,于是我会选择在cellForItem执行异步绘制。
在listAdapterdidEndDisplaying暂停异步绘制,最大程度上防止滑动速度过快,导致白白浪费去执行绘制任务。
和想象不一样的数据驱动
当初看到github中官方给的图是这样的:
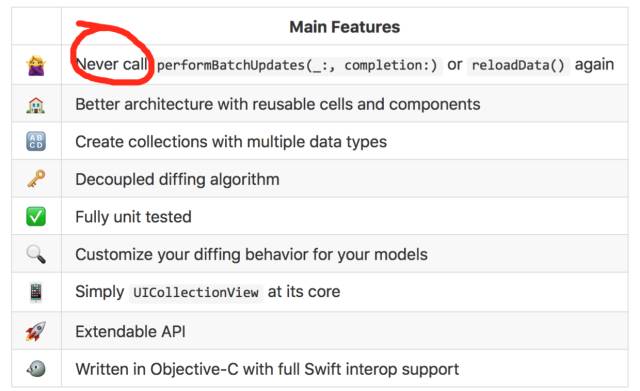
我以为IGListKit里的数据驱动是类似双向绑定的结构,更新时不用手动显式的调用Update,可实际修改数据源模型,还是要显式调用
adapter.performUpdates(animated: true, completion: nil)
而这句代码对应的就是
/**
     Perform an update from the previous state of the data source. This is analagous to calling
     -[UICollectionView performBatchUpdates:completion:].


    open func performUpdates(animated: Bool, completion: IGListKit.IGListUpdaterCompletion? = nil)
为什么称为Never Call呢?
再来看一下Diff算法
简单来说这个算法就是计算tableView或者collectionView前后数据变化增删改移关系的一个算法,时间复杂度是O(n),算是IGListKit的特色特点之一。
其实这个算法单独拿出来不只可以计算collectionView模型,稍加改造,也适用于其他模型或者文件的变化
使用的是Paul Heckel 的A technique for isolating differences between files 的算法,这份paper是收费。
不过这并不妨碍我们直接看源码,我们可以看一下IGListDiff.mm文件,该算法使用C++来编写。
主要是通过hashtable和新旧的两个数组结构:
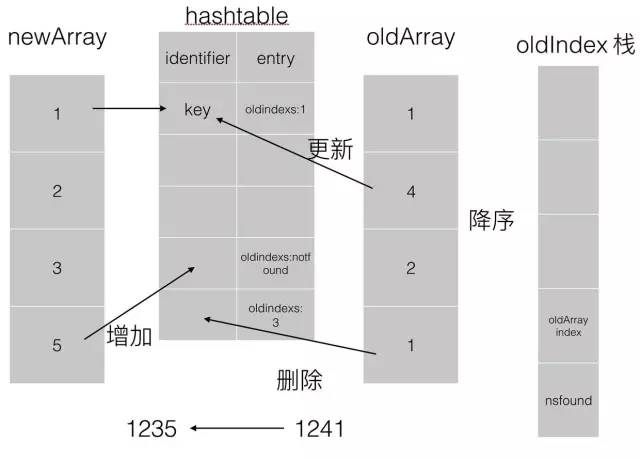
用简单的例子来说,这里我模拟的是从假设原来的 1,2,4,1的旧数据模型到新的1,2,3,5的数据模型的变化过程,假想成Swift中代码,应该是这样的:
let oldModel = [
        Num(id: 1, name: "1"),
        Num(id: 2, name: "2"),
        Num(id: 3, name: "4"),
        Num(id: 4, name: "1"),
    ]
let newModel = [
        Num(id: 1, name: "1"),
        Num(id: 2, name: "2"),
        Num(id: 3, name: "3"),
        Num(id: 4, name: "5"),
    ]
let result = IGListDiffPaths(0, 0, from, to, .equality).forBatchUpdates()
tableView.beginUpdates()
tableView.deleteRows(at: result.deletes, with: .fade)
tableView.insertRows(at: result.inserts, with: .fade)
for move in result.moves {
            tableView.moveRow(at: move.from, to: move.to)
}
tableView.endUpdates()
首先oldIndexs是一个栈的结构,过程是先遍历新数组,将数组里模型的id对应的hash值作为key,找到对应的Num成员对象(实际代码中为entry,可以理解为一种抽象)的oldIndexs栈存入NSNotFound。
再遍历旧数组,拿例子来说,就是将数组里模型的id 对应的hash值作为key,找到对应的Num成员对象里的oldIndexs栈增加旧数组的下标值。
如果是新增加的,那么在hashtable中key对应的value存入的Num成员对象就是notfound。
这样算法如图使用的数据结构(已简化,实际稍复杂些),可以绑定新旧数组的成员的对应关系,包括成员间的移动增加删除修改关系,对于像TableView或者CollectionView非常适合不过。