目录
paramiko 模块
线程与进程之线程
一、paramiko 模块
1、堡垒机准备
paramiko:基于ssh用于连接远程服务器并执行相关操作,批量管理
- 安装
yum -y install python-pip  # linux环境,win安装完python自带pip
pip install paramiko- 1
- 2
1.1 SSHClient 基于用户名密码连接
- 基于用户名密码连接 执行命令:
import paramiko
# 创建ssh对象
ssh = paramiko.SSHClient()
# 允许连接不在know_hosts文件中的主机,可以注释掉看下效果
ssh.set_missing_host_key_policy(paramiko.AutoAddPolicy())
# 连接服务器
ssh.connect(hostname='192.168.8.140',port=22,username='root',password='123456')
# 执行命令
stdin, stdout, stderr = ssh.exec_command("top")  # 标准输入、标准输出、标准错误
# 获取命令结果
stdout_result = stdout.read()
stderr_result = stderr.read()
result = stdout_result if stdout_result else stderr_result
print(result.decode())
# 关闭连接
ssh.close()- 1
- 2
- 3
- 4
- 5
- 6
- 7
- 8
- 9
- 10
- 11
- 12
- 13
- 14
- 15
- 16
- 基于用户名密码连接 传输文件:
# shell scp 传输文件
scp -rp -P22 fgf.txt root@192.168.8.140:/tmp/- 1
- 2
import paramiko

transport = paramiko.Transport(('192.168.8.140',22))
transport.connect(username='root', password='123456')
sftp = paramiko.SFTPClient.from_transport(transport)
# 将文件上传到服务器
sftp.put('ssh.py', '/tmp/ssh.py')
# 讲文件下载到本地
sftp.get('/tmp/ssh.py', 'ssh1.py')

transport.close()- 1
- 2
- 3
- 4
- 5
- 6
- 7
- 8
- 9
- 10
- 11
1.2 SSHClient 基于密钥连接
RSA : 非对称密钥验证
公钥 : public key
私钥 : private key
把自己的公钥放在自己要连的机器上
# 生成: 权限必须600
ssh-keygen  # 公钥放到对方要登录用户的.ssh下 authorized_keys  (一行)
# 命令拷贝 (以下命令用一个就可以,或者自己拷贝)
ssh-copy-id "-p22 root@10.0.0.31 "
ssh-copy-id -i ~/.ssh/id_rsa.pub 192.168.198.132- 1
- 2
- 3
- 4
- 5
- 基于公钥密钥连接 执行命令
import paramiko
private_key = paramiko.RSAKey.from_private_key_file('id_rsa')

# 创建ssh对象
ssh = paramiko.SSHClient()
# 允许连接不在know_hosts文件中的主机
ssh.set_missing_host_key_policy(paramiko.AutoAddPolicy())
# 连接服务器
ssh.connect(hostname='192.168.8.140',port=22,username='root',pkey=private_key)
# 执行命令
stdin, stdout, stderr = ssh.exec_command("ifconfig")
# 获取命令结果
stdout_result = stdout.read()
stderr_result = stderr.read()
result = stdout_result if stdout_result else stderr_result
print(result.decode())
# 关闭连接
ssh.close()- 1
- 2
- 3
- 4
- 5
- 6
- 7
- 8
- 9
- 10
- 11
- 12
- 13
- 14
- 15
- 16
- 17
- 18
- 基于公钥密钥连接 传输文件
import paramiko

private_key = paramiko.RSAKey.from_private_key_file('/home/auto/.ssh/id_rsa')

transport = paramiko.Transport(('hostname', 22))
transport.connect(username='fgf', pkey=private_key )

sftp = paramiko.SFTPClient.from_transport(transport)
# 将location.py 上传至服务器 /tmp/test.py
sftp.put('/tmp/location.py', '/tmp/test.py')
# 将remove_path 下载到本地 local_path
sftp.get('remove_path', 'local_path')

transport.close()- 1
- 2
- 3
- 4
- 5
- 6
- 7
- 8
- 9
- 10
- 11
- 12
- 13
- 14
二、多线程、多进程
1、什么是线程(thread)?
线程是操作系统能够进行运算调度的最小单位。它被包含在进程之中,是进程中的实际运作单位。
一个线程指的是进程中一个单一顺序的控制流,
一个进程中可以并发多个线程,每条线程并行执行不同的任务
简单理解:线程 <—> 一堆指令
2、什么是进程(process)?
每一个程序的内存是独立的,例如:word不能访问QQ
进程:qq 要以一个整体的形式暴露给操作系统管理,里面包含各种资源的调用(内存管理、网络接口调用等)
3、线程和进程的区别
- [x] 进程:对各种资源管理的集合
- [x] 线程:操作系统最小的调度单位,是一串指令的集合
进程不能单独执行,只是资源的集合
进程要操作CPU,必须要先创建一个线程。
所有在同一个进程里的线程,是同享同一块内存空间的
< 关系
进程中第一个线程是主线程,主线程创建其他线程,其他线程也可以创建线程,线程之间是平等的
进程有父进程、子进程,独立的内存空间,唯一的进程标识符、pid
< 速度
启动线程比启动进程快。运行进程和运行线程速度上是一样的,没有可比性。
线程共享内存空间,进程的内存是独立的
< 创建
父进程生成子进程,相当于克隆一份内存空间。进程直接不能直接访问
创建新线程很简单,创建新进程需要对其父进程进行一次克隆
一个线程可以控制和操作同一线程里的其他线程,但是进程只能操作子进程
< 交互
同一个进程之间的线程之间可以直接交流
两个进程想通信必须通过一个中间代理来实现。
三、使用多线程 threading
上面说了那么多,写一个简单的多线程
- 直接调用
import threading
import time

def run(n):
    print("task",n)
    time.sleep(2)

t1 = threading.Thread(target=run, args=('t1',))  # 一个参数也得加逗号
t2 = threading.Thread(target=run, args=('t2',))
t1.start()
t2.start()- 1
- 2
- 3
- 4
- 5
- 6
- 7
- 8
- 9
- 10
- 11
- 继承式调用(了解就好)
import threading

class MyThread(threading.Thread):
    def __init__(self,n):
        super(MyThread,self).__init__()
        self.n = n
    def run(self):
        print("这种方式函数名必须是run,写死的",self.n)

t1 = MyThread('t1')
t2 = MyThread('t2')

t1.start()
t2.start()- 1
- 2
- 3
- 4
- 5
- 6
- 7
- 8
- 9
- 10
- 11
- 12
- 13
- 14
- 上面是一行一行输的启动线程,那么如果一下启动很多线程呢?
import threading, time

def run(n):
    print("task",n)
    time.sleep(2)

start_time = time.time()
for i in range(16):
    t = threading.Thread(target=run, args=('t-%s'%i,))
    t.start()
print("cost:", time.time()-start_time)- 1
- 2
- 3
- 4
- 5
- 6
- 7
- 8
- 9
- 10
- 11
上面的代码打印执行时间才零点几秒,不是应该2秒么?
注意:
主线程启动子线程只有继续往下走,不会等待子线程执行结束。
因为:多线程、是并行执行的
那么,我如果想等所有子线程执行结果怎么办?
1、join()等待(等待 线程结束)
import threading
import time

def run(n):
    print("task",n, threading.current_thread())  # 线程号
    time.sleep(2)

start_time = time.time()
t_objs = []  # 存线程实例
for i in range(16):
    t = threading.Thread(target=run, args=('t-%s'%i,))
    t.start()  # 在这里直接加join()会阻塞,变成串行效果
    t_objs.append(t)  # 为了不阻塞后面线程的启动,不在这里join,先放到列表里

print("当前活动线程:",threading.active_count())
for t in t_objs:
    t.join()  # t.wait() 等待所有线程执行结束

print("all threads has finished...",threading.current_thread())
print("cost:", time.time()-start_time)- 1
- 2
- 3
- 4
- 5
- 6
- 7
- 8
- 9
- 10
- 11
- 12
- 13
- 14
- 15
- 16
- 17
- 18
- 19
- 20
2、守护线程
什么是守护线程呢,比如皇帝有很多仆人,当皇帝死了之后,那么多仆人就得陪葬。
只要非守护线程结束了,不管守护线程结束没结束,程序都结束
import threading
import time

def run(n):
    print("task",n)
    time.sleep(2)

start_time = time.time()
t_objs = []
for i in range(16):
    t = threading.Thread(target=run, args=('t-%s'%i,))
    t.setDaemon(True)  # 设置线程为守护状态,非守护状态线程都退出程序就退出,不等待守护状态线程
    t.start()  # setDaemon 必须在 start 前面
    t_objs.append(t)

print(threading.active_count())
print(t_objs)
print("all threads has finished...",threading.current_thread())
print("cost:", time.time()-start_time)- 1
- 2
- 3
- 4
- 5
- 6
- 7
- 8
- 9
- 10
- 11
- 12
- 13
- 14
- 15
- 16
- 17
- 18
- 19
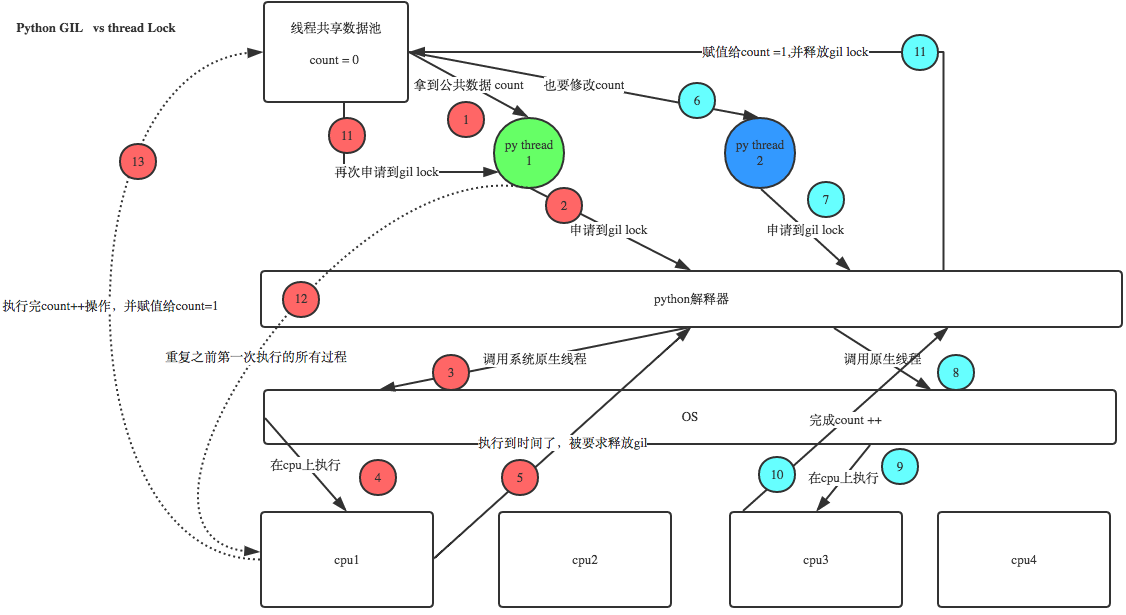
3、GIL 全局解释器锁
例如 4核机器上
python创建4线程,四个线程均匀分到多核上,但是同时只能一核在处理数据。
python调用操作系统、C语音的原生接口,在出口做了设置。全局解释器锁,保证数据统一
所以有人说python的线程是假线程。
在修改数据的时候,为了防止数据改乱了,所以多线程就变成串行处理,但是以为是python在处理,实际上是调用了操作系统的C语音的线程接口,所以中间的过程,python控制不了了,只知道结果。在这种情况下,设置的方式是出口控制,虽然四个线程,但是同一时间只有一个线程在工作。
所以这算是python的一个缺陷,但是也不能说是python的缺陷,是Cpython的缺陷。因为Cpython是C语音写的,以后python的未来是PYPY。
4、线程 锁
线程锁,又叫互斥锁
线程之间沟通:保证同一时间只有一个线程修改数据
python 2.x 中需要加锁,
python 3.x 中加不加都一样,解释器做了优化
可以在linuxpython2下尝试一下代码,可能会遇到数值修改错误的问题
import threading

# 假定这是你的银行存款:
balance = 0

def change_it(n):
    # 先存后取,结果应该为0:
    global balance
    balance = balance + n
    balance = balance - n

def run_thread(n):
    for i in range(10000):
        change_it(n)

t1 = threading.Thread(target=run_thread, args=(5,))
t2 = threading.Thread(target=run_thread, args=(8,))
t1.start()
t2.start()
t1.join()
t2.join()
print(balance)- 1
- 2
- 3
- 4
- 5
- 6
- 7
- 8
- 9
- 10
- 11
- 12
- 13
- 14
- 15
- 16
- 17
- 18
- 19
- 20
- 21
- 22
注意:这里这个锁和全局解释器锁没有关系,这是用户程序自己的锁,用户态的锁。
通过上图可以看出,全局解释器锁:是出口加锁给OS,线程锁是返回数据修改原数据加锁。
线程锁
import time, threading

def run():
    lock.acquire()  # 修改数据前加锁
    global  num
    num +=1
    # time.sleep(0.5)  # 加锁之后程序就变串行效果了
    lock.release()  # 修改后释放

lock = threading.Lock()  # 生成锁的实例
num = 0
for i in range(1000):
    d = threading.Thread(target=run)
    d.start()
print(num)- 1
- 2
- 3
- 4
- 5
- 6
- 7
- 8
- 9
- 10
- 11
- 12
- 13
- 14
- 15
5、RLock(递归锁)
大锁中还有小锁,递归锁,解锁时就混了,所以用递归锁,Rlock()
import threading,time

def run1():
    print("grab the first part data")
    lock.acquire()
    global num
    num +=1
    lock.release()
    return num
def run2():
    print("grab the second part data")
    lock.acquire()
    global  num2
    num2+=1
    lock.release()
    return num2
def run3():
    lock.acquire()
    res = run1()
    print('--------between run1 and run2-----')
    res2 = run2()
    lock.release()
    print(res,res2)

if __name__ == '__main__':

    num,num2 = 0,0
    lock = threading.RLock()  # 声明递归锁
    # lock = threading.Lock() # 用互斥锁,会锁死了,弄混锁情况,可以试一下
    for i in range(10):
        t = threading.Thread(target=run3)
        t.start()

    while threading.active_count() != 1:
        print(threading.active_count())
    else:
        print('----all threads done---')
print(num,num2)- 1
- 2
- 3
- 4
- 5
- 6
- 7
- 8
- 9
- 10
- 11
- 12
- 13
- 14
- 15
- 16
- 17
- 18
- 19
- 20
- 21
- 22
- 23
- 24
- 25
- 26
- 27
- 28
- 29
- 30
- 31
- 32
- 33
- 34
- 35
- 36
- 37
- 38
转载请务必保留此出处:http://blog.csdn.net/fgf00/article/details/52773459
6、信号量
互斥锁 同时只允许一个线程更改数据,而Semaphore是同时允许一定数量的线程更改数据 ,比如厕所有3个坑,那最多只允许3个人上厕所,后面的人只能等里面有人出来了才能再进去。
import threading
import time

def run(n):
    semaphore.acquire()
    time.sleep(1)
    print("run the thread: %s
" %n)
    semaphore.release()

if __name__ == '__main__':
    semaphore = threading.BoundedSemaphore(5)  # 最多允许5个线程同时运行
    for i in range(22):
        t = threading.Thread(target=run, args=(i,))
        t.start()

    while threading.active_count() != 1:
        pass
    else:
print('---all threads done---')- 1
- 2
- 3
- 4
- 5
- 6
- 7
- 8
- 9
- 10
- 11
- 12
- 13
- 14
- 15
- 16
- 17
- 18
- 19
7、事件events
线程之间交互。就是在设置一个全局变量,线程之间通信。
下面写一个模拟红绿灯的例子:
import threading
import time
event = threading.Event() # 声明事件
def ligter():
count = 0
event.set() # 设置标志位,先设置绿灯
while True:
if count in list(range(6,10)): # 改红灯
event.clear() # 清空标志位
print("�33[41;1mred light is on...�33[0m")
elif count > 10: # 改绿灯
event.set()
count =0
else:
print("�33[42;1mgreen light is on...�33[0m")
time.sleep(1)
count +=1
def car(name):
while True:
if event.is_set(): # 判断是不是设定(代表路灯)
print("[%s] running..." %name)
time.sleep(1)
else:
print("[%s] sees red light , waiting..." %name)
event.wait() # 标志位没设,就卡住,设置了就执行(等待标志位被设定)
print("�33[34;1m[%s] green light is on ,start going...�33[0m" %name)
light = threading.Thread(target=ligter,)
light.start()
car1 = threading.Thread(target=car,args=("Tesla",))
car1.start()- 1
- 2
- 3
- 4
- 5
- 6
- 7
- 8
- 9
- 10
- 11
- 12
- 13
- 14
- 15
- 16
- 17
- 18
- 19
- 20
- 21
- 22
- 23
- 24
- 25
- 26
- 27
- 28
- 29
- 30
- 31
- 32
- 33
- 34
8、queue 队列
队列作用:
- 增加双方的效率
- 完成了程序的解耦,松耦合
队列可以理解为一个容器,容器就是放数据的,不过队列是有顺序的,那列表、字典也是容器,有它们了,为什么还要队列啊?队列和列表最直接的区别是什么呢?
你从列表中取出来一个数据之后,数据还在列表里,只是拷贝了一份,而队列取走了就没了。
队列的几个方法
class queue.Queue(maxsize=0)         # 先入先出 first in first out
class queue.LifoQueue(maxsize=0)     # 后进先出 last in fisrt out
class queue.PriorityQueue(maxsize=0) # 存储数据时可设置优先级的队列,VIP- 1
- 2
- 3
Queue.put(item, block=True, timeout=None)  # put 放数据
Queue.get(block=True, timeout=None)        # get 取数据
# block:是否阻塞   timeout:超时时间
Queue.qsize()                              # qsize 队列大小
……- 1
- 2
- 3
- 4
- 5
使用:
>>> import queue
>>> q = queue.Queue()
>>> q.put("disk1")
>>> q.put("disk2")
>>> q.qsize()
2
>>> q.get()
'disk1'
>>> q.get()
'disk2'
>>> q.get()
# 使用get,如果没数据,就等待状态
>>> q.get_nowait()  # 没有数据报queue.Empty异常
# 可以通过判断qsize,为零就不取了。

q = queue.Queue(maxsize=3) # 设置最大为3个数据- 1
- 2
- 3
- 4
- 5
- 6
- 7
- 8
- 9
- 10
- 11
- 12
- 13
- 14
- 15
- 16
设置优先级
import queue

q = queue.PriorityQueue()

q.put((5,"fgf"))
q.put((7, "ze"))
q.put((2, "ping"))  # 数字越小的,优先级越高
print(q.get())  # (2, 'ping')
print(q.get())  # (5, 'fgf')
print(q.get()) # (7, 'ze')- 1
- 2
- 3
- 4
- 5
- 6
- 7
- 8
- 9
- 10
9、生产者消费者模型
在并发编程中使用生产者和消费者模式能够解决绝大多数并发问题。该模式通过平衡生产线程和消费线程的工作能力来提高程序的整体处理数据的速度。
什么是生产者消费者模式
生产者消费者模式是通过一个容器来解决生产者和消费者的强耦合问题。生产者和消费者彼此之间不直接通讯,而通过阻塞队列来进行通讯,所以生产者生产完数据之后不用等待消费者处理,直接扔给阻塞队列,消费者不找生产者要数据,而是直接从阻塞队列里取,阻塞队列就相当于一个缓冲区,平衡了生产者和消费者的处理能力。
下面来学习一个最基本的生产者消费者模型的例子:
import threading,time
import queue

q = queue.Queue(maxsize=10)

def Producer(name):
    count = 1
    while True:
        q.put("骨头%s" % count)
        print("生产了骨头",count)
        count +=1
        time.sleep(0.1)

def  Consumer(name):
    #while q.qsize()>0:
    while True:
        print("[%s] 取到[%s] 并且吃了它..." %(name, q.get()))
        time.sleep(1)

p = threading.Thread(target=Producer,args=("fgf",))
c = threading.Thread(target=Consumer,args=("dog A",))
c1 = threading.Thread(target=Consumer,args=("dog B",))

p.start()
c.start()
c1.start()- 1
- 2
- 3
- 4
- 5
- 6
- 7
- 8
- 9
- 10
- 11
- 12
- 13
- 14
- 15
- 16
- 17
- 18
- 19
- 20
- 21
- 22
- 23
- 24
- 25
- 26
转载请务必保留此出处:http://blog.csdn.net/fgf00/article/details/52773459