简介
在上面的博客中,主要介绍了如何合并、拆分表格等,中间用到了一些表格的基本设置,比如,指定表格样式,内容居中等,在这篇博客中,详细介绍这一部分
需求
1. 表格样式修改
2. 列宽高设置
3. 属性设置(居中)
4. 给每个单元格赋值
5. 设置表格边框
模板设置
只需要在word中插入以下标签
{{p mysubdoc}}

实现一:表格样式修改
1. 代码
from docxtpl import DocxTemplate
from docxtpl import Document
from docx.shared import Inches
import re
import json
import collections
tpl = DocxTemplate('test.docx')
sd = tpl.new_subdoc()
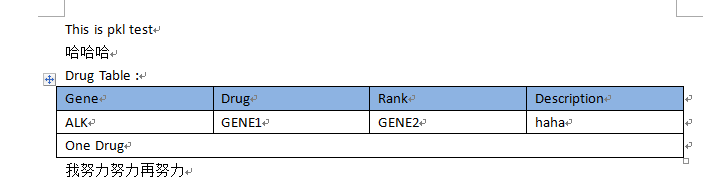
sd.add_paragraph('Drug Table :')
rows=3
cols=4
###创建表格的时候,指定style,这个style可以是docx的样式,例如"Table Grid"
###style也可以是在word中自定义的表格样式
table = sd.add_table(rows=rows, cols=cols ,style='outertable')
#header
cells = table.rows[0].cells
cells[0].text="Gene"
cells[1].text="Drug"
cells[2].text="Rank"
cells[3].text="Description"
table.cell(1,0).text="ALK"
table.cell(1,1).text="GENE1"
table.cell(1,2).text="GENE2"
table.cell(1,3).text="haha"
#
# #https://python-docx.readthedocs.io/en/latest/api/table.html#docx.table.Table.style
# #merge
table.cell(2,0).merge(table.cell(2,3)).text="One Drug"
context = {
'mysubdoc' : sd,
}
tpl.render(context)
tpl.save('vertical_merge.docx')上面的add_table还可以写成下面的格式
table = sd.add_table(rows=rows, cols=cols)
table.style = "outertable"
2. 结果
实现二:列宽高设置
1. 代码
若不特殊指定列宽,则每列会平均分配
需要注意的是,Cm设置失败,不起作用,原因不明
from docxtpl import DocxTemplate
from docxtpl import Document
from docx.shared import Inches
import re
import json
import collections
from docx.shared import Cm
from docx.oxml.shared import OxmlElement, qn

tpl = DocxTemplate('test.docx')
sd = tpl.new_subdoc()
sd.add_paragraph('Drug Table :')
rows=3
cols=4
table = sd.add_table(rows=rows, cols=cols,style="outertable")
width = OxmlElement('w:tblW')
width.set(qn('w:type'), 'pct')
width.set(qn('w:w'), '5000')
table._tblPr.append(width)

#header
cells = table.rows[0].cells
cells[0].text="Gene"
cells[1].text="Drug"
cells[2].text="Rank"
cells[3].text="Description"

table.cell(1,0).text="ALK"
table.cell(1,1).text="GENE1"
table.cell(1,2).text="GENE2"
table.cell(1,3).text="haha"
# #merge
table.cell(2,0).merge(table.cell(2,3)).text="One Drug"

table.rows[0].height = Cm(2)

col_width = [1,2,3,4]
for col in range(4):
    table.cell(0,col).width = Inches(col_width[col])
#需要注意的是,Cm设置失败,不起作用
# table.cell(0,0).width = Cm(1)
# table.cell(0,1).width = Cm(2)
# table.cell(0,2).width = Cm(3)
# table.cell(0,3).width = Cm(4)

context = {
    'mysubdoc' : sd,
}


tpl.render(context)
tpl.save('vertical_merge.docx')
2. 结果

实现三:属性设置
1. 代码
除了直接指定style之外,还可以对具体一个属性进行设置,比如常用的居中设置
有表格的居中以及表格文本的居中
表格的居中设置
from docx.enum.table import WD_TABLE_ALIGNMENT

table = sd.add_table(rows=rows, cols=cols,style="outertable")
table.alignment = WD_TABLE_ALIGNMENT.CENTER
不过我们一般说的居中指的是表格里文本的居中
水平居中
直接设置整个表格居中 CENTER LEFT RIGHT
table.style.paragraph_format.alignment=WD_PARAGRAPH_ALIGNMENT.CENTER
或者也可以
table.style.paragraph_format.alignment=WD_TABLE_ALIGNMENT.CENTER
from docxtpl import DocxTemplate
from docxtpl import Document
from docx.shared import Inches
import re
import json
import collections
from docx.shared import Cm
from docx.oxml.shared import OxmlElement, qn
from docx.enum.text import WD_PARAGRAPH_ALIGNMENT

tpl = DocxTemplate('test.docx')
sd = tpl.new_subdoc()
sd.add_paragraph('Drug Table :')
rows=3
cols=4
table = sd.add_table(rows=rows, cols=cols,style="outertable")
width = OxmlElement('w:tblW')
width.set(qn('w:type'), 'pct')
width.set(qn('w:w'), '5000')
table._tblPr.append(width)

#header
cells = table.rows[0].cells
cells[0].text="Gene"
cells[1].text="Drug"
cells[2].text="Rank"
cells[3].text="Description"

table.cell(1,0).text="ALK"
table.cell(1,1).text="GENE1"
table.cell(1,2).text="GENE2"
table.cell(1,3).text="haha"
# #merge
table.cell(2,0).merge(table.cell(2,3)).text="One Drug"

##设置标题行的高度
table.rows[0].height = Cm(2)
##设置每一列的宽度
col_width = [1,2,3,4]
for col in range(4):
    table.cell(0,col).width = Inches(col_width[col])

#水平居中
table.style.paragraph_format.alignment=WD_PARAGRAPH_ALIGNMENT.CENTER

context = {
    'mysubdoc' : sd,
}


tpl.render(context)
tpl.save('vertical_merge.docx')
也可以挨个为每个cell,设置水平居中
from docxtpl import DocxTemplate
from docxtpl import Document
from docx.shared import Inches
import re
import json
import collections
from docx.shared import Cm
from docx.oxml.shared import OxmlElement, qn
from docx.enum.text import WD_ALIGN_PARAGRAPH

tpl = DocxTemplate('test.docx')
sd = tpl.new_subdoc()
sd.add_paragraph('Drug Table :')
rows=3
cols=4
table = sd.add_table(rows=rows, cols=cols,style="outertable")
width = OxmlElement('w:tblW')
width.set(qn('w:type'), 'pct')
width.set(qn('w:w'), '5000')
table._tblPr.append(width)

#header
cells = table.rows[0].cells
cells[0].text="Gene"
cells[1].text="Drug"
cells[2].text="Rank"
cells[3].text="Description"

table.cell(1,0).text="ALK"
table.cell(1,1).text="GENE1"
table.cell(1,2).text="GENE2"
table.cell(1,3).text="haha"
# #merge
table.cell(2,0).merge(table.cell(2,3)).text="One Drug"

##设置标题行的高度
table.rows[0].height = Cm(2)
##设置每一列的宽度
col_width = [1,2,3,4]
for col in range(4):
    table.cell(0,col).width = Inches(col_width[col])

###为每一列设置居中
for row in range(3):
    for col in range(4):
        cell = table.cell(row, col)
        pa = cell.paragraphs[0]
        pa.alignment = WD_ALIGN_PARAGRAPH.CENTER  ##居中

context = {
    'mysubdoc' : sd,
}


tpl.render(context)
tpl.save('vertical_merge.docx')
垂直居中
目前我还不知道,如何给整个表格设置垂直居中
垂直共有3种格式:CENTER TOP BOTTOM
from docxtpl import DocxTemplate
from docxtpl import Document
from docx.shared import Inches
import re
import json
import collections
from docx.shared import Cm
from docx.oxml.shared import OxmlElement, qn
from docx.enum.text import WD_PARAGRAPH_ALIGNMENT,WD_ALIGN_PARAGRAPH
from docx.enum.table import WD_ALIGN_VERTICAL

tpl = DocxTemplate('test.docx')
sd = tpl.new_subdoc()
sd.add_paragraph('Drug Table :')
rows=3
cols=4
table = sd.add_table(rows=rows, cols=cols,style="outertable")
width = OxmlElement('w:tblW')
width.set(qn('w:type'), 'pct')
width.set(qn('w:w'), '5000')
table._tblPr.append(width)

#header
cells = table.rows[0].cells
cells[0].text="Gene"
cells[1].text="Drug"
cells[2].text="Rank"
cells[3].text="Description"

table.cell(1,0).text="ALK"
table.cell(1,1).text="GENE1"
table.cell(1,2).text="GENE2"
table.cell(1,3).text="haha"
# #merge
table.cell(2,0).merge(table.cell(2,3)).text="One Drug"

##设置标题行的高度
table.rows[0].height = Cm(2)
##设置每一列的宽度
col_width = [1,2,3,4]
for col in range(4):
    table.cell(0,col).width = Inches(col_width[col])

#水平居中
#table.style.paragraph_format.alignment=WD_PARAGRAPH_ALIGNMENT.CENTER
###为每一列设置居中
for row in range(3):
    for col in range(4):
        cell = table.cell(row, col)
        pa = cell.paragraphs[0]
        pa.alignment = WD_ALIGN_PARAGRAPH.CENTER  ##水平居中
        cell.vertical_alignment = WD_ALIGN_VERTICAL.CENTER  ##垂直居中

context = {
    'mysubdoc' : sd,
}


tpl.render(context)
tpl.save('vertical_merge.docx')
2. 结果
水平居中的结果

垂直居中的结果

实现四:给每个单元格赋值
1. 代码
第一种如上方代码
table.cell(1,0).text="ALK"第二种
run是比paragraphs更小的单位
cell = table.cell(i + 1, col)
pa = cell.paragraphs[0]
pa.add_run("xxxxx")
实现五:设置表格边框
docx包比较贴近word底层结构,想要读明白需要花点功夫。
python-docx: docx.xml.table
这里是给表格的每个单元格设置边框
insertH ,insertV:不用于单元格
color: 边框颜色,RRGGBB格式,不需要加#
val: 边框样式,例如single: 单行,none:无框线,dashed:虚线
from docx.oxml.shared import OxmlElement, qn
from docxtpl import DocxTemplate, InlineImage, RichText
from docx.oxml import parse_xml

#设置单元格的边框
def set_cell_border(self, cell, **kwargs):
    """
    Set cell`s border
    Usage:
    set_cell_border(
        cell,
        top={"sz": 12, "val": "single", "color": "FF0000", "space": "0"},
        bottom={"sz": 12, "color": "00FF00", "val": "single"},
        left={"sz": 24, "val": "dashed", "shadow": "true"},
        right={"sz": 12, "val": "dashed"},
    )
    """
    tc = cell._tc
    tcPr = tc.get_or_add_tcPr()

    tcBorders = tcPr.first_child_found_in("w:tcBorders")
    if tcBorders is None:
        tcBorders = OxmlElement('w:tcBorders')
        tcPr.append(tcBorders)

    for edge in ('left', 'top', 'right', 'bottom', 'insideH', 'insideV'):
        edge_data = kwargs.get(edge)
        if edge_data:
            tag = 'w:{}'.format(edge)

            # check for tag existnace, if none found, then create one
            element = tcBorders.find(qn(tag))
            if element is None:
                element = OxmlElement(tag)
                tcBorders.append(element)

            # looks like order of attributes is important
            for key in ["sz", "val", "color", "space", "shadow"]:
                if key in edge_data:
                    element.set(qn('w:{}'.format(key)), str(edge_data[key]))

def table():
    doc = DocxTemplate('xxx.docx')
    sd = doc.new_subdoc()
    table = sd.add_table(rows=1, cols=2)
set_cell_border(table.cell(0,0), bottom={"sz": 6, "color": "#000000", "val": "single"})统计中的t检验
降维工具箱drtool
pca主成份分析方法
经典相关分析,典型关分析, CCA,Canonical Correlation Analysis,多元变量分析,线性组合,相关系数最大化
博客中插入公式——之在线数学公式生成
Mathtype常用快捷键
下标运算符重载
赋值运算符的重载
算术和关系运算符重载