每个实现Iterable接口的类必须提供一个iterator方法,返回一个Iterator对象,ArrayList也不例外
public Iterator<E> iterator() {
        return new Itr();
}
返回的是一个Itr类的对象,接下来我们来看它的部分源码
protected transient int modCount = 0;

private class Itr implements Iterator<E> {

		// 指向下一个要被迭代的元素
        int cursor;
        // 指向当前元素
        int lastRet = -1;
        // 将modCount赋值给expectedModCount
        int expectedModCount = modCount;
这里主要先看一下一个重点,modCount
modCount顾名思义就是修改次数,每次对ArrayList内容的修改都将增加这个值
Fail-Fast 机制
modCount主要是为了防止在迭代过程中通过List的方法(非迭代器)改变了原集合,导致出现不可预料的情况,从而提前抛出并发修改异常,注意是“提前“,这可能也是Fail-Fast机制命名的由来。在可能出现错误的情况下提前抛出异常终止操作,如下:
ArrayList<Integer> arrayList = new ArrayList<>();
        for (int i = 0; i < 1000; i++) {
            arrayList.add(i);
}

Iterator iterator = arrayList.iterator();

while (iterator.hasNext()) {
    arrayList.remove(1);
    iterator.next();
}
这段代码最终会抛出ConcurrentModificationException
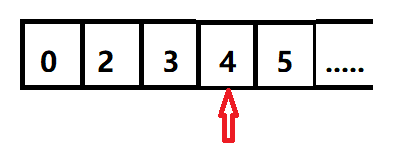
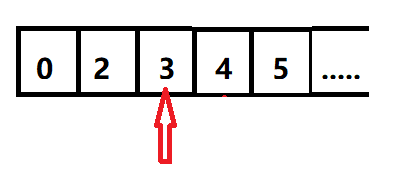
原因是因为,在迭代器进行遍历的时候,如果 iterator.next()选择了需要遍历的下一个目标时(假设这个目标为坐标3的数),

我却调用了arrayList.remove(1)将坐标1给删了,那么这时候它就会遍历成原本坐标为4的数字4,却没有遍历数字3了,如果是LinkedList,会直接找不到目标
为了防止这种情况,在迭代器初始化过程中会将modCount赋给迭代器的 expectedModCount。在迭代过程中,判断 modCount 跟 expectedModCount 是否相等,如果不相等就表示通过其他方法修改了 ArrayList的结构
final void checkForComodification() {
            if (modCount != expectedModCount)
                throw new ConcurrentModificationException();
}
为什么说是其他方法呢?因为Iterator的remove方法和ArrayList的不一样
public void remove() {
            if (lastRet < 0)
                throw new IllegalStateException();
            checkForComodification();

            try {
                ArrayList.this.remove(lastRet);
                cursor = lastRet;
                lastRet = -1;
                expectedModCount = modCount;
            } catch (IndexOutOfBoundsException ex) {
                throw new ConcurrentModificationException();
            }
}
它在每一次删除之后都会将cursor(下一项)的位置设置为当前位置,也就是将cursor往前移动了一位,之后再将modCount赋值给expectedModCount使它们保持相等。
这样就不会产生ConcurrentModificationException异常了