转自:ToolBar的使用
ToolBar的出现是为了替换之前的ActionBar的各种不灵活使用方式,相反,ToolBar的使用变得非常灵活,因为它可以让我们自由往里面添加子控件.低版本要使用的话,可以添加support-v7包.
* toolabr使用:替代actionBar
* 可以自定义布局
* 点击事件和加载菜单可以当做view来使用
* 位置可以任意
* 需要在清单文件中去掉actionBar
* toolbar可以当做viewGroup使用
注意:toolbar兼容低版本时,所在的activity也应该是兼容低版本的activity即AppCompatActivity
* 否则,只能在Api21以上才能使用
如果需要实现toolbar与侧滑菜单的绑定与切换,请查看
安卓Design包之NavigationView结合DrawerLayout,toolbar的使用,FloatingActionButton
添加依赖库:
compile 'com.android.support:design:24.2.0'
xml文件:
<?xml version="1.0" encoding="utf-8"?>
<RelativeLayout xmlns:android="http://schemas.android.com/apk/res/android"
    xmlns:tools="http://schemas.android.com/tools"
    android:layout_width="match_parent"
    android:layout_height="match_parent"
    xmlns:app="http://schemas.android.com/apk/res-auto"
    tools:context="fanggao.qf.toolbartest.MainActivity">
    <android.support.v7.widget.Toolbar
        android:id="@+id/toolbar"
        android:layout_width="match_parent"
        android:layout_height="?attr/actionBarSize"
        android:background="#0000ff"
       >
        <!--
         ?attr/actionBarSize:表示根据屏幕的分辨率采用系统默认的高度
         如果低版本也要使用的话,则需要使用v7包的,否则只有api21上才能有效
         -->

        <!--自定义view-->
        <LinearLayout
            android:layout_width="wrap_content"
            android:layout_height="wrap_content"
            android:orientation="horizontal">
            <Button
                android:id="@+id/button"
                android:layout_width="wrap_content"
                android:layout_height="wrap_content"
                android:text="自定义"/>
        </LinearLayout>
    </android.support.v7.widget.Toolbar>
</RelativeLayout>
menu:包含两个item
<?xml version="1.0" encoding="utf-8"?>
<menu xmlns:android="http://schemas.android.com/apk/res/android"
    xmlns:app="http://schemas.android.com/apk/res-auto">
    <item
        android:id="@+id/item1"
        android:title="menu1"
        app:showAsAction="always"></item>
    <item
        android:id="@+id/item2"
        android:title="menu2"
        app:showAsAction="always"></item>
</menu>
layout_popupWindow.xml
自定义的带图标的菜单布局

<?xml version="1.0" encoding="utf-8"?>
<LinearLayout xmlns:android="http://schemas.android.com/apk/res/android"
    android:orientation="vertical" android:layout_width="match_parent"
    android:layout_height="match_parent"
    android:background="#274B5E"
    android:padding="10dp">

    <LinearLayout
        android:id="@+id/ll_item1"
        android:layout_width="match_parent"
        android:layout_height="wrap_content"
        android:gravity="center">

        <ImageView
            android:layout_width="wrap_content"
            android:layout_height="wrap_content"
            android:src="@mipmap/ic_launcher" />

        <TextView
            android:layout_width="wrap_content"
            android:layout_height="wrap_content"
            android:layout_marginLeft="10dp"
            android:text="哈哈"
            android:textSize="20sp" />
    </LinearLayout>

    <LinearLayout
        android:id="@+id/ll_item2"
        android:layout_width="match_parent"
        android:layout_height="wrap_content"
        android:gravity="center">

        <ImageView
            android:layout_width="wrap_content"
            android:layout_height="wrap_content"
            android:src="@mipmap/ic_launcher" />

        <TextView
            android:layout_width="wrap_content"
            android:layout_height="wrap_content"
            android:layout_marginLeft="10dp"
            android:text="呵呵"
            android:textSize="20sp" />
    </LinearLayout>

    <LinearLayout
        android:id="@+id/ll_item3"
        android:layout_width="match_parent"
        android:layout_height="wrap_content"
        android:gravity="center">

        <ImageView
            android:layout_width="wrap_content"
            android:layout_height="wrap_content"
            android:src="@mipmap/ic_launcher" />

        <TextView
            android:layout_width="wrap_content"
            android:layout_height="wrap_content"
            android:layout_marginLeft="10dp"
            android:text="嘻嘻"
            android:textSize="20sp" />
    </LinearLayout>
</LinearLayout>
源代码:
/**
 * PopupWindow 动画组件
 */
public class MainActivity extends AppCompatActivity implements Toolbar.OnMenuItemClickListener,View.OnClickListener {
    private Toolbar toolbar;
    private PopupWindow popupWindow;
    @Override
    protected void onCreate(Bundle savedInstanceState) {
        super.onCreate(savedInstanceState);
        setContentView(R.layout.activity_main);
        toolbar = (Toolbar) findViewById(R.id.toolbar);
        //当做actionBar用
        //设置最左侧图标
        toolbar.setNavigationIcon(R.mipmap.ic_launcher);
        //程序logo
       // toolbar.setLogo(R.mipmap.ic_launcher);
        //程序标题
        toolbar.setTitle("我来自toolbar");
        //子标题
        toolbar.setSubtitle("son");
        //取代原本的actionBar,需要在清单文件style中设置noActionBar,否则报错
        setSupportActionBar(toolbar);
        //设置NavigationIcon的点击事件,需要放在setSupportActionBar之后设置才会生效
        //因为setsupportActionBar里面也有setNavigationOnClickListener
        toolbar.setNavigationOnClickListener(new View.OnClickListener() {
            @Override
            public void onClick(View v) {
                Toast.makeText(MainActivity.this, "click NavigationIcon", Toast.LENGTH_SHORT).show();
            }
        });
        //如果设置toolbar为标题头,菜单不显示,需要重写onCreateOptionsMenu(Menu menu)方法加载菜单
        //toolbar加载菜单
        //   toolbar.inflateMenu(R.menu.menu);
        //设置菜单选项的点击事件
        toolbar.setOnMenuItemClickListener(this);
        //自定义按钮的的点击事件
        toolbar.findViewById(R.id.button).setOnClickListener(new View.OnClickListener() {
            @Override
            public void onClick(View v) {
                Toast.makeText(MainActivity.this, "点击了按钮", Toast.LENGTH_SHORT).show();
            }
        });
    }
    /* 设置toolBar上的MenuItem点击事件*/
    @Override
    public boolean onMenuItemClick(MenuItem item) {
        switch (item.getItemId()) {
            case R.id.item1:
                Toast.makeText(MainActivity.this, "item1", Toast.LENGTH_SHORT).show();
                break;
            case R.id.item2:
                //自定义的带图标的菜单
                myPopupMenuwithIcon();
               break;
        }
        return true;
    }
    /**
     * 自定义的带图标的菜单
     */
    private void myPopupMenuwithIcon() {
        //获取状态栏高度
        Rect frame = new Rect();
        getWindow().getDecorView().getWindowVisibleDisplayFrame(frame);
        //状态栏高度+toolbar的高度
        int yOffset = frame.top + toolbar.getHeight();
        if (popupWindow == null) {
            //初始化动画组件的布局
            View popContentView = getLayoutInflater().inflate(R.layout.layout_popupwindow_item, null);
            //参数一:动画组件布局,参数二三:宽高,参数四设置是否可聚焦 focusAble
            popupWindow = new PopupWindow(popContentView, ViewGroup.LayoutParams.WRAP_CONTENT, ViewGroup.LayoutParams.WRAP_CONTENT, true);
            //设置背景颜色后setOntsideTouchable(true)才会有效
            popupWindow.setBackgroundDrawable(new ColorDrawable());
            //点击外部关闭
            popupWindow.setOutsideTouchable(true);
            //设置动画
            popupWindow.setAnimationStyle(android.R.style.Animation_Dialog);
            //设置位置 参数一:父布局  参数二:位置,参数三:x轴的偏移量,参数四:y轴的偏移量
            popupWindow.showAtLocation(toolbar, Gravity.TOP | Gravity.RIGHT, 0, yOffset);
            //设置item的点击监听
            popContentView.findViewById(R.id.ll_item1).setOnClickListener(this);
            popContentView.findViewById(R.id.ll_item2).setOnClickListener(this);
            popContentView.findViewById(R.id.ll_item3).setOnClickListener(this);
        } else {
            popupWindow.showAtLocation(toolbar, Gravity.RIGHT | Gravity.TOP, 0, yOffset);
        }
    }
    //如果有Menu,创建完后,系统会自动添加到ToolBar上
    @Override
    public boolean onCreateOptionsMenu(Menu menu) {
        super.onCreateOptionsMenu(menu);
        getMenuInflater().inflate(R.menu.menu, menu);
        return true;
    }
    @Override
    public void onClick(View v) {
        switch (v.getId()) {
            case R.id.ll_item1:
                Toast.makeText(MainActivity.this, "haha", Toast.LENGTH_SHORT).show();
                break;
            case R.id.ll_item2:
                Toast.makeText(MainActivity.this, "hehe", Toast.LENGTH_SHORT).show();
                break;
            case R.id.ll_item3:
                Toast.makeText(MainActivity.this, "xixi", Toast.LENGTH_SHORT).show();
                break;
        }
        //点击PopWindow的item后,关闭此PopWindow
        if (null != popupWindow && popupWindow.isShowing()) {
            popupWindow.dismiss();
        }
    }
}
效果:

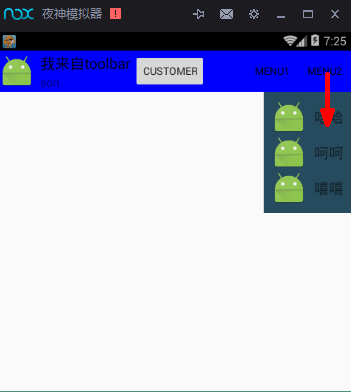
点击menu2后

