Prometheus
Prometheus简介
Prometheus 是一套开源的系统监控报警框架。它启发于 Google 的 borgmon 监控系统,由工作在 SoundCloud 的 google 前员工在 2012 年创建,作为社区开源项目进行开发,并于 2015 年正式发布。2016 年,Prometheus 正式加入 Cloud Native Computing Foundation,成为受欢迎度仅次于 Kubernetes 的项目。
安装Prometheus
Prometheus基于Golang编写,编译后的软件包,不依赖于任何的第三方依赖。用户只需要下载对应平台的二进制包,解压并且添加基本的配置即可正常启动Prometheus Server。
1.首先从下载页面下载最新的Prometheus Server安装包,然后解压它:
wget https://github.com/prometheus/prometheus/releases/download/v2.23.0/prometheus-2.23.0.linux-amd64.tar.gz
tar xvfz prometheus-2.23.0.linux-amd64.tar.gz
mv prometheus-2.23.0.linux-amd64 /opt/prometheus
2.修改Prometheus服务器配置文件
cd /opt/prometheus
cat prometheus.yml
# my global config
global:
scrape_interval: 15s # Set the scrape interval to every 15 seconds. Default is every 1 minute.
evaluation_interval: 15s # Evaluate rules every 15 seconds. The default is every 1 minute.
# scrape_timeout is set to the global default (10s).
# Alertmanager configuration
alerting:
alertmanagers:
- static_configs:
- targets:
# - alertmanager:9093
# Load rules once and periodically evaluate them according to the global 'evaluation_interval'.
rule_files:
# - "first_rules.yml"
# - "second_rules.yml"
# A scrape configuration containing exactly one endpoint to scrape:
# Here it's Prometheus itself.
scrape_configs:
# The job name is added as a label `job=<job_name>` to any timeseries scraped from this config.
- job_name: 'prometheus'
# metrics_path defaults to '/metrics'
# scheme defaults to 'http'.
static_configs:
- targets: ['localhost:9090']
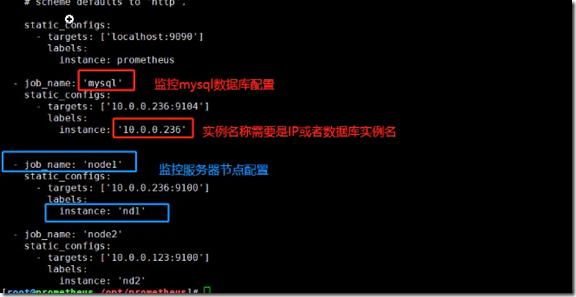 ,详细请参考官网配置文件。
注:每次修改配置完成,用promtool检测配置文件是否正确
[root@server1 prometheus]# ./promtool check config prometheus.yml
3.启动prometheus服务器方法
第一种启动方法:
[root@prometheus /opt/prometheus]# nohup ./prometheus --config.file=./prometheus.yml &
第二种启动方法:
[root@prometheus /opt/prometheus]# ./prometheus &
第二种方法启动前需要进行的操作如下:
启动问题1:
level=error ts=2018-11-19T06:01:05.697957445Z caller=main.go:625
err="opening storage failed: lock DB directory: resource temporarily unavailable
解决:删除 lock 文件
rm -f /opt/prometheus/data/lock
启动问题2:
level=error ts=2018-11-19T06:04:47.83421089Z caller=main.go:625
err="error starting web server: listen tcp 0.0.0.0:9090: bind: address already in use"
解决:查找使用9090端口的PID并删掉
yum install net-tools
netstat -apn | grep 9090
kill -9 <pid>
4.将Prometheus配置为系统服务
4.1 systemd目录下创建文件:touch /usr/lib/systemd/system/prometheus.service
vi /usr/lib/systemd/system/prometheus.service
[Unit]
Description=Prometheus
Documentation=https://prometheus.io/
After=network.target
[Service]
Restart=on-failure
ExecStart=/opt/prometheus/prometheus --config.file=/opt/prometheus/prometheus/prometheus.yml --storage.tsdb.retention.time=5d
[Install]
WantedBy=multi-user.target
注:storage.tsdb.retention.time是数据存储时长,存储时间默认是15d(天),单位:y, w, d, h, m, s, ms
4.2 启动服务,设置开机自启
systemctl enable prometheus
systemctl daemon-reload
systemctl start prometheus
systemctl status prometheus
5.防火墙添加端口
firewall-cmd --add-port=9090/tcp --permanent ##永久添加 9090 端口
firewall-cmd --add-port=9100/tcp --permanent ##永久添加 9100 端口
systemctl restart firewalld ##重启防火墙
firewall-cmd --list-ports ##列出开放的端口
systemctl status firewalld ##查看防火墙状态
6.启动后访问prometheus服务器http://服务器的ip:9090,启动成功,查看Status->Targets可以看到节点正常
7.重启服务
ps aux | grep prometheus
可以用kill -HUP 进程id 自动加载新配置文件
8.绘图
访问http://服务器的ip:9090/metrics 查看从exporter具体能抓到的数据
9.被监控的客户端安装node_exporter(收集服务器数据)
官网有若干度量采集器,这里介绍监控Linux主机采集器。
监控客户端从官网下载最新的node_exporter,然后解压它:
wget https://github.com/prometheus/node_exporter/releases/download/v1.0.1/node_exporter-1.0.1.linux-amd64.tar.gz
tar zxvf node_exporter-1.0.1.linux-amd64.tar.gz
mv node_exporter-1.0.1.linux-amd64 /opt/node_exporter
9.1 启动node_exporter
cd /opt/node_exporter/
nohup ./node_exporter &
9.2.将Prometheus配置为系统服务
9.2.1 systemd目录下创建文件:touch /usr/lib/systemd/system/node_exporter.service
vi /usr/lib/systemd/system/node_exporter.service
[Unit]
Description=node_exporter
Documentation=https://prometheus.io/
After=network.target
[Service]
Restart=on-failure
ExecStart=/opt/node_exporter/node_exporter
[Install]
WantedBy=multi-user.target
9.2.2 启动服务,设置开机自启
systemctl enable node_exporter
systemctl start node_exporter
9.3 防火墙添加端口
firewall-cmd --add-port=9100/tcp --permanent ##永久添加 9100 端口
systemctl restart firewalld ##重启防火墙
firewall-cmd --list-ports ##列出开放的端口
systemctl status firewalld ##查看防火墙状态
9.4 修改服务器Prometheus配置文件
- job_name: 'node1'
static_configs:
- targets: ['客户端IP:9100']
labels:
instance: 'nd1'
重启服务器Prometheus服务
ps aux | grep prometheus
kill -HUP 7557
Grafana
Grafana(发音)简介
Grafana是一个跨平台的开源的度量分析和可视化工具,可以通过将采集的数据查询然后可视化的展示,并及时通知。
安装Grafana
1.根据自己的系统版本,从官网选择下载grafana安装包
wget https://mirrors.tuna.tsinghua.edu.cn/grafana/yum/rpm/grafana-7.3.4-1.x86_64.rpm
mv grafana-7.3.4-1.x86_64.rpm /opt/
2.Grafana离线包下载
wget https://mirrors.tuna.tsinghua.edu.cn/grafana/yum/rpm/grafana-7.3.4-1.x86_64.rpm
rpm -ivh grafana-7.3.4-1.x86_64.rpm //查看rpm依赖包
依赖rpm包下载网址: https://www.rpmfind.net/
下载依赖包urw-fonts,和grafana-6.6.1-1.x86_64.rpm放入一个文件夹,提供离线安装使用
yum install --downloadonly --downloaddir=/root/ urw-fonts //联网环境下载依赖包urw-fonts
注:只下载包,不安装包
yum install --downloadonly --downloaddir=[download_dir] [package]
上传grafana相关所有离线包到离线环境
离线安装
切换到grafana离线包所在目录
yum clean all ; yum localinstall –y --skip-broken ./*
grafana-server -v //查看版本
3.安装并启动Grafana服务
cd /opt/
yum install grafana-7.3.4-1.x86_64.rpm
systemctl enable grafana-server
systemctl start grafana-server
systemctl status grafana-server
4.防火墙添加端口
firewall-cmd --add-port=3000/tcp --permanent ##永久添加 3000 端口
systemctl restart firewalld ##重启防火墙
firewall-cmd --list-ports ##列出开放的端口
systemctl status firewalld ##查看防火墙状态
web访问Grafana服务
[http://服务器的IP:3000/],用户名:初始密码 admin/admin
让Grafana从Prometheus中拉取数据
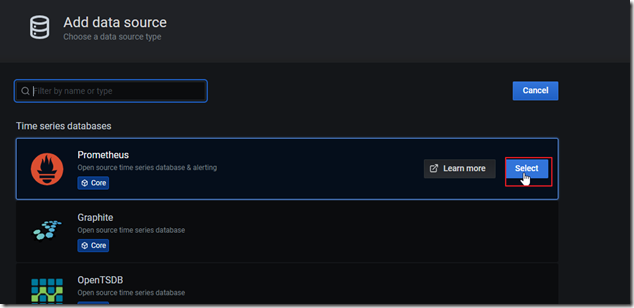
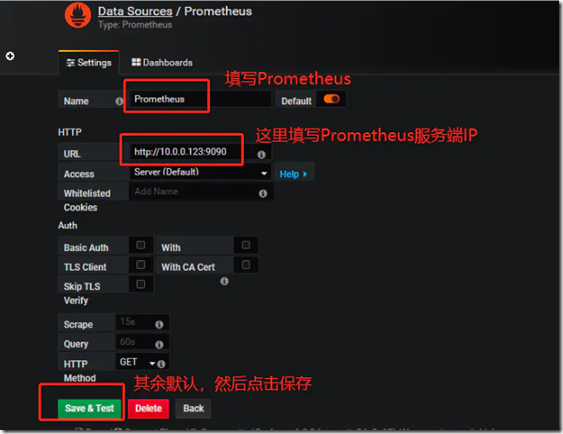
1.添加一个data source ,基础配置如下:
2.导入对node监控的DashBoard
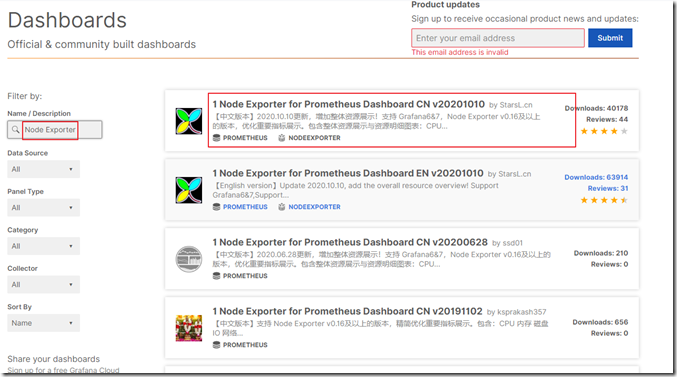
首先去官网下载对主机监控的Dashboard, 搜素 Node Exporter:
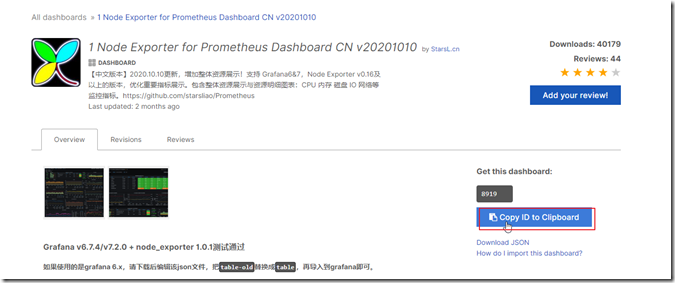
再点开第一个 ,拷贝对应的Dashboard Id 8919:
离线导入的话,可以选择上面的”Download JSON”,再在Import中的Upload JSON file选择下载的文件或者把json全部内容粘贴到Import via panel json中点击Load。
然后回到我们的图形监控平台Grafana,Dashboard ---> import:
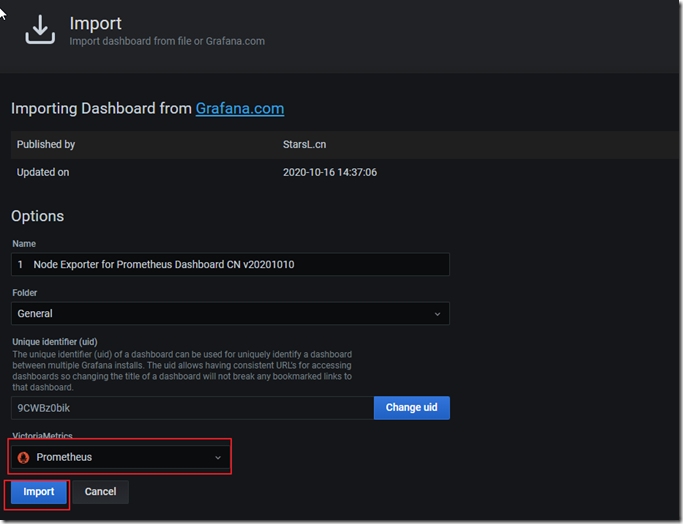
输入 dashboard ID 8919,选择数据源为prometheus即可,然后点击导入:
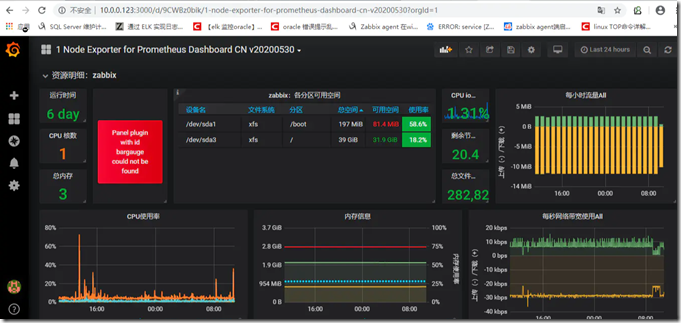
最后即可查看数据
监控Jmeter测试结果
请参考如何用 JMeter + Kubernetes + Prometheus + Grafana + Alert Manager 实时监控你的服务器、JMeter, Prometheus, and Grafana Integration。


