1、Harbor介绍
Harbor是Vmvare中国团队开发的开源registry仓库,相比docker官方拥有更丰富的权限权利和完善的架构设计,适用大规模docker集群部署提供仓库服务。
2、安装环境(自行准备docker环境)
系统:centos7
docker版本:17.09 客户端和服务器版本一致
compose:1.18.0
Harbor版本:1.3.0
3、下载地址
(1)下载compose地址:
   https://github.com/docker/compose/releases/
(2)harbor软件网址:
   https://github.com/vmware/harbor/releases【此页面提供源码安装和二进制安装下载地址,不建议方式】
   http://harbor.orientsoft.cn/             【此页面提供离线下载安装包,建议此种方式】
4、环境准备
4.1、安装compose
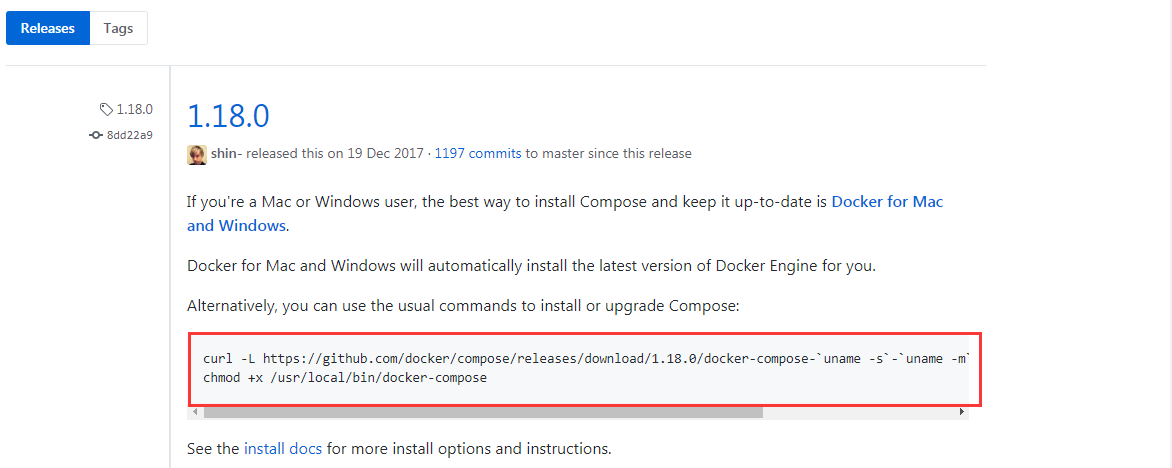
Harbor是通过docker的compose项目部署的,需要安装compose,幸好compost 在git上提供了安装指令:

[root@linux-node1 ~]# curl -L https://github.com/docker/compose/releases/download/1.18.0/docker-compose-`uname -s`-`uname -m` -o /usr/local/bin/docker-compose

[root@linux-node1 ~]# chmod +x /usr/local/bin/docker-compose

[root@linux-node1 ~]# docker-compose --version  #查看安装是否程成功
4.2、Harbor软件安装
4.2.1、下载离线安装软件
[root@linux-node1 ~]# wget http://harbor.orientsoft.cn/harbor-v1.3.0-rc4/harbor-offline-installer-v1.3.0-rc4.tgz
4.2.2、解压文件
[root@linux-node1 ~]# tar -zxf harbor-offline-installer-v1.3.0-rc4.tgz
#解压后的文件夹是harbor

[root@linux-node1 ~]# ll
total 914572
-rw-------. 1 root root 1436 Jun 14 17:31 anaconda-ks.cfg
drwxr-xr-x 3 root root 267 Nov 28 01:11 harbor
-rw-r--r-- 1 root root 936517182 Dec 20 2017 harbor-offline-installer-v1.3.0-rc4.tgz
4.2.3、修改配置文件harbor.conf,如果是测试环境基本不用什么更改配置,主要就是hostname
[root@linux-node1 ~]# vim /root/harbor/harbor.cfg
## Configuration file of Harbor
#The IP address or hostname to access admin UI and registry service.
#DO NOT use localhost or 127.0.0.1, because Harbor needs to be accessed by external clients.
#主机地址,不可以设置为127或者localhost
hostname = 192.168.56.21
#The protocol for accessing the UI and token/notification service, by default it is http.
#It can be set to https if ssl is enabled on nginx.
ui_url_protocol = http
#The password for the root user of mysql db, change this before any production use.
#mysql密码
db_password = root123
#Maximum number of job workers in job service
max_job_workers = 3
#Determine whether or not to generate certificate for the registry's token.
#If the value is on, the prepare script creates new root cert and private key
#for generating token to access the registry. If the value is off the default key/cert will be used.
#This flag also controls the creation of the notary signer's cert.
customize_crt = on
#The path of cert and key files for nginx, they are applied only the protocol is set to https
ssl_cert = /data/cert/server.crt
ssl_cert_key = /data/cert/server.key
#The path of secretkey storage
secretkey_path = /data
#Admiral's url, comment this attribute, or set its value to NA when Harbor is standalone
admiral_url = NA
#The password of the Clair's postgres database, only effective when Harbor is deployed with Clair.
#Please update it before deployment, subsequent update will cause Clair's API server and Harbor unable to access Clair's database.
clair_db_password = password
#Log files are rotated log_rotate_count times before being removed. If count is 0, old versions are removed rather than rotated.
log_rotate_count = 50
#Log files are rotated only if they grow bigger than log_rotate_size bytes. If size is followed by k, the size is assumed to be in kilobytes.
#If the M is used, the size is in megabytes, and if G is used, the size is in gigabytes. So size 100, size 100k, size 100M and size 100G
#are all valid.
log_rotate_size = 200M
#NOTES: The properties between BEGIN INITIAL PROPERTIES and END INITIAL PROPERTIES
#only take effect in the first boot, the subsequent changes of these properties
#should be performed on web ui
#************************BEGIN INITIAL PROPERTIES************************
#Email account settings for sending out password resetting emails.
#Email server uses the given username and password to authenticate on TLS connections to host and act as identity.
#Identity left blank to act as username.
email_identity =
email_server = smtp.mydomain.com
email_server_port = 25
email_username = sample_admin@mydomain.com
email_password = abc
email_from = admin <sample_admin@mydomain.com>
email_ssl = false
email_insecure = false
##The initial password of Harbor admin, only works for the first time when Harbor starts.
#It has no effect after the first launch of Harbor.
#Change the admin password from UI after launching Harbor.
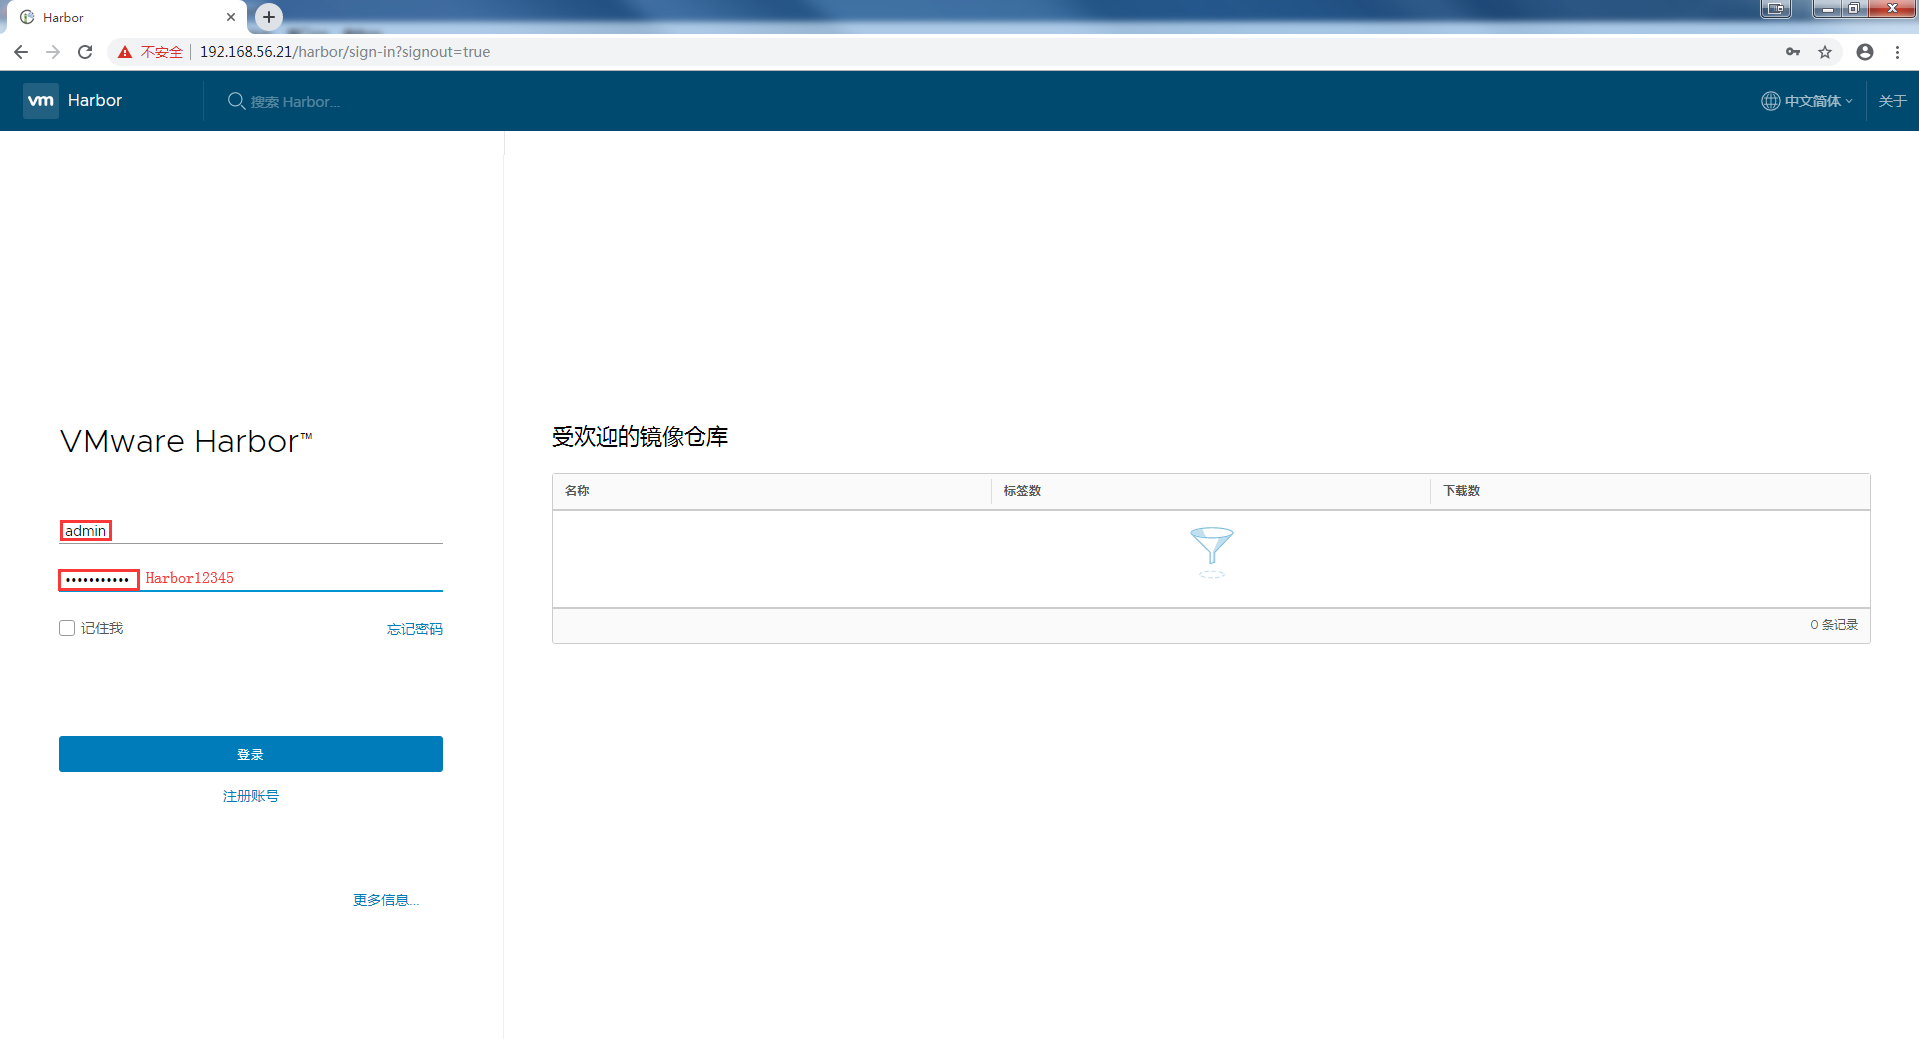
#这里是web登录页面的密码,可以更改
harbor_admin_password = Harbor12345
##By default the auth mode is db_auth, i.e. the credentials are stored in a local database.
#Set it to ldap_auth if you want to verify a user's credentials against an LDAP server.
auth_mode = db_auth
#The url for an ldap endpoint.
ldap_url = ldaps://ldap.mydomain.com
#A user's DN who has the permission to search the LDAP/AD server.
#If your LDAP/AD server does not support anonymous search, you should configure this DN and ldap_search_pwd.
#ldap_searchdn = uid=searchuser,ou=people,dc=mydomain,dc=com
#the password of the ldap_searchdn
#ldap_search_pwd = password
#The base DN from which to look up a user in LDAP/AD
ldap_basedn = ou=people,dc=mydomain,dc=com
#Search filter for LDAP/AD, make sure the syntax of the filter is correct.
#ldap_filter = (objectClass=person)
# The attribute used in a search to match a user, it could be uid, cn, email, sAMAccountName or other attributes depending on your LDAP/AD
ldap_uid = uid
#the scope to search for users, 1-LDAP_SCOPE_BASE, 2-LDAP_SCOPE_ONELEVEL, 3-LDAP_SCOPE_SUBTREE
ldap_scope = 3
#Timeout (in seconds)  when connecting to an LDAP Server. The default value (and most reasonable) is 5 seconds.
ldap_timeout = 5
#Turn on or off the self-registration feature
self_registration = on
#The expiration time (in minute) of token created by token service, default is 30 minutes
token_expiration = 30
#The flag to control what users have permission to create projects
#The default value "everyone" allows everyone to creates a project.
#Set to "adminonly" so that only admin user can create project.
project_creation_restriction = everyone
#The follow configurations are for Harbor HA mode only
#the address of the mysql database.
db_host = mysql
#The port of mysql database host
db_port = 3306
#The user name of mysql database
db_user = root
#************************END INITIAL PROPERTIES************************
#The following attributes only need to be set when auth mode is uaa_auth
uaa_endpoint = uaa.mydomain.org
uaa_clientid= id
uaa_clientsecret= secret
uaa_ca_root= /path/to/uaa_ca.pem
#############
4.2.4、启动harbor,修改完配置文件就可以执行该目录下的install.sh文件即可,程序会自动启动相关镜像,因为harbor是用你镜像进行安装的。
[root@linux-node1 ~]# cd harbor

注释:按自己需求修改镜像存储,日志目录路径
[root@linux-node1 ~]# rm -rf /data/
[root@linux-node1 ~]# mkdir -p /root/harbor/{data,logs}
[root@linux-node1 ~]# ln -s /root/harbor/data/ /data
[root@linux-node1 ~]# ln -s /root/harbor/logs/  /var/log/harbor

[root@linux-node1 habor]# ./install.sh
[Step 0]: checking installation environment ...

Note: docker version: 18.06.0

Note: docker-compose version: 1.18.0

[Step 1]: loading Harbor images ...
454c81edbd3b: Loading layer [==================================================>] 135.2MB/135.2MB
7b9d4bb4a97a: Loading layer [==================================================>] 221.3MB/221.3MB
bf09be2fb717: Loading layer [==================================================>] 10.75MB/10.75MB
e58dd96cb442: Loading layer [==================================================>] 2.048kB/2.048kB
ee0b77dfb8f1: Loading layer [==================================================>] 48.13kB/48.13kB
ed57bf8fb48c: Loading layer [==================================================>] 10.8MB/10.8MB
Loaded image: vmware/clair:v2.0.1-photon
418e636d0b27: Loading layer [==================================================>] 161.5MB/161.5MB
fb804e98cb47: Loading layer [==================================================>] 6.656kB/6.656kB
d961645df25c: Loading layer [==================================================>] 6.656kB/6.656kB
Loaded image: vmware/postgresql:9.6.5-photon
f0e1410639e2: Loading layer [==================================================>] 135.6MB/135.6MB
0322acd71000: Loading layer [==================================================>] 83.12MB/83.12MB
8265b579ac53: Loading layer [==================================================>] 3.584kB/3.584kB
0abe406acf80: Loading layer [==================================================>] 3.072kB/3.072kB
fb23cc7075ed: Loading layer [==================================================>] 4.096kB/4.096kB
375ed6d91a0f: Loading layer [==================================================>] 3.584kB/3.584kB
a085b43fa3ca: Loading layer [==================================================>] 10.24kB/10.24kB
Loaded image: vmware/harbor-log:v1.3.0-rc4
f9c4edb94ebd: Loading layer [==================================================>] 33.62MB/33.62MB
ef48bfe354ce: Loading layer [==================================================>] 18.33MB/18.33MB
89053c2be5da: Loading layer [==================================================>] 18.33MB/18.33MB
Loaded image: vmware/harbor-jobservice:v1.3.0-rc4
Loaded image: vmware/photon:1.0
11a7546bc950: Loading layer [==================================================>] 90.74MB/90.74MB
0e1b40dbb3d2: Loading layer [==================================================>] 10.95MB/10.95MB
58127bdab8e5: Loading layer [==================================================>] 17.3MB/17.3MB
2e3e9ac4492d: Loading layer [==================================================>] 15.87kB/15.87kB
bd6c57401b0f: Loading layer [==================================================>] 3.072kB/3.072kB
08a6f4315b6a: Loading layer [==================================================>] 3.072kB/3.072kB
Loaded image: vmware/notary-photon:signer-0.5.1
6ef4d1283569: Loading layer [==================================================>] 33.62MB/33.62MB
aa8ab1116859: Loading layer [==================================================>] 7.071MB/7.071MB
28edc44951b3: Loading layer [==================================================>] 7.071MB/7.071MB
Loaded image: vmware/harbor-adminserver:v1.3.0-rc4
c3b5dddf8f59: Loading layer [==================================================>] 33.63MB/33.63MB
cea7455f9bad: Loading layer [==================================================>] 22.7MB/22.7MB
382e7f8c6c19: Loading layer [==================================================>] 7.168kB/7.168kB
f7178decadad: Loading layer [==================================================>] 5.38MB/5.38MB
11017bb8fb9d: Loading layer [==================================================>] 22.69MB/22.69MB
Loaded image: vmware/harbor-ui:v1.3.0-rc4
cd0c2ef5af40: Loading layer [==================================================>] 72.46MB/72.46MB
Loaded image: vmware/nginx-photon:1.11.13
7280dd18d4e6: Loading layer [==================================================>] 90.74MB/90.74MB
29de07437cda: Loading layer [==================================================>] 2.048kB/2.048kB
bf435791a668: Loading layer [==================================================>] 2.048kB/2.048kB
ea6923ed1a8e: Loading layer [==================================================>] 2.048kB/2.048kB
b39969acb12a: Loading layer [==================================================>] 3.072kB/3.072kB
a07efc1d5b07: Loading layer [==================================================>] 22.8MB/22.8MB
Loaded image: vmware/registry:2.6.2-photon
cd2cb03dfead: Loading layer [==================================================>] 12.16MB/12.16MB
fdcb5fa28b07: Loading layer [==================================================>] 17.3MB/17.3MB
eef410f82bbe: Loading layer [==================================================>] 15.87kB/15.87kB
938e5e2a4bad: Loading layer [==================================================>] 3.072kB/3.072kB
558c91f2870a: Loading layer [==================================================>] 3.072kB/3.072kB
Loaded image: vmware/notary-photon:server-0.5.1
bab81b4d4981: Loading layer [==================================================>] 463.7MB/463.7MB
5735a75e540c: Loading layer [==================================================>] 9.216kB/9.216kB
44394f38b0c9: Loading layer [==================================================>] 9.216kB/9.216kB
13775ef23512: Loading layer [==================================================>] 7.68kB/7.68kB
9d8d34eb8c97: Loading layer [==================================================>] 1.536kB/1.536kB
c8024e65e28b: Loading layer [==================================================>] 9.216kB/9.216kB
7f209817157f: Loading layer [==================================================>] 2.56kB/2.56kB
fe89c37cefa2: Loading layer [==================================================>] 3.072kB/3.072kB
Loaded image: vmware/harbor-db:v1.3.0-rc4
Loaded image: vmware/mariadb-photon:10.2.10
e99db1275091: Loading layer [==================================================>] 395.4MB/395.4MB
051e4ee23882: Loading layer [==================================================>] 9.216kB/9.216kB
6cca4437b6f6: Loading layer [==================================================>] 9.216kB/9.216kB
1d48fc08c8bc: Loading layer [==================================================>] 7.68kB/7.68kB
0419724fd942: Loading layer [==================================================>] 1.536kB/1.536kB
92ce53616a73: Loading layer [==================================================>] 599.2MB/599.2MB
2004244b53a2: Loading layer [==================================================>] 74.24kB/74.24kB
Loaded image: vmware/harbor-db-migrator:1.3


[Step 2]: preparing environment ...
Generated and saved secret to file: /data/secretkey
Generated configuration file: ./common/config/nginx/nginx.conf
Generated configuration file: ./common/config/adminserver/env
Generated configuration file: ./common/config/ui/env
Generated configuration file: ./common/config/registry/config.yml
Generated configuration file: ./common/config/db/env
Generated configuration file: ./common/config/jobservice/env
Generated configuration file: ./common/config/log/logrotate.conf
Generated configuration file: ./common/config/jobservice/app.conf
Generated configuration file: ./common/config/ui/app.conf
Generated certificate, key file: ./common/config/ui/private_key.pem, cert file: ./common/config/registry/root.crt
The configuration files are ready, please use docker-compose to start the service.

eating harbor-log ... done
?Step 3]: checking existing instance of Harbor ...

Creating registry ... done
Creating harbor-ui ... done
Creating network "harbor_harbor" with the default driver
Creating nginx ... done
Creating harbor-adminserver ...
Creating harbor-db ...
Creating registry ...
Creating harbor-ui ...
Creating nginx ...
Creating harbor-jobservice ...

? ----Harbor has been installed and started successfully.----

Now you should be able to visit the admin portal at http://192.168.56.21.
For more details, please visit https://github.com/vmware/harbor .

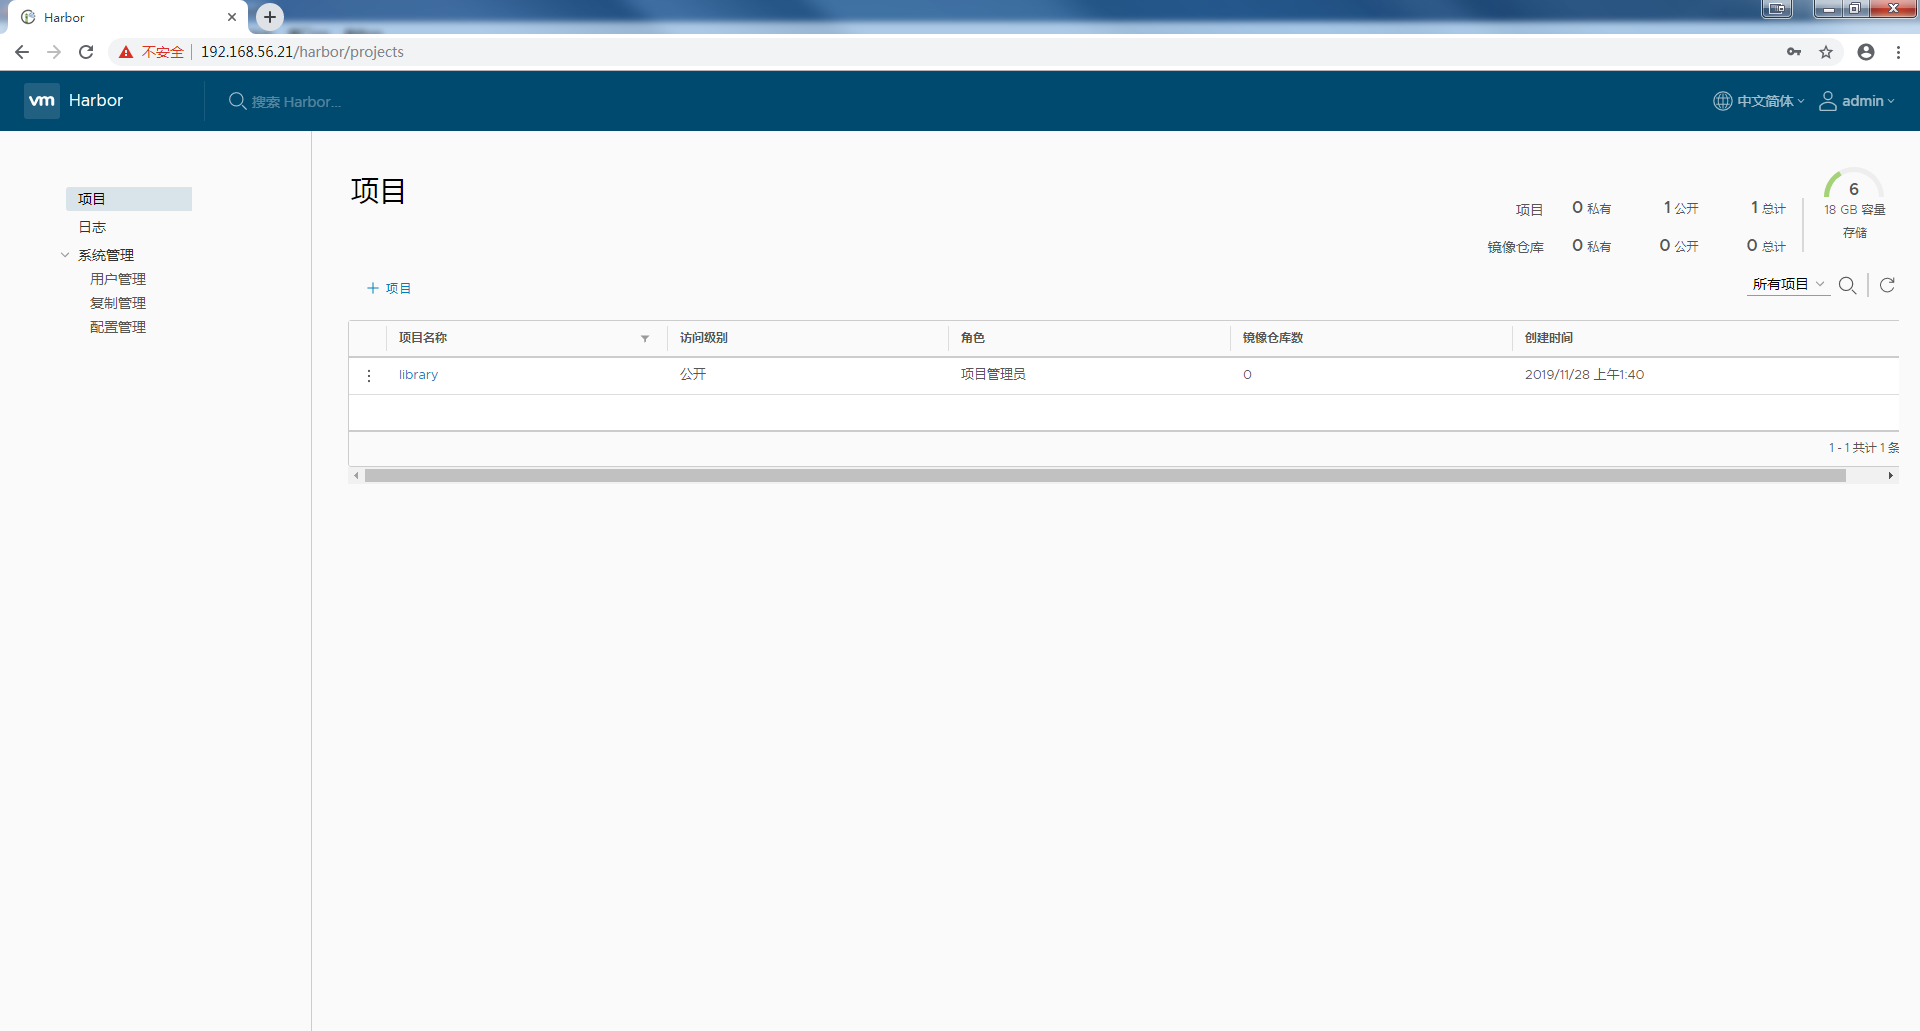
4.3、浏览器登录harbor
4.4、服务器登录harbor
4.4.1、登录harbor报错
[root@linux-node1 harbor]# docker login 192.168.56.21
Username: admin
Password:
Error response from daemon: Get https://192.168.56.21/v2/: dial tcp 192.168.56.21:443: connect: connection refused

注释:Docker从1.3.X之后,与docker registry交互默认使用的是https,然而此处搭建的私有仓库只提供http服务,所以当与私有仓库交互时就会报上面的错误。
4.4.2、解决方案
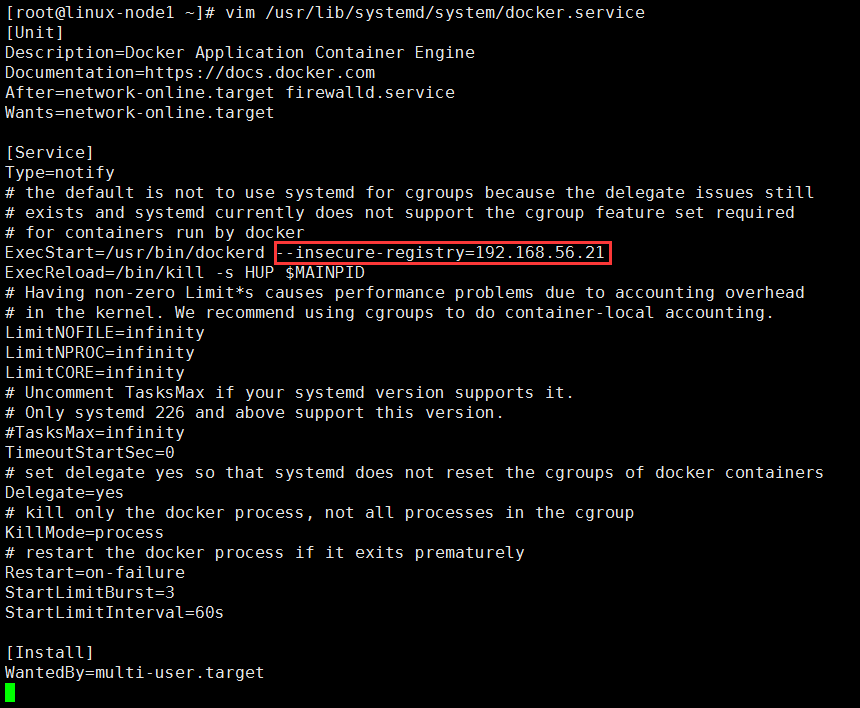
为了解决这个问题需要在启动docker server时增加启动参数为默认使用http访问。
在docker启动文件/usr/lib/systemd/system/docker.service中添加(不安全的注册地址 ---- harbor服务器地址) 【--insecure-registry=192.168.56.21】

[root@linux-node1~]# systemctl daemon-reload
[root@linux-node1~]# systemctl restart docker
重启harbor,进入解压的目录并执行start会自动编排


5.修改harbor端口
5.1、修改docker-compose.yml文件映射为8080端口
[root@linux-node1 ~]# vim /root/harbor/docker-compose.yml
  。。。。。。。。。。
  proxy:
    image: vmware/nginx-photon:1.11.13
    container_name: nginx
    restart: always
    volumes:
      - ./common/config/nginx:/etc/nginx:z
    networks:
      - harbor
    ports:
      - 8080:80
      - 443:443
      - 4443:4443
    depends_on:
      - mysql
      - registry
      - ui
      - log
  。。。。。。。。。。
5.2、修改common/templates/registry/config.yml文件加入8080端口
[root@linux-node1 ~]# vim /root/harbor/common/templates/registry/config.yml
version: 0.1
log:
  level: info
  fields:
    service: registry
storage:
  cache:
    layerinfo: inmemory
  $storage_provider_info
  maintenance:
    uploadpurging:
      enabled: false
  delete:
    enabled: true
http:
  addr: :5000
  secret: placeholder
  debug:
    addr: localhost:5001
auth:
  token:
    issuer: harbor-token-issuer
    realm: $public_url:8888/service/token
    rootcertbundle: /etc/registry/root.crt
    service: harbor-registry
notifications:
  endpoints:
  - name: harbor
    disabled: false
    url: $ui_url/service/notifications
    timeout: 3000ms
    threshold: 5
    backoff: 1s

注释:如果不修改此处,和/usr/lib/systemd/system/docker.service配置文件中的--insecure-registry=192.168.56.21:8080时 ,再次docker login时会报错
[root@linux-node1 harbor]# docker login 192.168.56.21:8080
Username: admin
Password:
Error response from daemon: Get http://192.168.56.21:8080/v2/: Get http://192.168.56.21/service/token?account=admin&client_id=docker&offline_token=true&service=harbor-registry: dial tcp 192.168.56.21:80: connect: connection refused
5.3、停止harbor,重新启动并生成配置文件
[root@linux-node1 ~]# cd /root/harbor/

[root@linux-node1 harbor]# docker-compose stop
Stopping harbor-jobservice  ... done
Stopping nginx              ... done
Stopping harbor-ui          ... done
Stopping registry           ... done
Stopping harbor-db          ... done
Stopping harbor-adminserver ... done
Stopping harbor-log         ... done


[root@linux-node1 harbor]# ./install.sh
5.4、修改docker启动文件,设置信任的主机与端口
[root@linux-node1 ~]# vim /usr/lib/systemd/system/docker.service
ExecStart=/usr/bin/dockerd --insecure-registry=192.168.56.21:8080
5.5、重新启动docker,测试验证
[root@linux-node1 harbor]# systemctl daemon-reload

[root@linux-node1 harbor]# systemctl restart docker.service

[root@linux-node1 harbor]# docker-compose start
Starting log         ... done
Starting adminserver ... done
Starting registry    ... done
Starting ui          ... done
Starting mysql       ... done
Starting jobservice  ... done
Starting proxy       ... done

[root@linux-node1 harbor]# docker login 192.168.56.21:8080
Username: admin
Password:
WARNING! Your password will be stored unencrypted in /root/.docker/config.json.
Configure a credential helper to remove this warning. See
https://docs.docker.com/engine/reference/commandline/login/#credentials-store

Login Succeeded


