整体架构
我们先看下整个框架的架构是什么样子的,这里我们有三个服务提供者和三个服务调用者,它们通过 Consul 和 Nginx,以及 Consul-template 来实现负载均衡。
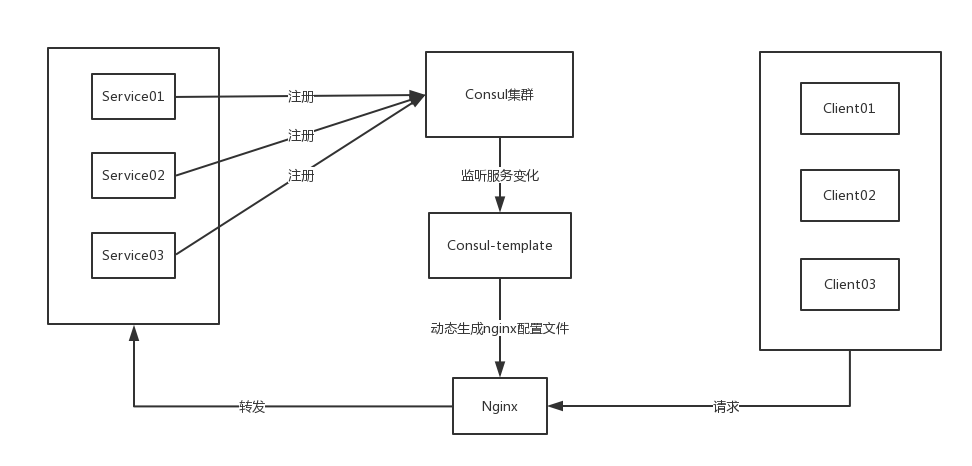
说明 本例子是进行 RPC 的负载均衡,RPC 是 tcp协议,所以 Nginx 要配置 tcp 模块,支持 tcp 负载均衡。
- Consul 集群 用于服务注册,注册多个服务实例,对外提供 RPC 服务。
- Consul-template 用于实时监测 Consul 中服务的状态,配合自身一个模板文件,生成 Nginx 的配置文件。
- Nginx 使用自身的配置文件和第二步生成的配置文件,进行负载均衡。
Nginx安装
- 安装最新版 Nginx,保证 Nginx 版本在1.9.0以上
- 1.9.0 版本以上才支持 TCP 转发,据说不是默认安装了该模块,安装完成可以查询一下,如果有
--with-stream参数,表示已经支持TCP。如果没有就重新编译增加参数安装。 -

- 我的 Nginx 安装在
/etc/nginx目录下 - 安装完成使用
nginx -t监测一下是否成功。
Consul-template
本文旨在负载均衡,Consul 集群搭建不作介绍。
- 下载对应系统版本文件 https://releases.hashicorp.com/consul-template/
- 解压,并复制到PATH路径下
[silence@centos145 ~]$ tar xzvf consul-template_0.19.4_linux_amd64.tgz
[silence@centos145 ~]$ mv ./consul-template /usr/sbin/consul-template
-
找个地方新建个文件夹,并创建三个文件

-
config.hcl 主要用来配置consul-template的启动参数项,包括consul服务器的地址,模板文件的位置,生成的配置文件的位置等等。除了consul和template块,其他参数可选。参考https://github.com/hashicorp/consul-template
-
Consul块配置Consul服务器地址和端口
consul {
  auth {
    enabled  = false
    username = "test"
    password = "test"
  }

  address = "172.20.132.196:8500"
  retry {
    enabled = true
    attempts = 12
    backoff = "250ms"
    max_backoff = "1m"
  }

}
- template块配置模板的路径和生成文件的位置,以及生成文件后需要执行的命令。在我们这里我们需要nginx重新加载配置文件,所以设置的命令为
nginx -s reload
template {
  source = "/etc/nginx/consul-template/template.ctmpl"
  destination = "/etc/nginx/consul-template/nginx.conf"
  create_dest_dirs = true
  command = "/usr/sbin/nginx -s reload"
  command_timeout = "30s"
  error_on_missing_key = false
  perms = 0600
  backup = true
  left_delimiter  = "{{"
  right_delimiter = "}}"
  wait {
    min = "2s"
    max = "10s"
  }
}
- template.ctmpl编写,因为这里只需要服务器地址和端口号就可以,所以模板文件如下:
[root@centos145 consul-template]# cat template.ctmpl
stream {

    log_format main '$remote_addr - [$time_local] '
      '$status';

    access_log /var/log/nginx/tcp_access.log main;

    upstream cloudsocket {
 {{range service "ad-rpc-device-server"}}server {{.Address}}:{{.Port}};{{end}}
    }

    server {
 listen 8888;
 proxy_pass cloudsocket;
    }
}
- 启动consul-template
consul-template -config=./config.hcl
使用config.hcl配置文件是为了简化命令 consul-template -consul-addr=172.20.132.196:8500 -template=./template.ctmpl:./nginx.conf
- 初始的nignx.conf文件为空的,在启动后内容为
[root@centos145 consul-template]# cat nginx.conf
stream {

    log_format main '$remote_addr - [$time_local] '
      '$status';

    access_log /var/log/nginx/tcp_access.log main;

    upstream cloudsocket {
 server 172.20.139.77:8183;
    }

    server {
 listen 8888;
 proxy_pass cloudsocket;
    }
}
确保服务已经成功注册到Consul中,即可以看到服务器地址和端口已经配置进去了。
- 在nginx的安装目录的nginx.conf中引入consul-template生成的配置文件
include /etc/nginx/consul-template/nginx.conf;
注意生成的配置文件不能喝nginx本身的配置文件中内容重复!!!
- 启动一个服务实例,查看生成的nginx.conf文件会发现在upstream cloudsocket{}中会动态增加服务列表,并且随着服务的加入和离开,动态变化。
[root@centos145 consul-template]# cat nginx.conf
stream {

    log_format main '$remote_addr - [$time_local] '
      '$status';

    access_log /var/log/nginx/tcp_access.log main;

    upstream cloudsocket {
 server 172.20.139.77:8183;
    }

    server {
 listen 8888;
 proxy_pass cloudsocket;
    }
}
再启动一个,服务列表变成两个了
[root@centos145 consul-template]# cat nginx.conf
stream {

    log_format main '$remote_addr - [$time_local] '
      '$status';

    access_log /var/log/nginx/tcp_access.log main;

    upstream cloudsocket {
 server 172.20.139.77:8183;server 172.20.139.77:8184;
    }

    server {
 listen 8888;
 proxy_pass cloudsocket;
    }
}
- thrift客户端在调用的时候只需要配置Nginx的地址和端口就可以了,不需要配置服务的地址和端口了,Nginx会自动做转发。